 Roots
Roots Hair
Object 毛发物体Basic 基础Coord.Guides 指南Hairs 毛发Editor 编辑Generate 生成Dynamics 动力学Forces 力量Cache 缓存Partings 分别Culling 剔除Advanced 高级
Hair
Object 毛发物体Basic 基础Coord.Guides 指南Hairs 毛发Editor 编辑Generate 生成Dynamics 动力学Forces 力量Cache 缓存Partings 分别Culling 剔除Advanced 高级
Hairs
毛发
The settings in this tab define the physical properties of the hair that will actually be rendered.
这个选项卡中的设置定义了实际渲染的毛发的物理属性。
These properties can, for example, also be made invisible by corresponding Hair material settings or by the settings in the Culling tab.
例如,这些属性也可以通过相应的 Hair material 设置或者 Culling 选项卡中的设置来隐藏。
These hairs, which far outnumber the guides, will be interpolated between the guides.
这些毛发的数量远远超过向导,它们将被插入到向导之间。
计数[1. . 2147483647]
This setting defines the actual number of hairs. The more individual hairs you use, the more realistic the hair will look, and the longer it will take to render. Using fewer individual hairs can be compensated for, to a certain degree, by increasing their thickness using the Thickness channel in the Hair material.
这个设置定义了毛发的实际数量。你使用的毛发越多,毛发看起来就越真实,渲染时间也就越长。使用较少的个人毛发可以补偿,在一定程度上,通过增加他们的厚度使用厚度通道的毛发材质。
For comparison: On a real human head are between 100,000 and 150,000 hairs, an amount that can still be rendered within realistic render times (assuming not too many light sources are used to cast shadows on the hair – this dramatically increases render times).
比较一下: 一个真正的人类头部有100,000到150,000根毛发,这个数量仍然可以在真实的渲染时间内渲染(假设没有太多的光源在毛发上投射阴影——这会显著地增加渲染时间)。
片段[1. . 1024]
 From left to right: 3, 8, 48 segments,
respectively. 从左到右: 分别为3、8、48段
From left to right: 3, 8, 48 segments,
respectively. 从左到右: 分别为3、8、48段
As you already know, there is also a Segments setting for guides. The Segments setting here performs the same function, only for the hair. Higher values cause the hair to be more flowing. Higher values also cause render times and processing requirements to increase accordingly.
正如你已经知道的,还有一个片段设置为导游。这里的片段设置执行相同的功能,只是对于毛发。更高的值会使毛发更加柔顺。较高的值还会导致渲染时间和处理需求相应增加。
The quality of rendered and lit hair containing few segments can be improved (render time will increase accordingly) by selecting the Pixel option in the Render Settings … / Effects / Hair Render menu.
通过选择渲染设置.../效果/毛发渲染菜单中的像素选项,可以提高渲染和点燃毛发的质量(渲染时间将相应增加)。
Guides and hair do not have to have an equal number of segments. The more segments each have, the longer the render time will be. An increased number of segments will also improve the precision of the hair when rendered and when affected by dynamics.
向导和毛发不一定要有相同数量的片段。每个片段越多,渲染时间就越长。增加片段的数量也将提高毛发渲染时的精确度和受动态影响时的精确度。
In the example below, a comparison of hair and guides containing different numbers of segments is made.
在下面的例子中,比较毛发和指南包含不同数量的部分是作出。
 Clockwise from top left: Guide = 3 segments, hair =
8 segments; both = 3 segments; Guide = 24 segments, hair = 3 segments; both = 24 segments. 从左上顺时针方向: 指南 = 3段,毛发 = 8段; 都 = 3段; 指南 = 24段,毛发 = 3段; 都 = 24段
Clockwise from top left: Guide = 3 segments, hair =
8 segments; both = 3 segments; Guide = 24 segments, hair = 3 segments; both = 24 segments. 从左上顺时针方向: 指南 = 3段,毛发 = 8段; 都 = 3段; 指南 = 24段,毛发 = 3段; 都 = 24段
In the image above, a single hair was used for demonstration purposes only. Even if 238,594 hairs had been used, all would look just like the lonely hair shown.
在上图中,一根毛发仅用于演示目的。即使使用了238,594根毛发,所有的毛发看起来都会像图中显示的那根孤独的毛发。
Roots
根
根
Use this setting to define where the hair should be positioned on the underlying object. The same applies here as was described for the Root setting here, the only difference being that a disproportionately high number of hair roots to hair will be positioned.
使用此设置可定义毛发应放置在基础对象上的位置。同样的情况也适用于这里描述的根设置,唯一的区别是,一个不成比例的毛发根的毛发将被定位。
If your hair-covered object lies within a Subdivision Surface object, the following will apply (depending on what was placed in the Links field): The roots will be located either on the smoothed object (the Subdivision Surface object itself lies in the Links field) or on the non-smooth object.
如果你的被毛发覆盖的物体位于一个细分曲面对象中,下面的内容将被应用(取决于链接字段中放置的内容) : 根将位于光滑对象(细分曲面对象本身位于链接字段中)或非光滑对象上。
The following two options are also available:
以下两个备选方案也可供选择:
一如既往
Activating this setting will ensure the hair root segments are oriented in the direction of the surface Normals, regardless of what was defined for the guides.
激活这个设置将确保毛发根段的方向是在表面法线,无论什么是定义的指南。
 Left: 左图:As Normal 一如既往 not
active. Right: 不活跃。右:As Normal 一如既往 active. Both examples use the flat guide shown in the
inset. 两个示例都使用插入部分所示的平面指南
Left: 左图:As Normal 一如既往 not
active. Right: 不活跃。右:As Normal 一如既往 active. Both examples use the flat guide shown in the
inset. 两个示例都使用插入部分所示的平面指南
U Spacing[0..100%]
V Spacing[0..100%]
U Variation[0..100%]
V Variation[0..100%]
间隔[0.100% ] v 间隔[0.100% ] u 变化[0.100% ] v 变化[0.100% ]
See UV Grid (Guides Tab).
请参阅紫外线网格(指南标签)。
偏移[-∞ . . + ∞]
 Top: Positive 上图: 积极的Offset 偏移量
value. Bottom: Negative 底部: 否定Offset 偏移量 value. 价值
Top: Positive 上图: 积极的Offset 偏移量
value. Bottom: Negative 底部: 否定Offset 偏移量 value. 价值
Use this setting to offset the hair in the direction of the surface Normals. A value of 0 means the hair roots will lay directly on the hair-covered surface.
使用此设置可以在表面法线的方向上偏移毛发。值为0意味着毛发根将直接放置在被毛发覆盖的表面上。
Offset can be used for special effects, such as a cartoon figure’s eyelashes, or if certain Hair materials (e.g., the Include Root option in the Hair material’s Displace channel) no longer function in conjunction with displacement. This can then be adjusted manually using Offset.
偏移量可以用于特殊效果,如卡通人物的睫毛,或者如果某些毛发材质(如毛发材质的置换通道中的“包含根”选项)不再与位移一起起作用。然后可以使用偏移量手动调整。
扩展[0. . + ∞]
Activating this setting will simply extend the hair root segment into the hair-covered surface, in the direction of the hair root segment. The remaining hair will remain unchanged. This can be effective in solving problems you may encounter with Subdivision Surfaces, e.g., if the hair roots seem to be floating freely.
激活这个设置将简单地延长毛发根部分到毛发覆盖的表面,在毛发根部分的方向。剩余的毛发将保持不变。这可以有效地解决问题,你可能会遇到细分曲面,例如,如果毛发根似乎是自由浮动。
Growth
增长
移除无效的
The Growth menu’s settings can be used to define the placement of hair. For example, a minimum distance between hairs can be defined. Since the hairs are positioned using an interative process it can occur that several of the rules (Min Spacing, Density, etc.) cannot be adhered to and hair will nevertheless be rendered at these locations. This can be prevented by enabling the Remove Invalid option.
生长菜单的设置可以用来定义毛发的位置。例如,可以定义毛发之间的最小距离。由于毛发的定位使用一个相互作用的过程,它可能会发生的一些规则(最小间距,密度等)不能坚持和毛发将在这些地点渲染。可以通过启用 Remove Invalid 选项来防止这种情况。
最小间隔距离[0. . + ∞ m ]
If hair is distributed randomly, as is the case with most root types, some hair may be positioned very close together. This can be avoided by defining a minimum spacing between hairs.
如果毛发是随机分布的,就像大多数发根类型一样,一些毛发可能被放置得非常靠近。这可以通过定义毛发之间的最小间距来避免。
密度
A texture can be placed into this field, with which the density of the hair can be defined using that texture’s grayscale values (object-based). A similar Density channel is located in the Hair material settings, which regulates the density of the hair via the material (material-based).
一个纹理可以放置到这个领域,其中的毛发密度可以定义使用纹理的灰度值(对象为基础)。一个类似的密度通道位于毛发材质设置,通过材质(材质为基础)调节毛发的密度。
 Partial hair loss. Right, the texture (a 部分脱发。对,质地(aVoronoi noise shader) was projected onto the head. Hair was thinned to make texture
visible. 噪音着色器)被投射到头部。毛发变得稀疏,使质地清晰可见
Partial hair loss. Right, the texture (a 部分脱发。对,质地(aVoronoi noise shader) was projected onto the head. Hair was thinned to make texture
visible. 噪音着色器)被投射到头部。毛发变得稀疏,使质地清晰可见
The projection is done using the UVW Tag, which was placed into the UV Tag field in the Advanced tab.
投影是使用 UVW 标签完成的,它被放置在高级标签的 UV 标签字段。
级别[2. . 10000]
This setting quantizes (internally) a loaded texture according to its grayscale values. Levels defines the number of gray tones that can be used. The lower the value, the rougher the steps will be, the higher the value, the more precise the steps will be.
此设置根据其灰度值对加载的纹理进行量化(内部)。级别定义了可以使用的灰色调的数量。值越低,步骤越粗糙,值越高,步骤就越精确。
Restrict to Guides
Distance[0..+∞m]
Guides[1..100]
限制向导距离[0. . + ∞ m ]指南[1. . 100]

The guides on the left were used to create the clumps on the right with the Restrict to Guides setting.
左边的指南被用来创建右边的团块与限制指南设置。
Activate the Restrict to Guides setting if you want the hair to be arranged only in a specific radius around the guides. The Distance setting defines the size of this radius.
激活限制指南设置,如果你想要的毛发被安排在一个特定的半径周围的指南。距离设置定义这个半径的大小。
The Guides setting defines the number of guides that should positioned within the Distance setting, so the hair can be rendered. What you are essentially doing is controlling the distribution of hair based on guide density.
指南设置定义了在距离设置中应该定位的指南数量,这样可以渲染毛发。你所做的本质上是控制毛发的分布基于导向密度。
Cloning
克隆
克隆体[0.2147483647]
 A brush or broom. Each bristle consists of a single
hair, which was cloned 10 times using the 刷子或扫帚。每根鬃毛都由一根毛发组成,这根毛发被克隆了10次Clone 克隆 setting. 设置
A brush or broom. Each bristle consists of a single
hair, which was cloned 10 times using the 刷子或扫帚。每根鬃毛都由一根毛发组成,这根毛发被克隆了10次Clone 克隆 setting. 设置
The Clone setting will create a specific number of clones for each hair. Hair that has been cloned can be positioned separately at the root and tip. Cloning hair will dramatically increase the number of hairs to be rendered, which will also increase render times and required processing power accordingly.
克隆设置将为每根毛发创建特定数量的克隆。被克隆出来的毛发可以分别定位在根部和顶端。克隆毛发将显著增加毛发的渲染数量,这也将相应地增加渲染时间和所需的处理能力。
扎根
Cloned hair that was created at rendering is not rooted, and therefore is not directly linked to the underlying geometry. The hair will not be affected by displacements. If Set Roots is activated, though, displacement effects such as Sub-Polygon Displacement will affect the hair.
在渲染时创建的克隆毛发没有根,因此不直接链接到基础几何体。毛发不会因位移而受到影响。如果设置根被激活,然而,位移效果,如亚多边形位移将影响毛发。
根[0. . + ∞ m ]提示[0. . + ∞ m ]
Use these settings to define the distance the root and tip (each separately) of the cloned hair may diverge from the original position of the hair on the X- and Z -axes. In the example above, the tips of the bristles were varied more than were the roots. This resulted in the final bristles spreading at the tip.
使用这些设置来定义克隆毛发的根部和尖端(每个单独)可能偏离毛发在 x 轴和 z 轴上的原始位置的距离。在上面的例子中,刚毛的尖端比根部的变化更大。这导致最后的刚毛在尖端扩散。
Scale[0..+∞%]
Variation[0..+∞%]
标度[0. . + ∞% ]变化[0. . + ∞% ]
Use the Scale setting to define how much larger or smaller the cloned hair should be compared to the original hair. The Variation setting randomly varies the cloned hair within the Scale setting.
使用 Scale 设置来定义与原始毛发相比,克隆毛发应该大多少或小多少。变异设置随机变化克隆毛发在规模设置。
偏移量
Use this curve to adjust the random divergences set in Root and Tip, over the length of the hair.
用这条曲线来调整发根和发梢上的随机发散。
例子
 Weaved cloth can also be created
(thanks to Pingo van der Brinkloev for this idea!) 编织的布料也可以被创造出来(感谢 Pingo van der Brinkloev 的这个想法!) Weaved cloth can also be created
(thanks to Pingo van der Brinkloev for this idea!) 编织的布料也可以被创造出来(感谢 Pingo van der Brinkloev 的这个想法!) |  |
Cloned hairs can also be used to render cloth in close-up shots. The key lies in the way in which the splines
are modeled (individual loops were created using a  Spline
Wrap
Spline
Wrap Helix
Helix Cloner
 Connect
克隆的毛发也可以用来在特写镜头中渲染布料。关键在于样条的建模方式(使用多螺旋样条包装创建单独的循环,以适应其轮廓)。然后使用 Cloner 对象克隆循环并使用 Connect 命令连接。然后毛发将在后者上生长(指南标签: 模式设置为样条指南)。
Interpolation
插值
Since it would be impossible to style hair one hair at a time, guides (far fewer in number than the actual hair) are used to roughly indicate the hairstyle. A great number of hairs will be interpolated between these guides. The closer a given hair is to a guide, the more it will conform to the shape of that guide (the effects of any Hair material settings will subsequently take effect). The Interpolation setting defines how the hair should conform to the shapes of the guides. A depiction of the different interpolation options is shown below.
因为不可能一次只给一根毛发做造型,所以指南(数量远少于实际发型)被用来粗略地指示发型。在这些导线之间会插入大量的毛发。给定的毛发离指南越近,它就越符合指南的形状(任何毛发材质设置的效果将随后生效)。插值设置定义了毛发应该如何符合向导的形状。下面显示了不同插值选项的描述。
类型
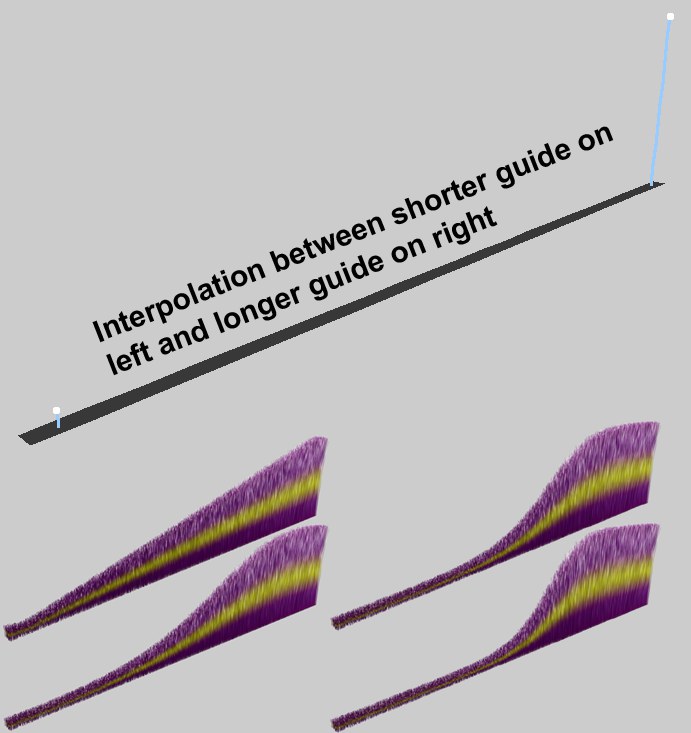 Linear, Square, Cubic and Quartic
interpolation. 线性插值、平方插值、立方插值和四次插值
Linear, Square, Cubic and Quartic
interpolation. 线性插值、平方插值、立方插值和四次插值
Each type of interpolation applies its own particular falloff to each individual guide. This effect is illustrated in the image above, where hair was interpolated between a very short and a much longer guide. Simply imagine any of these interpolations on an entire surface and you will have a good idea of how each interpolation works.
每种类型的插值对每个单独的向导都应用它自己的特定衰减。这种效果在上面的图片中得到了说明,在一个非常短的和一个非常长的指南之间插入了毛发。简单地想象一下在一个完整的曲面上这些插值中的任何一个,你就会对每个插值的工作原理有一个很好的了解。
摘自《指南》[1. . 1024]
Interpolated hair searches for the guides nearest to it and will conform accordingly. From Guides defines the degree to which individual hairs will be influenced by the guides (hair located closer to the guides will be influenced to a greater degree). The larger the value entered for From Guides, the more flowing and homogeneous the interpolation between guides will be.
插入的毛发搜索最接近它的向导,并将遵循相应的。从指南定义的程度,个人毛发将受到导游(毛发位于接近导游将受到更大程度的影响)。从指南中输入的值越大,指南之间的插值就越流畅和均匀。
变化[0. . + ∞% ]
Use the Variation setting to randomly vary the interpolation of individual hairs, causing the hair to look less uniform and more realistic.
使用变化设置,以随机变化插值的个人毛发,导致毛发看起来不那么一致,更真实。
丛
Activating this setting will basically turn off free interpolation between guides, and attract the hair to the nearest guide, letting you easily create clumps of hair. A similar function, which offers greater control, is available in the Clump channel of the Hair material.
激活这个设置基本上会关闭指南之间的自由插值,并吸引毛发到最近的指南,让你轻松地创建毛发丛。一个类似的功能,它提供了更大的控制,是可用于丛通道的毛发材质。
吸引力
Use this curve to define the strength of clump creation over the length of each hair.
使用这条曲线来定义每根毛发长度上的丛生物的力量。
Various Interpolation Settings and Their Resulting Effects.
不同的插值设置及其效果。
At the top left of the image below, the distribution of guides is shown, as used for each of the examples.
在下面图片的左上角,显示了向导的分布情况,每个示例都使用了这种分布情况。
The following variations were then applied:
随后采取了以下变通办法:
