 Roots
Roots Hair
Object 毛发物体Basic 基础Coord.Guides 指南Hairs 毛发Editor 编辑Generate 生成Dynamics 动力学Forces 力量Cache 缓存Partings 分别Culling 剔除Advanced 高级
Hair
Object 毛发物体Basic 基础Coord.Guides 指南Hairs 毛发Editor 编辑Generate 生成Dynamics 动力学Forces 力量Cache 缓存Partings 分别Culling 剔除Advanced 高级
Guides
指南
Everything having to do with the creation and distribution of guides is defined using this tab.
与创建和分发指南有关的所有事情都使用这个选项卡进行定义。
Guides can grow on the following objects / elements:
指南可以在以下对象/元素上增长:
Guides will normally be generated if: You select Add Hair while an object is selected; after having added weighted points; while a point-, edge-, or polygon selection is active. If you are not happy with the guides that were generated automatically, you can use the settings in this tab to define the exact number, placement and orientation of additional or newly created guides.
在以下情况下通常会生成指南: 在选择对象时选择添加毛发; 在添加加权点之后; 当点、边或多边形选择处于活动状态时。如果你对自动生成的指南不满意,你可以使用这个标签中的设置来定义额外的或新创建的指南的确切数字、位置和方向。
Changes made to the following settings will not always be seen in real time in the editor view. It may be necessary to click on the Regrow or Re-Root buttons in order to make changes visible. This will also cause the previous hairstyle to be deleted (changes to guides)!
对以下设置所做的更改并不总是能在编辑器视图中实时看到。可能有必要单击重新排列或重新根按钮,以使更改可见。这也会导致以前的发型被删除(更改指南) !
Tip: 提示:链接
An object, Selection tag or Vertex Map tag can be placed into this field. This will then define approximately where guides or hair should grow (after the Regrow button has been pressed). Additional guides can be added at any time using the Add Guides tool.
对象、选择标记或顶点映射标记可以放置在这个字段中。然后,这将定义大约指南或毛发应该生长的地方(后,再生按钮已按)。可以在任何时候使用添加指南工具添加其他指南。
As a rule, the corresponding element will automatically be linked if it was active when Add Hair was invoked.
通常,如果在调用 Add Hair 时对应的元素处于活动状态,那么该元素将自动链接。
The position of guides and hair can be defined more precisely using the settings in the Guides and Hairs tabs.
导游和毛发的位置可以使用导游和毛发标签的设置更精确地定义。
Roots
根
计数[1. . 2147483647]
Use this setting to define the number of guides for a given Hair object. Depending on what option was selected in the Roots setting, the number of guides that can be created may be limited. If, for example, Polygon Center is selected, the guide count will be restricted to that particular surface.
使用此设置定义给定 Hair 对象的指南数。根据在 Roots 设置中选择的选项,可以创建的指南数量可能有限。例如,如果选择多边形中心,则指南计数将限制在该特定曲面上。
Otherwise you can create as many guides as you wish.
否则你可以创建任意多的指南。
The number of guides is almost never related to the number of hairs that will be rendered. The number of hairs is defined in the Hairs tab.
导线的数量几乎与将要渲染的毛发的数量无关。毛发的数量在“毛发”标签中定义。
片段[1. . 1024]
Use this setting to define the number of guide segments. The more segments guides have, the more accurately they can be styled using the various tools, and the more precisely they will be affected by dynamics. The more segments that are added, more guide points that will also be added, resulting in slower styling and dynamics.
使用此设置可定义导航段的数量。片段指南的数量越多,可以使用各种工具对它们进行更精确的样式设置,并且它们将更精确地受到动态的影响。增加的片段越多,也将增加更多的指导点,造成较慢的造型和动态。
The number of segments guides have is also a deciding factor when using dynamics, since a higher number of segments results in longer calculation times and a more flowing movement. Furthermore, a separate mass point will be attached to each segment, which enlarges the general volume of the hair and leads to droopy hair.
片段指南的数量也是决定因素时使用动态,因为更多的片段导致更长的计算时间和更流动的运动。此外,一个单独的质点将连接到每个片段,扩大了毛发的总体积,导致毛发下垂。
长度[0. . + ∞ m ]
Use this setting to define the length of the guides. If no changes are made to the corresponding Hair material, the Length setting will also define the length of the hair.
使用此设置定义指南的长度。如果没有改变相应的毛发材质,长度设置也将定义毛发的长度。
根
Use this setting to select exactly where the guide roots will be placed. Depending on the type of object the guides will grow on (polygon object, spline or on existing guides), different options are available. You will find the same options in the Hairs tab, where you can actually position the hair roots.
使用此设置可以精确地选择将要放置导向根的位置。根据对象类型的导游将增长(多边形对象,样条或现有的导游) ,不同的选项是可用的。你可以在“毛发”选项卡中找到相同的选项,在那里你可以实际定位毛发的发根。
1. 几何学
多边形
 Left: Polygon mode. Right: Polygon Area
mode. 左: 多边形模式。右: 多边形区域模式
Left: Polygon mode. Right: Polygon Area
mode. 左: 多边形模式。右: 多边形区域模式
The guides will be distributed randomly across corresponding polygons. This bears the disadvantage that very small polygons will be assigned many more guides in relation to their size than large polygons. If you want the guides to be distributed evenly, independent of polygon size, select the next option, Polygon Area.
指南将随机分布在相应的多边形上。这样做的缺点是,根据尺寸的不同,很小的多边形会比大多边形分配更多的向导。如果您希望指南均匀分布,独立于多边形大小,选择下一个选项,多边形面积。
多边形面积
Select this option to distribute guides evenly, more or less independent of the size of the polygons.
选择此选项可以均匀地分布导线,与多边形的大小或多或少无关。
多边形中心
Depending on the Count setting, a maximum of one guide will be arranged in the center of a polygon.
根据计数设置,最多一个指南将被安排在一个多边形的中心。
多边形边缘
This option ensures a random distribution of guides, exclusively along the edges of polygons. This is very practical for growing eyelashes, for example.
这个选项确保了向导的随机分布,仅仅沿着多边形的边缘。这是非常实用的睫毛增长,例如。
紫外线
Guides will be distributed randomly across the existing UV space. The larger the UV polygons, the more guides that will be arranged onto the corresponding polygons, i.e., fewer guides will be assigned to polygons with small UV polygons.
指南将随机分布在现有的紫外线空间。紫外线多边形越大,相应的多边形上的波导就越多,也就是说,分配给紫外线多边形小的多边形的波导就越少。
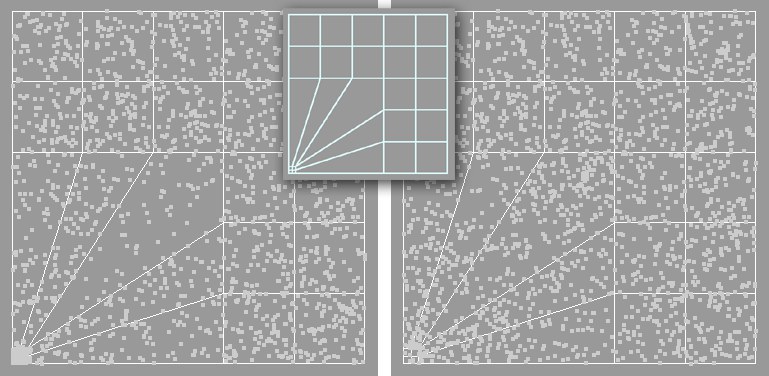
紫外线网格
Guides will be distributed in a grid-like manner across the existing UV space. The grid spacing can be adjusted using the U Spacing and V Spacing settings. The grid can also be varied by entering different U Variation and V Variation values (assuming Count is set high enough).
指南将分布在现有的紫外线空间网格状的方式。网格间距可以使用 u 间距和 v 间距设置进行调整。网格也可以通过输入不同的 u 变化和 v 变化值来改变(假设计数设置得足够高)。
The lower the Spacing values, the tighter the guide grid will be.
间距值越低,引导网格就会越紧。
习俗
Select this option if you want to, for example, add guides using the Add Guides tool.
例如,如果要使用“添加指南”工具添加指南,请选择此选项。
2. 样条
 From left to right: Spline Vertex; Spline Segment;
Spline Uniform; spline Tip ( 从左到右: 样条顶点; 样条段; 样条均匀; 样条尖端(Growth 增长 set to 开始Random 随机);
Spline 2D. ) ; 样条2 d
From left to right: Spline Vertex; Spline Segment;
Spline Uniform; spline Tip ( 从左到右: 样条顶点; 样条段; 样条均匀; 样条尖端(Growth 增长 set to 开始Random 随机);
Spline 2D. ) ; 样条2 d
样条顶点
A maximum of one guide point will be added, base on the value entered for Guide.
根据为指南输入的值,最多添加一个指南点。
样条段
Guides (the amount will be defined by the Count setting) will be randomly distributed along the length of the spline.
指南(数量将由计数设置定义)将沿样条的长度随机分布。
样条均匀
Guides will be distributed evenly along the length of the spline.
导轨将沿花键长度均匀分布。
花键尖端
Guides will only be positioned at the beginning of the spline. If Random is selected in the Growth setting, the guides will be arranged spherically around this point.
导轨将只定位在花键的开头。如果在生长设置中选择随机,指南将围绕这一点以球状排列。
2 d 样条
Guides will be created between existing spline segments, using interpolation. These guides cannot be manipulated using any tool.
导轨将在现有的样条段之间创建,使用插值。这些导轨不能使用任何工具进行操作。
花键导轨
Splines will be viewed as guides. This option should be selected if, for example, you want splines to be rendered as hair. As Guides should then also be activated in the Root setting of the Hair tab. These guides cannot be manipulated using any tool.
样条将被视为向导。例如,如果您希望将样条渲染为 hair,则应选择此选项。作为指南,然后也应该被激活在根设置的毛发标签。这些指南不能用任何工具操作。
If you happen to have a Spline with a single segment this mode is perfect for creating strands of hair. The hairs simply have to be cloned.
如果你碰巧有一条单段的样条曲线,这种模式非常适合制作发丝。这些毛发必须被克隆。
 Cloned hairs growing along a spline. 沿着花键生长的克隆毛
3. 指南
If you arrange guides onto other guides, a second Hair object will be created. The 如果你将指南安排到其他指南上,第二个毛发对象将被创建。这个sequence 序列 with which the Hair objects will be calculated is important! Make sure the initial Hair object (i.e. the object on which the hair grows) is arranged in front of the subsequently created Hair object in the 用来计算毛发对象的值是非常重要的!确保最初的毛发对象(即毛发生长的对象)被安排在随后创建的毛发对象的前面Object Manager 对象管理器.毛发顶点
A new guide will be created at each guide point. The number of new guides created is dependent on the number of segments (Segments setting) the original guides have.
在每个导航点将创建一个新的导航。创建的新导游的数量取决于原始导游的片段数量(片段设置)。
发线
New guides will be created and placed randomly on the original guides. The number of guides created can be adjusted using the Count setting.
新的指南将被创建并随机放置在原始指南上。创建的指南数量可以使用 Count 设置进行调整。
毛发指南
The original guides will be assumed as new guides, virtually duplicating the hairstyle.
原来的导游将被假定为新的导游,几乎复制的发型。
导游提示
New guides will be created and positioned at the tips of the original guides. When using this option, the Random option in the Growth menu should also be selected.
新的指南将被创建和定位在原始指南的提示。当使用此选项时,还应该选择“增长”菜单中的“随机”选项。
地图
This setting always then comes into use if you edit the geometry on which existing guides are rooted (i.e. by deleting polygons, cutting the geometry with the Knife tool, subdividing the mesh, etc.) or if guide settings are changed.
如果你编辑现有导轨的几何形状(例如,删除多边形,用刀工具切割几何形状,细分网格等) ,或者导轨设置改变,这个设置总是会被使用。
Internally, guides are linked to polygons, points, etc. If these are edited, some guides will be changed as well. The following options are available:
在内部,向导链接到多边形、点等。如果这些被编辑,一些指南也将被改变。以下方案可供选择:
新
Selecting this option can result in a completely new distribution of guides. This can cause your hairstyle to have a really bad hair day, i.e., your hairstyle may become entirely messed up. In this case, selecting Old or Unroot would be better.
选择此选项可以导致导轨的全新分布。这可能会导致你的发型有一个非常糟糕的一天,也就是说,你的发型可能会变得完全一团糟。在这种情况下,选择 Old 或 Unroot 会更好。
旧的
This (default) option basically leaves everything the way it was. Any guides affected by this option will be positioned as closely as possible to the old guide. If this is not possible, existing guides will be interpolated to create a new guide.
这个(默认)选项基本上保持了原来的样子。任何受此选项影响的导游将尽可能靠近旧导游的位置。如果这是不可能的,现有的指南将插入创建一个新的指南。
Basically works like the Old option, except that newly created guides will be unrooted, preventing changes from being made to the hairstyle. Hence, deleting polygons on which hair grows will not delete the corresponding guides, as would be the case if you used either of the previous two options. So, use this option if you definitely want to avoid the hairstyle from being affected by changes to the underlying mesh. Nevertheless, unrooted guides do offer several disadvantages.
基本上工作原理类似于旧的选项,只是新创建的指南将被取消根,防止改变发型。因此,删除毛发生长的多边形不会删除相应的指南,如果使用前面两个选项中的任何一个,就会出现这种情况。所以,使用这个选项,如果你确实想避免发型受影响的变化,底层网格。然而,没有根基的导游确实有几个缺点。
U Spacing[0..100%]
V Spacing[0..100%]
U Variation[0..100%]
V Variation[0..100%]
间隔[0.100% ] v 间隔[0.100% ] u 变化[0.100% ] v 变化[0.100% ]
See Roots / UV-Grid.
参见 Roots/UV-Grid。
Growth
增长
增长
Use this setting to set the direction in which the guides should be oriented. The following options are available:
使用此设置可以设置指南的方向。可以使用以下选项:
正常值
The guides will point in the direction of the surface Normals.
指南将指向表面法线的方向。
方向
The guides will point in the direction defined in the Axis setting.
导轨将指向轴设置中定义的方向。
随机
The guides will point in just about every (random) directions.
指南将指向几乎每一个(随机)方向。
Use these settings to define the world axis, in whose direction the guides should point (if the Direction option is selected in the Growth menu). If Local is activated, the coordinate system of the object on which the hair grows will be used.
使用这些设置来定义世界轴,指南应该指向其方向(如果在“增长”菜单中选择了“方向”选项)。如果激活 Local,将使用毛发生长对象的坐标系。
最小间距[0. . + ∞ m ]
Activate Min. Spacing if the guides should maintain a minimum distance (Distance setting) from one another. The Min. Spacing setting will not work if the number of guides is set so high that maintaining the defined minimum distance is no longer possible. The Redistribute Roots setting in the Advanced tab can be used to try to maintain the minimum distance between roots. One of the functions of the Redistribute Roots setting is to define (internally) how often guides should be redistributed in order to meet the requirements of this setting.
启动 Min。如果导轨之间应保持最小距离(距离设置) ,则应保持间距。最低工资。间距设置将不工作,如果指南的数量是如此高,维持规定的最小距离不再可能。可以使用 Advanced 选项卡中的 Redistribute root 设置来尝试保持根之间的最小距离。Redistribute root 设置的功能之一是(在内部)定义应该重新分发指南的频率,以满足此设置的需求。
密度
A texture can be placed into this field and used to define the guide density over the area of that texture. UV mapping will be applied to the hair-covered object, to which the Hair object is assigned. If this object already uses several UVW Tags, the corresponding tag can be placed into the UV Tag field in the Advanced tab.
一个纹理可以放置到这个领域,并用来定义该纹理的面积上的导向密度。UV 映射将应用于毛发覆盖的对象,毛发对象被分配。如果这个对象已经使用了几个 UVW 标签,相应的标签可以放置到高级标签的 UV 标签字段。
Density is a restrictive setting and can only be used in conjunction with the previously described settings, which, by the way, have priority. For example, if you have a guide count of 400 on an object with 400 polygons, and the Polygon Center option is selected in the Roots setting, even the most elaborate texture will have no effect on the distribution of guides.
密度是一个限制性的设置,只能与前面描述的设置一起使用,顺便说一下,它有优先权。例如,如果你对一个有400个多边形的物体有一个400的向导数,并且在根设置中选择 Polygon Center 选项,即使是最复杂的纹理也不会对向导的分布产生影响。
级别[2. . 10000]
This setting quantizes (internally) a loaded texture according to its grayscale values. Levels defines the number of gray tones that can be used. The lower the value, the rougher the steps will be, the higher the value, the more precise the steps will be.
此设置根据其灰度值对加载的纹理进行量化(内部)。级别定义了可以使用的灰色调的数量。值越低,步骤越粗糙,值越高,步骤就越精确。
Editing
编辑
点数连结
Let’s say you want to edit the guides using Cinema 4D point editing tools. No problem: Create an empty Spline object (main menu: Create / Spline / Empty Spline) and drag it into the Points Link field.
假设你想用 Cinema 4D 点编辑工具来编辑指南。没问题: 创建一个空的样条对象(主菜单: Create/Spline/Empty Spline) ,并将其拖放到 Points Link 字段中。
 Splines as guides. Left: Active Hair object. Right:
Active Spline object. 样条作为参考。左: 活动毛发对象。右: 活动样条对象
Splines as guides. Left: Active Hair object. Right:
Active Spline object. 样条作为参考。左: 活动毛发对象。右: 活动样条对象
The guides will then be linked with the Spline object. If you switch to point mode and click on the Spline object, the guides will be treated as splines and can be edited accordingly. If you subsequently select the Hair object, you will see that the guides have conformed to the spline. You can also edit the guides using the Hair tools, which will, in turn, affect the spline.
然后将导轨与样条对象链接起来。如果切换到点模式并单击样条对象,则指南将被视为样条,并可以相应地进行编辑。如果您随后选择了 Hair 对象,您将看到向导已经符合样条。您还可以使用 Hair 工具编辑指南,这将反过来影响样条曲线。
If you should then want to animate the splines per PLA animation, the guides will be affected as well.
如果您然后想要动画每 PLA 的样条,指南将受到影响。
Any point-based object can be placed into the Points Link field, even an empty polygon object. Dragging an empty object into this field would not make much sense, though, since most polygon tools will only affect the polygons themselves.
任何基于点的对象都可以放置到 Points Link 字段中,甚至是一个空的多边形对象。不过,将一个空对象拖动到这个字段中没有多大意义,因为大多数多边形工具只会影响多边形本身。
编辑顶点[0. . 1024]
If you are in vertex mode, you can use this setting to define which guide vertex should be active. A value of 0 will affect the point at the root of the guides; increasing values will correspondingly affect points located higher on the guides.
如果您处于顶点模式,您可以使用此设置来定义哪个引导顶点应该处于活动状态。值为0将影响指南根部的点; 增加值将相应地影响指南上位于较高位置的点。
Use this button to manually re-root the guides in accordance with the settings in this tab. This setting has the same function as if the New option in the Map setting were selected and Auto Update active.
使用此按钮根据此标签中的设置手动重新根导游。此设置的功能与选中 Map 设置中的 New 选项并激活“自动更新”相同。
Don’t forget that the 不要忘记Set Roots 扎根 tool can also be used to replant selected guides. 工具也可以用来重新种植选定的指南Rerow
Clicking this button will create new guides based on the settings in the Guides tab. Existing hairstyles, though, may be destroyed, (i.e. guides that have been manipulated using the Hair tools).
单击此按钮将基于 Guides 选项卡中的设置创建新的向导。然而,现有的发型可能会被破坏(例如,使用发型工具操纵的指南)。
安全
Use Store to temporarily store a guide state (e.g., a specific hairstyle), to which you can later revert by clicking the Restore button. You have three guesses as to what will happen if you click on Clear. Exactly, the stored guide state will be cleared (deleted).
使用 Store 临时存储指导状态(例如,特定的发型) ,稍后您可以通过单击 Restore 按钮恢复到该状态。你有三次机会猜测如果你点击“清除”会发生什么。确切地说,存储的引导状态将被清除(删除)。
Symmetry
对称性
对称性
 Left: Initial state. Center: 左: 初始状态。中心:Show Guides 节目指南 active. Right: The guides after 活跃的。右: 之后的向导Make Editable 制作可编辑的
was pressed. 是按下的
Left: Initial state. Center: 左: 初始状态。中心:Show Guides 节目指南 active. Right: The guides after 活跃的。右: 之后的向导Make Editable 制作可编辑的
was pressed. 是按下的
Symmetry is designed for such instances when, for example, only half a head was modeled, and mirrored using the Cinema 4D Symmetry Tool. You can then position guides on the half of the head that was modeled first, and mirror them onto the subsequently created half.
对称是为这样的情况而设计的,例如,只有半个头部被建模,镜像使用C4D 对称工具。然后,你可以将导轨放置在最初建模的头部的一半上,并将它们映射到后来创建的另一半上。
To activate this function, simply activate the Symmetry setting.
要激活这个功能,只需激活对称设置。
飞机
Use this setting to define the mirror plane. With regard to characters, this will most often be the YZ plane. Mirror planes lie in the respective object’s coordinate system and run through the null point.
使用此设置定义镜面。对于字符来说,这通常是 YZ 平面。镜像平面位于各对象的坐标系中,并通过空点运行。
节目指南
Activate this setting if you want to have the (still virtual) mirrored guides displayed as blue lines.
如果希望将(仍然是虚拟的)镜像指南显示为蓝线,则激活此设置。
As soon as you click on Make Editable, new guides will be created. Auto Root defines whether roots will automatically be assigned to the guides (active) or if the guides should remain unrooted (not active).
一旦你点击 Make Editable,新的指南将被创建。Auto Root 定义是否将根自动分配给向导(活动的) ,或者是否应该保持向导无根(非活动的)。
制作可编辑的
Virtual guides will only then become real guides when Make Editable is pressed. The Hair tools can then be used to manipulate the hair a little in order to avoid a perfectly symmetrical look.
只有当按下 Make Editable 时,虚拟指南才会成为真正的指南。然后,毛发工具可以用来操纵毛发一点,以避免一个完美的对称外观。
If the mesh is not perfectly symmetrical, newly generated mirrored guides will not be mirrored exactly, since they will have to be replanted.
如果网格不是完全对称的,新生成的镜像导线将不会完全镜像,因为他们将不得不重新种植。
自动更新指南
If you make changes to the guide settings, the changes made will automatically be shown in the editor view if the Auto Update setting has been activated. Otherwise, any changes made will first be visible after the Update Guides button has been pressed.
如果更改了指南设置,则如果“自动更新”设置已被激活,则所做的更改将自动显示在编辑器视图中。否则,在按下“更新指南”按钮之后,所做的任何更改都将首先可见。