 Instance
 Hair
Object 毛发物体Basic 基础Coord.Guides 指南Hairs 毛发Editor 编辑Generate 生成Dynamics 动力学Forces 力量Cache 缓存Partings 分别Culling 剔除Advanced 高级
Hair
Object 毛发物体Basic 基础Coord.Guides 指南Hairs 毛发Editor 编辑Generate 生成Dynamics 动力学Forces 力量Cache 缓存Partings 分别Culling 剔除Advanced 高级
Generate
生成
This tab mainly serves to replace hair with polygons (even selected objects using the Instance option) or splines. If, for example, you want to use the Cinema 4D Standard renderer to render HAIR, or render HAIR in conjunction with Sketch and Toon, you will need polygons. Furthermore, plugins are available that require splines for their special areas of use. This can all be set using the Generate tab. The Hair object can also be made editable (by pressing the c key), which will make it polygonal. Otherwise polygons will only be present internally. The same applies to splines.
此选项卡主要用于用多边形(即使是使用 Instance 选项选择的对象)或样条替换毛发。例如,如果你想使用 Cinema 4D Standard 渲染器渲染 HAIR,或者将 HAIR 与 Sketch 和 Toon 一起渲染,你将需要多边形。此外,插件是可用的,需要为他们的特殊领域的使用样条。这些都可以通过 Generate 选项卡进行设置。毛发对象也可以进行编辑(按 c 键) ,这将使它成为多边形。否则,多边形将只出现在内部。这同样适用于样条曲线。
Glass hair with an area shadow, as shown in the image below, can only be created using the Cinema 4D renderer. If you want to create a similar effect, simply apply a normal Cinema 4D material to the Hair object:
带有区域阴影的玻璃毛发,如下图所示,只能使用 Cinema 4D 渲染器创建。如果你想创造一个类似的效果,只需将一个普通的 Cinema 4D 材质应用到毛发对象上:
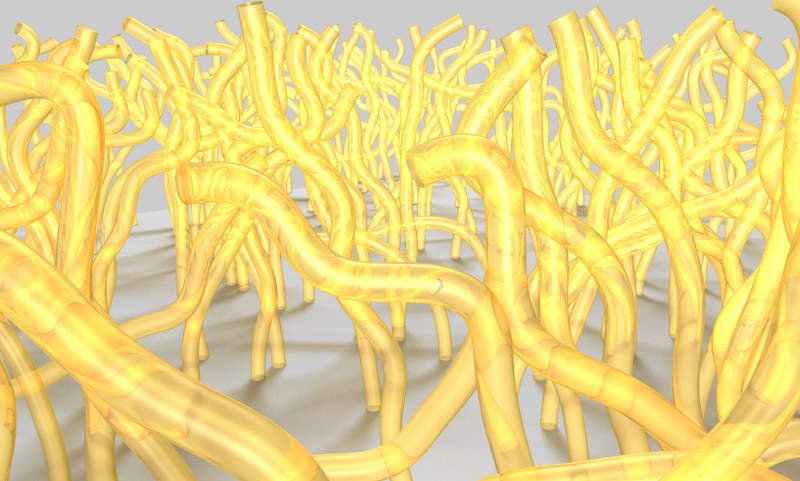 Hair rendered using the Cinema 4D renderer:
Transparent, refracting hair, and area shadows on the floor. 毛发渲染使用Cinema 4d 渲染器: 透明,折射毛发,地板上的区域阴影
Hair rendered using the Cinema 4D renderer:
Transparent, refracting hair, and area shadows on the floor. 毛发渲染使用Cinema 4d 渲染器: 透明,折射毛发,地板上的区域阴影
If you want to render polygonal hair with lighting properties similar to those of the Hair material, use the polygon hair shader (see Polygon Hair Shader).
如果你想渲染多边形毛发,并且与毛发材质的光照特性相似,使用多边形毛发着色器(参见多边形毛发着色器)。
Even trees can be created using the parameters in this tab
甚至可以使用此选项卡中的参数创建树
 © Bernd Neutag (JackMcRip). 贝恩德 · 诺伊塔格(jackmcip)
The branches in the example above are each individual HAIR Objects with increasing Guide and hair counts. The Kink channel was used to create the smaller sprawling branches.
上面例子中的分支是每个单独的毛发物体,并且增加了指南和毛发数量。扭结通道被用来创造更小的蔓生分支机构。
Even leaves could be created, if desired. All you would have to do is add HAIR Object and add simple layers with Alpha channels cut out in the shapes of leaves and apply the Instance type.
如果愿意,甚至可以创造出树叶。所有你需要做的就是添加 HAIR 对象和简单的图层,用 Alpha 通道剪切成树叶的形状,然后应用实例类型。
 These leaves were created using
instances. 这些叶子是使用实例创建的
These leaves were created using
instances. 这些叶子是使用实例创建的
渲染毛发
Use this setting to turn the hair of a given Hair object on or off for the Hair renderer. This setting will not have an effect if applied to polygons used as hair, in conjunction with the settings described below.
使用此设置为毛发渲染器打开或关闭给定毛发对象的毛发。如果将此设置应用于作为毛发的多边形,并结合下面所描述的设置,则不会产生影响。
类型
 Clockwise from top left: Spline, Flat, Triangle,
Square, Circle, Instance (with cones). 从左上顺时针方向: 样条,平面,三角形,正方形,圆形,实例(带圆锥)
Clockwise from top left: Spline, Flat, Triangle,
Square, Circle, Instance (with cones). 从左上顺时针方向: 样条,平面,三角形,正方形,圆形,实例(带圆锥)
The following types of generation are available (each is affected by the hair and segment settings in the Hairs tab):
以下类型的生成是可用的(每一个都受毛发和毛发标签的分段设置的影响) :
没有
No polygons or splines will be generated.
不会生成多边形或样条。
花键
A spline segment of a common spline object will be generated from each hair.
一个共同的样条对象的样条段将从每根毛发生成。
单位
A flat polygon band will be generated from each hair.
每根毛发将生成一条平面多边形带。
三角形
A polygonal tube with a triangular cross-section will be generated from each hair.
每根毛发将生成一个具有三角形横截面的多边形管。
广场
A polygonal tube with a square cross-section will be generated from each hair.
每根毛发将生成一根具有正方形横截面的多边形管。
圆圈
A polygonal tube with a circular cross-section will be generated from each hair.
每根毛发将生成一根具有圆形横截面的多边形管。
例如

The Instance option lets you use any polygonal object (e.g., no parametric primitives or Generators) in place of hair:
Instance 选项允许您使用任何多边形对象(例如,没有参数化原语或生成器)来代替毛发:
 A cone that was replicated using 一个用来复制的圆锥体Instance 例如 (define the thickness in the (定义厚度Thickness 厚度 channel of
the Hair material). 毛发材质的通道)
A cone that was replicated using 一个用来复制的圆锥体Instance 例如 (define the thickness in the (定义厚度Thickness 厚度 channel of
the Hair material). 毛发材质的通道)
打扫

A polygonal tube will be generated from each hair, whose profile can be defined freely. To define the profile of the tube, place a spline object into the Object field. Use the Axis setting to define the axis on which the spline object should run along the hair in order to generate the volume of the hair. It is not possible to generate caps for this Sweep. If you want to create caps, select the Spline option and assign a Sweep object to it, which will give you more control.
每根毛发将生成一个多边形管,其轮廓可以自由定义。若要定义管道的轮廓,请将样条对象放入 Object 字段中。使用 Axis 设置来定义样条对象应该沿着毛发运行的轴,以便生成毛发的体积。不可能为此扫描生成帽子。如果要创建大写,请选择样条选项并为其分配一个 Sweep 对象,这样可以获得更多控制权。
帧更新
If shaders are animated in the Hair material (e.g., in the Displace channel in order to simulate hair billowing in the wind), activating this option will refresh the generation type at each frame.
如果着色器在毛发材质中动画(例如,为了模拟毛发在风中翻滚) ,激活此选项将在每帧刷新生成类型。
Instance
例如
对象
Place the object, from the Object Manager, into this field that should be used in place of the hair. Make sure that the object is made up of as few polygons as possible, since memory requirements can increase dramatically once the object is instanced.
放置对象,从对象管理器,到这个领域,应该在毛发的地方使用。确保对象由尽可能少的多边形组成,因为一旦对象被实例化,内存需求就会急剧增加。
轴心
This setting defines along which axis the instanced object will run along the hair.
这个设置定义了被实例化的物体将沿着毛发的哪个轴运行。
缩放
Use this setting to define how the instances should be scaled in accordance with the thickness of the hair.
使用此设置来定义实例应该如何根据毛发的厚度进行缩放。
变形
Use this setting to define how the instanced object will be deformed when it runs along the length of the hair. If None is selected, no deformation will take place. If Bend is selected, the instances will bend in accordance with the hair (make sure the original object contains enough subdivisions). Align will arrange the instances consecutively along each hair without deforming them. The axis defined in the Axis setting corresponds to the hair tangent.
使用此设置定义如何实例对象将变形时,沿着毛发的长度运行。如果没有选择,不会发生变形。如果弯曲被选中,实例将根据毛发弯曲(确保原始对象包含足够的细分)。排列将安排的实例顺着每个毛发不变形他们顺序。在 Axis 设置中定义的轴对应于毛发切线。
Uniform will scale each instance equally and proportionally along all axes – hence, its shape will not be changed. Keep Aspect will maintain the aspect ratio of each instance, whereas Fit will scale each instance according to the thickness of the hair.
统一将沿所有轴平等和成比例地缩放每个实例——因此,它的形状不会改变。Keep Aspect 将保持每个实例的长宽比,而 Fit 将根据毛发的厚度来缩放每个实例。
等级
If more than one object is instanced, the sequence in which the objects are applied from the hair root can be defined using Hierarchy. The original objects must be child objects (in the Object Manager) of the object located in the Object field of the Generate tab. The hierarchical sequences listed below are available. The examples are based on the following scenario: 4 objects are used – A,B,C & D. Objects B,C and D are all child objects of object A. The possible sequence of objects, starting at the root are:
如果实例化了多个对象,那么可以使用 Hierarchy 定义从发根应用对象的顺序。原始对象必须是位于 Generate 选项卡的 Object 字段中的对象的子对象(在 Object Manager 中)。下面列出的等级顺序可用。这些例子基于以下场景: 使用了4个对象—— a、 b、 c & d 对象 b、 c 和 d 都是对象 a 的子对象。可能的对象序列,从根开始:
重复[1. . 2147483647]
Use this setting to define the number of instances that will be generated per hair.
使用这个设置来定义每根毛发生成的数量。
保留纹理
If a material has been assigned to the original object, activating Keep Textures will assure that all instances will be textured as well.
如果一个材质已经被分配到原始对象,激活保持纹理将确保所有实例将纹理以及。
开始[0. . 100% ]结束[0. . 100% ]
Use these settings to define over which length of the hair the instances should be arranged. If, for example, Start is set to 50%, instances will be arranged onto the hair beginning at its midpoint:
使用这些设置来定义实例的毛发长度。例如,如果 Start 设置为50% ,那么实例将被安排在毛发的中间位置:
 Start 开始 = 50%, = 50% ,End 完 = 100%. = 100%
Alignment
调整
校准
Use this setting to define the direction the hair will lay (the shape of the hair itself will not be changed, only the (internal) orientation of the hair segment). This becomes important if Flat is selected in the Type menu, where hair is rendered as polygonal bands. You can define the alignment of the individual polygons in the direction of the camera, thereby ensuring the best visibility (of the polygons). The orientation of instances can also be set (whereby it is important that their Z axis is rotated to the correct direction). The following directions can be defined:
使用这个设置来定义毛发的摆放方向(毛发本身的形状不会改变,只有毛发部分的(内部)方向)。如果在类型菜单中选择 Flat,那么这一点就变得很重要,因为在类型菜单中毛发呈现为多边形条带。您可以定义单个多边形在相机方向上的对齐方式,从而确保(多边形的)最佳可见性。还可以设置实例的方向(使其 z 轴旋转到正确的方向非常重要)。可以确定以下方向:
本地
Use this setting to define which coordinate system should be used.
使用这个设置来定义应该使用哪个坐标系。
Rotates the elements to be aligned by 180°. They will show in the exact opposite direction of the Alignment setting.
旋转要对齐的元素180 ° 。它们将以与对齐设置完全相反的方向显示。
看
See Alignment / Object.
参见对齐/对象。
Advanced
高级
单一对象
Use this setting to define if polygon hair or spline hair should be converted (c-key) to a single object or if each hair should be converted to a separate polygon object (setting not active) or spline object (setting active).
使用此设置来定义是否多边形毛发或样条毛发应该转换为单一对象(c-key) ,或者是否每根毛发应该转换为单独的多边形对象(设置为非活动)或样条对象(设置为活动)。
启动 CapEnd 盖
The Triangle, Square and Circle generation types basically generate a simplified Sweep object, with the corresponding cross-section, along the length of a hair in order to give the hair volume. Start Cap and End Cap let you add caps to the ends of these elements.
三角形、正方形和圆形的生成类型基本上生成一个简化的扫描对象,它具有相应的横截面,沿着一根毛发的长度,以便给出毛发的体积。开始帽和结束帽让您添加大写的结束这些元素。
切片
If this option is active, the Square and Triangle generation types can only be displayed as squares or triangles, respectively, at segment joints. The slice will take place perpendicular to the hair, and the resulting shape will be defined as a polygon.
如果此选项处于活动状态,则正方形和三角形生成类型只能分别显示为正方形或三角形,位于分段关节处。切片将垂直于毛发的方向进行,生成的形状将被定义为多边形。
轴心
 From left to right: Hair, Camera,
Normal. 从左到右: 毛发,相机,正常
From left to right: Hair, Camera,
Normal. 从左到右: 毛发,相机,正常
Use the options in the Axis setting to define in which direction the polygons created using the previous Slice option should be arranged:
使用 Axis 设置中的选项来定义使用前一个 Slice 选项创建的多边形应该按照哪个方向排列: