Light
Object 轻物体Basic 基础Coord.General 常规Details 详情Visibility 能见度Shadow 阴影Photometric 光度计的Caustics 焦散Noise 噪音Lens 镜头Project 工程项目
Light
Object 轻物体Basic 基础Coord.General 常规Details 详情Visibility 能见度Shadow 阴影Photometric 光度计的Caustics 焦散Noise 噪音Lens 镜头Project 工程项目
Lens Effects
镜头效果
Cinema 4D can simulate the aberrations of real-world camera lens systems and film material. Basic sunbeams are brought to life with a solar corona or a halo. A lens reflection of a low-quality camera lens can be easily simulated, as rainbow colored circles develop and run diagonally across the screen. A welcome flaw in an otherwise too perfect virtual world!
Cinema 4D 可以模拟真实世界摄像机镜头系统和胶片材质的像差。基本的阳光通过日冕或日晕复活。低质量相机镜头的镜头反射可以很容易地模拟,因为彩虹色的圆形发展和运行对角屏幕。一个受欢迎的缺陷,否则过于完美的虚拟世界!

You may recall that on the General page you have the option to disable light radiation (No Illumination). If this option is enabled then the light source will no longer illuminate the objects in the scene, but all lens effects of the light will still be visible. This is handy, for example, in a scene in which the objects are already illuminated as you want and adding another light source for a lens flare will result in over-lighting the scene.
你可能记得,在一般页面上,你可以选择禁用光辐射(禁止照明)。如果启用这个选项,那么光源将不再照亮场景中的物体,但是光的所有镜头效果仍然可见。这是方便的,例如,在一个场景中,对象已经照明,因为你想要和增加另一个光源的镜头耀斑将导致过度照明的场景。
Try not to overuse lens effects; they can soon become distracting. Real world the cameraman will try to avoid them. 尽量不要过度使用镜头效果,它们会很快分散注意力。现实生活中,摄影师会尽量避开他们The parameters for these lens effects are many and varied and take up two separate pages. You can define the basic effect on the Lens page. Use the Glow editor and Lens editor to refine almost any detail of the lens effect.
这些镜头效果的参数是多种多样的,占据了两个独立的页面。您可以在 Lens 页面上定义基本效果。使用辉光编辑器和镜头编辑器精炼几乎任何细节的镜头效果。
Why not build a library of lens effects? You can produce many types of light sources with different effects an save them as individual objects in the 为什么不建立一个镜头效果库呢?你可以产生许多类型的光源,具有不同的效果,一个保存他们作为单独的对象在Object Manager 对象管理器. When you require one of these specific lights for your scene, simply load it from your light source library. .当你需要这些特定的灯光之一为你的场景,只需要从你的光源库加载它 Lens effects cannot be displayed in QuickTime VR panoramas 镜头效果无法在 QuickTime VR 全景中显示发光
To change the overall shape of the light’s glow, select a glow element from this menu of predefined light source glows.
要改变整体形状的光的辉光,选择发光元素从这个菜单预定义的光源发光。
Glows are a type of over-exposure to light. When the light intensity is sufficient, this exposure bloom includes film grain in the areas surrounding a bright light, even though those areas are not illuminated. The rings around a glow (sometimes called halos) are also caused by over-exposure, but with added color distortions caused by the diffraction of the film grain.
发光是一种对光线过度曝光的现象。当光照强度足够时,即使这些区域没有被照亮,曝光过程中也会在明亮光线周围的区域产生颗粒。辉光周围的光环(有时称为光晕)也是由于过度曝光造成的,但是由于胶片颗粒的衍射而增加了色彩变形。
Lens reflections, (termed reflexes), are caused by the focal image of poor quality lenses. The colored shape produced is an artifact of the lens surface, the shape resulting from the shape of the lens. Large apertures produce small reflections, small apertures produce larger ones. Use the Lens editor to change the reflexes as desired. The small preview shows the Lens Type, while the large preview shows the entire lens effect.
镜头反射,(称为反射) ,是由低品质的镜头焦像造成的。所产生的有色形状是透镜表面的伪影,这种形状是由透镜的形状决定的。大孔径产生小的反射,小孔径产生大孔径。使用镜头编辑器来改变你想要的反射。小预览显示镜头类型,而大预览显示整个镜头效果。
亮度[0. . 1000% ]
Controls the global brightness of the glow. To increase the brightness, enter a value above 100%. To reduce the brightness, enter a value below 100%.
控制发光的全局亮度。若要增加亮度,请输入100% 以上的值。若要降低亮度,请输入低于100% 的值。
长宽比[0.1. . 10]
Modifying this value allows you to change the aspect ratio of the glow. The glow appears circular at its default size of 1. Smaller or larger values shrink or stretch the glow’s aspect to a horizontal or vertical ellipse.
通过修改此值,可以更改发光体的长宽比。在默认尺寸为1时,发光呈圆形。较小或较大的值会将辉光的方向收缩或拉伸为水平或垂直椭圆。
设置
Click the Glow Edit button to open the Glow editor.
单击“发光编辑”按钮打开“发光编辑器”。

辉光编辑器
Use the Glow editor to edit glow properties such as rings, the colors of beams and the number of beams. There are four main areas in Glow Editor dialog: one area for the glow itself (top left), one for the surrounding ring (center left), one for beams (bottom left) and one for the type and appearance of the beams (top right).
使用辉光编辑器编辑辉光属性,如环,光束的颜色和光束的数量。在 Glow Editor 对话框中有四个主要区域: 一个区域用于辉光本身(左上) ,一个区域用于周围的环(左中) ,一个区域用于光束(左下) ,还有一个区域用于光束的类型和外观(右上)。
发光
Glows consists of a stack of separately editable elements. The end result is the combination of effects from each element. Select which element you want to edit.
Glows 由一堆单独可编辑的元素组成。最终的结果是来自每个元素的影响的组合。选择要编辑的元素。
类型
Choose a type of glow type for the currently selected element. This defines the distribution of brightness for the element.
为当前选定的元素选择一种辉光类型。这定义了元素的亮度分布。
大小
Here you set the overall size of the glow element as a percentage of the screen’s size. A value of 100% represents the distance from the center of the screen to the edge of the screen.
在这里,您可以将发光元素的整体大小设置为屏幕大小的百分比。值100% 表示从屏幕中心到屏幕边缘的距离。
长宽比 r
This value defines the aspect ratio for the glow. A value of 1 results in a circular glow, whereas values greater or less than 1 produce a horizontal or vertical ellipse.
这个值定义了发光的宽高比。值为1会产生圆形辉光,而值大于或小于1则会产生水平或垂直椭圆。
颜色
To set the color of the glow element, click the box to the right of Size. The system color chooser will open. Select the desired color.
若要设置发光元素的颜色,请单击“大小”右侧的框。系统颜色选择器将打开。选择所需的颜色。
戒指(光环)
Choose one of the following Ring settings from the drop-down list: Inactive (no ring), Ring (set the ring’s color using the color box next to Size) or Rainbow Ring (multi-colored ring).
从下拉列表中选择以下戒指设置: 非活动戒指(无戒指)、戒指(使用大小旁边的颜色框设置戒指的颜色)或彩虹戒指(多色戒指)。
大小
Here you set the overall size of the ring element as a percentage of the screen’s size. A value of 100% represents the distance from the center of the screen to the edge of the screen.
在这里,您可以将 ring 元素的整体大小设置为屏幕大小的百分比。值100% 表示从屏幕中心到屏幕边缘的距离。
长宽比 r
This value defines the aspect ratio for the ring. A value of 1 results in a circular ring, whereas values greater or less than 1 produce a horizontal or vertical ellipse.
这个值定义了环的宽高比。值为1的结果是一个圆环,而值大于或小于1的结果是一个水平或垂直椭圆。
颜色
To set the color for the ring element, click the box to the right of Size. The color picker for your operating system will open. Pick the desired color.
若要设置 ring 元素的颜色,请单击 Size 右侧的框。您的操作系统的颜色选择器将打开。选择你想要的颜色。
Beams consists of a stack of separately editable elements. The end result is the combination of effects from each element.
光束由一堆单独可编辑的元素组成,最终的结果是每个元素的效果的组合。
横梁
Use the drop-down list to choose which element you want to edit.
使用下拉列表可以选择要编辑的元素。
类型
Choose a beam type for the element from the drop-down list. This defines the distribution of brightness for the element.
从下拉列表中为元素选择一个光束类型。这定义了元素的亮度分布。
大小
Here you set the overall size of the beam element as a percentage of the screen’s size. A value of 100% represents the distance from the center of the screen to the edge of the screen.
在这里您可以设置梁元素的整体大小作为屏幕大小的百分比。值100% 表示从屏幕中心到屏幕边缘的距离。
长宽比 r
This value defines the aspect ratio for the beam element. A value of 1 results in a circular shape, whereas values greater or less than 1 produce a horizontal or vertical ellipse.
这个值定义了梁单元的纵横比。值为1将生成圆形,而值大于或小于1将生成水平或垂直椭圆。
颜色
To set the color of the beam element, click the color box to the right of Size. The system color picker opens. Pick the desired color.
若要设置梁元素的颜色,请单击“大小”右侧的颜色框。打开系统颜色选择器。选择你想要的颜色。
角度
To rotate the beam element to a particular angle, enter the angle value here.
若要将梁单元旋转到特定角度,请在此处输入角度值。
横梁(型号/外观)
厚度
Defines the width of beams as a percentage. The lower the value, the narrower the beams will appear.
以百分比定义梁的宽度。值越低,梁的宽度就越窄。
横梁
Defines the total number of beams. Up to 200 beams are allowed per light source.
定义光束总数。每个光源允许多达200个光束。
休息
You can add breaks to the beams by entering the number of breaks into the Breaks box. The breaks will be added to the gaps that already exist between beams.
你可以通过在刹车框中输入刹车的数量来增加刹车。这些断裂将被加到已经存在的梁之间的间隙上。
宽度
Use the Width parameter to control the size of the breaks.
使用 Width 参数控制分隔符的大小。
随机分布
For a random arrangement of beams, enable this option.
对于梁的任意排列,启用此选项。
随机光束长度
Enable this option if you want the beams to vary in length.
如果你希望光束长度变化,启用这个选项。
像星星一样
To have the beams arranged in a star-like pattern, enable this option. The beams will thicken towards the center.
要使光束排列成星形图案,启用这个选项。光束朝向中心会变粗。
For a realistic star, use a low number of thick beams.
对于一个真实的星星,使用低数量的粗光束。
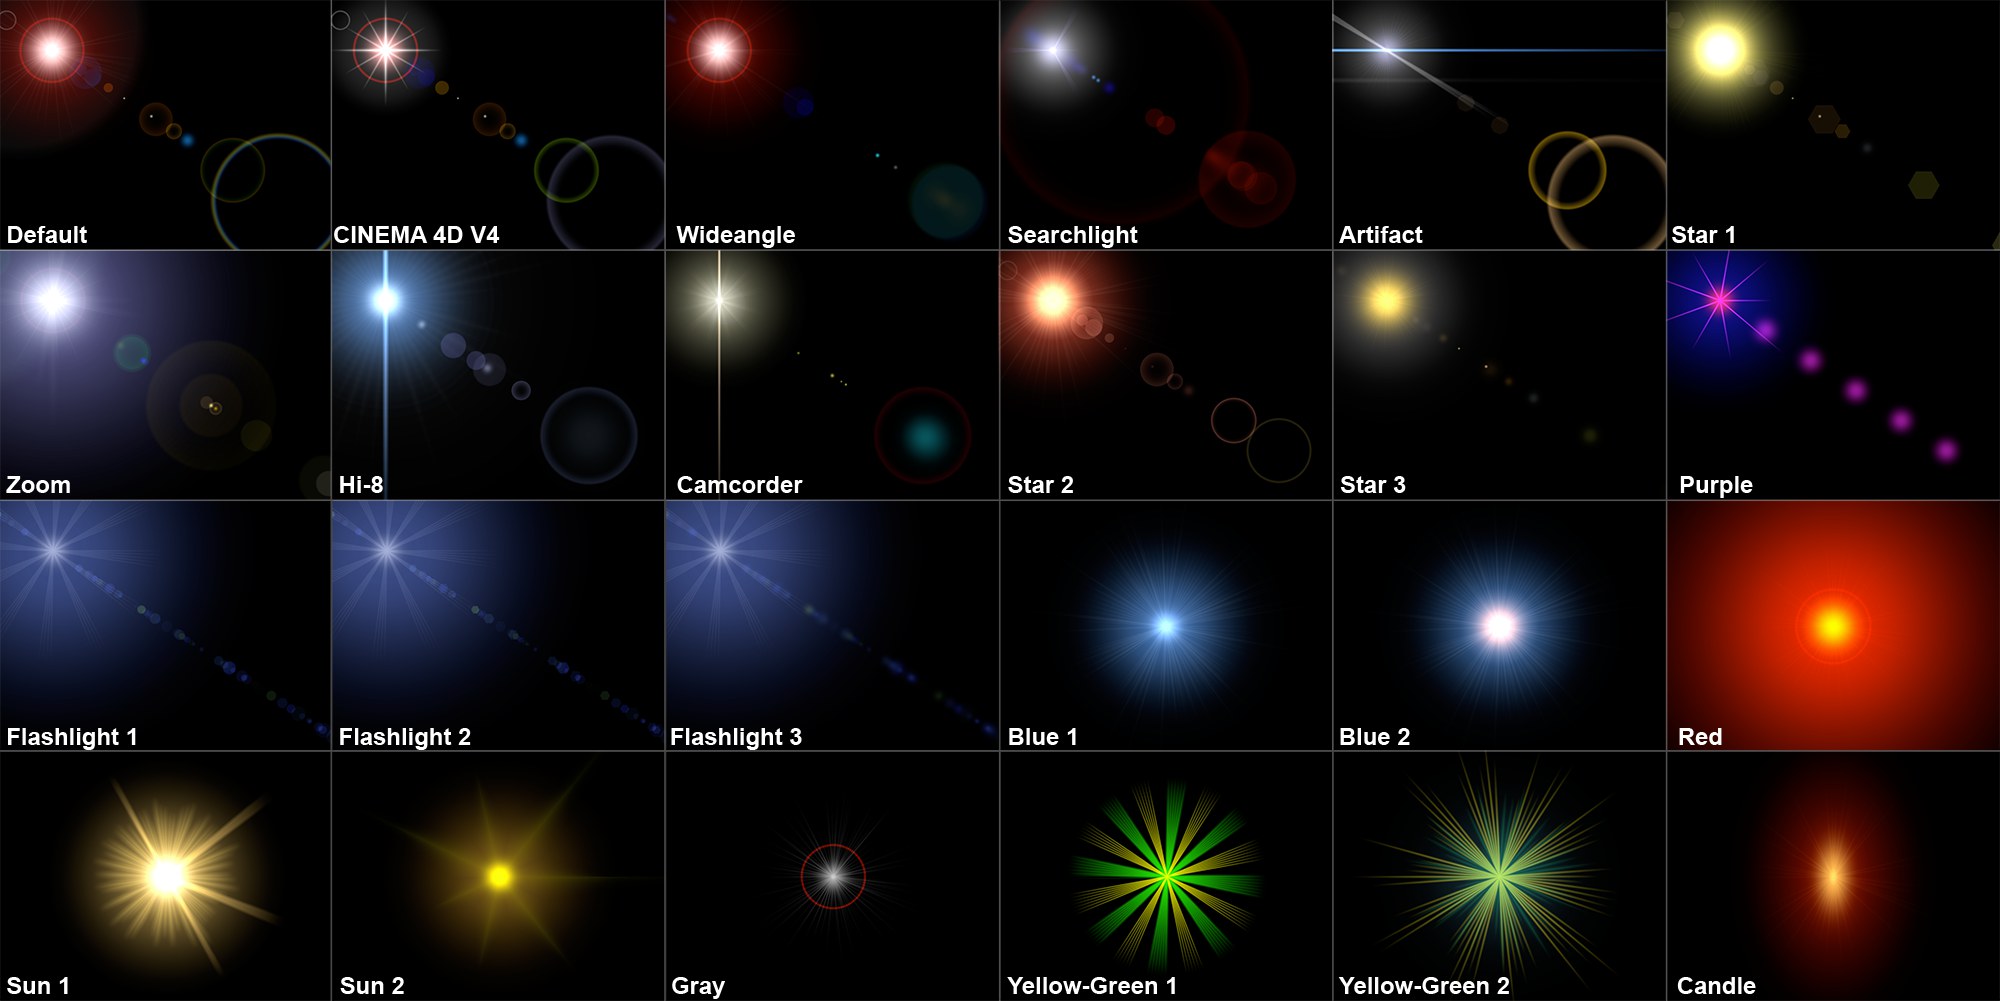
反射
Select the desired reflexes from this menu of presets.
从这个预设菜单中选择你想要的反射。
亮度[0. . 1000% ]
Controls the global brightness of the reflexes. Values below 100% reduce the brightness of the effect; values greater than 100% increase the brightness.
控制反射的全局亮度。低于100% 的值会降低效果的亮度; 高于100% 的值会增加亮度。
长宽比[0.1. . 10]
The reflexes appear circular at the default size of 1. Smaller or larger values shrink or stretch the reflexes to a horizontal or vertical ellipse.
反射在默认大小为1时显示为圆形。较小或较大的值会缩小或拉伸对水平或垂直椭圆的反应。
编辑..。
Click the Reflexes Edit button to open the Lens editor.
点击条件反射编辑按钮打开镜头编辑器。
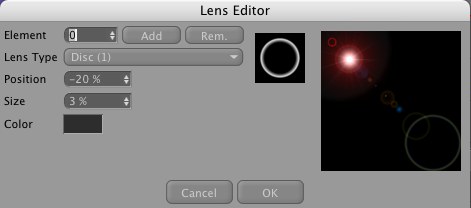
镜头编辑器
To open the Lens editor click the Edit button in the Reflexes area.
要打开镜头编辑器单击编辑按钮的反射区域。
元素,添加,Rem
Choose which reflex you want to edit.
选择你想要编辑的反射。
To add or remove reflexes, click the Add or Rem buttons. You can use up to 40 reflexes.
要增加或消除反射,点击添加或快速眼动按钮。你可以使用多达40条反射。
镜头类型
Defines the shape of the reflexes. Only in the rarest case, if at all, should different reflex types be used in the same scene. For example, apply only circular or only hexagonal types in the same scene. Keep in mind that your scene is shot through one simulated real-world lens — these lens reflections depend upon that lens system, not on your existing scene lights.
定义反射的形状。只有在最罕见的情况下,如果有的话,应该在同一场景中使用不同的反射类型。例如,在同一场景中只应用圆形或只应用六角形类型。请记住,你的场景是通过一个模拟真实世界的镜头拍摄的ーー这些镜头的反射取决于镜头系统,而不是你现有的场景灯。
Here are some examples:
以下是一些例子:

职位
This value sets the positioning of the element on the screen. The axis on which all reflections lie travels through two points: the light source, and the center of the screen (which is also the center of the lens).
该值设置元素在屏幕上的位置。所有反射的轴线通过两点传播: 光源和屏幕的中心(也是透镜的中心)。
Here the following values apply.
这里应用以下值。
Negative values place the reflections behind the light source.
负值将反射置于光源之后。
大小
This value determines the size of the element. The radius is shown as a percentage, where 100% is the distance from the center of the screen to the edge.
此值决定元素的大小。半径以百分比的形式显示,其中100% 是从屏幕中心到边缘的距离。
颜色
Select the color for the element.
选择元素的颜色。
比例[0. . 1000% ]
This value adjusts the size of the entire lens effect (rays, glows and reflexes). This saves you from having to adjust each effect individually.
这个值调整整个镜头效果的大小(光线,发光和反射)。这样你就不必单独调整每个效果了。
旋转[-∞ . . + ∞ ° ]
Use this value to rotate the lens glow (only lens glow will be affected) to any angle.
使用此值旋转镜毛发光(只有镜毛发光将受到影响)到任何角度。
参考尺寸[0. . + ∞ m ]
When the Glow Distance Scale checkbox or the Reflex Distance Scale checkbox is enabled, this setting adjusts the distance value used to calculate the glow and reflex effects. The lower the value, the more distant (i.e. smaller) the effect appears. Increasing the value makes the effect appear closer.
当辉光距离规模复选框或反射距离规模复选框启用,此设置调整距离值用于计算辉光和反射效果。数值越低,效果出现的距离越远(即越小)。增加值会使效果显得更加接近。
Lens reflexes normally have a constant size no matter how far away they are from the camera. However, if for example you want a spaceship model to fire torpedoes that pass under the camera, the lens reflexes and glows must become larger as the torpedoes near the camera.
镜头反射通常有一个不变的大小,不管他们离相机有多远。然而,例如,如果你想让宇宙飞船模型发射从相机下方经过的鱼雷,镜头的反射和发光必须随着鱼雷靠近相机而变大。
使用光线参数
If this option is enabled, the properties defined on the light’s General page also affect the glow/reflex effects. For example, if the light source color is red then the glow/reflex effect also appears red.
如果启用此选项,光的常规页面上定义的属性也会影响辉光/反射效果。例如,如果光源颜色是红色,那么辉光/反射效果也显示为红色。
如在边境附近,则淡出
Enabling this option will make the lens effect fade the closer it is to the edge of the image. The lens effect will have maximum intensity when it is at the center of the screen. This corresponds to a light’s physical behavior in the real world.
启用此选项将使镜头效果淡出越接近图像的边缘。镜头效果将有最大的强度时,它是在屏幕的中心。这与现实世界中光的物理行为相对应。
淡入物体后面
Enabling this option will determine whether light sources that lie behind objects will still produce effects. Lens flares do not occur if light sources are behind objects, but glows or radiation can produce pleasing effects.
启用这个选项将决定物体背后的光源是否仍然会产生影响。如果光源在物体后面,镜头光晕不会发生,但是发光或辐射可以产生令人愉快的效果。
接近物体时褪色
Normally, if a light source with a lens effect starts to disappear behind an object, the effects are still at maximum strength until the light source origin is fully behind the object. With this option enabled, the effect’s strength gradually fades as the light source approaches the object.
通常情况下,如果一个具有透镜效果的光源开始消失在物体后面,这种效果仍然是最大的强度,直到光源的原点完全在物体后面。启用此选项后,当光源接近物体时,效果的强度逐渐减弱。
A good example of this effect is the gradual fading of a sun behind a planet.
这种效果的一个很好的例子是行星后面太阳的逐渐衰落。
发光距离比例尺
If this option is enabled, the glow effect is scaled according to its distance from the camera. The further away the glow is from the camera, the smaller the glow will be.
如果启用此选项,发光效果将根据它与相机的距离进行缩放。光线离相机越远,发出的光线就越小。
反射距离量表
The same as Glow Distance Scale only for reflexes. If this option is enabled, the reflexes are scaled depending on their distance from the camera. The further away the reflexes are from the camera, the smaller they appear.
与辉光距离量表相同,只适用于反射。如果这个选项是启用的,反射是缩放取决于他们的距离相机。反射动作离镜头越远,显得越小。