 Modifiers
 Sketch
Material 素描材质Basic 基础Main 主要Strokes 中风Adjust 调整Distort 扭曲Color 颜色Thickness 厚度Opacity 不透明度Render 渲染Clone 克隆Animate 动画Assign 分配
Sketch
Material 素描材质Basic 基础Main 主要Strokes 中风Adjust 调整Distort 扭曲Color 颜色Thickness 厚度Opacity 不透明度Render 渲染Clone 克隆Animate 动画Assign 分配
Opacity
不透明度
These three tabs give you complete control over the color, thickness and opacity of lines. They enable you to create any type of line effect, from simple lines that fade out to complex brush effects. Each tab works in a similar way:
这三个选项卡可以完全控制线条的颜色、粗细和不透明度。它们使你能够创建任何类型的线条效果,从简单的淡出线条到复杂的画笔效果。每个标签页的工作原理都是相似的:
不透明度[0. . 10000% ]
Use this setting to define the overall opacity.
使用此设置来定义整体不透明度。
链接到厚度
The Opacity tab has a Link To Thickness option which enables you to use the same modifier settings for thickness and opacity. Instead of setting the modifiers on both tabs, set them on the Thickness tab only and enable the Link To Thickness option on the Opacity tab.
不透明选项卡有一个“链接到厚度”选项,使您可以对厚度和不透明度使用相同的修改设置。不要在两个选项卡上都设置力场,只在厚度选项卡上设置力场,并在不透明选项卡上启用链接到厚度选项。
With a few exceptions, each tab has the same modifier options. For example, the Along Stroke modifier is present on all three tabs.
除了少数例外,每个选项卡都有相同的修改选项。例如,沿笔画力场出现在所有三个选项卡上。
Modifiers
力场
Distance
Position
Scale
Illumination
Texture
Vertex Map
Texture Map
Screen Texture
Along Stroke
Total Length
Facing Angle
Join Angle
Screen Angle
From Line
Python
Noise
距离位置比例尺照明纹理顶点贴图纹理贴图屏幕纹理沿笔画总长面向角连接角屏幕角来自线条 Python 噪声
Activate the desired modifier here:
在这里激活所需的力场:
Python
巨蟒
In order to use this very powerful modifier, you should have a good command of Python, which is the script language implemented by Cinema 4D. For details about the Python programming language, visit http://developers.maxon.net.实力[0. . 10000% ]
This is the strength of the modifier’s effect, from 0% (no effect) to 100% (full effect).
这是改进剂效果的强度,从0% (无效果)到100% (完全效果)。
剧本
Enter your Python script into the Script field.
在 Script 字段中输入您的 Python 脚本。
编辑..。
Enter a script into the Script box or click the Expresson Editor button and enter the script into Cinema 4D’s script editor.
在脚本框中输入脚本,或者点击 Expresson Editor 按钮,将脚本输入到 Cinema 4D 的脚本编辑器中。
命令
This acts as a quick reference to look up the names of the commands. It has no other purpose. It does not insert commands.
这充当快速引用,用于查找命令的名称。它没有其他目的。它不插入命令。
位置[ Real ]
Position along a line in pixels (screen space).
以像素(屏幕空间)为单位沿直线定位。
恢复正常电子数据处理程序[ Real ]
Normalized position along a line (0 to 1).
沿直线归一化位置(0至1)。
托林[瑞尔]
Distance to the line from the current render point (which is within the line’s thickness). Values range from - Thickness to 0 to Thickness.
从当前呈现点到直线的距离(在直线的粗细范围内)。数值范围从-厚度到0到厚度。
厚度[真实]
The line’s thickness as set on the [Thickness] tab.
线条的粗细设置在[粗细]选项卡上。
斯特罗克伦斯[ Real ]
The total length of the stroke being rendered.
呈现的行程总长度。
[向量]
The render point in screen space (with Z).
屏幕空间中的呈现点(带 z)。
LineOff [ Real ]
The offset (0 to 1) along the line segment being rendered.
沿着被呈现的线段的偏移量(0到1)。
wPnt [ Vector ]
The world coordinates for the point being rendered.
要呈现的点的世界坐标。
时间[真实]
Current document time in seconds.
当前文档时间(秒)。
帧[真实]
Current frame.
当前帧。
第一财政预算案〔朗〕
Frames per second.
帧率。
LineStart [ Vector ]
The screen space coordinates for the start of the line (LineOff = 0 at the LineStart, 1 at LineEnd).
行开始的屏幕空间坐标(LineStart 上的 LineOff = 0,LineEnd 上的1)。
Linend [ Vector ]
Screen space for line segment’s end point.
线段端点的屏幕空间。
JoinAngleA [ Real ]
Join angle to the line segment at LineStart (if available, or 0.0).
与 LineStart 线段的连接角度(如果可用,或0.0)。
JoinAngleB [ Real ]
Join angle (0 to 2*pi) to the line segment at LineEnd.
连接角(0至2 * π)到 LineEnd 的线段。
LineNormal [ Vector ]
The line normal in screen space (2D, Z=0).
屏幕空间中的法线(2D,z = 0)。
[矢量]
The normal from the edge that created the original line segment.
从创建原始线段的边缘开始的法线。
莱尼波萨[真实]
The line segment’s position along the stroke in pixels (A means LineStart, B LineEnd).
线段沿笔画的位置(a 表示 LineStart,b 表示 linend)。
Linebasb [ Real ]
The position along the stroke in screen space for the line segment being rendered.
要呈现的线段在屏幕空间中沿笔划的位置。
PntA [ Long ]
The index number of the object point or spline point that created the start of the line segment (or -1 if not available).
创建直线段起点的对象点或样条点的索引号(如果不可用,则为 -1)。
PntB [ Long ]
The point index that created the LineEnd (or -1).
创建 LineEnd (或-1)的点索引。
保利亚〔朗〕
The polygon index that created the line segment (or -1 if not available, like a spline).
创建线段的多边形索引(如果不可用,则为 -1,如样条)。
理大〔朗〕
The polygon index that shared the edge (or -1 if not available).
共享边的多边形索引(如果不可用,则为 -1)。
RayBits [ Long ]
This passes in the raybits from the Cinema 4D render. See the Cinema 4D SDK.
这通过从Cinema 4D 渲染的光线位。见Cinema 4D SDK。
CosC [ Real ]
The angle between the ray and normal on the surface.
光线与表面法线之间的角度。
法线〔向量〕
The normal from the surface (if PolyHit is not 0, which says it hit an object).
表面法线(如果 PolyHit 不是0,表示它击中了一个物体)。
BumpNormal [ Vector ]
Bumped surface normal.
碰撞表面法线。
区[真实]
Distance to the point hit on the surface (if one was hit).
到击中表面的点的距离(如果有人被击中)。
保利海特[朗]
Really only useful to know if an object was hit by a ray, which means the value is not 0.
真正有用的只是知道一个对象是否被射线击中,这意味着该值不是0。
RayPos [ Vector ]
World position for the ray’s starting point.
射线起始点的世界位置。
2.1.1.1.1.1.1.1.2.2.2.1.2.2.2.2.2.2.2.2.2.2.2.2.2.2.2
Direction of the ray (the ray is from Cinema 4D).
射线的方向(射线来自C4D)。
SurfPnt [ Vector ]
The world coordinates for the point hit (if one was hit).
击中点(如果有人被击中)的世界坐标。
RendLeft [ Real ]
The render image left pixel.
左边的渲染图像像素。
RendTop [ Real ]
Render top pixel (left, top usually 0, but not always, e.g render region).
渲染顶部像素(左边,顶部通常是0,但不总是,例如渲染区域)。
RendRight [ Real ]
Right pixel (width = right-left+1)..
右像素(宽度 = 右-左 + 1)。
RendBottom [ Real ]
Bottom pixel (height = bottom - top +1).
底部像素(高度 = 底部-顶部 + 1)。
[实际]
Object’s left screen bounds pixel. This is for the object that the line came from. This is not necessarily the object hit by the Cinema 4D ray.
对象的左屏幕边界像素。这是代表这条线所来自的对象。这并不一定是C4D 射线击中的对象。
奥布吉托普[皇马]
Object’s top screen bounds pixel.
对象的屏幕顶部边界像素。
ObjRight [ Real ]
Object’s right screen bounds pixel.
对象的右屏幕边界像素。
ObjBottom [ Real ]
Object’s bottom screen bounds pixel.
对象的屏幕底部边界像素。
颜色[矢量]
The color set in the [Color] tab (Color parameter only).
[ Color ]选项卡中设置的颜色(仅为 Color 参数)。
Distance
距离
 Original, Color, Thickness, Opacity, All
three 原始,颜色,厚度,不透明度,所有三个
Original, Color, Thickness, Opacity, All
three 原始,颜色,厚度,不透明度,所有三个
The Distance modifier modifies the color, thickness or opacity based on distance from the camera.
距离修改器会根据距离修改颜色、厚度或不透明度。
材质编辑器设置
实力[0. . 10000% ]
This is the strength of the modifier’s effect, from 0% (no effect) to 100% (full effect).
这是改进剂效果的强度,从0% (无效果)到100% (完全效果)。
范围
The Range setting defines the range over which the color, thickness or opacity is modified.
范围设置定义了修改颜色、厚度或不透明度的范围。
对象
This range is from the part of the object nearest the camera to the part furthest away.
这个范围是从最接近相机的物体的一部分到最远的一部分。
相机
This uses the camera’s Front Blur End and Rear Blur End values (Depth tab) when you enable them. If the options are disabled then Sketch and Toon will use the Target Distance in place of Rear Blur End and the Camera in place of Front Blur End.
这使用相机的前端模糊和后端模糊值(深度标签) ,当你启用他们。如果选项被禁用,那么素描和图恩将使用目标距离代替后方模糊末端和摄像机代替前方模糊末端。
习俗
When you select the Custom range, you will see the Min and Max boxes appear. These define the start and end of the range as distances from the camera.
当您选择自定义范围,您将看到最小和最大框出现。它们将距离的起点和终点定义为与相机的距离。
模式
TIP 提示Use this mode to define how thickness or opacity should influence a particular area. The Linear mode mixes line thickness or opacity evenly over a given area. The Invert option will reverse the direction of the mixing. If, on the other hand, you set Mode to Spline, a spline graph will appear in which you can draw a gradient that will influence thickness and opacity. The X axis represents the area from start to end of a given line, the Y axis represents its thickness or opacity.
使用此模式可定义厚度或不透明度对特定区域的影响程度。线性模式混合线厚度或不透明度均匀地在一个给定的区域。倒置选项将逆转混合的方向。另一方面,如果将 Mode 设置为 Spline,则会出现一个样条图形,您可以在其中绘制一个梯度,该梯度将影响厚度和透明度。X 轴表示给定线条从开始到结束的区域,y 轴表示其厚度或不透明度。
See alsoMode.
参见 alsoode。
Min [0. . + ∞ m ]
See Mode.
参见《模式》。
最大值[0. . + ∞ m ]
See Mode.
参见《模式》。
花键
See Mode.
参见《模式》。
Position
职位
 Original, Color, Thickness, Opacity, All
three 原始,颜色,厚度,不透明度,所有三个
Original, Color, Thickness, Opacity, All
three 原始,颜色,厚度,不透明度,所有三个
The Position modifier modifies the color, thickness or opacity based on the object’s position along the camera’s X, Y or Z axis.
位置修改器根据物体在相机 x、 y 或 z 轴上的位置修改颜色、厚度或不透明度。
材质编辑器设置
实力[0. . 10000% ]
This is the strength of the modifier’s effect, from 0% (no effect) to 100% (full effect).
这是改进剂效果的强度,从0% (无效果)到100% (完全效果)。
轴心
Defines which camera axis should be used.
定义应该使用哪个摄像机轴。
模式
See Distance / Mode.
参见距离/模式。
See Distance / Mode.
参见距离/模式。
Min [0. . + ∞ m ]
The Min and Max values define the range over which the parameter will be modified. If, for example, the Z axis was selected and Min and Max were set to 500 and 1000 respectively, the range will span from 500 to 1000 units along the camera’s Z axis.
最小值和最大值定义修改参数的范围。例如,如果选择 z 轴,并将 Min 和 Max 分别设置为500和1000,那么沿着相机的 z 轴的范围将从500到1000单位。
最大值[0. . + ∞ m ]
花键
See Distance / Mode.
参见距离/模式。
Scale
比例
The Scale modifier modifies the color, thickness or opacity based on the object’s scale along an axis.
Scale 力场根据物体沿轴线的尺度修改颜色、厚度或不透明度。
 Original, Color, Thickness, Opacity, All
three 原始,颜色,厚度,不透明度,所有三个
Original, Color, Thickness, Opacity, All
three 原始,颜色,厚度,不透明度,所有三个
This modifier is based on the scale — not the size — of the objects!
这个力场是基于对象的比例,而不是大小!
材质编辑器设置
实力[0. . 10000% ]
This is the strength of the modifier’s effect, from 0% (no effect) to 100% (full effect).
这是改进剂效果的强度,从0% (无效果)到100% (完全效果)。
轴心
The Axis setting determines which axis will be used: X, Y or Z. The Coordinates setting lets you choose whether this axis is an object axis (Local) or world axis (World). For example, if you set Axis to Y and Coordinates to Local, the lines will be modified based on the scale of the object’s Y axis.
轴的设置决定了将使用哪个轴: x、 y 或 z。坐标设置允许您选择此轴是对象轴(局部)还是世界轴(世界)。例如,如果将 Axis 设置为 y,将 Coordinates 设置为 Local,那么将根据对象的 y 轴的比例修改这些直线。
坐标
See ”Axis".
见“轴”。
范围
(only in thickness and opacity tabs)
(仅限于厚度和不透明度选项卡)
Note 注意This is the scale of the range over which a parameter is modified. If range is set to scale the scale range will stretch from 0 to 1. In order to define an individual range, select the manual setting and set enter a value for min. and max. ranges.
这是修改参数范围的缩放比例。如果范围设置为缩放比例范围将从0到1。为了定义一个单独的范围,选择手动设置并设置输入一个分钟值。还有麦克斯。范围。
模式
See Distance / Mode.
参见距离/模式。
Enable this option to invert the effect.
启用此选项以反转效果。
Min [0. . + ∞]
See Range.
参见范围。
最大值[0. . + ∞]
See Range.
参见范围。
花键
See Distance / Mode.
参见距离/模式。
Along Stroke
沿着中风
 Original, Color, Thickness, Opacity, All
three 原始,颜色,厚度,不透明度,所有三个
Original, Color, Thickness, Opacity, All
three 原始,颜色,厚度,不透明度,所有三个
The Along Stroke modifier modifies the color, thickness or opacity based on position along the stroke.
沿笔划力场修改颜色,厚度或不透明度的基础上的位置沿笔划。
材质编辑器设置
实力[0. . 10000% ]
This is the strength of the modifier’s effect, from 0% (no effect) to 100% (full effect).
这是改进剂效果的强度,从0% (无效果)到100% (完全效果)。
范围
The Range setting defines the range over which the color, thickness or opacity is modified.
范围设置定义了修改颜色、厚度或不透明度的范围。
习俗
When you select the Custom range, you will see the Min and Max boxes appear. These define the start and end of the range as distances from the camera.
当您选择自定义范围,您将看到最小和最大框出现。它们将距离的起点和终点定义为与相机的距离。
第一行
This setting rages from start to end of a given stroke. If stroke is deactivated, this range will apply to the length of a stroke segment)
这种设置从一个给定的笔画的开始到结束都会发怒。如果停用笔画,这个范围将适用于笔画段的长度)
模式
See Distance / Mode.
参见距离/模式。
See Distance / Mode.
参见距离/模式。
Min [0. . + ∞]
See ”Range".
请参阅”范围”。
最大值[0. . + ∞]
See ”Range".
请参阅”范围”。
花键
See Distance / Mode.
参见距离/模式。
Total Length
总长度
These define the minimum and maximum line length in pixels over which the parameter is modified.
它们定义了修改参数的最小和最大行长度(以像素为单位)。
 Original, Color, Thickness, Opacity, All
three 原始,颜色,厚度,不透明度,所有三个
Original, Color, Thickness, Opacity, All
three 原始,颜色,厚度,不透明度,所有三个
The Total Length modifier modifiers the color, thickness or opacity based on the length of each stroke (or line segment if strokes are disabled).
总长度力场颜色,厚度或不透明度的基础上每笔画的长度(或线段,如果笔画禁用)。
材质编辑器设置
实力[0. . 10000% ]
This is the strength of the modifier’s effect, from 0% (no effect) to 100% (full effect).
这是改进剂效果的强度,从0% (无效果)到100% (完全效果)。
Min [0. . + ∞]
Use the min. and max. settings to define the minimum and maximum stroke length, in pixels, along which a parameter should be modified.
利用分钟。还有麦克斯。设置,以定义最小和最大笔划长度(以像素为单位) ,并应根据该长度修改参数。
最大值[0. . + ∞]
See ”Min".
参见“ Min”。
花键
See Distance / Mode.
参见距离/模式。
Facing Angle
面向角度
 Original, Color, Thickness, Opacity, All
three 原始,颜色,厚度,不透明度,所有三个
Original, Color, Thickness, Opacity, All
three 原始,颜色,厚度,不透明度,所有三个
The Facing Angle modifier modifies the color, thickness or opacity based on the direction in which the lines are facing relative to the camera. Hidden lines are also affected if shown.
面向角度修改器根据线条相对于相机的方向来修改颜色、厚度或不透明度。如果显示,隐藏线也会受到影响。
 Blue visible lines and red hidden lines via the
Facing Angle modifier. 蓝色可见线和红色隐藏线通过面向角度力场
Blue visible lines and red hidden lines via the
Facing Angle modifier. 蓝色可见线和红色隐藏线通过面向角度力场
材质编辑器设置
实力[0. . 10000% ]
This is the strength of the modifier’s effect, from 0% (no effect) to 100% (full effect).
这是改进剂效果的强度,从0% (无效果)到100% (完全效果)。
花键
See Distance / Mode.
参见距离/模式。
Join Angle
连接角
This modifier works with strokes only. 这个力场只对笔画有效 Original, Color, Thickness, Opacity, All
three 原始,颜色,厚度,不透明度,所有三个
Original, Color, Thickness, Opacity, All
three 原始,颜色,厚度,不透明度,所有三个
The Join Angle modifier modifies the color, thickness or opacity based on the angle of the joints in the stroke.
连接角度修改器修改颜色,厚度或不透明度的基础上的角度的关节在中风。
材质编辑器设置
实力[0. . 10000% ]
This is the strength of the modifier’s effect, from 0% (no effect) to 100% (full effect).
这是改进剂效果的强度,从0% (无效果)到100% (完全效果)。
完
Use this setting to define the look of the line tips.
使用此设置定义线条提示的外观。
没有变化
When in this mode, the parameter’s values will remain unchanged at both start and end of a given line. For example, if Thickness is set to 12 pixels in the Thickness tab the line will be 12 pixels thick at its start and at its end.
在此模式下,参数的值在给定行的开始和结束处都将保持不变。例如,如果厚度在厚度标签中设置为12像素,那么线条在开始和结束时将是12像素厚度。
Minimum Angle
Zero Angle
Maximum Angle
最小角度零最大角度
Depending on the option selected, the line ends will reflect minimum, maximum or zero angle.
根据所选择的选项,线端将反映最小、最大或零角度。
花键
See Distance / Mode.
参见距离/模式。
Screen Angle
屏幕角度
 Original, Color, Thickness, Opacity, All
three 原始,颜色,厚度,不透明度,所有三个
Original, Color, Thickness, Opacity, All
three 原始,颜色,厚度,不透明度,所有三个
The Screen Angle modifier modifies the color, thickness or opacity based on the line’s direction on the computer screen.
Screen Angle 力场根据计算机屏幕上线条的方向修改颜色、厚度或不透明度。
材质编辑器设置
实力[0. . 10000% ]
This is the strength of the modifier’s effect, from 0% (no effect) to 100% (full effect).
这是改进剂效果的强度,从0% (无效果)到100% (完全效果)。
花键
See Distance / Mode.
参见距离/模式。
旋转[-360. . 360 ° ]
The Rotate setting lets you rotate the modifier’s effect.
旋转设置允许你旋转修改器的效果。
From Line
来自 Line
This modifier is available on the Color and Opacity tabs only. 这个力场只能在颜色和不透明度选项卡上使用 Original, Color, Opacity, Color +
Opacity 原始,颜色,不透明度,颜色 + 不透明度
Original, Color, Opacity, Color +
Opacity 原始,颜色,不透明度,颜色 + 不透明度
The From Line modifier modifies the color or opacity based on distance from the line’s edge.
From Line 力场根据与线条边缘的距离修改颜色或不透明度。
材质编辑器设置
实力[0. . 10000% ]
This is the strength of the modifier’s effect, from 0% (no effect) to 100% (full effect).
这是改进剂效果的强度,从0% (无效果)到100% (完全效果)。
花键
See Distance / Mode.
参见距离/模式。
Texture
纹理
This modifier is available on the Color and Opacity tabs only. 这个力场只能在颜色和不透明度选项卡上使用With the exception of the Python modifier, this is the most powerful modifier in Sketch and Toon. It offers considerable control over the rendering of the lines and enables you to create countless brush effects.
除了 Python 力场之外,这是 Sketch 和 Toon 中最强大的力场。它提供了相当大的控制渲染线,并使您能够创建无数的画笔效果。
材质编辑器设置
加载刷子..。
These buttons enable you to load and save the Texture settings for brush-style presets.
这些按钮使您能够加载和保存笔刷样式预设置的纹理设置。
保存刷子..。
These buttons enable you to load and save the Texture settings for brush-style presets.
这些按钮使您能够加载和保存笔刷样式预设置的纹理设置。
纹理
 Texture & alpha, Original line, Texture,
Texture & Alpha 纹理 & 阿尔法,原线,纹理,纹理 & 阿尔法
Texture & alpha, Original line, Texture,
Texture & Alpha 纹理 & 阿尔法,原线,纹理,纹理 & 阿尔法
Here you can choose the main texture and apply an alpha to it.
在这里你可以选择主纹理并应用一个 alpha。
实力[0. . 10000% ]
This is the strength of the modifier’s effect, from 0% (no effect) to 100% (full effect).
这是改进剂效果的强度,从0% (无效果)到100% (完全效果)。
偏移量 u [-100. . 100% ]
Use this setting to offset scale and texturing in the U direction.
使用此设置可以在 u 方向偏移缩放和纹理。
偏移量 v [-100. . 100% ]
Use this setting to offset scale and texturing in the V direction.
使用此设置可以在 v 方向偏移缩放和纹理。
量表 u [0. . 1000% ]
These values offset and scale the texturing in the U and V directions.
这些值在 u 和 v 方向上偏移和缩放纹理。
量表 v [0. . 1000% ]
These values offset and scale the texturing in the U and V directions.
这些值在 u 和 v 方向上偏移和缩放纹理。
间隔[1. . 1000% ]
 From left to right: Spacing set to 100%, 200% and
50%. 从左到右: 间隔设置为100% ,200% 和50%
From left to right: Spacing set to 100%, 200% and
50%. 从左到右: 间隔设置为100% ,200% 和50%
The default Spacing value of 100% places one texture tile directly after another. Use a higher or lower value to move the tiles apart or overlap them.
默认的100% 间距值将一个纹理贴图直接放在另一个纹理之后。使用较高或较低的值来移动磁贴或重叠它们。
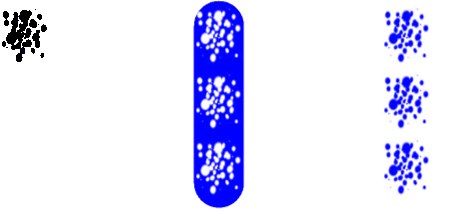
驱散你[0. . 1000% ]
 Original, Scatter U, Scatter V, Scatter U & V,
Count = 8 原创,分散 u,分散 v,分散 u & v,计数 = 8
Original, Scatter U, Scatter V, Scatter U & V,
Count = 8 原创,分散 u,分散 v,分散 u & v,计数 = 8
The Scatter values scatter the tiles in the U and V directions. 0% means no variation, 100% means maximum variation.
分散值在 u 和 v 方向上分散。0% 意味着没有变化,100% 意味着最大的变化。
分散 v [0. . 1000% ]
The Scatter values scatter the tiles in the U and V directions. 0% means no variation, 100% means maximum variation.
分散值在 u 和 v 方向上分散。0% 意味着没有变化,100% 意味着最大的变化。
To mix in extra tiles, increase the Count value. For example, change the Count value from 1 to 3 for three times as many tiles.
若要混合额外的瓷砖,请增加 Count 值。例如,将 Count 值从1更改为3,以获得三倍数量的瓷砖。
Parts of the texture that are not on the line will be cut off. See the middle line below.
不在线上的部分纹理将被切断。请参阅下面的中间线。

尺寸[1. . 1000% ]
 From left to right: Size set to 100%, 50% and
25%. 从左到右: 大小设置为100% ,50% 和25%
From left to right: Size set to 100%, 50% and
25%. 从左到右: 大小设置为100% ,50% 和25%
The Size controls the scale of the tiles. The Variation value lets you vary the size of each tile from 0% (no variation) to 100% (maximum variation).
大小控制瓷砖的规模。变化值允许您改变每个瓦片的大小从0% (没有变化)到100% (最大变化)。
变动[0. . 100% ]
See ”Size".
请参阅”尺寸”。
圆度[1. . 1000% ]
 From left to right: Roundness set to 100%, 35% and
200%. 从左到右: 圆度设置为100% ,35% 和200%
From left to right: Roundness set to 100%, 35% and
200%. 从左到右: 圆度设置为100% ,35% 和200%
The Roundness value squashes (less than 100%) or stretches (greater than 100%) the tiles in the line’s U direction. The Variation value varies the roundness of each tile from 0% (no variation) to 100% (maximum variation).
圆度值会使线条的 u 方向上的方块变形(小于100%)或者变形(大于100%)。变化值使每块瓷砖的圆度从0% (没有变化)到100% (最大变化)不等。
变动[0. . 100% ]
See ”Roundness".
参见“圆度”。
角度[0.360 ° ]
This value rotates each tile.
这个值会旋转每个平铺。
变动[0. . 100% ]
The Variation value varies the angle of each tile from 0% (no variation) to 100% (maximum variation).
变化值使每个瓦片的角度从0% (无变化)到100% (最大变化)不等。
计数[0. . 100]
See ”Scatter U", ”Scatter V", ”Count".
参见“分散 u” ,“分散 v” ,“计数”。
变动[0. . 100% ]
Use this setting to define the degree of deviation allowed from the set value (0%=no deviation; 100%=maximum deviation).
使用此设置定义允许偏离设置值的程度(0% = 无偏差; 100% = 最大偏差)。
方面
 Aspect disabled (left) and enabled
(right). 禁用方面(左)和启用方面(右)
Aspect disabled (left) and enabled
(right). 禁用方面(左)和启用方面(右)
If the Aspect option is disabled, the texture tile is stretched to fit the whole line. Enable the option to use the texture’s width to height ratio instead.
如果切面选项被禁用,纹理贴图将被拉伸以适应整个线条。启用该选项以改为使用纹理的宽高比。
 The texture (left) and Invert disabled (center) and
enabled (right). 纹理(左)和 Invert 禁用(中)和启用(右)
The texture (left) and Invert disabled (center) and
enabled (right). 纹理(左)和 Invert 禁用(中)和启用(右)
Enable the Invert option to invert the texture’s effect. Transparent parts become opaque and vice versa.
启用倒置选项来倒置纹理的效果。透明部分变成不透明部分,反之亦然。
瓷砖
 Tile disabled (left) and enabled
(right). 禁用平铺(左)和启用(右)
Tile disabled (left) and enabled
(right). 禁用平铺(左)和启用(右)
To tile the texture, enable the Tile option and ensure the Aspect option is disabled.
要平铺纹理,启用平铺选项,并确保切面选项被禁用。
弯曲
 Bend disabled (left) and enabled
(right). 禁用弯曲(左)和启用(右)
Bend disabled (left) and enabled
(right). 禁用弯曲(左)和启用(右)
Enable the Bend option if you want the tiles rotate to follow the direction of the line.
如果您希望磁贴沿着线条的方向旋转,则启用“弯曲”选项。
Making a brush with the Texture modifier
使用纹理修改器制作画笔
 Figure 1. 图1
 Figure 2. 图2
 Figure 3. 图3
 Figure 4. 图4
For finishing touches, try fading out the thickness and opacity at the ends of the stroke using the Along Stroke modifier on the Thickness and Opacity tabs (Figure 4, right line).
对于最后的润色,尝试使用粗细和不透明选项卡(图4,右行)上的沿笔划力场来淡化粗细和不透明度。
Screen Texture
屏幕纹理
 The texture, Color, Thickness, Opacity, All
three 纹理,颜色,厚度,不透明度,所有三个
The texture, Color, Thickness, Opacity, All
three 纹理,颜色,厚度,不透明度,所有三个
The Screen Texture modifier modifies the color, thickness or opacity based on a texture map placed over the entire rendered image (the screen). If the object covers only part of the screen, it will receive only part of the texture.
屏幕纹理修改器根据放置在整个渲染图像(屏幕)上的纹理贴图修改颜色、厚度或不透明度。如果对象只覆盖屏幕的一部分,那么它将只接收纹理的一部分。
材质编辑器设置
纹理
Select a Screen Texture here.
在这里选择一个屏幕纹理。
实力[0. . 10000% ]
This is the strength of the modifier’s effect, from 0% (no effect) to 100% (full effect).
这是改进剂效果的强度,从0% (无效果)到100% (完全效果)。
偏移量 x [-∞ . . + ∞% ]
Use this setting to offset the text origin along the x axis on the screen.
使用此设置可以沿着屏幕上的 x 轴偏移文本原点。
偏移量 y [-∞ . . + ∞% ]
See ”Offset X".
见“偏移 x”。
长度 x [-∞ . . + ∞% ]
See ”Offset X".
见“偏移 x”。
长度 y [-∞ . . + ∞% ]
See ”Offset Y".
见“偏移 y”。
Vertex Map
顶点地图
This modifier is available on the Thickness and Opacity tabs only. 这个力场只适用于厚度和不透明度选项卡 Original, Thickness, Opacity 原始值,厚度,不透明度
The Vertex Map modifier modifies the thickness or opacity based on a vertex map. To choose which vertex map is used, assign a Sketch Style tag to the object if it does not have one already and set the map on the tag’s Maps tab (Drag & drop the tag into the Thickness Map or Opacity Map box).
顶点映射力场基于顶点映射修改厚度或不透明度。若要选择使用哪个顶点映射,请为对象分配一个草图样式标记(Sketch Style) ,如果该对象还没有草图样式标记,则在标记的 Maps 选项卡上设置映射(将标记拖放到“厚度映射”或“不透明映射”框中)。
材质编辑器设置
实力[0. . 10000% ]
This is the strength of the modifier’s effect, from 0% (no effect) to 100% (full effect).
这是改进剂效果的强度,从0% (无效果)到100% (完全效果)。
Texture Map
纹理贴图
The object must have a Material tag with a material assigned for this modifier to have an effect. 该对象必须有一个材质标签与材质分配的这个力场有效果 The texture, Color, Thickness, Opacity, All
three 纹理,颜色,厚度,不透明度,所有三个
The texture, Color, Thickness, Opacity, All
three 纹理,颜色,厚度,不透明度,所有三个
The Texture Map modifier modifies the color, thickness or opacity based on a texture map.
纹理贴图力场基于纹理贴图修改颜色、厚度或不透明度。
材质编辑器设置
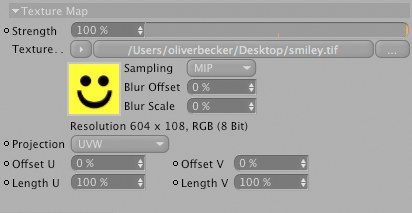 Color tab. 颜色标签
力量[0. . 100% ]
This is the strength of the modifier’s effect, from 0% (no effect) to 100% (full effect).
这是改进剂效果的强度,从0% (无效果)到100% (完全效果)。
纹理
Load the texture that should affect the strokes here.
加载纹理,应该影响笔画在这里。
投影
Note: 注意:Use this setting to define the type of projection for your texture, e.g., UVW, flat or spherical.
使用这个设置来定义纹理的投影类型,例如,UVW,平面或者球面。
偏移量 u [-∞ . . + ∞% ]
Use this setting to offset scale and texturing in the U direction.
使用此设置可以在 u 方向偏移缩放和纹理。
偏移量 v [-∞ . . + ∞% ]
See ”Offset U".
见“偏移量 u”。
长度 u [-∞ . . + ∞% ]
See ”Offset U".
见“偏移量 u”。
长度 v [-∞ . . + ∞% ]
See ”Offset U".
见“偏移量 u”。
Illumination
照明
 Original lighting, Color, Thickness, Opacity, All
three 原始照明,颜色,厚度,不透明度,所有三个
Original lighting, Color, Thickness, Opacity, All
three 原始照明,颜色,厚度,不透明度,所有三个
The Illumination modifier modifies the color, thickness or opacity based on the illumination falling onto the line.
照明修改器修改的颜色,厚度或不透明的基础上的照明下降到线上。
材质编辑器设置
On the Color tab you can use the modifier in two modes: Intensity and Color.
在“颜色”选项卡上,您可以在两种模式下使用该调节器: 亮度和颜色。
花键
Using the spline, the strength of opacity can be adjusted via the illumination intensity.
使用样条,不透明度的强度可以通过调整照明强度。
模式
Use this setting to define (per drag & drop) which lights should be used. Normally, all lights in a scene will be used. In order to use only selected lights or to exclude lights, use the include or exclude modes accordingly.
使用此设置来定义(每次拖放)应该使用哪些灯光。通常情况下,场景中的所有灯光都会被使用。为了只使用选定的灯或排除灯,相应地使用包括或排除模式。
照明
Use this setting to define whether the modification should use lighting, its shadow or both.
使用此设置来定义修改是否应该使用光照、阴影或两者兼而有之。
Enable this option to invert a given effect.
启用此选项以反转给定效果。
实力[0. . 10000% ]
This is the strength of the modifier’s effect, from 0% (no effect) to 100% (full effect).
这是改进剂效果的强度,从0% (无效果)到100% (完全效果)。
灯光
Drag lights that should be included in rendering into this field.
将呈现中应包含的灯光拖动到此字段中。
Noise
噪音
 Original, Color, Thickness, Opacity, All
three 原始,颜色,厚度,不透明度,所有三个
Original, Color, Thickness, Opacity, All
three 原始,颜色,厚度,不透明度,所有三个
The Noise modifier modifies the color, thickness or opacity based on a noise pattern.
噪音力场修改的颜色,厚度或不透明的基础上噪音模式。
材质编辑器设置
实力[0. . 10000% ]
This is the strength of the modifier’s effect, from 0% (no effect) to 100% (full effect).
这是改进剂效果的强度,从0% (无效果)到100% (完全效果)。
类型
Choose from 30 types of noise such as Blistered Turbulence, Dents and Wavy Turbulence. These are the same types that are available for Cinema 4D’s Noise shader.
从30种类型的噪音中选择,例如起泡的湍流,凹痕和波浪的湍流。这些是相同的类型,可为C4D 的噪音着色器。
地图
The Mapping drop-down list controls which coordinates are used to generate the noise. This can affect how the noise looks, how it changes as the object or camera moves and whether the noise is continuous over line segments if strokes are disabled.
Mapping 下拉列表控件,用于生成噪声的坐标。这会影响噪声的外观,当物体或摄像机移动时噪声的变化,以及当笔画被禁用时噪声是否是连续的。
第1D 行,第2D 行
 Strokes disabled (left) and enabled
(right). 中风禁用(左)和启用(右)
Strokes disabled (left) and enabled
(right). 中风禁用(左)和启用(右)
This modifier uses the position along the line. Avoid using this type if strokes are disabled, otherwise poor results are likely (see left cylinder above).
这个力场使用行的位置。如果中风是禁用的,避免使用这种类型,否则结果可能会很差(见上面的左圆柱)。
屏幕
The noise is calculated in the space of the screen. The noise will change as the object’s position on the screen changes.
噪声是在屏幕空间内计算出来的。当物体在屏幕上的位置改变时,噪音也会随之改变。
对象
The noise is calculated in object space and remains the same regardless of object and camera moves.
噪声是在物体空间中计算出来的,不管物体和摄像机的移动如何,噪声都是一样的。
世界
The noise is calculated in world coordinates. The noise remains the same if you move the camera but changes if you move the object.
噪声是按世界坐标计算的。如果你移动摄像机,噪音保持不变,但如果你移动物体,噪音就会发生变化。
八度音[1. . 20]
Controls the number of octaves over which the noise will span.
控制噪声将跨越的八度音阶的数量。
比例[0. . 10000% ]
This setting shows the noise’s global expanse. The scale X and scale Y values are the noise’s relative scale values in the X and Y directions.
这个设置显示了噪音的全局扩展。尺度 x 和尺度 y 值是噪声在 x 和 y 方向上的相对尺度值。
X 量表[0. . 10000% ]
See ”Scale".
请参阅「量表」。
Y 比例[0. . 10000% ]
See Scale.
参见比例尺。
Anim Speed [0. . + ∞]
Use this setting to define, in cycles per second, the speed with which the noise cycles should move.
使用此设置可以定义噪声周期的移动速度(以每秒周期为单位)。
细节[0. . + ∞% ]
Used for antialiasing. In general, leave the value set to the default of 100% but if the line texture flickers when you animate, try increasing the value. Or if you are rendering a high-res still and you want crisp detail, set the value lower.
用于抗锯齿。一般情况下,将设置的值设置为默认值100% ,但如果线条纹理在动画显示时闪烁,请尝试增加该值。或者如果你渲染的仍然是高分辨率,你想要清晰的细节,设置较低的值。
低剪辑[0. . 100% ]
Use this setting to define lowest the point at which the noise will be cut off. All lesser values will be set to 0.
使用此设置定义噪声将被截断的最低点。所有较小的值将被设置为0。
高剪辑[0. . 100% ]
Use this setting to define the highest point at which the noise will reach its maximum effect (100%).
使用此设置可定义噪声达到最大效果(100%)的最高点。
亮度[-100. . 100% ]
Use this setting to adjust the brightness of the noise. A value greater than 0 will increase the brightness, a value of less than 0 will lessen the brightness.
使用此设置来调整噪音的亮度。大于0的亮度值会增加亮度,小于0的亮度值会降低亮度。
对比度[-100. . 100% ]
Use this setting to adjust the contrast of the noise. Values greater than 0 will increase contrast, values less than 0 will lessen contrast.
使用此设置来调整噪声的对比度。大于0的值将增加对比度,小于0的值将减少对比度。
绝对
If this option is enabled, the noise is absolute, causing it to fold about its midpoint.
如果启用此选项,则噪声为绝对噪声,导致其在中点附近折叠。
Activate this option to invert the noise.
激活此选项以反转噪音。