
The Take Manager
场次管理器
常规
Many who work in 3D know about the problem of working with Projects that contain various animations, render settings, camera perspectives and a variety of other variations. This meant that several Project files had to be created and maintained accordingly when changes were made, which could require a great deal of time and organization effort. With the Take function, all of this information can be included in a single file, which can then be rendered (note also the powerful variable file and path names (Tokens), which was introduced together with the Take system).
许多从事3D 工作的人都知道使用包含各种动画、渲染设置、摄像机透视图和各种其他变化的项目时会遇到的问题。这意味着在进行更改时,必须创建并相应地维护几个项目文件,这可能需要大量时间和组织工作。使用 Take 函数,所有这些信息都可以包含在一个文件中,然后可以呈现这个文件(还要注意与 Take 系统一起引入的强大的变量文件和路径名(token)))。
Another application for the Take system would be for non-destructive work on a complex Project. In the past it was always important not to lose the scene’s initial state by changing settings or modifying animations. With the Take system, the initial state is saved in the Main take and new animations can then be used to fine-tune, test and modify the scene.
采取系统的另一个应用是对一个复杂的项目进行无损的工作。在过去,不要通过改变设置或修改动画来丢失场景的初始状态是很重要的。使用 Take 系统,初始状态保存在 Main Take 中,然后可以使用新的动画来微调、测试和修改场景。
Simply put, the Take system is a valuable enhancement for all complex Projects that you want to integrate into your workflow quickly and reliably.
简单地说,对于所有希望快速可靠地集成到工作流中的复杂项目,Take 系统是一个有价值的增强。
例子
Before we start describing the system itself we’ll use an example: In the description of the Color Chooser an image was used that showed a bottle with various textures and colors.
在我们开始描述系统本身之前,我们将使用一个例子: 在颜色选择器的描述中,使用了一个图像,显示了一个具有各种纹理和颜色的瓶子。

To create this image you would have to render 5 times, each time with a different label texture and cap colors. With the Take system, this can be quickly set up and everything rendered at once using the Render all Takes in PV command.
要创建这个图像,你需要渲染5次,每次使用不同的标签纹理和帽子颜色。使用 Take 系统,可以快速设置,并使用 Render all Takes in PV 命令一次渲染所有内容。
Just as textures and colors were switched in this example, this can be done with just about any Attribute Manager setting (incl. animation keyframes!).
正如纹理和颜色在这个例子中被切换,这可以通过任何属性管理器设置(包括。动画关键帧!).
What is the Take system and what can it do?
什么是采取系统,它能做什么?
The Take system makes multiple states - e.g., varying (even animated) object/tag/material settings, render settings or cameras - of a given Project available in a single file.
采取系统使得给定项目的多种状态——例如,变化的(甚至是动画的)对象/标记/材质设置、渲染设置或摄像机——在一个单独的文件中可用。
These various states are referred to as Takes can be selected with a click of the mouse, which means that a large number of parameter changes can be included. With reference to the example above, the following can, for example, be done:
这些不同的状态被称为 Takes,可以通过单击鼠标来选择,这意味着可以包含大量的参数更改。根据上面的例子,可以这样做:
Only one Take can be active at once. This Take is then the current project, i.e., this Take will be exported (and not a Main Take).
只有一个 Take 可以同时激活。这个 Take 是当前的项目,也就是说,这个 Take 将被导出(而不是一个 Main Take)。
If you want to work without the Take system, make sure that the Take Manager contains no Takes except for the Main. Cinema 4D will then work as it did in previous versions.
如果您想在没有采取系统的情况下工作,请确保采取管理器除了 Main 之外不包含任何采取。C4D将会像以前的版本一样工作。
Where can Take settings be found?
在哪里可以找到 Take 设置?
Which settings work in conjunction with the Take system?
哪些设置与采取系统一起工作?
All settings available in the context menu in conjunction with the Attribute Manager'sOverride command. These include most settings for objects, materials, shaders, tags, nodes, etc.
与属性管理器的 sOverride 命令一起在上下文菜单中可用的所有设置。这些包括对象、材质、着色器、标签、节点等的大多数设置。
Tool settings, Preferences, Project settings, and so on will not work. These are stored in the Main or are valid globally anyway.
工具设置、首选项、项目设置等等都不起作用。它们存储在 Main 中,或者无论如何都是全局有效的。
Several special objects such as XRef objects (that modify the Project's content) can be applied in a limited fashion (reference objects cannot be exchanged in the master Project, i.e., the reference Project is the same in all Takes).
一些特殊的对象,比如 XRef 对象(修改 Project 的内容)可以以有限的方式应用(在 master Project 中不能交换引用对象,也就是说,所有 Takes 中的引用项目是相同的)。
动画
Animations are supported by the Take system, i.e., each Take can have its own animations that are independent of other Takes (with the exception of the Motion System). The following rules apply:
动画是由采取系统支持,也就是说,每个采取可以有自己的动画,独立于其他采取(运动系统除外)。以下规则适用:
一般资料
A material Node’s input parameters can either be controlled manually or via another input port. In conjunction with the Take System (which, for example, cannot switch connections) the following applies: a connection always has priority over a parameter modified by a Take.
材质节点的输入参数可以手动控制或通过另一个输入端口。结合采取系统(例如,不能切换连接)应用以下内容: 连接总是优先于由 Take 修改的参数。
场次管理器。
 Note how the settings are initially grayed out.
This changes once the settings are overwritten. 请注意设置最初是如何变成灰色的。一旦设置被覆盖,就会发生变化
Note how the settings are initially grayed out.
This changes once the settings are overwritten. 请注意设置最初是如何变成灰色的。一旦设置被覆盖,就会发生变化
At the top left of the Take Manager (with default settings) you will see the Main Take. This option cannot be removed or moved elsewhere. All scene elements will initially be cached here. Even when an older Project is loaded, everything will be placed into the Main Take. The Main Take contains all elements such as objects, tags, materials, animations and the element's relations to one another (allocations, hierarchies, etc.), i.e., everything that makes up a given Project. It represents the complete Cinema 4D file as you know them from previous versions. If the Main Take is activated, all other overwrites in the remaining Takes will be displayed in the Override Tree.
在采取管理器的左上角(具有默认设置) ,您将看到主采取。此选项不能被移除或移到其他位置。所有的场景元素最初将缓存在这里。即使加载了一个旧的项目,所有的东西都会被放到 Main Take 中。Main Take 包含所有元素,例如对象、标签、材质、动画和元素之间的关系(分配、层次结构等) ,也就是组成给定项目的所有元素。它代表了完整的Cinema 4d 文件,因为你知道他们从以前的版本。如果激活了主采集,剩余采集中的所有其他覆盖都将显示在覆盖树中。
You can create a new Take using the Main Take (double-click in the empty area on the left window). Each newly created Take will initially reflect the Main Take because it will inherit all properties (=Attribute Manager settings). This is evident by the fact that the newly created Take is displayed as a sub-object of the Main Take object in the hierarchy.
您可以使用 Main Take (在左窗口的空白区域双击)创建一个新的 Take。每个新创建的 Take 最初都将反映 Main Take,因为它将继承所有属性(= Attribute Manager settings)。新创建的 Take 显示为层次结构中 maintake 对象的子对象,这一事实证明了这一点。
Tip: 提示:If you create a new object or tag or model an object on a give layer, all new elements or models will always be placed in the Main Take. The Take system primarily only varies properties of existing elements (whereby objects can naturally be hidden from rendering; e.g., Visible in Renderer is "only" a property).
如果您在给定层上创建一个新的对象或标记或建模一个对象,所有新的元素或模型将始终放置在主服务器中。Take 系统主要只是改变现有元素的属性(通过这种方式,对象可以自然地隐藏在渲染中; 例如,在 Renderer 中 Visible 是“仅仅”一个属性)。
An exception to the rule: On the one hand there are the Override Groups that only allow a few selected tags to work within a Take; on the other hand, Take-specific animations can be created whose animation keys are not placed into the Main Take. Note also this tip.
这个规则的一个例外: 一方面有 Override group,它只允许一些选定的标签在一个 Take 中工作; 另一方面,可以创建特定于 Take 的动画,其动画键没有放置到主 Take 中。还要注意这个提示。
.When a new Take is created, all element settings are grayed out in the Attribute Manager. What this basically means is that the settings from the parent Take will be assumed. If you want to subsequently change settings you have to 'overwrite' the parent settings with a new Take. This can be done in one of several ways:
创建新的 Take 时,属性管理器中的所有元素设置都显示为灰色。这基本上意味着来自父 Take 的设置将被假定。如果您希望随后更改设置,则必须使用新的 Take“覆盖”父级设置。这可以通过以下几种方式之一来实现:
The setting value can then be modified in the Attribute Manager or by double-clicking on the respective setting in the Take Manager's 'Value' column. A setting that is overwritten in this way will in turn pass its values on to subordinate Takes and can overwrite these. The passing on of values reflects the behavior of the tags in the Object Manager: If an object at the top of the hierarchy has a texture, this texture will be inherited by all subordinate objects unless an object has its own Material tag.
然后可以在 Attribute Manager 中修改设置值,或者双击 Take Manager 的“ Value”列中的相应设置。以这种方式覆盖的设置将反过来将其值传递给下属的 Takes 并可以覆盖这些值。值的传递反映了 Object Manager 中标记的行为: 如果位于层次结构顶部的对象有一个纹理,那么这个纹理将被所有从属对象继承,除非对象有自己的 Material 标记。
You can switch between various Takes by clicking on the small cross icon at the far left of the Take names. It will turn white and the active Take will be displayed. The Take name will also be displayed in the Cinema 4D name list at the right of the file name.
你可以通过点击 Take names 最左边的小十字图标在不同的 Take 之间切换。它将变成白色,并且将显示活动的 Take。采取名称也将显示在Cinema 4D 名单中的文件名称的右侧。
Where there's light there's also shadow: It has to be noted that the 'readability' or the comprehensibility of a scene that is opened for the first time can be challenging, depending on the complexity of the scene. This was also true in the past but now it is, in principle, possible to load a seemingly different file by selecting a different Take. Open the following file:
有光的地方也有阴影: 需要注意的是,第一次打开的场景的‘可读性’或可理解性是很有挑战性的,这取决于场景的复杂程度。这在过去也是正确的,但是现在,原则上,可以通过选择不同的 Take 来加载一个看似不同的文件。打开以下文件:

Switch to the Take Manager and switch between Takes. You will notice the effect.
切换到采取管理器和切换之间的采取。您将注意到的效果。
Take a look at how the scene is set up in the Layer Manager. Depending on the Take, different objects and materials will be hidden for both the Viewport and the Managers.
看看如何在图层管理器中设置场景。根据采取,不同的对象和材质将隐藏的视口和管理器。
This is due to the fact that the Take system is so powerful that confusing Project states can be generated. In such cases, the scene should be commented (e.g., using the Annotation tag).
这是因为 Take 系统非常强大,以至于可能会产生混乱的 Project 状态。在这种情况下,应该对场景进行注释(例如,使用 Annotation 标记)。
以 Tree 为例
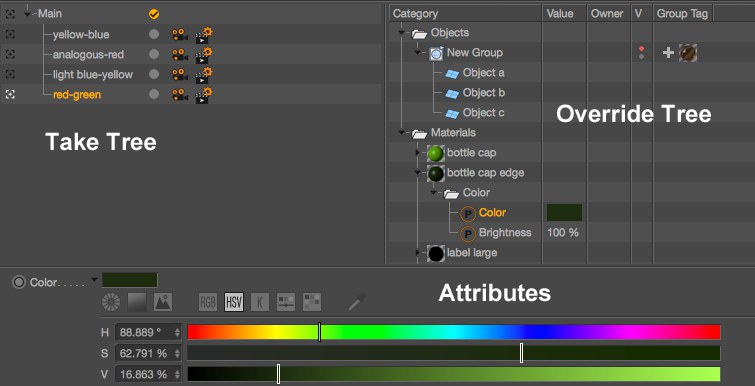 Note also the Group Tag column where selected tags
affect object groups ( 还要注意 grouptag 列,其中选定的标记影响对象组(Add Override Group 添加覆盖组 command in the File menu). 文件菜单中的命令)
Note also the Group Tag column where selected tags
affect object groups ( 还要注意 grouptag 列,其中选定的标记影响对象组(Add Override Group 添加覆盖组 command in the File menu). 文件菜单中的命令)On the left of the image above you will see a list with existing Takes arranged hierarchically in a Take Tree.
The items can be re-arranged via drag and drop (e.g., to modify hierarchies, render orders, etc.) or selected
(
在上面的图片的左边,你会看到一个列表,现有的 Take 按照层次排列在一个 Take Tree 中。这些项目可以通过拖放重新排列(例如,修改层次结构、呈现顺序等)或选择(Cmd/Ctrl + click 添加/删除选择; Shift 选择范围; Del 删除选择范围)。
When Takes are selected, their properties will be displayed in the Attribute Manager below.
当选择“采取”时,它们的属性将显示在下面的属性管理器中。
Each item listed has the following settings (from left to right):
列出的每个项目都有以下设置(从左到右) :
以任务为例
Defines the current Take. The current Take will be displayed in the Viewport and rendered when, for example, the Render to Picture Viewer is called up. This is currently active Project state in Cinema 4D. Note also that the Current Take HUD element (view settings / HUD tab) does the same.
定义当前的 Take。当前的采取将显示在 Viewport,并呈现时,例如,渲染图片查看器被调用。这是目前活跃的项目状态在Cinema 4D。还要注意,Current Take HUD 元素(查看设置/HUD 选项卡)也是如此。
姓名
Each Take has a unique name, which can be changed by double-clicking on it. The Take will be displayed with this name at other locations within Cinema 4D as well.
每个 Take 都有一个唯一的名称,可以通过双击它来更改。该采取将显示与此名称在其他地点Cinema 4D 以及。
标记
Mark individual Takes, e.g., to only render a specific Take. Click on the Take to change its state.
标记单独的取物,例如,只呈现一个特定的取物。点击取物来改变它的状态。
相机
Assign an existing camera to a Take as a render camera via click + selection from the selection menu. The selection menu also contains the following options:
通过选择菜单中的点击 + 选择将一个现有的相机分配给一个 Take as a render 相机。选择菜单还包含以下选项:
渲染设置
Click on a Take to assign an existing Render Setting to it. The selection menu also contains the following options: Inherit From Parent: assumes the render settings from the Parent take.
单击“取景”将现有的渲染设置分配给它。选择菜单还包含以下选项: Inherit From Parent: 假定从 Parent take 进行呈现设置。
Note also the context menu, which is displayed when you right-click on the Take Tree (these settings are described further below).
还要注意上下文菜单,当您右键单击 Take Tree 时会显示(下面将进一步描述这些设置)。
覆盖树
The Override Tree displays a list of the following settings when a Take is selected:
当选择 Take 时,Override Tree 显示以下设置的列表:
The settings are sorted hierarchically according to elements (objects, tags, shaders, etc.), sub-tabs and other structures, depending on the type, and their depiction is oriented according to the Attribute Manager.
这些设置按照元素(对象、标签、着色器等)、子选项卡和其他结构分层排序,具体取决于类型,并且它们的描述是面向属性管理器的。
The listed items can be selected in the usual manner (
列出的项目可以通常的方式进行选择(Ctrl/Cmd 添加或删除选择; Shift 选择范围; Del 删除选择范围)。已删除的设置将再次假定父 Take 的值。
If the list appears to cluttered you can apply the filters - the first two icons at the top right of the Take Manager.
如果列表看起来混乱,你可以应用过滤器-前两个图标在采取管理器的右上角。
Selected elements/settings (but not folder names) each list their overwritten settings that can be modified in the attribute section (alternatively you can double-click on the individual setting in the Override Tree). Multiple selections only work well within the same element settings, i.e., for a single object or tag. The order of elements can be re-arranged via drag and drop within the folder (e.g., objects within Objects).
选定的元素/设置(但不包括文件夹名称)每个列表的重写设置可以在属性部分中修改(或者您可以双击重写树中的单个设置)。多重选择只适用于相同的元素设置,例如,对于单个对象或标记。元素的顺序可以在文件夹中通过拖放重新排列(例如,对象中的对象)。
The following columns are available in the Override Tree:
以下列可在覆盖树中找到:
属性
This is where the setting values of selected elements are displayed. These can be modified - or animated - here or in the Attribute Manager.
这是显示所选元素的设置值的位置。这些可以修改-或动画-这里或在属性管理器。
The four icons at the top right
右上角的四个图标
The following icons are available at the top right of the Take Manager window:
下面的图标可以在 Take Manager 窗口的右上角找到:
菜单命令
档案
新镜头
Use this command to create a new, empty Take (it will inherit all properties of the Main Take). A new Take can also be created by double-clicking on an empty region of the Take Tree.
使用此命令创建一个新的空 Take (它将继承 Main Take 的所有属性)。也可以通过双击 Take Tree 的空白区域来创建一个新的 Take。
添加覆盖组
 8 different tags can be assigned to an Override
Group. Tags assigned to Override groups are labeled with a 可以为 Override Group 分配8个不同的标记。分配给 Override 组的标记用T in the 在Object Manager 对象管理器.
8 different tags can be assigned to an Override
Group. Tags assigned to Override groups are labeled with a 可以为 Override Group 分配8个不同的标记。分配给 Override 组的标记用T in the 在Object Manager 对象管理器.This command can be used if a certain number of objects have to be grouped for a Take, which all have to be affected equally by the selected tags. It can, for example, be very useful for assigning an object group a common alpha channel (via a Compositing tag’s Object channel) and an object group with a different constellation in another Take the same alpha channel. Or, simply put: assigning a different material to different object groups per Take. The possibilities are wide-ranging. However, the Override tags are restricted to render-specific types and only one of these types can be applied per Override Group.
如果一个 Take 需要对一定数量的对象进行分组,那么可以使用这个命令,所有这些对象都必须同样受到所选标记的影响。例如,对于为一个对象组分配一个公共的 alpha 通道(通过合成标记的对象通道)和另一个对象组中具有不同星座的对象组,它可以非常有用。或者,简单地说: 每次为不同的对象组分配不同的材质。这种可能性是广泛的。但是,Override 标记仅限于呈现特定的类型,每个 Override Group 只能应用其中一个类型。
This is how Override Groups work:
这就是 Override group 的工作原理:
Note that one object per Take can belong to only a single Override Group.
请注意,每个 Take 只能有一个对象属于单个 Override Group。
保存预置
Take presets can be saved to the Content Browser (Presets/User/Take Presets) for later use or distribution. Only Take names, hierarchies, Override Groups (incl. tags and their settings) and User Data will be saved. All Project elements such as objects, tags, materials, etc. and their setting values are not part of a Take preset.
采取预设可以保存到内容浏览器(预设/用户/采取预设)为以后使用或分发。只接受名称、层次结构、重写组(包括。标签及其设置)和用户数据将被保存。所有项目元素,如对象、标签、材质等及其设置值都不是 Take 预置的一部分。
Take presets are useful, for example, when they don’t have to be redefined when used in conjunction with User Data each time a Take is created.
采取预设是有用的,例如,当他们不必重新定义时,与用户数据一起使用,每次采取创建。
Another use would be for maintaining studio presets, e.g.:
另一个用途是维护工作室预置,例如:
Such presets (which can easily consist of dozens of Takes) are easy to maintain and manage.
这样的预设(可以很容易地包含几十个需求)很容易维护和管理。
自动拍摄
The Auto Take mode can be enabled to automatically assign the ,Override’ status to each modifiable setting (note that you can also drag entire objects, tags, materials, etc. into the Take Manager to make all of their settings overridable). The element settings will be colored accordingly (similar to Autokeying mode) and each setting will be modifiable (and will again be colored accordingly). All modified setting values will be placed into the Take Manager.
自动采取模式可以自动分配的,覆盖的状态,每个可修改的设置(注意,你也可以拖动整个对象,标签,材质等到采取管理器,使所有的设置覆盖)。元素设置将相应地着色(类似于自动键控模式) ,每个设置将可修改(并将再次相应地着色)。所有修改的设置值将被放置到采取管理器。
The Render Setting selections and render camera will also be set automatically in this mode.
渲染设置选择和渲染相机也将在这种模式下自动设置。
新文档的当前使用
Calling up this command will create a new document that contains all the properties of the current Take as a Main Take (incl. render settings and cameras). The Main Take will in essence be duplicated and all overridden settings will be assumed by the Main Take. Let’s say that you have a huge amount of Takes in convoluted hierarchies and no longer have an overview of which Takes override which settings, which setting value was inherited from which Take, etc. This command lets you get a fresh start with clearly defined setting values.
调用此命令将创建一个新文档,其中包含当前 Take as a Main Take (包括。渲染设置和摄像机)。主要采取将在本质上被复制和所有重写的设置将被承担的主要采取。假设您有大量复杂的层次结构中的 Takes,并且不再有哪些 Takes 覆盖哪些设置,哪些设置值继承自哪些 Take 等的概述。这个命令可以让您通过明确定义的设置值获得一个全新的开始。
用资产保存所有需要。用资产保存标记的需要
These commands resemble the already known  Save Project with
Assets...
Save Project with
Assets...
这些命令类似于已知的保存项目与资产... ,只有采取将与他们的个人资产保存(需要的纹理和其他链接文件可以改变每个采取!)分别放在不同的目录中。
The Take name will be added to Project file names and directories.
Take name 将被添加到 Project 文件名和目录中。
Takes can be marked by clicking on the light gray icons at the right of the Takes in the Take Tree (see also Marker).
采取可以通过点击采取在采取树(参见标记)的右侧的浅灰色图标标记。
上下文菜单
Right-clicking on the Take Tree will open a context menu that contains the following commands, in addition to those previously described:
右键单击 Take Tree 将打开一个包含以下命令的上下文菜单,此外还包含以前描述的命令:
新生儿服务
Creates a new Take as a Child of the Take selected per right-click.
每次右键单击选定的 Take,创建一个新的 Take as a Child。
删除需要
Deletes the selected Take. The same can be done using the
删除选定的 Take。同样可以使用 Del 或 Backspace 键完成。
复制/粘贴
Selected Takes, including all Child Takes, can be copied and passed as Child Takes of the Main Take. If the Main Take is copied, all Child Takes (all except the Main Take) will be copied.
选择的采取,包括所有子采取,可以复制和通过作为子采取的主要采取。如果复制了主图形,所有的子图形(除了主图形)都会被复制。
查看
显示空文件夹
Depending on the type of overridden element, these will be placed in corresponding folders such as Objects, Tags, Materials, etc. If these folders are empty they will be hidden by default. Selecting this option will display these empty folders.
根据重写元素的类型,这些元素将被放置在相应的文件夹中,如对象、标签、材质等。如果这些文件夹是空的,默认情况下它们将被隐藏。选择此选项将显示这些空文件夹。
树模式
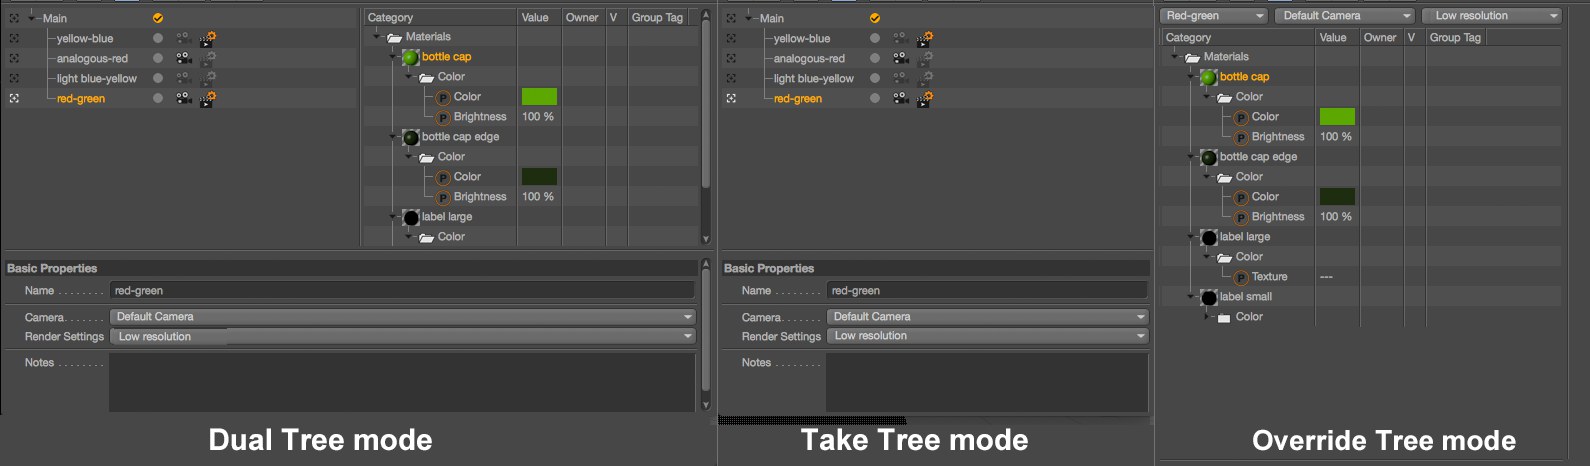
Use these two options to define how the Take Manager should be arranged (Take and Override Tree sections). The properties of Takes or elements can be hidden in the Attributes section, which can itself be hidden and is normally positioned at the bottom but can also be positioned as a third column on the right.
使用这两个选项来定义应该如何安排 Take Manager (Take 和 Override Tree 部分)。的属性或元素可以隐藏在 Attributes 部分,它本身可以隐藏,通常位于底部,但也可以定位为右侧的第三列。
The following options are available:
以下方案可供选择:
双树模式
Take and Override Trees are displayed next to each other. If a Take is selected on the left its Overrides will be shown on the right.
接受和覆盖树彼此并排显示。如果一个 Take 在左边被选中,它的 Overrides 将在右边显示。
采用树模式
This mode only displays the list of Takes with corresponding icons.
此模式只显示带有相应图标的“采集”列表。
覆盖树模式
In this mode, the Override settings are displayed and a selection menu is available at the top with the following options from left to right (exactly what can be selected in Dual Tree Mode):
在这种模式下,会显示 Override 设置,在顶部有一个选择菜单,从左到右有以下选项(在双树模式下完全可以选择) :
链接到其他管理器的选择
If this option is enabled, the corresponding element in the Take Manager will be selected if an element in the Object or Material Manager is selected, and vice-versa. This can help give you a better overview of things.
如果启用此选项,则如果选择了 Object 或 Material Manager 中的某个元素,则将选择 Take Manager 中的相应元素,反之亦然。这可以帮助你对事情有一个更好的概述。
覆盖
This menu’s settings let you omit specific sections from overrides (e.g., transformations, render settings, etc.), which means nothing more than that changes made to settings are no longer restricted to Takes but are global (no corresponding settings will be grayed out). This is useful, for example, if you only want to affect the visibility of objects in different Takes but keep all other settings modifiable and consistent across all Takes.
这个菜单的设置可以让你从重写中省略特定的部分(例如,转换,渲染设置等) ,这意味着对设置的更改不再局限于 Takes,而是全局的(没有相应的设置将变成灰色)。这是有用的,例如,如果你只想影响对象的可见性在不同的需求,但保持所有其他设置可修改和一致的所有需求。
The settings made here apply if Auto Take is enabled or disabled.
如果启用或禁用自动拍摄,此处的设置将应用。
Note that for each of the Customize Commands Manager options described below commands of the same name are available that can be quickly enabled or disabled via keyboard shortcut.
请注意,对于下面描述的每个同名的自定义命令管理器选项,都可以通过快捷键快速启用或禁用。
锁重载
This option is usually enabled and should only be disabled temporarily (a hotkey can be set up for this). Disable this option for the following purposes: If you want to modify a setting, i.e., a global parameter change, in the Base Take when editing an active Take to avoid having to activate the Base Take.
这个选项通常是启用的,应该只是暂时禁用(一个热键可以为此设置)。为了以下目的禁用此选项: 如果你想修改一个设置,例如,一个全局参数变化,在基础采取时,编辑一个活动的采取,以避免激活基础采取。
This is how it’s done:
这就是如何做到的:
There is one small exception: Assuming Take #2 is a Child object of Take #1 and setting X in Take #1 is overwritten. If the previuosly described process is applied to Take #2, Take #1 (and not the Base Take) will be affected by the change made to setting X.
有一个小的例外: 假设 Take # 2是 Take # 1的子对象,并且在 Take # 1中设置 x 被覆盖。如果前面描述的过程应用于 Take # 2,Take # 1(而不是 Base Take)将受到设置 x 的更改的影响。
全无
Use these settings to make all or none of the elements/sections available for the Override functionality.
使用这些设置可以使 Override 功能的所有元素/节都可用,或者不可用。
材质着色层
Select these items to enable or disable the respective element for the Override functionality. The Others option includes such items as XPresso nodes or special plugin elements.
选择这些项以启用或禁用 Override 功能的相应元素。其他选项包括 XPresso 节点或特殊插件元素等项目。
启用状态/可见性
This command affects Generator activation (the green check mark in the Object Manager) and the Visible in Editor[Visible in Renderer options (the dots in the Object Manager). These can be enabled or disabled for the Override functionality.
此命令影响 Generator 激活(对象管理器中的绿色复选标记)和 Visible in Editor [在渲染器选项中可见(对象管理器中的点)。可以为 Override 功能启用或禁用这些功能。
转变
The term ‘transformations’ refers to all settings in the Object tab’s Coordinates fields. This option enables/disables these for the Override functionality.
术语“转换”指的是 Object 选项卡的 Coordinates 字段中的所有设置。此选项为 Override 功能启用/禁用这些选项。
参数
These include all element settings with the exception of Transformations (Object tab’s Coordinates fields). This option enables/disables these for the Override functionality.
除了转换(Object 选项卡的 Coordinates 字段)之外,其中包括所有元素设置。此选项为 Override 功能启用/禁用这些选项。
摄像机/设置
Use these settings to define whether or not separate render cameras or render settings should be defined for the Takes. If disabled, only the Main Take’s render cameras and render settings will be used. Takes can be marked by clicking on the light gray icons at the right of the Takes in the Take Tree (see also Markierung).
使用这些设置来定义是否应该为拍摄定义单独的渲染相机或渲染设置。如果禁用,将只使用主要采取的渲染相机和渲染设置。采取可以通过点击采取在采取树的右侧的浅灰色图标标记(也见 Markierung)。
渲染
The following options are available in the main Cinema 4D menu under Render/Takes.
下面的选项可在渲染/需要下的主C4D 菜单中找到。
渲染所有需要到 PVRender 标记需要到 PV
Use these commands to render all or marked Takes in succession to the Picture Viewer (PV). Note the variable file and path names that can be assigned different names based on the Takes.
使用这些命令连续呈现所有或标记的接受图片查看器(PV)。注意可以根据 Takes 分配不同名称的变量文件和路径名。
团队渲染所有需要到 PVTeam 渲染标记需要到 PV
Use these commands to render all or marked Takes in succession to the Picture Viewer (PV) using Team Render. Note the variable file and path names that can be assigned different names based on the Takes.
使用这些命令连续使用 Team Render 将所有或标记的 Takes 呈现到图片查看器(PV)。注意,变量文件和路径名可以根据 Takes 分配不同的名称。
用户资料
A Take can be assigned any number of User Data, which can then output values and settings in combination with third-party plugins (e.g., render farm plugins) for the Take.
一个 Take 可以被分配任意数量的用户数据,然后它可以输出值和设置结合第三方插件(例如,渲染农场插件)的 Take。
Note that User Data can be saved together with Take presets, which makes it easier to create new Takes in the future.
请注意,用户数据可以与 Take 预设一起保存,这使得将来创建新的 Take 更加容易。
Creating and managing User Data is principally nothing new and works as described in the Attribute Manager section.
创建和管理用户数据基本上不是什么新鲜事,而是属性管理器部分中描述的工作。
场次


