 Axis
Center...
Axis
Center... Camera
Object 相机对象Basic 基础Coord.Object 对象Physical 身体上的Details 详情Stereoscopic 立体感Composition 构图Spherical 球形的
Camera
Object 相机对象Basic 基础Coord.Object 对象Physical 身体上的Details 详情Stereoscopic 立体感Composition 构图Spherical 球形的
Object Properties
对象属性
投影
By default, objects are shown from the viewpoint of a central perspective projection. Alternatively, choose other types of projection.
默认情况下,对象是从中心透视投影的视点显示的。或者,选择其他类型的投影。
 From left to right: Perspective, Gentleman,
Diametric, Isometric. 从左到右: 透视,绅士,径,等距
From left to right: Perspective, Gentleman,
Diametric, Isometric. 从左到右: 透视,绅士,径,等距
焦距[1.10000]
 Increasing focal length and decreasing field of
view from left to right. 从左到右增加焦距和减小视野
Increasing focal length and decreasing field of
view from left to right. 从左到右增加焦距和减小视野
In a real camera, the focal length represents the distance between the lens and the film. Small focal length values are used for wide-angle shots and present a wider view of the scene, but also distort the image (especially very short focal lengths). Larger focal length values zoom into the given scene accordingly. The greater the value, the less distorted the image will be until the perspective effect is lost completely with extremely large focal length values and the parallel projection effect increases.
在真正的相机中,焦距代表镜头和胶体积之间的距离。小焦距值用于广角拍摄,提供了一个更宽的场景视角,但也扭曲了图像(特别是非常短的焦距)。较大的焦距值相应地放大到给定的场景。值越大,图像失真越小,直到透视效果完全丧失,焦距值极大,平行投影效果增加。
The Focal Length is directly linked to the "field of view" in the formula illustrated below.
焦距直接与下面公式中的“视场”相连。

Larger Focal Length values produce a smaller field of view and vice versa.
较大的焦距值产生较小的视野,反之亦然。
Here you can select from several pre-defined focal lengths or you can define your own.
在这里你可以选择从几个预先定义的焦距或你可以定义自己的。
The following applies for depth of field (Physical Renderer): The larger the focal length value, the smaller the depth of field (the region in the direction of view that will be in focus) and vice versa. See also Depth Of Field.
下面的应用于景深(物理渲染器) : 焦距值越大,景深(焦点方向的区域)越小,反之亦然。参见景深。
Sensor Size (Film Gate)[1..2000]
35mm Equiv. Focal Length:
感光元件尺寸(胶片栅)[1. . 2000]35毫米等量焦距:
In a real camera, this value defines the film or sensor width in the camera onto which the light falls. For common cameras, this is usually 35mm (technically speaking, actually 36mm). In reality, this value is mostly constant and cannot be modified - unless you buy a new camera.
在真正的相机中,这个值定义了光线照射到的相机中的胶片或传感器的宽度。对于普通相机,这通常是35毫米(技术上讲,实际上是36毫米)。实际上,这个值几乎是恒定的,不能被修改——除非你买一个新的相机。
In combination with the focal length, the Field of View (Horizontal) value is determined.
结合焦距,确定视场(水平)值。
You can select from numerous sensor sizes or define your own by selecting Custom. If you modify the Sensor Size (Film Gate) value without modifying the Focal Length, the field of view will still change. Any depth of field, however, will remain unchanged.
您可以选择从许多传感器大小或定义自己的选择自定义。如果你修改了感光元件的尺寸(胶片栅极)值而没有修改焦距,视场仍然会改变。然而,任何景深都将保持不变。
The 35mm Equiv. Focal Length value is displayed since analog 35mm film is still very widespread in the world of photography despite the proliferation of digital sensors in varying sizes. Fans of traditional photography can use this as a reference for the image detail or the enlargement of the 3D scene or digital camera.
35mm Equiv.焦距值显示,因为模拟35毫米胶片仍然是非常广泛的摄影世界,尽管扩散的数字传感器在不同的大小。传统摄影爱好者可以利用这一点作为图像细节或3D 场景或数码相机放大的参考。

The sensor size has to be adjusted if the aspect ratio you want to render should be modified while maintaining the same perspective.
传感器的大小必须调整,如果你想渲染的长宽比应该修改,同时保持相同的透视。
Use the following formula to calculte the sendor size:
使用以下公式计算发送器大小:
New sensor size = old sensor size * (nwe Width / old Width)
新传感器尺寸 = 旧传感器尺寸 * (nwe 宽度/旧宽度)
Example: You have a scene in which the render format is set to 800 x 600 with a sensor size of 36 mm. You want to output the scene with an aspect ratio of 16:9 while maintaining the same perspective. First, you have to ascertain the new image width: switch to the Render Settings and set Film Aspect to HDTV (16:9). The Height value will be modified accordingly, which is what you don’t want. Enable the Lock Ratio option and set the Height value back to 600. The following Width value will result: 1066.667.
例如: 你有一个场景,渲染格式设置为800 x 600,传感器尺寸为36毫米。您希望在保持相同透视图的情况下输出长宽比为16:9的场景。首先,你必须确定新的图像宽度: 切换到渲染设置,并将电影方面设置为高清晰度电视(16:9)。将相应地修改 Height 值,这是您不希望看到的。启用锁定比率选项并将高度值设置回600。结果如下: 1066.667。
Use this value in the formula above. The sensor size will be 36 mm = * (1066.667/800) = 48mm.
在上面的公式中使用这个值。传感器的大小为36 mm = * (1066.667/800) = 48 mm。
Field of View (Horizontal)[0.2..174°]
Field of View (Vertical)[0.2..174°]
视野(水平)[0.2.174 ° ]视野(垂直)[0.2.174 ° ]
 Camera from top: large and small (horizontal) field
of view. 相机从顶部: 大和小(水平)视野
Camera from top: large and small (horizontal) field
of view. 相机从顶部: 大和小(水平)视野
The field of view represents the camera’s horizontal and vertical angle, respectively, to the scene. The field of view is directly linked to the focal length. The greater the focal length, the smaller the field of view and vice versa. A small field of view represents a camera with a telephoto lens; since only a small portion of the scene to be photographed enters the camera, this portion naturally appears very large on the light-sensitive surface of the camera, resulting in a zoomed-in image.
视场分别代表相机与场景的水平和垂直角度。视野直接与焦距相连。焦距越大,视野就越小,反之亦然。小视场代表带长焦镜头的照相机; 由于要拍摄的场景只有一小部分进入照相机,这一部分在照相机的感光表面上自然显得非常大,从而形成放大图像。
Incidentally, Field of View (Vertical) changes if the proportion between Width and Height are modified in the Render Settings.
顺便说一句,如果在渲染设置中修改了宽度和高度的比例,视野(垂直)就会发生变化。
Zoom [0. . 10000000]
The Zoom value can only be defined if a parallel perspective (this includes orthographic views) is used. This setting then defines the scaling of the view.
只有在使用平行透视(包括正投影视图)时才能定义缩放值。这个设置然后定义视图的缩放。
An important number here is 1024 because if a Zoom value of 1 will cover 1024 Cinema 4D units. This is always important when outputting precise pixel renders. Example: You have a sphere with a diameter of 12 cm and you want it to have a diameter of 120 pixels for rendering. Use the following formula to define the zoom:
这里一个重要的数字是1024,因为如果缩放值为1,将覆盖1024个Cinema 4D 单位。这在输出精确的像素渲染时总是很重要的。例如: 你有一个直径为12厘米的球体,你希望它有一个直径为120像素的渲染。使用以下公式定义缩放:
Zoom = 1/(Width)*1024, which is defined in the Output tab in the Render Settings.
Zoom = 1/(Width) * 1024,在 Render Settings 的 Output 选项卡中定义。
Precise pixel render outputs are, for example, needed if a rendering has to be adapted to fit existing footage (e.g., animated masks, satellite photos, etc.).
例如,如果渲染必须适应现有镜头(例如,动画蒙版、卫星照片等) ,则需要精确的像素渲染输出。
Film Offset X[-∞..+∞%]
Film Offset Y[-∞..+∞%]
胶片偏移 x [-∞ . . + ∞% ]胶片偏移 y [-∞ . . + ∞% ]

Suppose the Cinema 4D camera worked like a traditional film camera, with images being recorded onto photographic film one after the other. Now imagine if additional image information could be recorded by moving this film along the X and Y axis (beyond the strip of film in the example). This is exactly what these parameters do. Cinema 4D takes this one step further in that it does not restrict itself to the size of the filmstrip.
假设 Cinema 4D 摄像机像传统的胶片摄像机一样工作,将图像一个接一个地记录到胶片上。现在想象一下,如果可以通过沿 x 轴和 y 轴移动胶片来记录额外的图像信息(在例子中的胶片条之外)。这正是这些参数的作用。C4D更进一步,它不局限于幻灯片的大小。
So what use is all this?
那么,这一切有什么用呢?
A special trick makes it possible to render images to any given size. This is how it works: Animate Film Offset X and Film Offset Y in steps of 100% for each image. Split the scene into separate parts that will be rendered sequentially. Choose an image format as your output format (don’t choose video).
一个特殊的技巧使得渲染图像到任何给定大小成为可能。这就是它的工作原理: 动画电影胶片偏移 x 和胶片偏移 y 的步骤100% 为每个图像。将场景分割成单独的部分,并按顺序渲染。选择一种图像格式作为输出格式(不要选择视频)。
Once you are done rendering, you will have several images (none of which may exceed a resolution of 16,000 x 16,000 or 128000 x 128000 pixels) that you can then piece together in an image editor.
一旦你完成渲染,你将会得到一些图片(其中没有一个可能超过16,000 x 16,000或128000 x 128000像素的分辨率) ,然后你可以在一个图片编辑器中拼凑起来。
例子:
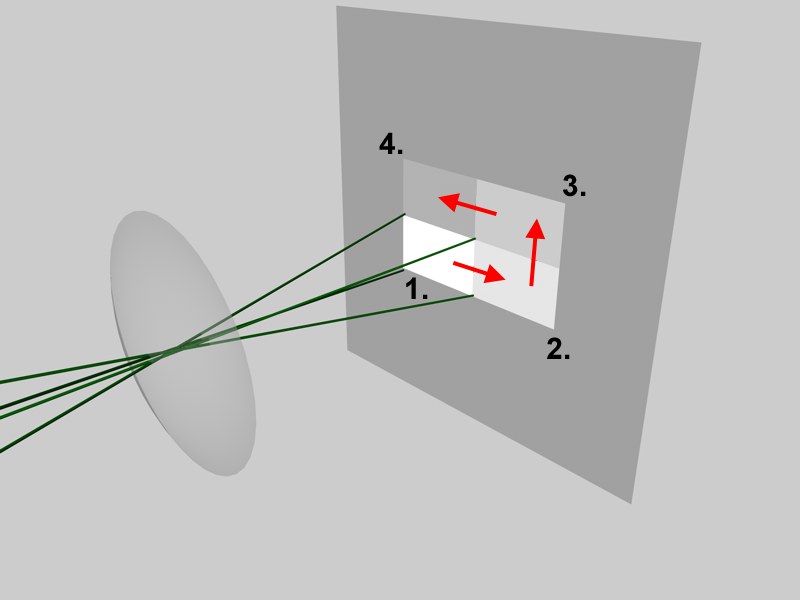
For the example, the scene was been split into four pictures. The camera’s Film Offset X and Film Offset Y were animated over four frames as follows.
例如,场景被分成四张图片。相机的胶片偏移 x 和胶片偏移 y 是动画的四帧如下。
The result is four separate images that you can piece together in an image editor.
其结果是四个独立的图像,你可以在一个图像编辑器拼凑在一起。
对焦距离[0. . + ∞ m ]
Note: This and the following 3 parameters are primarily designed for use with the Physical Renderer.
注意: 这个和以下3个参数主要是为物理渲染器设计的。
 The 这个Focus Distance 对焦距离
defines the blur plane. 定义了侠影的飞机
The 这个Focus Distance 对焦距离
defines the blur plane. 定义了侠影的飞机
The Focus Distance, measured from the camera’s origin out (=film or sensor plane), defines the distance to a plane that lies perpendicular to the angle of view, on which all objects are displayed perfectly in focus. In front of and behind this plane, all objects are rendered progressively blurred. This value can be defined interactively with the mouse in the Viewport by clicking and dragging on the camera’s center front handle.
焦距是从相机的原点(胶片或传感器平面)测量出来的,它定义了到垂直于视角的平面的距离,在这个平面上所有的物体都能得到完美的焦距。在这个平面的前面和后面,所有的物体都逐渐变得模糊。这个值可以通过单击和拖动相机的中心前手柄与 Viewport 中的鼠标交互式地定义。
A second function of this parameter is to define the position at which a depth map should be calculated (see Start).
这个参数的第二个功能是定义应该计算深度图的位置(参见开始)。
Tip: 提示:The arrow at the right of the setting can be used to interactively set the focal length in the Viewport (this only works in the Perspective or Parallel views) to a specific object. The camera will not be rotated. The distance to an imaginary plane lying vertically to the camera’s angle of view on which the selected object vertex lies will be used.
设置右边的箭头可以用来交互地设置视口中的焦距(这只适用于透视或平行视图)到一个特定的对象。照相机不会旋转。到一个假想平面的距离垂直位于相机的视角,选定的对象顶点位于上将被使用。
使用目标对象
If the camera has been assigned a Target tag, the target object will automatically be used by Focus Distance for calculation.
如果相机已经被分配了一个目标标记,目标对象将自动被聚焦距离用于计算。
聚焦对象
The Focus Distance can also be defined using any object. Null Objects are well-suited for this purpose. However, the camera will not rotate in the direction of this object. Only the distance in the camera’s direction of view will be applied.
焦距也可以使用任何对象来定义。空对象非常适合用于此目的。然而,相机不会旋转的方向,这个对象。只有在相机的视角方向的距离将被应用。
With imported scenes in particular, in which the object origins (axes) are centered globally, that the focus
distance is always calculated up to the axis. In this case you have to move the axis to the correct position
(the Axis
Center...
特别是对于导入的场景,物体起点(轴)是全局中心的,焦距总是计算到轴。在这种情况下,您必须将轴移动到正确的位置(Axis Center... 命令一个 help)。
White Balance (K)[1000..10000]
白平衡(k)[1000. . 10000]
 An outdoor scene (with sky) with 5500K, 6500K and
7500K 5500K、6500K 及7500K 户外(有天空)场景White Balance 白平衡, respectively. ,分别
An outdoor scene (with sky) with 5500K, 6500K and
7500K 5500K、6500K 及7500K 户外(有天空)场景White Balance 白平衡, respectively. ,分别
White balance is used to prevent light sources (e.g., sky, sun, candles, etc.) from colorizing white surfaces. Set the White Balance value to that of the light source’s color (Tungsten refers to the filament coil in a light bulb). If the presets do not quite match your needs you can select the Custom option and define a custom temperature via the Custom Temperature (K) value. Color hues can be defined without having to change the color of the light itself.
白平衡用于防止光源(如天空、太阳、蜡烛等)使白色表面着色。将白平衡值设置为光源的颜色(钨指灯泡中的灯丝线圈)。如果预设不完全符合您的需要,您可以选择自定义选项,并定义一个自定义温度通过自定义温度(k)值。可以不改变光本身的颜色来定义颜色色调。
As you can see in the image above, 5500K produces a slight blue hue and 7500K a slight yellow hue. The value 6500K (which is representative of daylight conditions), produces a grayed, cement-like hue (cement textures were applied to the objects in the image).
正如你在上面的图片中看到的,5500K 产生一种轻微的蓝色色调,7500K 产生一种轻微的黄色色调。值6500K (代表日光条件) ,产生灰色的水泥色调(水泥纹理应用于图像中的对象)。
Color temperature is measured in Kelvin (the colors shown below represent the range emitted by an idealized luminous body):
颜色温度以开尔文为单位测量(下面所示的颜色代表理想发光体发出的范围) :

Of course white balance can be used to colorize renderings. The neutral value is Daylight (6500K). Generally speaking, lower values result in hues of blue and higher values in hues of yellow (directly opposite to the depiction above; the white balance, after all, is a corrective value).
当然,白平衡可以用来着色渲染。中性值是日光(6500K)。一般来说,较低的值导致蓝色色调,较高的值导致黄色色调(与上述描述正好相反; 毕竟,白色平衡是一个校正值)。
Tip: 提示:只影响灯光
Sometimes it is easier to apply white balance to lights instead of cameras. Enable this option to do so.
有时候用白平衡代替照相机更容易。启用这个选项。
White balance will only work for light sources whose color is controlled via the Color Temperature (not the color chooser’s K setting).
白平衡只适用于颜色由色温控制的光源(不适用于色选者的 k 设置)。

Note that this White Balance is a simplified method (does not take all elements into account (e.g., glowing materials)) of white balance. The camera white balance takes into account all elements within its field of view.
注意,这种白平衡是白平衡的一种简化方法(没有考虑所有元素(例如,发光材质))。相机的白平衡考虑到其视野范围内的所有因素。
Tip: 提示:导出到合成
If enabled, the camera will be exported to the respective compositing application (see also here).
如果启用,相机将被导出到各自的合成应用程序(也见这里)。