Output
输出
All Output settings only affect rendering in separate editor windows. Since only single images or a part of an image can be rendered in the Viewport, these settings do not affect this rendering.
所有“输出”设置只影响单独的编辑器窗口中的呈现。由于只有单个图像或者图像的一部分可以在 Viewport 渲染,这些设置不会影响这种渲染。
预置
Clicking this button reveals all commonly used preset resolutions ranging from monitor resolution to print, video and film.
点击这个按钮可以显示所有常用的预置分辨率,从显示器分辨率到打印,视频和电影。
These presets automatically define the correct values for resolution, aspect ratio and frame rate. All you have to do is adjust the five parameters at the bottom of the page, which pertain mainly to overall output length, to fit your needs.
这些预设会自动定义正确的分辨率、宽高比和帧速率值。您所要做的就是调整页面底部的五个参数,它们主要与总输出长度相关,以满足您的需要。
Note the Screen / Editor Resolution option that will render to the exact resolution of your Viewport. If the Viewport size is changed this preset must be re-opened and defined again.
注意屏幕/编辑器分辨率选项将呈现为您的 Viewport 的精确分辨率。如果 Viewport 大小改变,则必须重新打开并重新定义此预设。
Width[0..128000]
Height[0..128000]
宽度[0. . 128000]高度[0. . 128000]
Defines the image’s output height and width. Selecting a preset resolution will automatically generate the correct Width and Height values for that preset. The drop-down menu to the right of the Width value lets you switch to other units of measure, if desired. Whatever you define, though, Cinema 4D will create a bitmap or video with a corresponding number of pixels (displayed below in the Resolution setting) for the resolution defined. For all units of measure other than Pixel, values will be calculated using the Resolution setting.
定义图像的输出高度和宽度。选择预设分辨率将自动为该预设值生成正确的 Width 和 Height 值。如果需要,宽度值右边的下拉菜单可以让您切换到其他度量单位。不管你怎么定义,Cinema 4D 都会为定义的分辨率创建一个带有相应数量像素的位图或视频(在下面的分辨率设置中显示)。对于像素以外的所有测量单位,将使用分辨率设置计算值。
The question you should ask to determine which resolution you should use is: "For which purpose will the image/video be used?"
要确定应该使用哪种分辨率,您应该问的问题是: “图像/视频将用于何种目的? ”
Once this has been determined you can select the correct preset from the Preset menu. Lower resolutions should be used for test renderings to speed up workflow.
一旦确定,您可以从预置菜单中选择正确的预置。测试渲染应该使用较低的分辨率来加速工作流。
Tip: 提示:
锁定比率
When enabled, width or height will be adjusted accordingly if on or the other is modified. The Film Aspect setting is taken into account during adjustment.
如果启用,宽度或高度将相应地调整,如果在或其他被修改。电影方面的设置是考虑到在调整。
调整数据传输速率
If you want to save a video you can define a data rate (e.g., 2,000) for the video compression in the Save menu. If this option is enabled and the output pixel size is, for example, doubled in the Width setting, the data rate will also be doubled. The number of pixels will equalize proportionally.
如果你想保存一个视频,你可以在保存菜单中定义一个数据传输速率(例如,2,000)给视频压缩。如果启用此选项,并且输出像素大小在宽度设置中是原来的两倍,那么数据速率也将是原来的两倍。像素的数量将按比例均衡。
决议[1.100000]
Enter a DPI value that will be taken into account for printed images (does not apply to video!). The Resolution value defines the size at which an image will be printed. Since most images that are generated by Cinema 4D are subsequently modified using either an image editing or layout software, these setting will generally not have to be modified by you.
输入一个 DPI 值,该值将用于打印图像(不适用于视频!).分辨率值定义了打印图像的大小。由于大多数由 Cinema 4D 生成的图像随后会使用图像编辑或布局软件进行修改,这些设置一般不需要您进行修改。
例子:
If an imaged rendered at a resolution of 700x1000 pixels and saved at 72 DPI it will have an overall size of 24.7 x 35.3 centimeters. If the same image is saved at 300 DPI its overall size will be 5.9 x 8.5 centimeters.
如果以700x1000像素的分辨率渲染成像,并以72 DPI 的分辨率保存,那么它的整体大小将为24.7 x35.3厘米。如果同样的图像保存在300 DPI,它的总体大小将是5.9 x 8.5厘米。
图片分辨率:
Displays the actual Cinema 4D resolution at which the file will be rendered.
显示实际的C4D 分辨率的文件将被渲染。
渲染区域
 Render Region disabled at left, enabled at
right. 渲染区域在左边禁用,在右边启用
Render Region disabled at left, enabled at
right. 渲染区域在左边禁用,在右边启用
Surely you are familiar with this problem: You just rendered a complex scene and now a modification must be made that effects only a small region of the entire image. Normally you would have to render the entire scene again once the modification has been made.
你肯定熟悉这个问题: 你刚刚渲染了一个复杂的场景,现在必须进行修改,效果只有整个图像的一小部分。正常情况下,一旦修改完成,你需要再次渲染整个场景。
The Render Region function keeps you from having to render the entire scene just because a minor modification was made somewhere in the scene. Only a selected region of the scene will be rendered - the remaining image will appear black - thus speeding up your workflow enormously. The rendered region can then be copied into the previously rendered image.
渲染区域功能使你不必仅仅因为场景中的某个地方做了一个小的修改就必须渲染整个场景。只有一个选定的区域的场景将渲染-剩下的图像将出现黑色-从而加速您的工作流程极大。然后可以将渲染的区域复制到先前渲染的图像中。
Left Border[0..128000]
Top Border[0..128000]
Right Border[0..128000]
Bottom Border[0..128000]
左边界[0. . 128000]上边界[0. . 128000]右边界[0. . 128000]下边界[0. . 128000]
Use these values to define the borders (in pixels) of the region you wish to render. Note that no border will be created if an invalid entry (e.g., larger than the entire image itself) is made.
使用这些值定义要呈现的区域的边界(以像素为单位)。请注意,如果一个无效的条目(例如,比整个图像本身大)被创建,则不会创建边框。
内部回报率的副本
Instead of defining the borders intuitively using the above settings, the Interactive Render Region can be created in the Viewport and the Copy From IRR option used to copy the border dimensions into the value fields described above.
与使用上述设置直观地定义边界不同,可以在 Viewport 和 Copy From IRR 选项中创建交互式渲染区域,该选项用于将边界尺寸复制到上述值字段中。
电影方面[0.001. . 1000]
Reflects the X-to-Y aspect ratio of the file to be rendered. Select the Custom option to manually enter custom values. This drop-down menu also contains numerous preset options.
反映要呈现的文件的 X-to-Y 纵横比。选择 Custom 选项手动输入自定义值。这个下拉菜单还包含许多预设选项。
The Height and Film Aspect values are linked directly. If the aspect ration is modified the Height value will change accordingly.
高度和电影方面的价值观是直接链接。如果切面比例被修改,高度值也会相应地改变。
例子:
You define a width of 320 and a height of 240 pixels, which represents an aspect ratio of 4:3 (i.e. 1.333:1). This can be automatically defined by selecting the Film Aspect option Standard (4:3). Now to the HDTV 16:9Film Aspect option. Cinema 4D will automatically change the image resolution to 320 x 180 pixels.
定义宽度为320,高度为240像素,表示宽高比为4:3(即1.333:1)。这可以通过选择 Film Aspect 选项 Standard (4:3)来自动定义。现在进入高清电视16:9电影方面的选项。C4D将自动将图像分辨率改为320x180像素。
The same image resolution will also be set in the Viewport. At the top and bottom or left and right of the Viewport you will now see gray borders. These are the Render Safe borders. What lies within these borders will appear in the rendered file.
同样的图像分辨率也将在视窗中设置。在视口的顶部和底部或左右,你现在会看到灰色的边框。这些是渲染安全边界。位于这些边框内的内容将显示在呈现的文件中。
像素外观[0.001. . 1000]
The Pixel Aspect is important for many output devices. It defines the ratio of a pixel’s on-screen width to its on-screen height. The pixel ratio for most monitors is 1:1 (Square).
像素方面是重要的许多输出设备。它定义了屏幕上像素宽度与屏幕高度的比率。大多数显示器的像素比为1:1(正方形)。
The pixel ratio will be written in the common output formats.
像素比将以常用的输出格式写入。
However, some display media use a pixel ratio other than 1:1 and the setting must be adjusted to avoid distortions such as circles appearing as ellipses.
但是,有些显示媒体使用1:1以外的像素比例,必须调整设置以避免圆形出现椭圆等扭曲现象。
If you need to calculate the pixel ratio manually, expand the side viewport to fit the entire screen and create a cube. Using a ruler, measure the cube’s width and height and enter these values in the two input boxes for Pixel.
如果你需要手动计算像素比率,扩展侧视窗以适应整个屏幕并创建一个立方体。使用标尺,测量多维数据集的宽度和高度,并在 Pixel 的两个输入框中输入这些值。
帧速率[1. . 2500]
Sets the frame rate (see configuring Cinema 4D)for the render. This is independent of the frame rate defined in the project settings. The number of frames that will be rendered is shown to the right of the text box.
设置渲染的帧速率(参见配置 Cinema 4D)。这与项目设置中定义的帧速率无关。将呈现的帧数显示在文本框的右侧。
帧范围
手册
If you want to render a frame sequence, but not the entire animation, enter the first frame for the sequence in the left input box and the last frame in the right input box. The Frame drop-down list will change to Manual automatically. If you want to save the animation, enter a save path on the Save page.
如果您想呈现一个帧序列,但不想呈现整个动画,请在左侧输入框中输入序列的第一帧,在右侧输入框中输入最后一帧。框架下拉列表将自动更改为手动。如果要保存动画,请在“保存”页中输入保存路径。
If you stop the rendering of a movie, all frames will be lost. You cannot resume. Alternatively, render short sequences and assemble the clips in a suitable video editor. 如果你停止渲染一部电影,所有的帧都会丢失。你不能重新开始。另外,渲染短序列和组装剪辑在一个合适的视频编辑器当前框架
Only the current frame will be rendered. If you want the frame to be saved automatically after rendering, enter a save path on the Save page.
只呈现当前帧。如果要在呈现后自动保存框架,请在“保存”页上输入保存路径。
所有框架
All the frames will be rendered, either as a picture sequence or as a video. If you want the animation to be saved automatically after rendering, enter a save path on the Save page.
所有的帧都会被渲染,可以是图片序列,也可以是视频。如果要在呈现后自动保存动画,请在“保存”页上输入保存路径。
If you stop the rendering of a movie, all frames will be lost. You cannot resume. Alternatively, render short sequences and assemble the clips in a suitable video editor. 如果你停止渲染一部电影,所有的帧都会丢失。你不能重新开始。另外,渲染短序列和组装剪辑在一个合适的视频编辑器预览范围
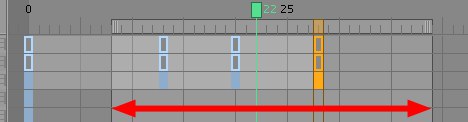 Arrow points out preview range 箭头指出预览范围
Only the preview range (the area in the Timeline between the green markers) will be rendered. The frames are rendered either as a picture sequence or as a movie. If you want the animation to be saved automatically after rendering, enter a save path on the Save page.
只会呈现预览范围(时间轴中绿色标记之间的区域)。这些帧被渲染为图片序列或者电影。如果要在呈现后自动保存动画,请在“保存”页上输入保存路径。
If you stop the rendering of a movie, all frames will be lost. You cannot resume. Alternatively, render short sequences and assemble the clips in a suitable video editor. 如果你停止渲染一部电影,所有的帧都会丢失。你不能重新开始。另外,渲染短序列和组装剪辑在一个合适的视频编辑器弗罗姆托
If you set this option to Custom you can manually enter the frame range that should be rendered.
如果将此选项设置为“自定义” ,则可以手动输入应呈现的帧范围。
帧步骤[1. . 1000000]
Use this setting to define if every animation frame should be output or every second, third, fourth, etc. frame should be output. Let’s say you have an animation consisting of 1500 frames and want to make a test render. If Frame Step is set to 10 for the test render, only every tenth frame will be rendered, offering a rough impression of what the final animation will look like.
使用此设置来定义是否每个动画帧都应该输出,或者每秒、第三、第四等帧应该输出。假设您有一个由1500帧组成的动画,并且希望进行测试渲染。如果在测试渲染时,Frame Step 被设置为10,那么只有十分之一的帧会被渲染,给出最终动画效果的粗略印象。
田野
Use field rendering for smoother playback when working with video. Consecutive fields are separated from each other by half the frame time. The renderer creates interlaced output frames, where each frame contains two fields. In each output frame, the second field is rendered half the frame time after the first field. The two fields are interlaced, with one field containing the odd lines (the odd field) and the next field containing the even lines (the even field).
使用字段渲染可以在处理视频时更流畅地播放视频。连续字段之间相隔的时间是帧时间的一半。渲染器创建交错的输出帧,其中每帧包含两个字段。在每个输出帧中,第二个字段在第一个字段之后呈现为帧时间的一半。这两个场是交错的,一个场包含奇数行(奇数场) ,另一个场包含偶数行(偶数场)。
PAL video (used in e.g., Europe) runs at 25 frames per second, which equals 50 fields per second. NTSC video (used in e.g., USA) runs at 30 frames per second, which equals 60 fields per second.
PAL 视频(在欧洲使用)每秒25帧率,相当于每秒50个字段。NTSC 视频(在美国使用)以30帧率/秒的速度运行,相当于每秒60个字段。
Do not use field rendering for stills — it is intended for video output only. 不要对照片使用字段渲染ー它只用于视频输出When field rendering, use a non-lossy compressor or no compression at all. Lossy compressors (e.g., JPEG, M-JPEG) blur the fields and are not suitable for field rendering. Poor results are likely with such compressors.
当场渲染时,使用无损压缩器或根本不进行压缩。损耗压缩器(如 JPEG、 m-JPEG)模糊了字段,不适合现场渲染。这样的压缩器可能会导致较差的结果。
Avoid using field rendering with the depth of field effect; otherwise, the image quality will be badly affected.
避免使用带景深效果的场渲染,否则会严重影响图像质量。
没有
Only complete frames are rendered. Use this setting if you are rendering stills or movies that will not be viewed on a video system.
只呈现完整的帧。如果正在渲染图片或不能在视频系统上观看的电影,请使用此设置。
即使是第一名
An animation image’s even fields will be mixed with the even fields of another image.
一个动画图像的偶数域将与另一个图像的偶数域混合。
奇数第一
An animation image’s odd fields will be mixed with the odd fields of another image.
一个动画图像的奇数字段将与另一个图像的奇数字段混合。
Tip: 提示:框架:
Displays the number of images that have been effectively rendered.
显示已有效渲染的图像数量。