 Camera
Object 相机对象Basic 基础Coord.Object 对象Physical 身体上的Details 详情Stereoscopic 立体感Composition 构图Spherical 球形的
Camera
Object 相机对象Basic 基础Coord.Object 对象Physical 身体上的Details 详情Stereoscopic 立体感Composition 构图Spherical 球形的
Physical Renderer
物理渲染器
Here you will find the settings for the Physical Camera (see also How does a real camera work?). Most of the following parameters will only be made available if the Physical Renderer is selected in the Edit Render Settings menu.
在这里你可以找到物理相机的设置(参见真正的相机是如何工作的?).下面的大多数参数只有在物理渲染器在编辑渲染设置菜单中被选中时才能使用。
Also note that several parameters will be grayed out depending on the type of projection selected (e.g., Lens Distortion, which does not work in conjunction with orthographic projection).
还要注意的是,几个参数将根据所选择的投影类型而变成灰色(例如,镜头失真,它不能与正投影图一起使用)。
电影摄影机
Enabling this option will make several additional camera settings (Shutter Angle, etc.) available with which the motion blur of a rotating shutter can be simulated.
启用此选项将使一些额外的相机设置(快门角度等)可用于模拟旋转快门的运动模糊。
F-Stop (f/#)[0.01. . 256]
 Various focal aperture (F-Stop)
settings. 各种焦距光圈(F-Stop)设置
Various focal aperture (F-Stop)
settings. 各种焦距光圈(F-Stop)设置
The F-Stop value is used to adjust the focal aperture. The larger the focal aperture (i.e. the smaller the F-Stop value), the smaller the depth of field will be and vice-versa. F-Stop is the most important setting for adjusting the depth of field. Small values result in correspondingly small depth of field. If Exposure is enabled, F-Stop will also define the amount of light that can enter the camera.
F 光圈值用于调整焦距光圈。光圈越大(即 f 光圈值越小) ,景深就越小,反之亦然。光圈停止是调整景深最重要的设置。较小的值相应地导致较小的景深。如果启用曝光,F-Stop 还将定义可以进入相机的光量。
Exposure
ISO[10..10000]
Gain (dB)[-100..100]
[10. . 10000]增益(dB)[-100. . 100]
If enabled, the camera will simulate the exposure process, i.e., the rendered image will vary in its brightness in correspondence with the ISO, Gain (movie camera), F-Stop and Shutter Speed settings.
如果启用,相机将模拟曝光过程,也就是说,渲染图像的亮度将随着 ISO、增益(电影相机)、 F-Stop 和快门速度的设置而变化。
In a real camera, the amount of light to which the film is exposed determines how bright the film will be. The more light to which the film is exposed (the aperture is farther open or the shutter speed is slower), the brighter the film will turn out and vice-versa.
在真正的相机中,胶体积曝光的光量决定了胶体积的亮度。胶体积曝光的光线越多(孔径越大或者快门速度越慢) ,胶体积就会越亮,反之亦然。
 Various ISO values and their effect. 各种 ISO 值及其影响
ISO is used to define the film’s sensitivity to light. Higher ISO values make the film more sensitive and thus the images brighter. The increased color noise that occurs in reality has been removed in Cinema 4D.
ISO 是用来定义胶片对光的敏感度的。更高的 ISO 值使胶体积更加敏感,因此图像更加明亮。现实中增加的色彩噪音已经在Cinema 4d 中被去除了。
If the Movie Camera option has been enabled, the same effect can be achieved using the Gain setting. Gain is basically the same as ISO only that it is used in conjunction with electronic light sensors and video cameras (and is measured in dB = decibel). Negative values can be entered as well. Smaller values produce correspondingly darker images.
如果电影相机选项已被启用,同样的效果可以通过使用增益设置来实现。增益基本上与 ISO 相同,只是它与电子光传感器和摄像机结合使用(并且以 dB = 分贝测量)。也可以输入负值。较小的数值会产生相应的较暗的图像。
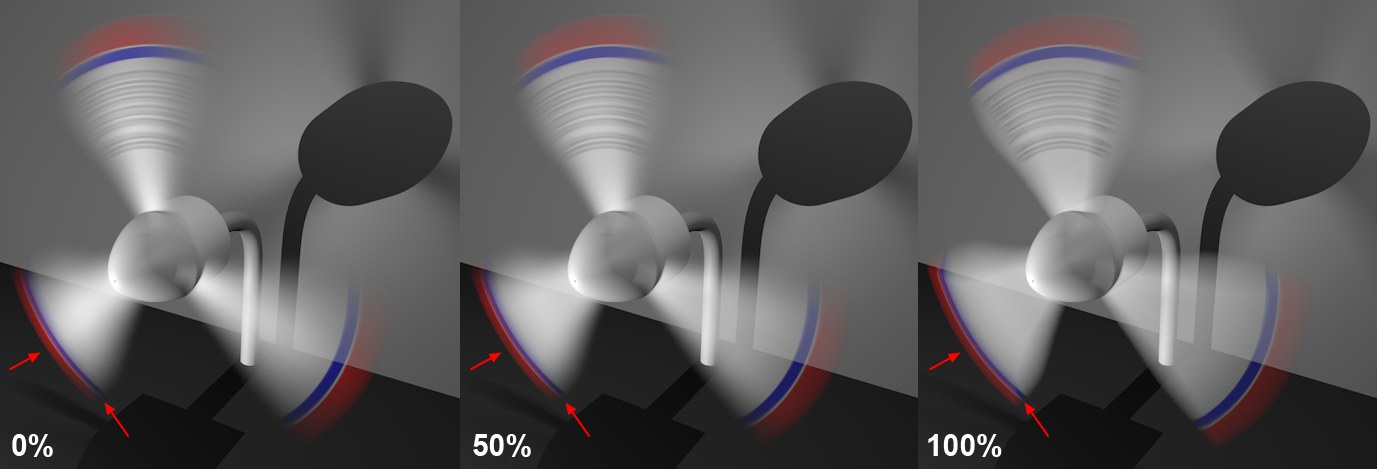
快门速度[0.100]
 Increasing 增加Shutter
Speed 快门速度 values from left to right, which produces correspondingly more motion blur (the propeller
rotates with about 3 rotations per second). 值从左到右,这相应产生更多的运动模糊(螺旋桨旋转约3旋转每秒)
Increasing 增加Shutter
Speed 快门速度 values from left to right, which produces correspondingly more motion blur (the propeller
rotates with about 3 rotations per second). 值从左到右,这相应产生更多的运动模糊(螺旋桨旋转约3旋转每秒)
The shutter speed defines how long the shutter will remain open when a picture is taken. This setting defines the following:
快门速度决定了拍照时快门保持打开的时间。这个设置定义如下:
If you don’t use Exposure or Motion Blur, this setting has no relevance for the rendered image.
如果你不使用曝光或者动态模糊,这个设置与渲染的图片没有关系。
快门角度[10. . 1080 ° ]
 The rotating shutter normally rotates with 24
rotations per second. At left a larger shutter angle (= longer exposure time), at right a smaller shutter
angle (= shorter exposure time). 旋转的快门通常每秒旋转24圈。左边的快门角度较大(= 较长的曝光时间) ,右边的快门角度较小(= 较短的曝光时间)
The rotating shutter normally rotates with 24
rotations per second. At left a larger shutter angle (= longer exposure time), at right a smaller shutter
angle (= shorter exposure time). 旋转的快门通常每秒旋转24圈。左边的快门角度较大(= 较长的曝光时间) ,右边的快门角度较小(= 较短的曝光时间)
This setting and the next only apply to the simulation of a movie camera with a rotating shutter. These cameras have 2 rotating shutters that are positioned in front of image aperture with the film to be exposed and can be adjusted in opposing directions to leave a gap of a given size between them. A section is left open between the shutters through which the film is exposed at a rate of about 24 times a second as it passes by behind the image aperture. The film is advanced one frame every time the shutters are in front of the image aperture.
这种设置和下一种设置只适用于带有旋转快门的电影摄像机的模拟。这些相机有两个旋转的快门,它们放置在曝光胶片的图像光圈前面,可以相反方向调整,在它们之间留下一个给定大小的间隙。当胶片从光圈后面经过时,胶片以每秒24次的速度曝光,胶片在百叶窗之间留出一段开口。每当百叶窗位于影像孔前时,胶片就提前一帧。
The Shutter Angle setting (normally set to 180°) is used to define the shutter speed. The smaller the angle, the less light that the shutter will allow through (this is relative in Cinema 4D only if Exposure is enabled) and the less motion blur that will be recorded (which is currently a growing trend in action movies). Cinema 4D also lets you define extremely large shutter angles of for example 1000°, which is not possible with real-world cameras, which is used to create extreme motion blur.
快门角度设置(通常设置为180 °)用于定义快门速度。角度越小,快门允许的光线就越少(只有在开启曝光的情况下,4D 影院的光线才是相对的) ,拍摄的动态模糊也就越少(目前动作电影的一个趋势)。Cinema 4D 还可以让你定义超大的快门角度,例如1000 ° ,这是不可能与真实世界的相机,这是用来创造极端的运动模糊。
快门偏移量[0. . 360 ° ]
Use this value to offset the blur effect (with increasing values) in the direction of the next animation frame.
使用此值在下一个动画帧的方向上抵消模糊效果(随着值的增加)。
快门效率[0. . 100% ]
 Increasing 增加Shutter
Efficiency 快门效率 value from left to right. 从左到右的值
Increasing 增加Shutter
Efficiency 快门效率 value from left to right. 从左到右的值
In reality, a shutter needs "time" to close. For motion blur, the smaller the value is, the softer the motion blur will be (the blurry effect will appear for a shorter period of time). The maximum value of 100% will cause an immediate closing, which will result in motion blur being calculated during almost the entire time the image is rendered (the blurry effect will then be larger).
实际上,快门需要“时间”来关闭。对于运动模糊,数值越小,运动模糊就会变得越软(模糊效果出现的时间会更短)。最大值100% 将导致立即关闭,这将导致运动模糊被计算几乎在整个时间内的图像渲染(模糊效果,然后将更大)。
Lens Distortion - Quadratic[-100..100%]
Lens Distortion - Cubic[-100..100%]
镜头失真-二次[-100. . 100% ]镜头失真-立方[-100. . 100% ]
 The same plane is rendered using various lens
distortion. 使用不同的镜头畸变绘制同一平面
The same plane is rendered using various lens
distortion. 使用不同的镜头畸变绘制同一平面
Lens distortion (different magnifications with regard to distance from the lens axis) causes straight lines at the image’s edge to appear curved. Don’t mix this effect up with the perspective distortion of a wide-angle lens (low Focal Length setting).
镜头扭曲(不同的放大率关于从镜头轴的距离)导致直线在图像的边缘出现曲线。不要把这种效果和广角镜头的透视变形混在一起(低焦距设置)。
In photography, wide-angle lenses (short Focal Lengths) tend to produce barrel-shaped and tele-focus lenses (long Focal Lengths) pillow-shaped distortions. These effects can be simulated using the Lens Distortion settings.
在摄影中,广角镜头(短焦距)倾向于产生桶形和远焦距镜头(长焦距)枕头形的畸变。这些效果可以模拟使用镜头失真设置。
These values define the degree of lens distortion. Positive values result in a barrel-shaped and negative in a pillow-shaped distortion.
这些值决定了镜头畸变的程度。正值导致桶形畸变,负值导致枕形畸变。
Use real-world tests and your camera’s tracking program to determine if you should use Quadratic or Cubic, or a combination of both (these differ only slightly visually from the center of view outward).
使用真实世界的测试和你的相机的跟踪程序来决定你是否应该使用二次或立方,或两者的组合(这些只是从视觉中心向外略有不同)。
渐晕
 Vignetting darkens the image towards its edges
(scene courtesy of Mike Winkelmann). 渐晕使图像的边缘变暗(场景由 Mike Winkelmann 提供)
Vignetting darkens the image towards its edges
(scene courtesy of Mike Winkelmann). 渐晕使图像的边缘变暗(场景由 Mike Winkelmann 提供)
Vignetting is the effect of darkening an image to its edges (light that hits the lens axis at an angle do not fill the shutter opening entirely due to the way the shutter is constructed).
虚光晕是将图像的边缘暗化的效果(由于快门的构造,光线以一定角度照射在镜头轴线上并不能完全填满快门开口)。
渐晕强度[0.500% ]
 Increasing 增加Vignetting
Intensity 渐晕强度 values from left to right. 值从左到右
Increasing 增加Vignetting
Intensity 渐晕强度 values from left to right. 值从左到右
A value of 0 turns vignetting off. Increasing values will darken the edge of the image accordingly. Extremely high values will leave only a small visible area at the center of the image.
值0将渐晕关闭。增加值会相应地使图像的边缘变暗。极高的值只会在图像中心留下一小块可见的区域。
渐晕偏移量[0. . 100% ]
 Increasing 增加Vignetting
Offset 渐晕偏移量 values from left to right. 值从左到右
Increasing 增加Vignetting
Offset 渐晕偏移量 values from left to right. 值从左到右
A value of 0 will create an even darkening from the center of the image to its edges. Increasing values will increase the radius of the circular region at the center of the image from which the darkening effect takes place. The circular region itself remains unaffected by the darkening effect.
值为0将创建一个从图像中心到边缘的均匀变暗。增加值将增加图像中心圆形区域的半径,从而产生暗化效果。环形区域本身不会受到暗化效果的影响。
Chromatic Aberration[-1000..1000%]
色差[-1000. . 1000% ]

Chromatic aberration occurs in lenses when differently colored parts of light (depending on the wavelength) are refracted with varying intensities. In the image above, this effect is noticeable due to the blue-red colored seams in the high-contrast regions. Chromatic aberration only occurs in blurred image regions, i.e., without blur, no chromatic aberration will take place.
当不同颜色的光线(取决于波长)被不同强度的折射时,色差就会发生。在上图中,由于在高对比度区域有蓝红色的接缝,这种效果很明显。色差只出现在模糊的影像区域,也就是说,如果没有模糊,就不会发生色差。
The value that can be defined here defines how strong the "color offset" will be rendered. It can also be described as the degree of saturation in the blue-red regions.
这里可以定义的值定义了“颜色偏移量”呈现的强度。它也可以用蓝红色区域的饱和度来描述。
A value of 0 turns chromatic aberration off.
如果值为0,则关闭色差。
Remember that enabling this effect also increases render times accordingly.
记住,启用这个效果也会相应地增加渲染时间。
膜片形状
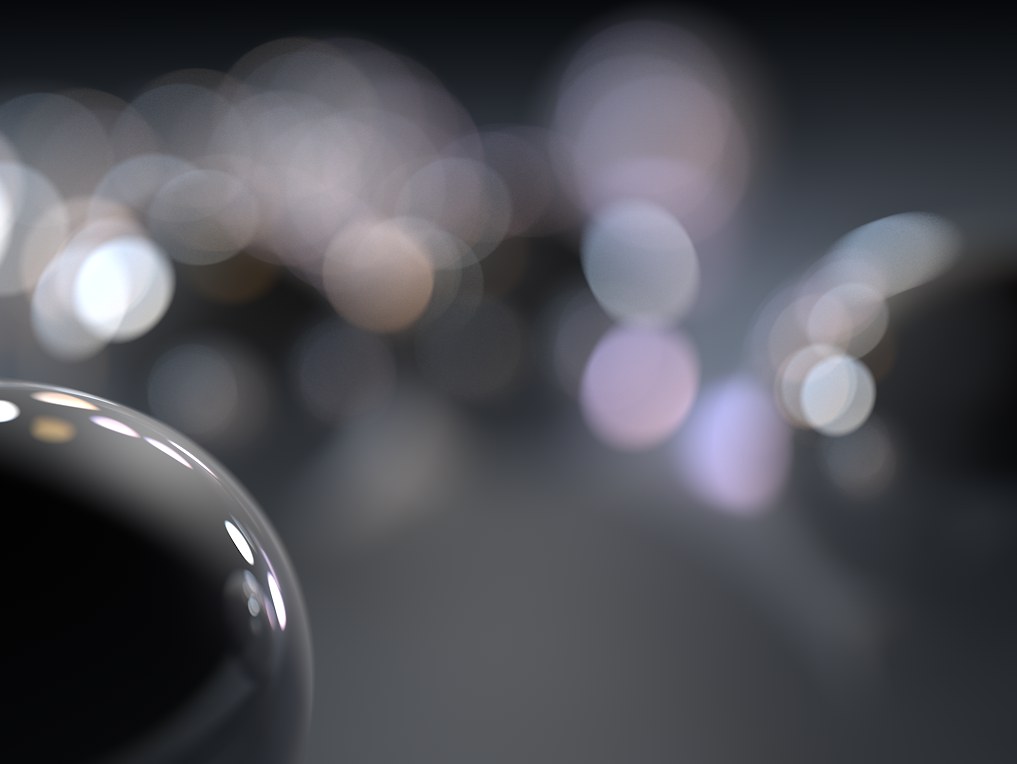 Regions not in focus create the bokeh
regions. 未聚焦的区域创建 bokeh 区域
Regions not in focus create the bokeh
regions. 未聚焦的区域创建 bokeh 区域
The following settings are used to create the bokeh regions. These are regions that lie outside of the camera’s area of focus and are therefore displayed as blurred. Small, bright regions are displayed on the shape of the aperture. Bokehs can have a strong effect on the "impact" an image has because blurred regions can have very different shapes depending on the shape of the aperture. In general, the best looking bokeh (i.e. the softest and most flowing) can be achieved with a circular aperture (Diaphragm Shape option disabled).
下面的设置用于创建散景区。这些区域位于相机的焦点区域之外,因此显示为模糊的。小而明亮的区域显示在光圈的形状上。散景会对图像的“冲击”产生强烈的影响,因为模糊区域根据光圈的形状可以有非常不同的形状。一般来说,最好看的 bokeh (即最柔软和最流畅)可以实现与圆形孔(膈膜形状选项禁用)。
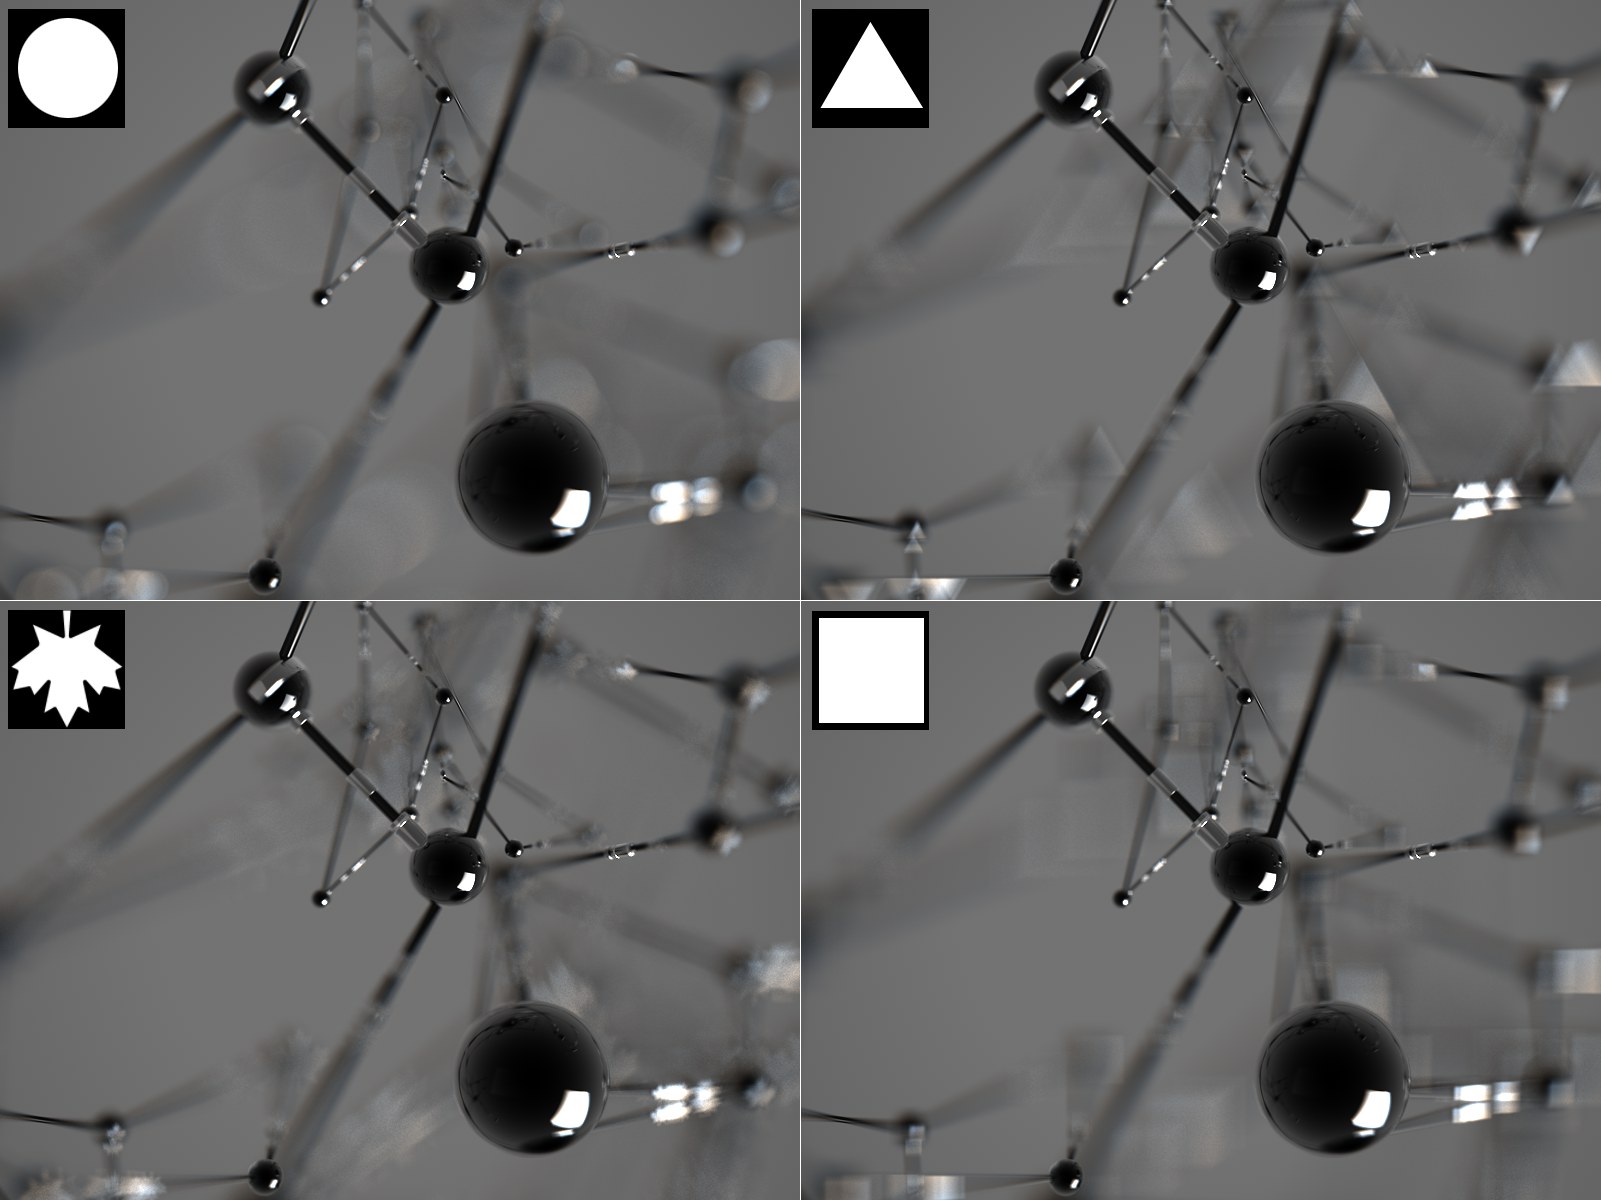 Different diaphragm shapes result in different
bokehs. 不同的横膈膜形状会导致不同的幻觉
Different diaphragm shapes result in different
bokehs. 不同的横膈膜形状会导致不同的幻觉
Note also how the bokeh can be inverted, depending on whether the given object lies in front of or behind the focal plane (is in particular noticeable with triangular shapes).
还要注意散景是如何倒转的,这取决于给定的物体是位于焦平面的前面还是后面(特别是三角形)。
The Diaphragm Shape option is either circular (when disabled) or can be given a different shape using the various settings when the option is enabled.
“膜片形状”选项可以是圆形的(禁用时) ,也可以在启用该选项时使用各种设置给出不同的形状。
Note that rendering high-contrast bokeh effects is a complex procedure and takes correspondingly long to render
(note that you can set Sampler set to
注意,渲染高对比度 bokeh 效果是一个复杂的过程,相应地需要很长的渲染时间(注意,您可以将 Sampler 设置为 Progressive,以渲染 bokeh 效果以后的预览)。
刀片[3. . 32]
 Number of 数目Blades 刀片 from
left to right: 3, 6, 12. 从左到右: 3612
Number of 数目Blades 刀片 from
left to right: 3, 6, 12. 从左到右: 3612
The bokeh is defined primarily via a diaphragm shape. The (iris)diaphragm shape in turn is dependent upon the defined number of Blades. The more blades that are defined here, the more round your diaphragm shape will be. The least number that can be defined is 3. What effect the Blade value has can be seen under Diaphragm Shape.
散热器主要是通过膜片形状来定义的。膜片的形状依次取决于叶片的确定数量。这里定义的叶片越多,隔膜的形状就越圆。可以定义的最小数是3。在膜片形状下可以看出刀片值的影响。
The blade shape used by Cinema 4D is somewhat simplified – real cameras have a sickle shape and no straight edges, as in the image above. The Shader option, however, lets you define any type of diaphragm shape (in which case the Blade setting will no longer apply).
Cinema 4D 使用的刀片形状有些简化——真实的摄像机有镰刀形状,没有直边,如上图所示。着色器选项,但是,让你定义任何类型的膜片形状(在这种情况下,刀片设置将不再适用)。
角度[0.3600 ° ]
Use this value to rotate the diaphragm shape (bokeh).
使用此值旋转隔膜的形状(散景)。
偏见[-1. . 1]

This value can be used to concentrate the brightness of an otherwise homogenous radial bokeh at its edge (negative values) or its center (positive values).
这个值可以用来集中亮度,否则同质径向 bokeh 的边缘(负值)或其中心(正值)。
各向异性[-100. . 100% ]
 Anisotropy 各向异性 squeezes
the bokehs together. 把那些家伙挤在一起
Anisotropy 各向异性 squeezes
the bokehs together. 把那些家伙挤在一起
Use this value to stretch the bokeh horizontally (positive values) or vertically (negative values). The bokehs will be rendered brighter than usual under certain circumstances. You can, however, enable the Exposure option to ensure correct calculation.
使用此值可以水平拉伸散景(正值)或垂直拉伸(负值)。在某些情况下,这种景象会比平时更加明亮。不过,您可以启用“曝光”选项,以确保计算正确。
着色器
 Custom shapes produce unusual bokehs. 自定义形状产生不寻常的散景
Here you can define a custom diaphragm shape. Simply use black-and-white masks. White areas will represent the transparent part of the aperture. Note that the bokeh shape might be inverted depending on where the bokeh-generating object is located (in front of or behind the focal plane).
在这里你可以定义一个自定义的膜片形状。简单地使用黑白面具。白色区域代表光圈的透明部分。请注意,散景物的形状可能是倒置的,这取决于散景物产生的对象所处的位置(在焦平面的前面或后面)。