 Joint 关节Basic 基础Coord.Object 对象Falloff 女名女子名Kinematics 运动学Symmetry 对称性
Falloff
女名女子名
常规
Joints can have shapes defined by Fields that will determine their weights on the mesh they influence. This is a great way to weight a joint to a mesh without actually painting its weights manually, or as a starting point without having to resort to auto weighting.
关节的形状可以由场决定,场决定它们对所影响的网格的重量。这是一个伟大的方式来重量联合到一个网格实际上没有油漆它的重量手动,或作为一个起点,而不必诉诸于自动称重。
Another advantage is also that, with falloff, the weighting can be made dynamic, meaning that you can at any time change falloff types, shape and size, and even animate these changes over time.
另一个优点是,通过减少,加权可以是动态的,这意味着您可以在任何时候更改减少类型、形状和大小,甚至可以使这些更改随着时间而变化。
When no falloff is used, you have to either paint the joints influences manually, or use the auto weighting to assign weights.
当没有使用减速,你要么手动绘制关节的影响,或使用自动称重分配权重。
 In this picture, each joint has a falloff affecting
the mesh. By overlapping each falloff, we can achieve nice deformations. When multiple falloffs overlap, the
weighting is normalized automatically to spread the influences between each joints. 在这张图片中,每个关节都有一个影响网格的衰减。通过重叠每个衰减,我们可以实现良好的变形。当多个关节重叠时,权重自动归一化,以分散每个关节之间的影响
Note:
注意:
In this picture, each joint has a falloff affecting
the mesh. By overlapping each falloff, we can achieve nice deformations. When multiple falloffs overlap, the
weighting is normalized automatically to spread the influences between each joints. 在这张图片中,每个关节都有一个影响网格的衰减。通过重叠每个衰减,我们可以实现良好的变形。当多个关节重叠时,权重自动归一化,以分散每个关节之间的影响
Note:
注意:So, make sure you bake any joint falloff if you notice mesh deformations that seem out of the ordinary (because weights not normalized = points total weights above or below 100% = points moving erratically).
所以,如果你注意到网格变形看起来不寻常,确保你烘培任何关节脱落(因为权重未归一化 = 点总重量高于或低于100% = 点移动不规则)。
Tip: 提示:切换到字段
This button will only be displayed if an older scene (prior to R20) is loaded. See Loading old MoGraph scenes.
这个按钮只有在加载了旧的场景(在 R20之前)时才会显示。参见加载旧的 MoGraph 场景。
田野调查
First off: Read here (Field) about Fields - what they are and how they’re used.
首先: 阅读这里(字段)关于字段-他们是什么和他们如何使用。
In the Field lists described below, Field objects, Field Layers and Modifier Layers are placed and combined with one another. This interface element can be found at numerous places in Cinema 4D (see here), which have little to do with one another at first glance. What basically takes place is that Field effects are blended with one another, which creates output values that are in turn used to affect an Effector or a group of points, for example. How Field objects are positioned in the Object Manager does not play a role for Field lists.
在下面描述的字段列表中,字段对象、字段层和力场层相互放置和组合。这个界面元素可以在C4D 中的许多地方找到(见这里) ,乍一看,它们之间几乎没有什么关系。基本上发生的是字段效果与另一个相混合,创建输出值,这些输出值反过来用于影响效果器或一组点,例如。字段对象在对象管理器中的定位方式对字段列表不起作用。
 The Direction channel is, for example, shown for a
Target Effector. 例如,方向通道显示为目标效果器
The Direction channel is, for example, shown for a
Target Effector. 例如,方向通道显示为目标效果器
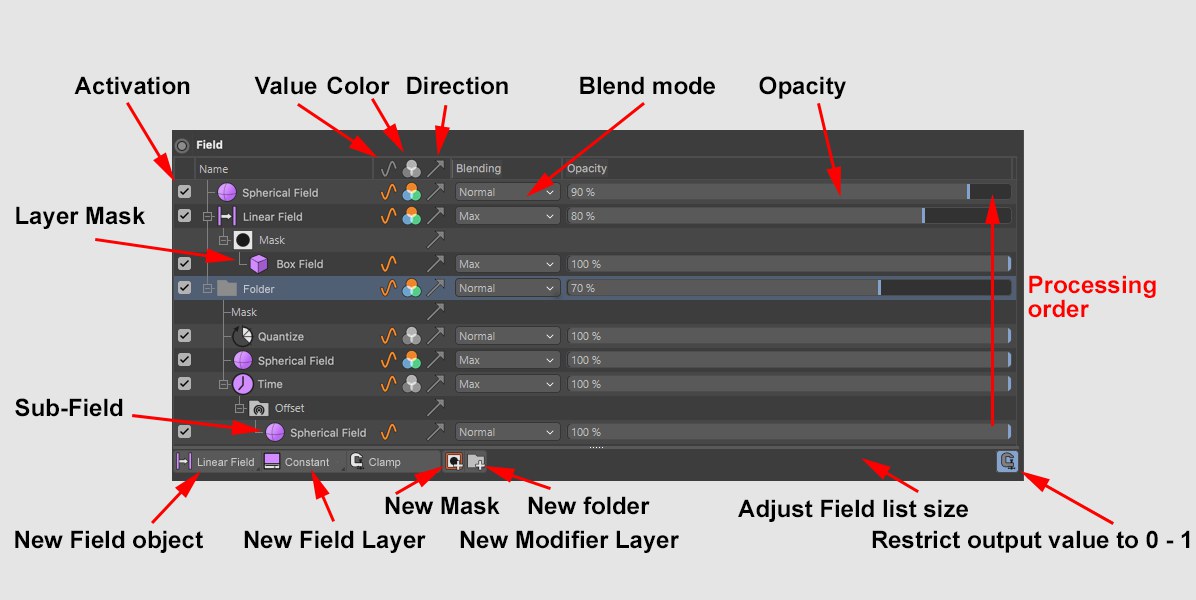
In the Field list you will find all Field Layers, Modifier Layers and folders organized in layers that are processed from bottom to top (exactly like layers that are placed in folders). The blending of elements works similarly to that of layers in image editing programs. Each layer has a blending mode, including opacity slider, that define how it should be blended with the layer below it.
在字段列表中,你会发现所有字段图层、修改图层和文件夹都是按照自下而上的方式组织的(就像文件夹中的图层一样)。元素的混合工作方式与图像编辑程序中的图层类似。每个图层都有一个混合模式,包括不透明度滑块,这定义了它应该如何与下面的图层混合。
The list entries can be dragged and dropped to a different location. Drop an element onto another in the list to make it a subordinate of that element (selected elements will be made subordinate elements of newly created elements). Elements can also be dragged out of a folder.
可以将列表项拖放到不同的位置。将一个元素拖放到列表中的另一个元素上,使其成为该元素的从属元素(选定的元素将成为新创建元素的从属元素)。元素也可以从文件夹中拖出。
Field objects can be dragged from the Object Manager onto other Field objects in the list to replace them while maintaining their settings.
字段对象可以从对象管理器拖动到列表中的其他字段对象上,以替换它们,同时维护它们的设置。
When elements (single or multiple) are selected, their properties will be displayed below. Most of these properties can be adjusted directly in the Field list. Selected elements can be deleted, either by pressing the Del key or using the respective context menu (here you will find commands for deleting elements).
当选择元素(单个或多个)时,它们的属性将显示在下面。这些属性中的大多数可以直接在 Field 列表中进行调整。可以通过按 Del 键或使用相应的上下文菜单来删除选定的元素(在这里您将找到删除元素的命令)。
Tip: 提示:The Value/ Color/ Direction icons function as display filters and can, for example, disable all layers that have no effect on colors.
“值”/“颜色”/“方向”图标的功能是显示过滤器,例如,可以禁用所有对颜色没有影响的图层。
The icons below the title bar define the functionality that they affect (value, color, direction). These properties can be defined for multiple layers by clicking and dragging vertically.
标题栏下面的图标定义了它们影响的功能(值、颜色、方向)。可以通过单击和垂直拖动为多个图层定义这些属性。
A layer can be renamed by double-clicking on it or selecting it and pressing
一个图层可以重命名为双击它或选择它并按回车。
Tip: 提示:In addition to Fields or Field and Modifier Layers, the following objects can also be dragged into the list, each of which will be evaluated using a special layer:
除了字段、字段和力场层之外,下面的对象也可以拖放到列表中,每个对象都将使用一个特殊的层进行评估:
The Field effect will then be defined along or through the respective object or its components (e.g., object points).
然后,场效果将沿着或通过相应的对象或其组成部分(例如,对象点)定义。
If an object is selected in the Field list that is also present in the Object Manager, this will also be selected via a temporary modification mode so it can be immediately moved interactively, if necessary. This object will be given a unique color in the Object Manager.
如果一个对象在字段列表中被选中,并且也出现在对象管理器中,那么这个对象也将通过一个临时修改模式被选中,以便在必要时可以立即交互式地移动它。这个对象将在对象管理器中被赋予一个唯一的颜色。
This functionality should be noted to better understand the overall function: if an Effector’s Field list is completely empty, the effect will not be zero everywhere but will be the contrary - maximum at all locations. This is a small trick that can be used to simulate the previous Unlimited setting when Effectors were created. As soon as a layer is created, these will be evaluated normally.
为了更好地理解整体功能,应该注意这个功能: 如果一个效果器的字段列表是完全空的,那么效果不会在任何地方为零,而是在所有地点为相反的最大值。这是一个小技巧,可以用来模拟以前的无限设置时效果器被创建。一旦一个层被创建,这些将被正常评估。
If you want to apply an identical Field list constellation to other elements, this can be done in one of 3 ways:
如果你想对其他元素应用相同的 Field 列表星座,可以通过以下三种方式之一来实现:
Fields list elements controlled by Fields
字段列出由字段控制的元素
If you drag elements into a Fields list that should in turn be controlled by it own Fields list (e.g., a Polygon Selection tag or a Group Field), its Field settings can be opened and controlled remotely from here.
如果你拖拽元素到一个 Fields 列表中,这个列表应该由它自己的 Fields 列表控制(例如,Polygon Selection 标签或 Group Field) ,它的 Field 设置可以在这里打开和远程控制。
颜色编码
Layers will be colored red if they are faulty in any way (e.g., Shader Field without a shader) and yellow if they will be ignored (empty folder).
如果图层有任何缺陷(例如,没有着色器的 Shader Field) ,就会被涂成红色; 如果图层被忽略,就会被涂成黄色(空文件夹)。
附加命令
The 5 icons below have the following functions (from left to right):
下面的5个图标有以下功能(从左到右) :
新建字段对象
Click on this icon to open a list of all available Fields. These are Fields that will also appear in the Object Manager - they will have a defined position and a rotation. Select one to add it to the list. The Field object will automatically be made a Child object of the respective object in the Object Manager (however, this is not required for the Field to work; what’s important is that it’s in the list). Alternatively, an existing Field can be dragged into the list. In addition, if a fitting element (e.g., Effector) is selected when a Field is generated externally (i.e., via a menu command), this will automatically be added to the list.
单击此图标打开所有可用字段的列表。这些字段也将出现在对象管理器中——它们将有一个定义的位置和一个旋转。选择一个将其添加到列表中。Field 对象将自动成为 Object Manager 中相应对象的子对象(但是,Field 不需要这样做; 重要的是它在列表中)。或者,可以将现有 Field 拖动到列表中。此外,如果在外部生成字段时选择了适当的元素(例如 Effector)(例如,通过菜单命令) ,这将自动添加到列表中。
新图层
Use this command to create a new Field Layer. Field Layers are Fields that do not appear in the Object Manager. The don’t have and don’t require a defined position or rotation.
使用此命令创建一个新的字段层。字段层是对象管理器中不出现的字段。没有也不需要一个固定的位置或者旋转。
新的力场层
Clicking on this icon will open a list of all available Modifier Layers that can be used to affect existing layers. Select one to add it to the list. Modifier Layers - as the name already implies - affect existing Fields and themselves make no values, colors or rotations available.
点击这个图标将会打开一个所有可用的力场层的列表,这些力场层可以用来影响现有的图层。选择一个将其添加到列表中。力场层——顾名思义——会影响现有的字段,而且本身不会产生任何值、颜色或旋转效果。
Modifier Layers work similarly to layers in image editing programs, which affect the layers below them, respectively. If you want to restrict effects to specific Fields, place the respective Modifier Layers or Field in a new folder.
修改图层的工作方式类似于图像编辑程序中的图层,它们分别影响下面的图层。如果您想限制特定字段的效果,请将相应的力场层或字段放到新文件夹中。
新建文件夹
Click on this icon to add a new folder to the list. If nothing in the list is selected, an empty folder will be created. Within the folder, the elements will be processed from bottom to top. The result of this folder’s processed contents will be blended accordingly using its own blending and strength settings with the remainder of the Field list elements.
单击此图标向列表添加一个新文件夹。如果列表中没有选中任何内容,则将创建一个空文件夹。在该文件夹中,元素将从底部到顶部进行处理。此文件夹的处理内容的结果将相应地使用它自己的混合和强度设置与 Field 列表元素的其余部分进行混合。
夹钳
This function can be used to restrict the output values for the current, complete Field list to values between 0 and 1 (for colors RGB 255, 255, 255). Applying this function is recommended for numerous purposes, e.g., if negative value or values that are too large should be excluded. For example, if a Target Field were in the Field list, the value would increase continuously. This function can be used to restrict it to a maximum value of 1.
此函数可用于将当前完整字段列表的输出值限制为0到1之间(对于 RGB 255、255、255颜色)。建议在很多情况下应用此函数,例如,是否应该排除负值或太大的值。例如,如果“字段”列表中包含一个“目标字段” ,则该值将不断增加。此函数可用于将其限制为最大值1。
By default, many Fields are already restricted in the Field list (Remapping tab), which can, however, be modified (Field sub-menu).
默认情况下,字段列表(Remapping 选项卡)中的许多字段已经受到限制,但是可以对其进行修改(字段子菜单)。
上下文菜单
新图层
Creates a new Field Layer.
创建一个新的字段层。
新领域
Creates a new Field Object.
创建一个新字段对象。
新建文件夹
Creates a new folder. The folder can be used to group layers or restrict Modifier Layers to specific layers.
创建一个新文件夹。该文件夹可用于对图层进行分组或将力场图层限制在特定的图层。
新集团领域
Selecting this command will group the currently selected layers in a Group Filed. They will be removed from the list and replaced by the group object.
选择这个命令将组合当前选择的层在一个组提交。它们将从列表中移除,并由 group 对象替换。
复本
Duplicates the currently selected layer. One and the same Field (which itself only exists once) can, for example, affect different elements within the list (e.g., with different strengths or Blending modes).
复制当前选择的图层。例如,同一个字段(它本身只存在一次)可以影响列表中的不同元素(例如,具有不同的强度或混合模式)。
复制粘贴
These are the usual commands to remove, add and copy elements (including to other Field lists).
这些是删除、添加和复制元素(包括到其他 Field 列表)的常用命令。
删除
Clicking on this button deletes the selected list elements, including in the Object Manager (Field objects).
The same happens if you delete by pressing the
单击此按钮将删除选定的列表元素,包括对象管理器(字段对象)中的元素。如果您按下 Shift 键然后按退格键或者 Del 键来删除,也会发生同样的情况。
只删除图层
Clicking on this button deletes the selected list elements. Objects in the Object Manager will not be affected.
单击此按钮将删除选定的列表元素。对象管理器中的对象不会受到影响。
选择 All/Select None
Selects/ deselects all layers.
选择/取消所有图层。
添加 MaskRemove 面具
 Here a Vertex Map is defined for the Linear Field
(left) and the Spline Field (right), respectively, whereby a Spherical Field serves as a mask for
each. 这里为线性场(左)和样条场(右)分别定义了顶点映射,其中球形场作为每个场的掩码
Here a Vertex Map is defined for the Linear Field
(left) and the Spline Field (right), respectively, whereby a Spherical Field serves as a mask for
each. 这里为线性场(左)和样条场(右)分别定义了顶点映射,其中球形场作为每个场的掩码
With the introduction of Cinema 4D R21, masks can be assigned to each layer. These masks are generated by other Fields and Layers and define the regions where the respective mask should work.
随着 Cinema 4D R21的引入,面具可以被分配到每一层。这些掩码由其他字段和图层生成,并定义各自掩码应该工作的区域。
Masks in Cinema 4D work analog to Photoshop’s layer masks, only spatially:
C4D院的蒙版与 Photoshop 的图层蒙版相似,只是在空间上:
If you want to assign a mask to a layer, right-click on the layer and select Add Mask. A list of sub-folders will appear. Drag the Fields and Layers to this point for the mask to take effect.
如果你想给一个图层分配一个蒙版,右键单击图层并选择添加蒙版。将出现一个子文件夹列表。拖动字段和图层到这一点,蒙版生效。
A similar mask functionality can also be realized without the method described above: simply create a Field, apply the Blending mode Multiply and place it in a separate folder above the respective layer.
类似的蒙版功能也可以在没有上面描述的方法的情况下实现: 简单地创建一个字段,应用混合模式 Multiply,并将其放置在相应层之上的一个单独的文件夹中。
All settings that can be made in the Field list are saved as parameters in the Blending tab (and also described there).
可以在 Field 列表中进行的所有设置都保存为 Blending 选项卡中的参数(这里也有描述)。
The tabs displayed for respective list elements
为各个列表元素显示的选项卡

The Field list can also display compound element properties. Example: A Circle spline is dragged into the Field list. The Circle layer is displayed farther below in the dialog window with 5 tabs, of which the Object tab is assumed directly from the spline (so you can easily modify the circle’s settings without having to select the Circle spline in the Object Manager). The Layer tab contains the actual settings of the Field Layer-specific settings. The other tabs Blending, Remapping and Color Mapping are general Field list layer properties whose own properties in turn are supplied by other - invisible - objects (see also Other Objects).
Field 列表还可以显示复合元素属性。示例: 将圆样条拖到字段列表中。圆圈层在下面的对话框窗口中有5个选项卡,其中的对象选项卡是直接从样条(所以你可以很容易地修改圆的设置,而不必在对象管理器中选择圆样条)。图层选项卡包含字段图层特定设置的实际设置。其他的选项卡混合、重新映射和颜色映射是一般的字段列表层属性,它们自己的属性反过来又由其他不可见的对象提供(参见其他对象)。
This sounds much more complicated than it actually is! Everything is laid out very logically and for the easiest possible use.
这听起来比实际情况要复杂得多!所有的东西都布置得非常有逻辑性,而且是为了最简单的用途。