Anti-Aliasing
抗锯齿
Antialiasing removes jagged edges from your images. It works by breaking down each pixel into sub-pixels; rather than calculate just one color for a pixel, several color values are calculated and averaged to produce the final color for the pixel.
反锯齿删除您的图像锯齿边缘。它通过将每个像素分解成子像素来工作; 而不是仅仅计算一个像素的一种颜色,而是计算几个颜色值并求取平均值以生成该像素的最终颜色。
 Using the settings on the Antialiasing page, you
can remove jagged edges. The top right inset box shows jagged edges without antialiasing, the bottom right
inset box shows the smoothed result of applying antialiasing. 使用“反锯齿”页上的设置,可以删除锯齿状边缘。右上角的插入框显示锯齿状边缘,没有反走样,右下角的插入框显示应用反走样的平滑结果
Tip:
提示:
Using the settings on the Antialiasing page, you
can remove jagged edges. The top right inset box shows jagged edges without antialiasing, the bottom right
inset box shows the smoothed result of applying antialiasing. 使用“反锯齿”页上的设置,可以删除锯齿状边缘。右上角的插入框显示锯齿状边缘,没有反走样,右下角的插入框显示应用反走样的平滑结果
Tip:
提示:反走样是如何工作的?
 The pixels (shown as large squares) are subdivided
into sub-pixels. A color value is calculated for each sub-pixel. Similar color values will be summarized into
a single pixel color value. 像素(显示为大正方形)被再细分为子像素。计算每个子像素的颜色值。相似的颜色值将被总结成一个单一的像素颜色值
The pixels (shown as large squares) are subdivided
into sub-pixels. A color value is calculated for each sub-pixel. Similar color values will be summarized into
a single pixel color value. 像素(显示为大正方形)被再细分为子像素。计算每个子像素的颜色值。相似的颜色值将被总结成一个单一的像素颜色值
For rendering, the render camera angle will first be divided into a pixel grid (which is defined using the Width and Height parameters in the Edit Render Settings menu). In principle, a lot can now happen in each pixel, e.g., an object edge can run through it, a texture can split the pixel in 2 different colors, etc. However, each pixel can only have a single color value. It’s a difficult task to calculate an image according to these guidelines that is visually appealing with homogenous and naturally flowing object and color edges.
对于渲染,渲染相机的角度将首先划分为像素网格(使用编辑渲染设置菜单中的宽度和高度参数定义)。原则上,现在每个像素中都可以发生很多事情,例如,一个物体边缘可以穿过它,一个纹理可以将像素分成两种不同的颜色,等等。但是,每个像素只能有一个颜色值。这是一个困难的任务,计算一个图像,根据这些准则,是视觉吸引力的同质和自然流动的对象和颜色边缘。
One solution for this problem is to break each pixel up into sub-pixels and calculate a separate sample (=color value) for each one individually. This process is also called oversampling (or simply "sampling").
这个问题的一个解决方案是将每个像素分解为子像素,并为每个像素单独计算一个独立的样本(= 颜色值)。这个过程也被称为过度抽样(或简称“抽样”)。
The second step is to summarize these pixels’ color values based on a defined radius around each pixel (this is done by the filters described farther below).
第二步是根据每个像素周围已定义的半径总结这些像素的颜色值(这是由下面描述的过滤器完成的)。
抗锯齿
 From left to right: None, Geometry (the slightly
blurred texture is a result of the antialiasing filters) and Best antialiasing. 从左到右: 无,几何(略微模糊纹理是反走样过滤器的结果)和最佳反走样
From left to right: None, Geometry (the slightly
blurred texture is a result of the antialiasing filters) and Best antialiasing. 从左到右: 无,几何(略微模糊纹理是反走样过滤器的结果)和最佳反走样
没有
The image to be output will be calculated without antialiasing (any existing Render tags with differing settings will be ignored). Step-like structures will be recognizable at object and color edges.
输出的图像将在不反走样的情况下计算(任何具有不同设置的现有 Render 标记将被忽略)。阶梯状的结构在物体边缘和颜色边缘都可以识别。
This mode is particularly suited for fast test renderings for which quality does not play a role.
这种模式特别适合于质量不起作用的快速测试渲染。
几何学
This is the default setting which smooths all object edges (automatically with 16x16 sub-pixels).
这是默认设置,平滑所有对象的边缘(自动与16x16子像素)。
最好的
This enables (in addition to object smoothing) Cinema 4D’s adaptive antialiasing (additional sub-pixels will only be calculated at critical regions, i.e., for pixels whose color differs greatly from those of its neighboring pixels), which affects color edges (e.g., also shadows, objects behind transparencies, etc.). This in turn is controlled via several parameters available for this mode.
这使得 Cinema 4D 的自适应反走样(附加的子像素只计算在关键区域,也就是说,像素的颜色与邻近像素有很大的不同)能够影响颜色边缘(也就是阴影、透明背后的物体等等)。这反过来是控制通过几个参数可用于这种模式。
Min Level
Max Level
Threshold[0..100%]
最低等级最高等级阈值[0. . 100% ]
This setting is used to control Cinema 4D’s adaptive antialiasing. Sub-pixels will be calculated for neighboring pixels whose color differs too greatly; for non-critical regions (large, uniformly colored regions) no sub-pixels will be calculated if at all possible.
这个设置用于控制 Cinema 4D 的自适应抗锯齿。对于颜色差异太大的邻近像素,将计算子像素; 对于非临界区域(大的、均匀着色的区域) ,如果可能的话,将不计算子像素。
The default combination of these three parameters can be applied in most cases.
这三个参数的默认组合在大多数情况下都可以应用。
Min Level defines the minimum number of sub-pixels that will always be rendered. The default value of 1.1 will suffice for most cases. If, however, artefacting should occur in very detailed regions, e.g., shadow elements get swallowed, higher values should be used.
Minlevel 定义将始终呈现的最小子像素数。在大多数情况下,默认值1.1就足够了。但是,如果制作应该在非常详细的区域进行,例如,影子元素被吞噬,则应该使用更高的值。
Max Level is the sub-pixel dispersion that is applied to critical regions (mostly high-contrast regions, i.e., color edges or object edges behind transparencies). This value can, for example, be increased when rendering glass to ensure the rendering of finer details.
Max Level 是应用于关键区域(大多数是高对比度区域,即透明度背后的颜色边缘或物体边缘)的亚像素色散。例如,在渲染玻璃时可以增加这个值,以确保渲染更细的细节。
In the image below, the difference in render results between the two settings cannot be seen at first glance. The settings should be optimized only if you want to get the utmost out of your rendering (which will, of course, result in correspondingly longer render times):
在下面的图像中,这两种设置的渲染结果之间的差异在第一眼看不出来。设置应该被优化,只有当你想得到你的渲染的最大限度(这当然会导致相应的更长的渲染时间) :
 Higher antialiasing settings are often only
noticeable in the finer details. In this example, the image on the right took 10 times (!) longer to render
than the image on the left. 更高的反走样设置往往只有在更好的细节中才能被注意到。在这个例子中,右边的图像使用了10次(!)比左边的图像渲染时间长
Higher antialiasing settings are often only
noticeable in the finer details. In this example, the image on the right took 10 times (!) longer to render
than the image on the left. 更高的反走样设置往往只有在更好的细节中才能被注意到。在这个例子中,右边的图像使用了10次(!)比左边的图像渲染时间长
The Threshold value defines the degree of color divergence at which Max Level should be applied for a given pixel. Small values will allow no divergence, large values will allow greater contrasts before smoothing begins.
阈值定义了给定像素应用最大级别的颜色散度。较小的值不允许有差异,较大的值在平滑开始之前允许有更大的对比。
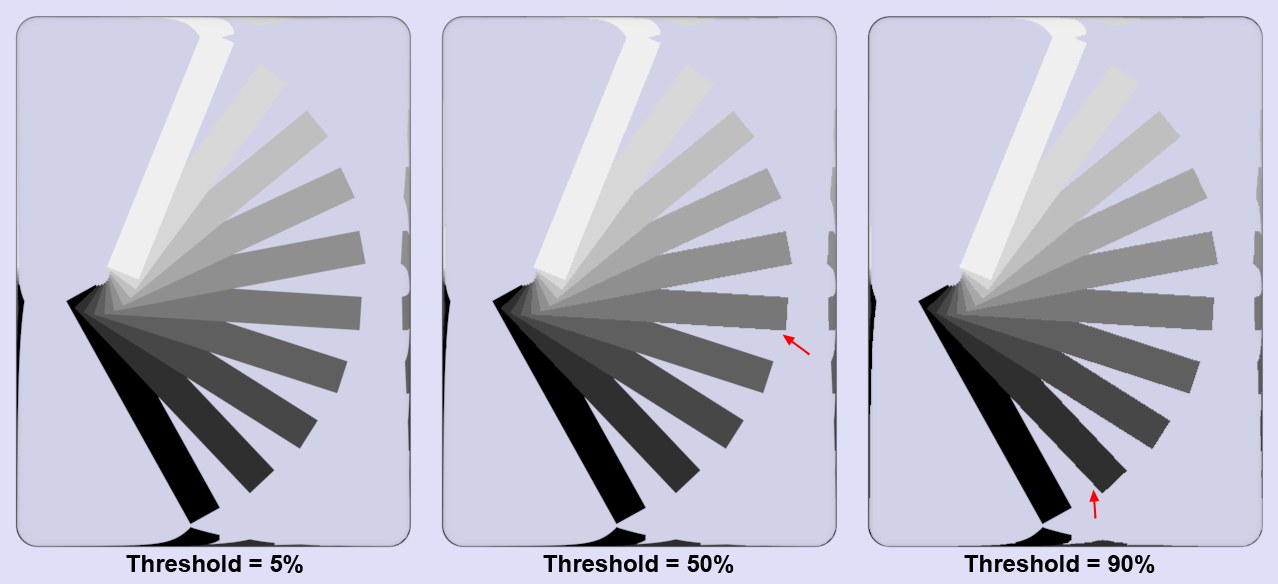 Various 各种各样的Threshold 门槛
values at 1x1 and 16x16 for 1x1 and 16x16 forMin Level 最低水平 and 及Max
Level 最高水平, respectively. Higher contrasts are needed for higher 对比度越高,对比度就越高Threshold 门槛 values for smoothing. 平滑值
Various 各种各样的Threshold 门槛
values at 1x1 and 16x16 for 1x1 and 16x16 forMin Level 最低水平 and 及Max
Level 最高水平, respectively. Higher contrasts are needed for higher 对比度越高,对比度就越高Threshold 门槛 values for smoothing. 平滑值
The image above shows a grayscale fan behind a glass block. Why behind a glass object? As described above, without the glass, only the object edge smoothing would take place (adaptive antialiasing only works for color edges or object edge smoothing for objects that lie behind transparent objects or in reflections). As you can see, a low Threshold value results in all regions being smoothed because Cinema 4D will only allow minimal color divergence before it applies smoothing. The greater the Threshold value, the greater the contrast will have to be before smoothing is applied.
上面的图片显示的是一块玻璃后面的一个灰色风扇。为什么在玻璃物体后面?如上所述,如果没有玻璃,只有物体边缘平滑会发生(自适应反走样仅适用于颜色边缘或物体边缘平滑,这些物体位于透明物体或反射物体之后)。正如你所看到的,低阈值会导致所有区域被平滑,因为 Cinema 4D 在应用平滑之前只允许最小的颜色差异。阈值越大,平滑前的对比度就越大。
In an average scene with a Threshold (Color) value of 10%, about 40% of all pixels will be affected, whereas a Threshold value of 5% will result in 90% of all pixels being affected. A value of 0% will cause all pixels of a rendered image to be antialiased – including superfluous regions.
在阈值为10% 的平均场景中,大约40% 的像素会受到影响,而阈值为5% 的场景中,90% 的像素会受到影响。值为0% 将导致渲染图像的所有像素消去锯齿——包括多余的区域。
These three parameters have a large influence on the render speed! Settings that are too high can easily increase render times tenfold, without much noticeable difference in render quality. The default values offer very good result for most cases and moderate render times.
这三个参数对渲染速度有很大的影响!设置太高很容易使渲染时间增加十倍,而渲染质量没有明显的差别。对于大多数情况,默认值提供了非常好的结果和适中的渲染时间。
Tip: 提示:This tag can be used to define antialiasing settings on object level. In the Edit Render Settings menu, set Antialiasing to Best and the Min/Max Level values each to 1x1. This reflects the least amount of antialiasing for the entire scene (i.e. none). You can, however, use Render tags to define the amount of antialiasing each object should have individually. This lets you, for example, apply a high level of antialiasing to prominent foreground objects and progressively less to objects that lie correspondingly further in the background.
此标记可用于在对象级别定义反走样设置。在“编辑渲染设置”菜单中,将“反锯齿”设置为“最佳” ,并将“最小/最大级别”值分别设置为1x1。这反映了整个场景的最小反走样量(即没有反走样)。但是,您可以使用 Render 标记来定义每个对象应该单独具有的反走样量。例如,这使您可以对突出的前景对象应用高级别的反走样,而对相应地位于背景中更远处的对象则逐渐减少反走样。
If artifacts appear (e.g., thin shadows are no longer or barely visible), either reduce the Threshold value or increase the Min Level value (the latter will save a lot of render time). If areas of high contrast are jagged — such as at shadow edges, edges behind transparent objects or within textures — increase the Max Level setting. 如果工件出现(例如,薄阴影不再或几乎看不见) ,要么降低阈值或增加最小层值(后者将节省大量渲染时间)。如果高对比度的区域呈锯齿状,例如在阴影边缘、透明物体后面的边缘或纹理内部,则增加最大水平设置关于渲染速度:
The render speed can be influenced by modifying the Compositing tag’s and Threshold’s (color) Min. Level / Max. Level parameters. Using very low settings for the Threshold (color) can really bog down your computer. In an average scene a Threshold (color) value of 10% will affect about 40% of the pixels - a value of 5% will affect about 90% of the pixels. A value of 0% will result in every single pixel being antialiased in the rendering process, even where no antialiasing is necessary.
渲染速度可以通过修改合成标记和阈值的(颜色)最小值来影响。水平/最高。级别参数。使用非常低的设置阈值(颜色)可以真正困扰你的计算机。在一个平均场景中,阈值(颜色)为10% 将影响大约40% 的像素——5% 的阈值将影响大约90% 的像素。值为0% 将导致每个像素在渲染过程中被反走样,即使不需要反走样。
使用对象属性
If this option is enabled, you can specify the Min/Max Level and the Threshold separately for each object using Compositing tags.
如果启用此选项,则可以使用复合标记为每个对象分别指定 Min/Max Level 和 Threshold。
考虑多重通行证
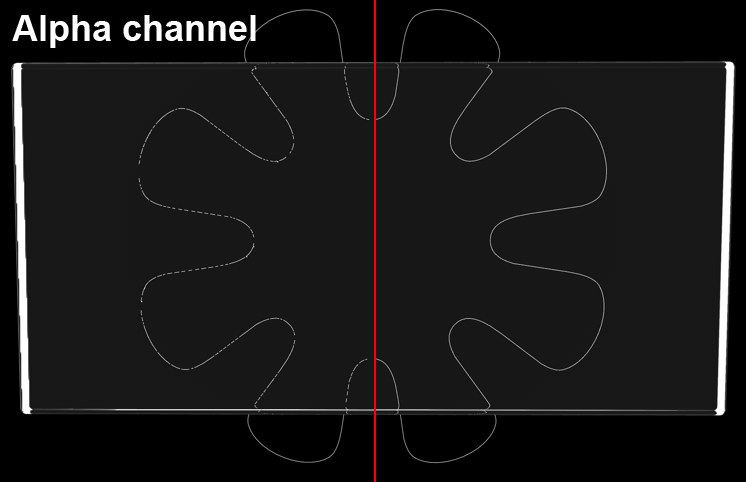 An object’s alpha channel (a 一个对象的 alpha 通道Refraction 折射 pass would look similar) behind a glass cube. At left, option disabled; at
right, option enabled. 在一个玻璃立方体后面。在左边,选项禁用; 在右边,选项启用
An object’s alpha channel (a 一个对象的 alpha 通道Refraction 折射 pass would look similar) behind a glass cube. At left, option disabled; at
right, option enabled. 在一个玻璃立方体后面。在左边,选项禁用; 在右边,选项启用
In certain instances it can occur that the quality of antialiasing in Multi-Passes and Alpha channels suffers. This can happen if, for example, thin structures are placed behind refractive transparent surfaces and rendered in front of a black background. In such an instance, this option should be enabled. In many cases it would be helpful to reduce the Threshold value.
在某些情况下,它可能发生的质量反走样在多通道和阿尔法通道遭受影响。例如,如果将薄结构置于折射透明表面之后,并在黑色背景之前渲染,就会发生这种情况。在这样的实例中,应该启用此选项。在许多情况下,降低阈值是有帮助的。
过滤器
A brief explanation of how the antialiasing filter works: Depending on the antialiasing settings, a number of subpixels will be calculated per pixel whose colors are then pooled for that pixel using various functions (a pixel can only have a single color). The filter works for both Geometry (object edge smoothing) and Best (color edge smoothing) antialiasing types.
简要说明一下抗锯齿滤镜的工作原理: 根据抗锯齿设置,每个像素将计算出一定数量的子像素,然后使用各种函数将其颜色合并到该像素中(一个像素只能有一种颜色)。该滤波器工程的几何(对象边缘平滑)和最佳(颜色边缘平滑)反走样类型。
Generally speaking, the filter controls how sharp and crisp the edges will be rendered.
一般来说,过滤器控制如何锐利和脆的边缘将呈现。
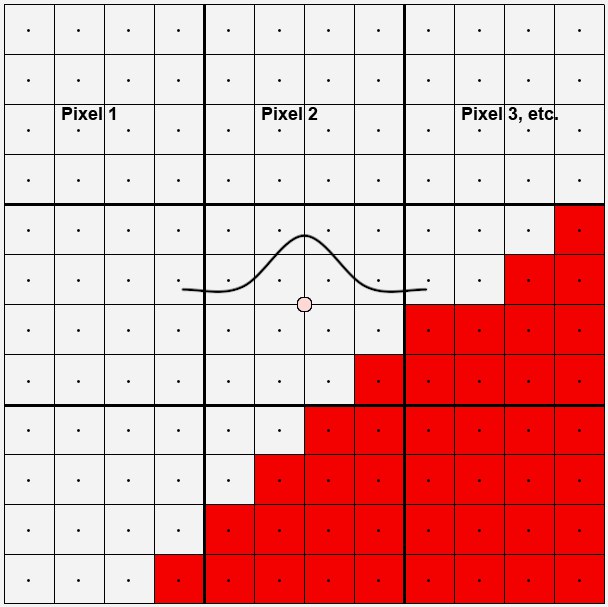
In the image above are 9 edge pixels that run diagonally across the image. Take a look at the center pixel. 16 sub-pixels were used to calculate this pixel. 15 are light gray, 1 red. These pixels form a curve (Mitchell in this case). Imagine this curve as flat around the center of a pixel. This curve then defines the degree of influence each sub-pixel should have. Because the filter size (Filter Width setting) and Filter Height (i.e. the spread within which sub-pixels will be taken into consideration) can be expanded to up to 4 pixels, the curve can be made to spread out quite a bit more. Conversely, this means that neighboring pixels for the most part see the same sub-pixel and therefore have a very similar color. Of course edges can then no longer be made to look sharp and crisp.
在上面的图像中有9个边缘像素沿对角线贯穿整个图像。看一下中心像素。用16个子像素计算这个像素。15个是浅灰色,1个是红色。这些像素形成一条曲线(在这里是米切尔)。把这条曲线想象成围绕像素中心的平坦曲线。这条曲线定义了每个子像素应该具有的影响程度。由于滤波器的大小(滤波器的宽度设定)和滤波器的高度(即子像素的分布范围)可扩展至最多4个像素,因此曲线可扩展至更多一点。相反,这意味着邻近的像素大部分看到相同的子像素,因此具有非常相似的颜色。当然,再也不能使边缘看起来锋利和清晰。
In the following image are curves for each of the 8 different filters, accompanied by a rendered example.
下面的图片是8个不同滤镜的曲线,并附有一个渲染的例子。

If you take a look at the curves above you will notice that several curves (Mitchell, Cubic and in particular Sinc) even fall below zero. This means that at corresponding edges, contrasting color values are rendered that are not even present in the scene. This makes the edges look sharper. This can, however, lead to problems under certain circumstances (see Clip Negative Component option).
如果你看一下上面的曲线,你会发现有几条曲线(Mitchell,Cubic,特别是 Sinc)甚至会跌到零度以下。这意味着在相应的边缘,对比色值被渲染,甚至在场景中不存在。这使得边缘看起来更锐利。但是,在某些情况下,这可能会导致问题(请参阅剪辑负组件选项)。
In most cases, the filter selection has little effect on the render speed.
在大多数情况下,过滤器的选择对渲染速度的影响很小。
It’s advisable to use a soft filter for animations. Edges that are too sharp can lead to flickering.
建议对动画使用软过滤器。过于清晰的边缘可能会导致闪烁。
Custom Size
Filter Width[0.5..4]
Filter Height[0.5..4]
自定义尺寸滤镜宽度[0.5. . 4]滤镜高度[0.5. . 4]
Filter Width / Height defines how many sub-pixels (calculate from the center of the pixel outwards) will be taken into consideration when the pixel color value is calculated (see also here).
滤镜宽度/高度定义了在计算像素颜色值时要考虑多少子像素(从像素中心向外计算)。
As long as the Custom Size option is enabled an ideal value for Filter Width and Filter Height will be used, which will also be displayed. The values are in relation to the pixel, i.e., a value of 0.5 for both parameters means that sub-pixels 0.5 to the left and right, and 0.5 above and below the pixel center point will be taken into consideration, i.e., all sub-pixels on the pixel surface. Higher values will extend to surrounding pixels accordingly, which will result in color edges being rendered correspondingly less sharp.
只要启用自定义大小选项,就会使用一个理想的过滤器宽度和过滤器高度值,这也会显示出来。这些值与像素有关,也就是说,这两个参数的值都是0.5,这意味着像素中心点上方和下方的子像素将被考虑在内,也就是说,像素表面上的所有子像素。较高的值将相应地延伸到周围的像素,这将导致颜色边缘渲染相应地不够清晰。
剪辑负面成分
 A filter function’s negative regions can be
clipped. 过滤器函数的负区域可以被剪切
A filter function’s negative regions can be
clipped. 过滤器函数的负区域可以被剪切
As you can see here here, several filters (Cubic, Mitchell, Sinc) run through regions smaller than 0. If the Clip Negative Component option is enabled, the negative regions will be clipped. What’s this good for? When using Linear Workflow, high color intensity and 32-bit rendering you may encounter problems in compositing (merging of image elements with alpha channels). Take a look at the inserts at the right of the image above: a cube was rendered to which a luminous material was assigned along with the Sinc antialiasing filter. At left the Clip Negative Component was disabled, at right it was enabled.
正如你在这里看到的,几个过滤器(Cubic,Mitchell,Sinc)运行在小于0的区域。如果启用了 Clip Negative Component 选项,则将剪切负区域。这有什么用?当使用线性工作流、高颜色强度和32位渲染时,您可能会在合成(图像元素与 alpha 通道的合并)中遇到问题。看看上面图片右边的插入部分: 一个立方体被渲染成了一个发光的材质,与 Sinc 反走样滤镜一起被赋予。在左边的剪辑负面组件被禁用,在右边它被启用。
按揭保险计划收费表[0. . 1000% ]
Scales the MIP/SAT strength globally. The local material settings (in which MIP Scale can also be defined) are also taken into consideration. The value range for the global settings ranges from 0% to 500%. A value of 100% represents a normal value; a value of 0% means that no MIP/SAT mapping, with regard to proximity, will take place; a value of 200%, for example, represents a doubling of the MIP/SAT mapping’s strength.
在全球范围内衡量按揭保险计划/学术能力评估的强度。当地的材质设置(也可以定义 MIP 刻度)也被考虑在内。全局设置的值范围从0% 到500% 。100% 的值表示正常值; 0% 的值表示不会发生任何 MIP/SAT 映射关于邻近性的情况; 例如,200% 的值表示 MIP/SAT 映射的强度增加了一倍。
This value should be increased when using highly detailed textures that are directly facing the camera. This will result in a better display of continuous lines – without interruption – by the antialiasing.
这个值应该增加时,使用非常详细的纹理,直接面对相机。这将导致一个更好的连续线显示-没有中断-通过反走样。
小碎片
 The Raytracer renders these types of scenes much
faster than the Scanliner. The marked area, for example, contains a large number of polygons per
pixel. Raytracer 渲染这些类型的场景要比 Scanliner 快得多。例如,标记区域每个像素包含大量的多边形
The Raytracer renders these types of scenes much
faster than the Scanliner. The marked area, for example, contains a large number of polygons per
pixel. Raytracer 渲染这些类型的场景要比 Scanliner 快得多。例如,标记区域每个像素包含大量的多边形
Since the introduction of Render Instances it is possible to render an innumerable number of complex objects. Let’s say you have a complete house consisting of thousands of polygons located at your scene’s horizon, which is so far away from the camera that it would only be about one pixel in size when rendered. The Small Fragments functionality is designed to render just such regions more effectively (as well as regions with high levels of Subsurface Scattering).
自从采用了 Render 实例之后,就有可能呈现无数复杂的对象。假设你有一个完整的房子,在场景的地平线上有数千个多边形,距离相机很远,渲染时只有一个像素大小。小碎片功能的设计就是为了更有效地渲染这样的区域(以及次表面散射高的区域)。
Cinema 4D has two internal render processes, the "Scanliner" and the "Raytracer", that were applied automatically without the user having a say in the matter. With regard to the aforementioned scene, the "Raytracer" will render a scene of this type much faster than the "Scanliner".
Cinema 4D 有两个内部渲染过程,“ Scanliner”和“ Raytracer” ,这两个过程是自动应用的,用户在这个问题上没有发言权。关于上述场景,“光线追踪器”将渲染这种类型的场景远远快于“扫描班轮”。
You might say that the Raytracer should be used to render every scene. Unfortunately this method bears the
disadvantage that it delivers a lower quality antialiasing and is slower when rendering scenes of contrasting
nature like the one in the image above. This is what the
你可能会说光线追踪器应该用来渲染每个场景。不幸的是,这种方法承担的缺点是,它提供了一个较低的质量反走样,是慢当渲染场景的对比性质像上面的图像之一。这就是混合选项的作用,它结合了两种方法的优点。简单地说,所有每个像素有超过50个多边形可见的图像区域都将由 Raytracer 渲染,而 Scanliner 将处理剩余的区域。默认的混合选项因此应该是正确的选择,为大多数渲染。Scanline Only 选项是在预 r11.5版本中使用的渲染方法。
Raytrace Only should only be used for scenes as the one described above. The scene will render faster than with Hybrid (but the antialiasing will be of slightly lesser quality).
光线追踪只应该用于上面描述的场景。场景渲染比混合渲染快(但是抗锯齿的质量稍微差一点)。