 Inactive Object
View
查看
标题
Here you can enter a name for the view. This will be displayed by the HUD by default.
在这里你可以为视图输入一个名称。默认情况下,HUD 会显示这个名称。
投影
You can use this setting to change the projection type (e.g., to Perspective, Bird, Diametric).
你可以使用这个设置来改变投影类型(例如,透视,鸟,径)。
链接相机
This box does the same job as the viewport’s Cameras / Use Camera sub-menu — in other words, it allows you to choose which camera the viewport is linked to. Drag & drop the desired camera from the Object Manager into this box.
这个框的作用与视窗的 Cameras/Use Camera 子菜单相同ーー换句话说,它允许你选择视窗链接到哪个相机。将所需的相机从对象管理器拖放到这个框中。
阴影
These settings define the display mode used for active objects.
这些设置定义了用于活动对象的显示模式。
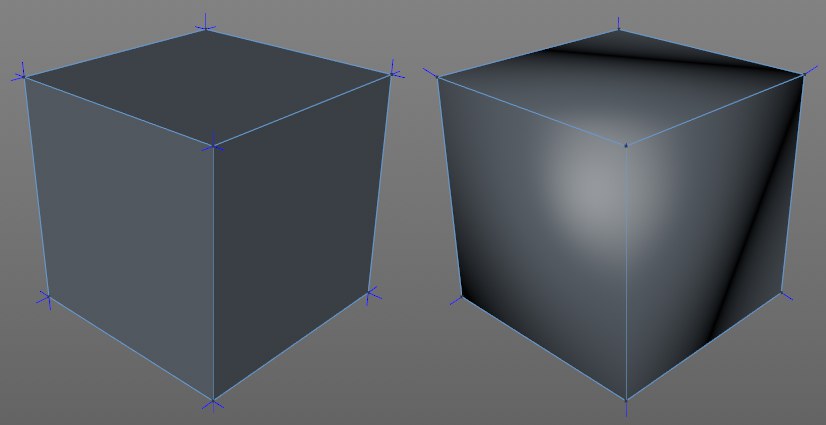
Gouraud Shading
Gouraud Shading (Lines)
Gouraud ShadingGouraud 阴影(线)

The highest quality display mode for viewports. All objects are shaded with smoothing and light sources are taken into account. The redraw rate is affected most by processor speed and graphics card speed — the faster your CPU and graphics display card, the faster scenes will redraw. If the display update becomes too slow, try reducing the size of the viewport..
最高质量的视窗显示模式。所有的物体都用平滑的方法进行阴影处理,光源也被考虑在内。重绘速度受处理器速度和显卡速度的影响最大ーー CPU 和显卡的速度越快,场景重绘的速度就越快。如果显示更新变得太慢,试着减小视口的大小。.
In this mode you can add wireframes or isoparms to the Gouraud shading by choosing
Wireframe or Isoparms from the
在这种模式下,你可以通过从显示菜单中选择线框图或等臂图来为 Gouraud 着色添加线框图或等臂图。
Quick Shading
Quick Shading (Lines)
快速造型快速阴影(线)

This is almost identical to Gouraud Shading. The difference is that the auto light is used instead of the scene’s lights to calculate the shading. This can lead to a faster redraw rate.
这几乎是相同的古拉德阴影。不同之处在于,用自动光代替场景中的光来计算阴影。这可以导致更快的重绘率。
In this mode you can add wireframes or isoparms to the Quick shading by choosing
Wireframe or Isoparms from the
在这种模式下,你可以通过从显示菜单中选择线框或等臂来添加线框或等臂到快速着色。
Constant Shading
Constant Shading (Lines)
恒定的阴影(线)

This option lets you display constant shading only or constant shading in conjunction with the wire frame.
此选项允许您仅显示常量着色或与线框一起显示常量着色。
隐藏线

In contrast to Lines mode, hidden lines are not displayed.
与行模式相反,隐藏线不会显示。
台词

The Lines mode allows the complete display of the polygon mesh including hidden lines.
线模式允许包括隐藏线在内的多边形网格的完整显示。
电线
线框图

The wireframe mode draws lines on the objects if combined with a mode that allows this such as Gouraud Shading (Lines).
线框模式绘制线条的对象,如果与模式,允许这一点,如 Gouraud 阴影(线)。
等臂

This mode displays isoparm lines for objects that use them such as Generator objects. Other objects such as polygon objects will be displayed in wireframe. This mode will only have an effect if used in combination with a mode that supports it such as Gouraud Shading (Lines).
此模式显示使用等臂线的对象,如生成器对象。其他物体,如多边形对象将显示在线框图。这种模式只有在与支持它的模式(如高卢阴影(线))结合使用时才会有效果。
方格

This mode displays each object as a box. Each box has the same dimensions as the object it represents. Box is the second fastest display mode available, making it useful for extremely demanding scenes.
此模式将每个对象显示为一个框。每个盒子与它所代表的物体具有相同的尺寸。是第二快的显示模式可用,使它有用极其苛刻的场景。
骨骼

This is the fastest display mode of all. It is only suitable for hierarchical structures. Each object origin is shown as a small dot and the dots are connected according to the hierarchy. This mode can be useful for character animation. Not only is it extremely fast, it also removes all non-critical lines to expose the skeleton.
这是最快的显示模式。它只适用于等级结构。每个物体的原点都显示为一个小点,并根据层次结构将点连接起来。这种模式可以用于角色动画。它不仅速度极快,而且还删除了所有非关键的线以暴露骨架。
音量矢量
Here you can define how the selected Volume Vectors are displayed in the view. For details see Volume Vectors.
在这里,您可以定义选定的体积向量在视图中的显示方式。
材质
To switch off material mapping, disable this option.
若要关闭材质映射,请禁用此选项。
背面剔除
Defines whether points, edges or polygons are used for display when the respective surface Normals are oriented away from the camera.
定义当相应的表面法线偏离相机时,是否使用点、边或多边形来显示。
Tip: 提示:多边形法线
If you enable this option, surface Normals will be displayed in the viewport for the selected polygons. Each normal is displayed as a small auxiliary line perpendicular to the polygon’s surface. By convention, the direction of a normal represents the direction of its polygon. In the Options menu you will find a command with which this option can be enabled or disabled.
如果启用此选项,表面法线将显示在所选多边形的视区中。每个法线都显示为一条垂直于多边形表面的小辅助线。根据约定,法线的方向代表其多边形的方向。在“选项”菜单中,您将找到一个可以启用或禁用此选项的命令。
For example, backface culling checks the direction of each normal to determine whether its surface should be drawn — if the normal points away from the camera, the surface is not drawn (the surface is assumed to point away from the camera, just like its normal).
例如,背面剔除检查每个法向的方向,以确定是否应该绘制其表面ー如果法向点远离相机,则不绘制表面(假定表面与法向点一样远离相机)。
仅供选择
Disable this option to display all polygon Normals of the selected objects.
禁用此选项可显示所选对象的所有多边形法线。
只选择顶点标准
Use these settings to define whether or not Vertex Normals should be displayed in Use Point, Edge or Polygon mode (in the Viewport’s Option menu you will find an option for enabling or disabling this feature). When in Use Polygon mode, Selected Only will display Vertex Normals that belong to selected polygons. If this option is disabled, all Vertex Normals will be displayed in all 3 component modes.
使用这些设置来定义顶点法线是否应该在使用点、边缘或多边形模式下显示(在 Viewport 的选项菜单中,你会找到一个启用或禁用此功能的选项)。在使用多边形模式时,“仅选”将显示属于所选多边形的顶点法线。如果禁用此选项,所有顶点法线将显示在所有3个组件模式。
什么是顶点法线?
As you know, polygon normals are an element of every polygon. A polygon normal is a vector that lies perpendicular to each polygon. Vertex Normals are normals at each of a (non-smoothed) polygon’s points. Each polygon point can have 1 to 4 Vertex Normals, depending on the number of polygons to which it belongs.
如你所知,多边形法线是每个多边形的元素。多边形法线是垂直于每个多边形的矢量。顶点法线是一个(非光滑)多边形的每一个点的法线。每个多边形点可以有1到4个顶点法线,这取决于它所属的多边形数量。
These Vertex Normals are evaluated for each visible surface point for shading/rendering and interpolated at this location to produce a soft, homogenous shading.
这些顶点法线是评估每个可见表面点的着色/渲染和插值在这个位置产生软,同质着色。
Currently, displaying surface Normals only serves informational purposes since they cannot be edited comfortably.
目前,显示表面法线只是为了提供信息,因为它们不能被舒适地编辑。
You can, however, influence them indirectly, e.g., by applying Use Edge Breaks or modifying the Angle Limit in the Phong tag’s settings:
然而,你可以间接的影响他们,例如,通过应用使用边缘突破或者修改 Phong 标签设置中的角度限制:
 Left no smoothing, right smoothing via the Phong
tag. 左边没有平滑,右边通过 Phong 标签平滑
Left no smoothing, right smoothing via the Phong
tag. 左边没有平滑,右边通过 Phong 标签平滑
In the image above, the shading on the left is not smoothed using the Phong tag; on the right smoothing with a Phong Angle of 90°. On the right, are 3 overlapping Vertex Normals. If an interpolation between these three is made for shading, the smoothing as shown, in which the shading edges are removed, will be produced. The result is shading as it would appear on a sphere.
在上面的图像中,左边的阴影没有使用 Phong 标签进行平滑; 右边的阴影平滑为 Phong 角90 ° 。在右边,是3个重叠的顶点法线。如果在这三者之间进行插值以进行阴影处理,将产生如图所示的平滑处理,其中去除阴影边缘。其结果是阴影,因为它会出现在一个球体上。
Normal tags that are normally imported with CAD formats, can set by Vertex Normals,
independent of surface Normals in order to achieve a better shading (than the automatic procedure described
above). By using Normal tags, Vertex Normals can also be displayed numerically in the Structure Manager
(
普通标签,通常是进口与 CAD 格式,可以设置顶点法线,独立于表面法线,以实现更好的着色(比自动程序上述)。通过使用法线标签,顶点法线也可以在构造管理器(模式 | 法线)中以数字形式显示和修改。
X 射线
To enter X-Ray mode, enable this option. If the active object is a polygon object, it will become semi-transparent so that you can see all of its points and edges.
若要进入 x 射线模式,请启用此选项。如果活动对象是一个多边形对象,它将成为半透明,以便您可以看到它的所有点和边。
 Isoline Editing enabled (top) and disabled
(bottom). 等值线编辑启用(顶部)和禁用(底部)
Isoline Editing enabled (top) and disabled
(bottom). 等值线编辑启用(顶部)和禁用(底部)
If this option is enabled, all the elements of the Subdivision Surfaces cage object — i.e., its points, edges and polygons — will be projected onto the smoothed Subdivision Surfaces object. This allows you to select these elements directly on the smoothed object. Although it may look like you are selected smoothed parts of the object, you are, in fact selecting cage elements!
如果启用此选项,细分曲面的所有元素(即其点、边和多边形)都将投影到光滑的细分曲面对象上。这允许您直接在 smoothed 对象上选择这些元素。尽管它看起来像是你被选中了对象的光滑部分,但实际上你是在选择 cage 元素!
变形的编辑
 A cube deformed by a Bulge object with Deformed
Editing disabled (left) and enabled (right). 一个立方体变形由一个膨胀的对象禁用变形编辑(左)和启用(右)
A cube deformed by a Bulge object with Deformed
Editing disabled (left) and enabled (right). 一个立方体变形由一个膨胀的对象禁用变形编辑(左)和启用(右)
If it frustrates you when you edited a polygon object that is being deformed by a deformer and the polygon object reverts to its non-deformed state as soon as you change to point, edge or polygon mode, now Cinema 4D allows you to edit polygon objects while they are still in the deformed state — simply enable the Deformed Editing option.
如果当你编辑一个被变形器变形的多边形对象,而当你改变为点、边或多边形模式时,多边形对象又恢复到它的非变形状态,这会让你感到沮丧,现在 Cinema 4D 允许你在多边形对象仍然处于变形状态时编辑它们ー只需启用 Deformed Editing 选项。
Some tools do not support Deformed Editing mode. While you are using such tools the polygon object will temporarily revert to its non-deformed state. 有些工具不支持 Deformed Editing 模式。在使用这些工具时,多边形对象将暂时恢复到未变形状态
Inactive Object
非活动对象
单独设置
Enable this option if you want the inactive objects to be displayed using different modes to the ones specified
on the viewport’s
如果您希望使用与 viewport 的 Display 菜单上指定的模式不同的模式显示非活动对象,请启用此选项。
These settings define the display mode used for inactive objects.
这些设置定义了非活动对象的显示模式。
显示标签
If this option is enabled, the inactive objects will use the display mode defined in their Display tags (if present) instead of the setting defined here in the viewport settings.
如果启用此选项,非活动对象将使用在其 Display 标记中定义的显示模式(如果存在) ,而不是在 viewport 设置中定义的设置。
音量矢量
Here you can define how non-selected Volume Vectors are displayed at the Viewport level. For details see Volume Vectors.
在这里,您可以定义如何在 Viewport 级别显示未选择的体积向量。