Hair material
毛发材质
材质编辑器

Just as with other materials in Cinema 4D, the Hair material can also be edited in either the Material Editor window (double-click on the Hair material) or in the Attribute Manager. The Material Editor is used for the following descriptions and screenshots.
正如其他材质在C4D,毛发材质也可以编辑材质编辑窗口(双击毛发材质)或在属性管理器。材质编辑器用于以下描述和截图。
A Hair material is made up of numerous material channels. You can activate or deactivate these channels to your heart’s content, and see what all you can create! When you click on a material channel, its properties will be made visible on the right-hand side in the Material Editor. As you can see in the image above, most channels also contain settings within menus that can be opened and closed (e.g., Roots, Tips, Colors, etc.). Clicking anywhere on the corresponding bar will open or close that menu.
毛发材质是由许多材质通道组成的。你可以激活或关闭这些频道,以你的心的内容,看看什么都可以创造!当你点击一个材质通道时,它的属性会在材质编辑器的右边显示出来。正如你在上面的图片中看到的,大多数通道还包含菜单中可以打开和关闭的设置(例如,root,Tips,Colors 等)。单击相应栏上的任意位置将打开或关闭该菜单。
At the top left of the Material Editor you will see a preview of the Hair material. This preview works similarly to the normal Cinema 4D material preview.
在材质编辑器的左上角,你会看到毛发材质的预览。这个预览工程类似于正常的C4D 材质预览。
Hair materials offer the following additional menu items (right-click on the preview image):
毛发材质提供以下附加菜单项(右键点击预览图片) :
All Hair channels are described here.
这里描述了所有的毛发通道。
毛发材质和物品
In most cases, the Hair material will be automatically assigned to the Hair object if you use the Create Hair command to grow hair on an object or selected item. The thickness of the hair and its style will then be influenced by the guides.
在大多数情况下,如果您使用 Create Hair 命令在对象或选定项上生长毛发,那么 Hair 材质将自动分配给 Hair 对象。毛发的厚度和发型会受到导游的影响。
The Hair material can also be applied manually to the following types of objects:
毛发材质也可以手动应用于以下类型的物体:
毛发绘图材质
投影
A Hair material with numerous Hair channels applied to an object requires a projection type. First, determine which of the following applies:
一个毛发材质与许多毛发渠道应用到一个对象需要一个投影类型。首先,确定下列哪项适用:
混合毛发材质

A Hair object can be assigned several Hair materials by simply dragging and dropping the Hair material from the Material Manager onto the Hair object in the Object Manager. Each time, a Hair Material tag (see Hair Material tag) will be created that defines how the Hair material is blended.
一个毛发对象可以分配几个毛发材质,只要简单地拖拽毛发材质从材质管理器到毛发对象管理器。每次都会创建一个 Hair Material 标签(参见 Hair Material 标签)来定义如何混合 Hair Material。
毛发通道序列
The Hair material channels will always be applied in the following order:
毛发材质通道将始终按以下顺序应用:
This applies only to the channels listed above and not to other channels.
这只适用于上面列出的频道,而不适用于其他频道。
Is the order in which the above channels are applied important? Well, it’s similar to the Cinema 4D Deformation objects – a different sequence would lead to a different result.
上述通道的应用顺序是否重要?嗯,它和C4D 变形物体很相似——不同的顺序会导致不同的结果。
Although this sequence cannot be changed, there is a trick you can use to work around this, if necessary:
虽然这个顺序不能改变,但是如果有必要的话,你可以使用一个技巧来解决这个问题:
Let’s say you decide you want to apply Frizz before Bend is applied. To do this, you need two materials - one with Frizz active, and Bend deactivated, and the other with Bend active, and Frizz deactivated. Apply both materials to the Hair object. In the Hair Material Tags that are subsequently created, deactivate the Use Available option for each tag. This lets each tag have an equal effect on all hairs.
假设您决定在应用 Bend 之前应用 Frizz。要做到这一点,您需要两种材质-一个体积曲活跃,弯曲停用,另一个体积曲活跃,和体积曲停用。将两种材质都应用到毛发物体上。在随后创建的毛发材质标签中,停用每个标签的使用可用选项。这使得每个标签对所有毛发都有相同的影响。
A deciding factor for the order in which channels will be applied is their placement in the Object Manager. The left-most Hair material will be applied first.
通道应用顺序的决定因素是它们在对象管理器中的位置。最左边的毛发材质将首先应用。
Editing Parameters Using Function Graphs and Textures
使用函数图和纹理编辑参数
Hair materials offer two basic methods for editing, which apply to almost every channel.
毛发材质提供了两种基本的编辑方法,适用于几乎每一个渠道。
1. 函数图
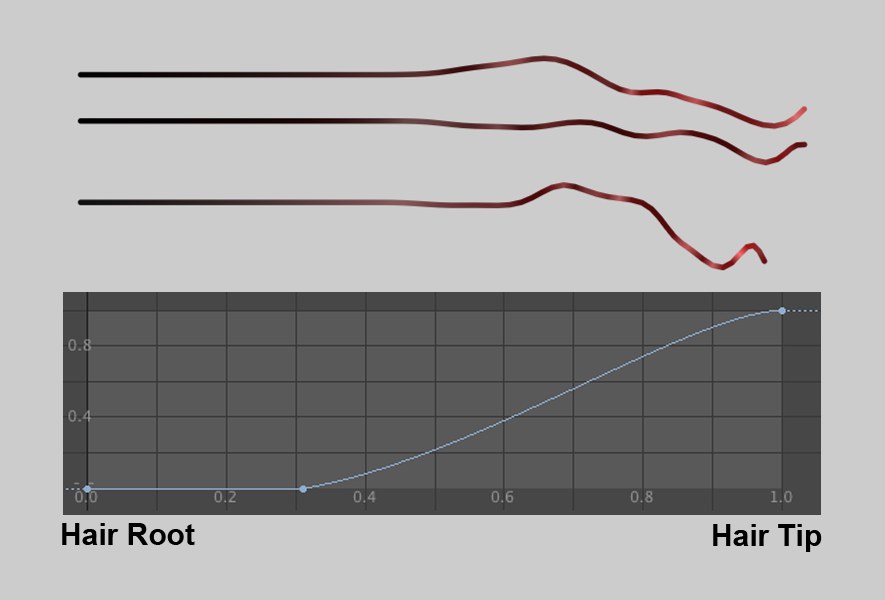
Function graphs can be used to adjust the strength of a channel’s influence along the length of the hair. The left end of the graph represents the hair root, the right end represents the tip of the hair. In the example above, the Kink of the hair was defined using the curve. The left half of the curve has a value of 0, i.e., the hair remains straight. The curve’s value increases on the right, resulting in the hair being influenced by the Kink more and more towards the tip. Often, such a curve will have a separate parameter which lets you set a maximum value for a channel.
功能图可以用来调整强度的通道的影响沿着长度的毛发。图的左端代表发根,右端代表毛发的尖端。在上面的例子中,毛发的扭结是用曲线定义的。曲线的左半部分的值为0,也就是说,毛发仍然是直的。曲线的价值增加的权利,导致毛发受到影响,扭结越来越多的向顶端。通常,这样的曲线会有一个单独的参数,可以让您为通道设置一个最大值。
Several function graphs have both a negative and a positive range. In this instance, a null-curve will result in a straight hair at mid height.
一些函数图既有正的范围也有负的范围。在这种情况下,一个零曲线将导致在中等高度的直发。
2. 纹理
 In this example, the Hair material channel 在这个例子中,毛发材质通道Kink 扭结 is defined using a texture. 是用纹理定义的
Most channels can also be controlled over an entire surface using a texture (vertex maps can even be painted!). Such a texture is always assigned to a setting that defines a maximum value that can be applied. In most cases, only the a shader’s or bitmap’s grayscale will be used.
大多数通道也可以控制在整个表面上使用纹理(顶点地图甚至可以绘制!).这样的纹理总是分配给定义可应用的最大值的设置。在大多数情况下,只使用着色器或位图的灰度。
The only exception: In rare cases, the RGB values will be utilized to define direction (e.g., Displacement channel: Direction).
唯一的例外: 在极少数情况下,RGB 值将被用来定义方向(例如,位移通道: 方向)。
Don’t forget that shaders can be animated. Especially interesting animations can, for example, be created using the 不要忘记着色器可以是动画的。特别有趣的动画,例如,可以创建使用Noise 噪音 shader. It can be made to 着色器。它可以做成wobble 摆动 using the 使用Animation Speed 动画速度 setting. Most material channels can be animated. 大多数材质频道可以动画化 Some shaders require texture data in order to be calculated properly, i.e., the hair-covered object should have a material assigned to it, just to be sure. 有些着色器需要纹理数据才能正确计算,例如,被毛发覆盖的对象应该有一个分配给它的材质,只是为了确保正确
毛发材质
毛发着色器