Light Mapping
光线测绘
常规
Simply stated, the Light Mapping method works as follows: A series of samples are emitted into the scene from the angle of view of the camera. These samples are often reflected (depending on the Maximum Depth value and if the sample doesn’t first strike the sky or nothing at all) and the colors that are calculated when geometry is struck will be evaluated. Entire sample chains result, which can be calculated very quickly (also for high numbers of reflections) and in consideration of other sample chains - faster than all other GI methods. The calculated colors are saved in a cell pattern (alternatively as a file, if desired, which can be re-used later) and then made available using the Primary Method, which itself uses the Light Map with a sample depth greater than 1 when gathering light (samples).
简单地说,光线测绘法的工作原理如下: 一系列样品从相机的视角发射到场景中。这些样本通常会被反射(取决于最大深度值,如果样本没有首先撞击天空或者根本没有撞击) ,并且当几何体被撞击时计算出的颜色将被评估。整个样本链的结果,这可以计算得非常快(也为高数量的反射) ,并考虑到其他样本链-快于所有其他 GI 方法。计算出来的颜色保存在一个单元格模式中(如果需要,可以作为文件保存,以后可以重复使用) ,然后使用主方法(Primary Method)提供,该方法本身在采集光线时使用样本深度大于1的光线贴图(样本)。
Note that the rendered image will more often be brighter due to the high sample depth, which is higher than that of other GI methods; This can be compensated for by reducing the Intensity value.
需要注意的是,由于采样深度较高,渲染后的图像会更亮一些,这比其他的 GI 方法要高; 这可以通过降低亮度值来补偿。
This method has both advantages and disadvantages:
这种方法既有优点也有缺点:
Advantages:
优点:
设置
First, we will take a look at what a good Light Map looks like (you can make a Light Map visible by setting Mode to
首先,我们来看看一个好的光线贴图是什么样的(你可以通过设置可视化模式来制作一个可视化的光线贴图) :

At the top left and top right are poor and better quality Light Maps, respectively. Good Light Maps have a homogenous light progression; in contrast, Light Maps with poor quality appear inhomogenous. When rendered, the difference is not as apparent because the Primary Method samples the Light Map with numerous samples and produces median values. Nevertheless, the Primary Method will only deliver sub-optimal results even with the best settings if the Light Map that was initially calculated was of poor quality. This can be seen at the bottom left of the image in which flickering occurs in the regions around the window and beneath the left ball.
左上角和右上角分别是低质量和高质量的灯光地图。好的光线贴图有一个均匀的光线进展,相比之下,质量差的光线贴图出现不均匀。当渲染时,差异并不明显,因为初级方法用大量的样本取样光图,并产生中值。尽管如此,如果最初计算的光照图质量很差,即使有最好的设置,初级方法也只能提供次优的结果。这可以在图像的左下角看到,在窗口周围和左下方的区域出现了闪烁。
In the Prefilter and Interpolation Method settings you will find functions that can be used to remove the cell pattern and for smoothing (both render very fast) in order to achieve the most homogenous light dispersion possible.
在预滤镜和插值方法的设置中,你会发现可以用来移除单元格模式和平滑(两者渲染都非常快)的函数,以实现最均匀的光色散可能。
See also Optimize Light Maps for avoiding light leaks.
请参阅优化灯光贴图,以避免灯光泄漏。
路径计数(x1000)[1. . 100000]
 Left smaller, right larger 左边小,右边大Path Count (1000s) 路径计数(1000秒) values. 价值观
Next to the Record Density setting, Path Count (1000s) is the most important setting for adjusting Light Map quality.
仅次于记录密度设置,路径计数(1000秒)是调整光照贴图质量最重要的设置。
The Path Count (1000s) value (which is multiplied internally by 1000) defines the number of samples that should be calculated for the entire scene. A sample chain with a depth corresponding to the Maximum Depth value will be generated.
Path Count (1000s)值(内部乘以1000)定义了应该为整个场景计算的样本数。将生成具有与最大深度值对应的深度的样本链。
The higher the number, the more homogenous the light dispersion will be and the longer the corresponding render times will be - more samples will be used per cell element and the random color divergence (at the top of the image, a sample coincidentally strikes a black seam) of neighboring cells will be smaller.
数字越高,光色散越均匀,相应的渲染时间越长——每个单元元素使用的样本越多,相邻单元的随机颜色发散(在图像顶部,一个样本恰好碰到一个黑缝)也越小。
Samples Size[0.001..1]
Samples Size[0.001..100000m]
样本大小[0.001. . 1]样本大小[0.001. . 100000米]
 Left larger, right smaller 左大,右小Sample Size 样本数量 values. 价值观
Use these values to define the cell size. The smaller the cells, the more accurate the result will be with regard to details. Cells that are too large will quickly lead to light leaks and are overall less precise with regard to details, i.e., shadows will be lost here and there. Depending on the Scale defined, Sample Size can be defined as absolute (World) or relative (Screen).
使用这些值定义单元格大小。单元格越小,细节方面的结果就越精确。太大的单元格会很快导致光线泄漏,总的来说在细节上不够精确,也就是说,阴影会在这里或那里丢失。根据定义的比例,样本大小可以定义为绝对(世界)或相对(屏幕)。
比例
You can select from the following options:
你可以从以下选项中选择:
This setting is affected by several algorithms, which use other criteria (e.g., very small Sample Size values will produce larger cells and geometry such as spheres will have smaller cells) to dynamically determine the cell size.
这种设置受到几种算法的影响,这些算法使用其他标准(例如,非常小的样本大小值将产生更大的单元格,而球体等几何体将有更小的单元格)来动态确定单元格的大小。
直接照明
Enabling this option will speed up rendering for Projects that have very many real light sources. For GI calculation (and not only for GI), surfaces illuminated by light sources will be placed directly into Light Maps:
启用此选项将加快项目的渲染速度,有很多真正的光源。对于 GI 计算(不仅仅是 GI) ,被光源照亮的表面将被直接放置到光照图中:
 Left: 左图:Direct Lights 直接照明
disabled; right: enabled. The strip of light is the light emitted by 120 Spot lights. 这条光带是由120盏聚光灯发出的光
Left: 左图:Direct Lights 直接照明
disabled; right: enabled. The strip of light is the light emitted by 120 Spot lights. 这条光带是由120盏聚光灯发出的光
The gain in render speed can be quite substantial, depending on the scene (simply put, light source information gathered during Light Map calculation is subsequently re-used by the GI Primary Method). Very good results at moderate render times can be achieved when using QMC+LM.
渲染速度的增益可以是相当可观的,取决于场景(简单地说,光源信息收集在光线贴图计算随后重新使用的 GI 主要方法)。使用 qmc + lm 可以在中等渲染时间获得非常好的效果。
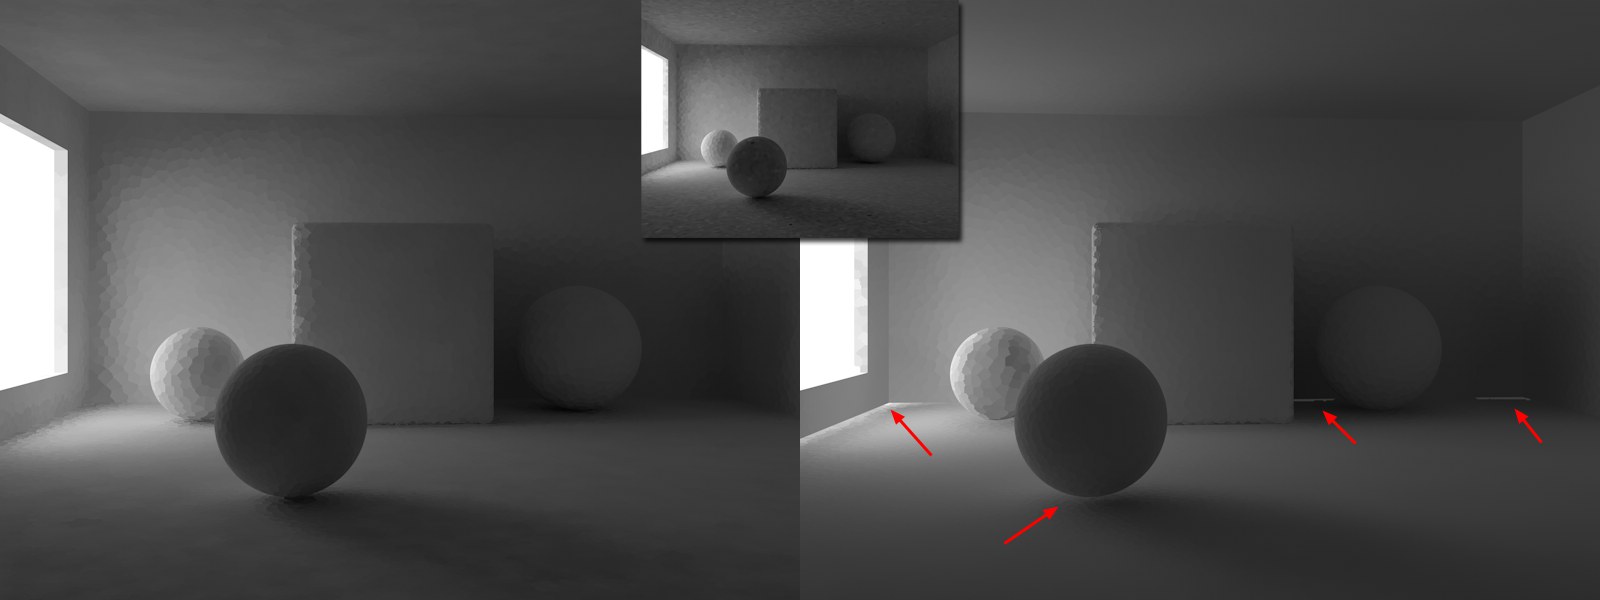
The following image was rendered using QMC+QMC (Record Density of 8) on the left, QMC+LM (Direct Lights disabled) at center, and QMC+LM (Direct Lights enabled) at right:
下面的图像使用 qmc + qmc (记录密度为8)渲染在左边,qmc + lm (禁用直接照明)在中间,qmc + lm (启用直接照明)在右边:
 This strip of light is also emitted by 120 Spot
lights. 这条光线也是由120束聚光灯发出的
This strip of light is also emitted by 120 Spot
lights. 这条光线也是由120束聚光灯发出的
Note how much faster and better Direct Lights renders. The Light Map’s high Record Density produces a brighter and more realistic image.
注意如何更快更好的直接灯呈现。灯光地图的高记录密度产生了一个更明亮和更真实的图像。
使用相机路径
If this option is enabled, all sample start points will be ascertained for the entire camera movement. This is useful if a camera movement’s start and end frames differ greatly and you have to ensure that the Light Map "sees" all angles of view. A single, unchanged and therewith stable (Light Map)cache will then be used to calculate the animation. If the camera only moves slightly and the angle of view does not change much, this option does not have to be enabled.
如果这个选项被启用,所有的样品起始点将被确定为整个相机运动。这是有用的,如果一个相机运动的开始和结束帧大不相同,你必须确保光地图“看到”所有的视角。然后使用一个单独的、不变的、带有稳定的(光线贴图)缓存的缓存来计算动画。如果相机只是轻微移动,视角变化不大,则不必启用此选项。
Tip: 提示:显示预览路径
This option does not affect the Light Map directly. If enabled, the progress of the samples just calculated will be shown during calculation. These will then be compiled according to Sample Size in a cell and averaged.
这个选项不会直接影响灯光贴图。如果启用,则在计算过程中将显示刚刚计算的样本的进度。然后,这些将被编译根据样本大小在一个单元格和平均。
构建辐射度图
Enabling this option is like switching on a turbo charger. If enabled, the Light Map will be calculated and it will then be converted to a Radiosity-Map, which will be used internally for rendering. This dramatically reduces render time while basically maintaining the same level of quality (both with IR+LM and with QMC+LM).
启用此选项就像打开涡轮增压器。如果启用,光照图将被计算,然后它将被转换为辐射度图,这将用于内部渲染。这显著地减少渲染时间,同时基本上保持相同的质量水平(包括 ir + lm 和 qmc + lm)。
Disadvantage: Radiosity Maps require a lot of memory for the saved cache on the hard drive as well as RAM. Problems can occur with complex projects. It is therefore recommended that Auto Load and Auto Save not be enabled in the Cache Files tab when working with this type of Radiosity Map. Rendering a Light Map with the right settings is also very fast.
缺点: 辐射度映射需要大量内存来保存硬盘上的缓存以及 RAM。复杂的项目可能会出现问题。因此,建议在使用这种类型的辐射度图时,不要在缓存文件选项卡中启用自动加载和自动保存。使用正确的设置渲染光线贴图也非常快。
地图密度[10. . 1000% ]
This settting works like the Map Density Radiosity Map setting of the same name, but that the sampling is much faster. Simply put, this is where you adjust the texel size.
这种设置类似于同名的映射密度辐射度映射设置,但是采样速度要快得多。简单地说,这就是你调整纹理大小的地方。
抽样分组[1. . 16]
This setting works like the Sampling Subdivisions Radiosity Map setting of the same name, but the sampling is much faster. Simply put, this is where you adjust a type of ,antialiasing’ for the texels.
此设置的工作方式类似于同名的采样细分辐射度图设置,但采样速度要快得多。简单地说,这是你调整一种类型的,反走样的纹理。
使光照地图同质化
 Left without, right with Prefilter. 左边没有,右边有预过滤器
The Prefilter ensures that a inhomogenous, spotty Light Map (or Radiosity Map) is converted to a more uniform map - before they are used for rendering or one of the following interpolations.
Prefilter 确保在使用不同质的斑点光图(或辐射度图)进行渲染或以下内插之一之前,将其转换为更加统一的图。
This is done per cell. Depending on the settings, the colors of several neighboring cells will be averaged and then assigned to the cell. This process is calculated very fast and has basically no affect on render time.
这是在每个单元格中完成的。根据设置,几个相邻单元格的颜色将被平均,然后分配给该单元格。这个过程计算非常快,基本上没有影响渲染时间。
Prefilters can reduce flickering in animation especially in conjunction with the Irradiance CachePrimary Method. However, note that a type of blurr effect takes place that can swallow details and lead to light leaks (which can be compensated for by improving the Path Count (1000s) and Sample Size settings).
预滤波器可以减少动画中的闪烁,特别是与辐照度 CachePrimary 方法相结合。然而,请注意,某种类型的 blurr 效果会吞噬细节并导致光线泄漏(可以通过改进路径计数(1000s)和样本大小设置来补偿)。
Tip: 提示:预过滤器
Enables/disables the Prefilter option.
启用/禁用 Prefilter 选项。
预过滤样本[1. . 64]
 At left a small 在左边一个小Prefilter
Samples 预过滤样本 value, at right a larger value. Note that contact shadows and light leaks are present on the
right. 价值,在右边一个更大的价值。注意,接触阴影和光泄漏出现在右侧
At left a small 在左边一个小Prefilter
Samples 预过滤样本 value, at right a larger value. Note that contact shadows and light leaks are present on the
right. 价值,在右边一个更大的价值。注意,接触阴影和光泄漏出现在右侧
Use this setting to define the size of the radius for the current cell by averaging surrounding cells.
使用此设置通过对周围单元格的平均值定义当前单元格的半径大小。
Values that are too large will swallow details and lead to light leaks.
太大的值会吞噬细节并导致漏光。
Interpolation Method
Sample Count[1..256]
Size Ratio[100..1600%]
插值方法样本数[1. . 256]大小比率[100. . 1600% ]
 The pre-filtered Light Map on the left has
interpolation added at the right. 左边的预滤光灯贴图在右边添加了插值
The pre-filtered Light Map on the left has
interpolation added at the right. 左边的预滤光灯贴图在右边添加了插值
During rendering, the Light Map’s (or Radiosity Map’s) cells are actually interpolated so the cell structure is dissolved if the settings’ values are high enough. This will produce even brightness progressions.
在渲染过程中,光线贴图(或辐射度贴图)的单元格实际上是内插的,因此如果设置的值足够高,单元格结构就会被溶解。这将产生甚至光明的级数。
Even better results can be achieved in combination with the Prefilter. However, interpolation requires a corresponding amount of additional render time and correspondingly more light leaks will result with larger interpolations.
甚至更好的结果可以实现与预滤波器的组合。但是,插值需要相应数量的额外渲染时间,相应地,随着插值的增加,会产生更多的漏光。
There are several methods from which to select for planar interpolation of discontinuous color gradients (cells):
有几种方法可以选择不连续颜色梯度(单元格)的平面插值:
What these effects look like is shown in the image below (for illustration purposes, Prefilter was not used):
这些效果如下图所示(为了说明起见,没有使用 Prefilter) :
 The state the left is prior to interpolation. In
the center and at the right various interpolation methods and settings were used. 左边的状态优先于插值。在中间和右侧使用了各种插值方法和设置
The state the left is prior to interpolation. In
the center and at the right various interpolation methods and settings were used. 左边的状态优先于插值。在中间和右侧使用了各种插值方法和设置
模式
Here you can select which Light Map should be displayed: if Visualize is selected, the Primary Method for GI will not be calculated - only the Secondary Method will be displayed and calculated. The examples in the previous image were all rendered using this method. This is very well suited for fine-tuning a Light Map prior to rendering.
在这里你可以选择应该显示哪个光影图: 如果可视化被选中,GI 的主要方法将不会被计算-只有次要方法将被显示和计算。前面图像中的例子都是用这种方法渲染的。这非常适合在渲染之前微调光线贴图。
Otherwise this mode serves to pre-calculate light map caches (without final rendering).
否则这个模式可以用来预先计算光线贴图缓存(不需要最终渲染)。
The final rendering must ALWAYS be done in Normal mode.
最终的渲染必须始终在正常模式下进行。