General
常规
预置
Since there are so many possible combinations of GI methods and being able to save a setup for a given Project type can really speed up worflow, this Preset option has been created, which makes it possible to save GI settings for a specific Project type.
因为有这么多可能的组合的 GI 方法和能够保存一个设置给定的项目类型可以真正加快工作流,这个预置选项已经创建,这使得有可能保存一个特定的项目类型的 GI 设置。
In doing so, it’s important to know how your Project is set up. You should differentiate between two main types:
在这样做的时候,了解你的项目是如何建立的很重要,你应该区分两种主要的类型:
These presets should only serve as a starting point. These settings can then be fine-tuned to optimize render quality or render time. Additional details can be found in each option’s description. Note also the example renderings, which illustrate various GI combinations.
这些预设应该只作为一个起点。然后可以对这些设置进行微调,以优化渲染质量或渲染时间。可以在每个选项的描述中找到其他详细信息。还要注意示例渲染,它演示了各种 GI 组合。
You can occaisionally experiment with unusual combination of methods. Often enough you will discover combinations that work better for a given situation.
你可以偶尔尝试不同寻常的方法组合。通常情况下,你会发现在特定情况下更好的组合。
习俗
As soon as you modify a GI setting, this option will be activated.
一旦您修改了 GI 设置,此选项将被激活。
缺省值(IC)
Irradiance Cache: The fastest GI method with a Diffuse Depth of 1.
辐照度缓存: 扩散深度为1的最快的 GI 方法。
室内空间
内部-预览
Irradiance Cache + Radiosity Maps: A fast preview with reduced Diffuse Depth.
辐照度缓存 + 辐射度映射: 一个缩小漫射深度的快速预览。
Interior - Preview (High Diffuse Depth)
内部-预览(高漫射深度)
Irradiance Cache + Light Mapping.
辐照度缓存 + 光照映射。
Interior - Preview (Small Illuminants)
内部预览(小型照明)
Irradiance Cache + Light Mapping.
辐照度缓存 + 光照映射。
内部-高
Irradiance Cache + Irradiance Cache.
辐照度缓存 + 辐照度缓存。
Interior - High (High Diffuse Depth)
内部-高(高漫射深度)
Irradiance Cache + Light Mapping.
辐照度缓存 + 光照映射。
Interior - High (Small Illuminants)
室内-高(小光源)
Irradiance Cache + Light Mapping.
辐照度缓存 + 光照映射。
The following information is important with regard to Interior presets:
关于内部预置,以下信息很重要:
外部空间
外观-预览
Irradiance Cache + Radiosity Maps: A fast preview with reduced Diffuse Depth.
辐照度缓存 + 辐射度映射: 一个缩小漫射深度的快速预览。
外部-天空
Irradiance Cache + QMC.
辐照度缓存 + QMC。
外部-HDR 图像
Irradiance Cache + QMC.
辐照度缓存 + QMC。
The following information is important with regard to Exterior presets:
关于外部预置,以下信息非常重要:
对象可视化
Object Visualization - Preview
对象可视化-预览
Irradiance Cache + Light Mapping.
辐照度缓存 + 光照映射。
对象可视化-高
Irradiance Cache + Irradiance Cache.
辐照度缓存 + 辐照度缓存。
Object Visualizations are well-lit and are most often centered in the composition, which means that they generally require few light reflections.
物体可视化是光线充足的,并且通常集中在构图中,这意味着它们通常需要很少的光反射。
Physical Renderer’s Progressive Sampler
物理渲染器的进步采样器
进行性-非准备性
QMC + QMC.
+ QMC.
Progressive - Fast Complete Diffuse
渐进-快速完全漫反射
QMC + Light Mapping.
灯光映射。
These two options are designed for use with the Physical Renderer’s
这两个选项设计用于 Physical Renderer 的 ProgressiveSampler 设置。你可以快速渲染质量逐渐提高的粗糙图像,并且可以让你检查整体渲染质量,而不需要等待很长时间直到图像完全渲染。
Note also the rendered examples of various combined methods.
还要注意呈现的各种组合方法的示例。
Primary Method
Secondary Method
主要方法次要方法
 The 这个Primary Method 主要方法
only brightens surfaces that are directly lit and the 只有直接照明的表面才会变亮Secondary Method 第二种方法 is
responsible for additionally reflected light. 负责额外的反射光
The 这个Primary Method 主要方法
only brightens surfaces that are directly lit and the 只有直接照明的表面才会变亮Secondary Method 第二种方法 is
responsible for additionally reflected light. 负责额外的反射光
GI in Cinema 4D works in two parts:
Cinema 4d 中的 GI 作品分为两部分:
 In this example, only the Primary Method was used
on the left side of the picture and both Primary and Secodary methods were used on the right; on the left a
polygon light, at right a normal light. 在这个例子中,图片的左侧只使用了 Primary 方法,右侧使用了 Primary 和 Secodary 方法; 左侧使用了多边形光,右侧使用了普通光
In this example, only the Primary Method was used
on the left side of the picture and both Primary and Secodary methods were used on the right; on the left a
polygon light, at right a normal light. 在这个例子中,图片的左侧只使用了 Primary 方法,右侧使用了 Primary 和 Secodary 方法; 左侧使用了多边形光,右侧使用了普通光
The results of both methods will be added to make up the overall GI when rendered.
这两个方法的结果在呈现时将被添加以组成整个 GI。
Why are these methods separate? Simply because the Primary Method is most important method for the render quality and therefore higher-quality methods such as QMC or IR should be used. Of course these also take correspondingly long to render. For light that is reflected back-and-forth, methods can be used that are of "lesser quality" and render faster (such as Radiosity or Light Mapping).
为什么这些方法是分开的?仅仅因为主方法是渲染质量的最重要的方法,因此应该使用更高质量的方法,如 QMC 或 IR。当然,这些也相应地需要很长的渲染时间。对于来回反射的光线,可以使用质量较差的方法,并且渲染速度较快(例如辐射度或光线映射)。
Depending on the Project’s setup, different methods can then be combined, which practically enough already have Presets defined for them.
根据项目的设置,不同的方法然后可以结合,这实际上已经足够的预置为他们定义。
Tip: 提示:Have a look at the first steps for GI rendering
看看 GI 渲染的第一步
In the following you will find a brief description of the individual methods.
在下面的文章中,您将看到对各个方法的简要描述。
Note also the rendered Examples, rendered with various combinations of both methods (QMC+LM, for example stands for QMC as Primary Method and Light Mapping as Secondary Method).
还要注意呈现的示例,它们是由两种方法的不同组合呈现的(例如,QMC + lm 代表 QMC 为主方法,轻映射为辅助方法)。
主要方法
准蒙特卡罗(QMC)方法
QMC is the most precise but slowest method (also works excellently when used with Light Mapping as Secondary Method at moderate render times). Animations are flicker-free (if not free of noise) when QMC+QMC is used. Details can be found here (How does QMC work?)
QMC 是最精确但速度最慢的方法(在中等渲染时间与光线映射辅助方法一起使用时效果也很好)。当使用 qmc + qmc 时,动画是无闪烁的(如果不是无噪声的话)。详情请参阅这里(QMC 是如何工作的?)
辐照度缓存
Irradiance Cache is a simplified, expeditious method of ascertaining the most important areas of a given Project, calculating GI at these locations and interpolating. Animations tend to flicker if the values are too low. Details can be found here (Irradiance Cache).
辐照度缓存是一个简化的,快速的方法确定最重要的领域的一个给定的项目,计算 GI 在这些位置和插值。如果值太低,动画往往会闪烁。详细信息可以在这里找到(辐照度缓存)。
辐照度缓存(遗产)
This is the Irradiance Cache from Cinema 4D versions prior to R15. It has been maintained so older Projects can be rendered with the same render results. Note that this method cannot be used in conjunction with Team Render.
这是 R15之前C4D 版本的辐射缓存。它已经被维护,所以旧的项目可以呈现相同的渲染结果。请注意,此方法不能与 teamrender 一起使用。
第二种方法
准蒙特卡罗(QMC)方法
QMC as a Secondary Method is best when used as IR+QMC for exterior scenes, and most precise - and slowest - as QMC+QMC.
作为辅助方法的 QMC 在外部场景中作为 ir + QMC 使用时最好,而作为 QMC + QMC 使用时最精确和最慢。
辐照度缓存
IC as Secondary Method works well for interior spaces with small lights defined as GI area lights or GI portal lights. Make sure to reduce the Samples value in combination with QMC+IR. Internally, a much greater number of QMC samples are used for IR, which can increase render times very dramatically.
集成电路作为次要方法适用于室内空间与小灯定义为 GI 区域灯或 GI 门户灯。确保与 qmc + ir 相结合降低样品值。在内部,更多的 QMC 样本用于 IR,这可以极大地增加渲染时间。
辐射度图
Radiosity Maps as Secondary Method are well-suited for fast preview renderings because of their low Diffuse Depth (less reflected light). Details can be found here (Radiosity Maps).
辐射度图作为次级方法非常适合于快速预览渲染,因为它们的漫射深度很低(反射光较少)。详细信息可以在这里找到(辐射度图)。
光线测绘
Light Mapping as Secondary Method work very well when rendering interior spaces where a lot of light is needed, which can be very quickly supplied by the high number of light reflections from Light Mapping. Details can be found here (Light Mapping).
当渲染需要大量光线的室内空间时,光线映射作为次级方法工作得非常好,这可以通过光线映射的大量光线反射非常快速地提供。细节可以在这里找到(光映射)。
没有
Disables the secondary GI calculation. This represents a Diffuse Depth of 1 (see image above).
禁用辅助 GI 计算。这表示漫射深度为1(见上图)。
Intensity[0.1..10000%]
Intensity[0.1..10000%]
强度[0.1.10000% ]强度[0.1.10000% ]
 From left to right, the following 从左到右,如下Primary/Secondary Intensity 小学/中学强度 values: 价值观:100%/100% 百分百/百分百, 300%/100%, 100%/500%.
Use these settings to adjust the GI’s brightness according to Primary or Secondary methods (see above).
使用这些设置来调整 GI 的亮度根据主要或次要的方法(见上文)。
Primary Method and Secondary Method) that can be defined separately.>
主要方法和次要方法) ,可以单独定义。 >
Saturation[0..1000%]
Saturation[0..1000%]
饱和[0. . 1000% ]饱和[0. . 1000% ]
 A single blue Polygon Light lights the scenery,
with various 一个单一的蓝色多边形灯光的风景,与各种Saturation 饱和度 settings. Note how the 设置。注意Secondary
Method 第二种方法 at the center emits colorless light. 中心发出无色的光
A single blue Polygon Light lights the scenery,
with various 一个单一的蓝色多边形灯光的风景,与各种Saturation 饱和度 settings. Note how the 设置。注意Secondary
Method 第二种方法 at the center emits colorless light. 中心发出无色的光
This setting can be used to define the color saturation used within the GI calculation separately for the Primary Method and Secondary Method GI functions. This is especially useful if the Physical Sky produces shadows that are too blue or if the Light Mapping produces a very saturated effect. In both instances the Saturation value for the Secondary Method can be reduced. If other methods produce too little saturation (as is sometimes the case with IR/QMC as a secondary method), the Saturation value can, of course, be increased.
这个设置可以用来定义颜色饱和度在 GI 计算中分别使用的主要方法和次要方法 GI 函数。如果物理天空产生的阴影太蓝或者光线映射产生了非常饱和的效果,这个特别有用。在这两种情况下,次级方法的饱和度值都可以降低。如果其他方法产生的饱和度太低(有时候 IR/QMC 作为辅助方法) ,饱和度值当然可以增加。
Note that if the Primary Method’s Saturation setting is set to 0%, no colors will be available for the Secondary Method.
请注意,如果主方法的饱和度设置为0% ,辅助方法将不会有颜色可用。
For Radiosity Maps, the Secondary Method’s Saturation will only affect real Area lights (not Polygon Lights) and/or Physical Sky (which is given a real light source via the Sun light).
对于辐射度图,次级方法的饱和度只会影响真实的区域光(不是多边形光)和/或物理天空(通过太阳光给予真实的光源)。
Color saturations can also be modified for materials (see also Saturation). Both of these parameters represent a global, Project-wide saturation setting.
颜色饱和度也可以修改材质(也见饱和度)。这两个参数都表示一个全局的、项目范围的饱和设置。
漫射深度[2. . 8]
 Increasing Diffuse Depth values for increased
realism. Note that no light reaches behind the walls with the 增加漫射深度值增加现实主义。请注意,没有光线到达墙后与Diffuse Depth 漫射深度 set
to 开始1 (= deactivated Secondary Method). (= 停用的次级方法)
Increasing Diffuse Depth values for increased
realism. Note that no light reaches behind the walls with the 增加漫射深度值增加现实主义。请注意,没有光线到达墙后与Diffuse Depth 漫射深度 set
to 开始1 (= deactivated Secondary Method). (= 停用的次级方法)
The Diffuse Depth (that can only be defined for the Irradiance Cache or QMC Secondary Methods) determines how often light should be reflected from a surface (note the difference between polygon lights and real lights, as described here). Greater Diffuse Depth values will result in correspondingly, but moderately, longer render times (the difference between a value of 1 and 2 is greater than that between 2 and 8 - as you can see, a completely different behavior compared to previous GI versions) but the dispersion of light will become increasingly homogeneous, brighter and more realistic. However, the effect at values greater than 3 in a normal scene will become less and less noticeable and the rendered result will simply become brighter.
漫射深度(只能为 Irradiance Cache 或 QMC 辅助方法定义)确定光线从表面反射的频率(注意多边形光线和真实光线之间的差异,如此处所述)。相应地,扩散深度值越大,渲染时间越长(1和2之间的差值大于2和8之间的差值——正如你所看到的,与以前的 GI 版本相比,这是一种完全不同的行为) ,但是光线的扩散将变得越来越均匀,越来越亮,越来越真实。然而,大于3的效果在一个正常的场景中会变得越来越不明显,渲染的结果会变得更明亮。
Note that gamma correction can, within limits, be used to compensate for lower Diffuse Depth values.
注意,在一定范围内,伽玛校正可以用来补偿较低的漫射深度值。
Generally speaking, high diffuse depths should be achieved by using Light Mapping
一般来说,高漫射深度应该通过使用光绘图来实现
Tip: 提示:最大深度[1. . 128]
 Left: Maximum Depth = 左图: 最大深度 =8, right = ,right =32.
The visual sample emitted into the scene when a Light Map is calculated (see also Light Mapping) is calculated using the number of "ricochets’ defined here. Higher values will produce a brighter and more homogenous dispersion of light with no increase in render time. The increase in brightness is less in closed spaces. In exterior scenes, the visual sample will quickly reach the sky and then be exempted from further reflections.
当计算光照贴图时,发射到场景中的视觉样本(参见光照贴图)是使用这里定义的“跳跃”数来计算的。更高的值将产生更明亮和更均匀的分散光,没有增加渲染时间。在封闭空间中亮度的增加较小。在外景中,视觉样本会很快到达天空,然后免除进一步的反射。
A reminder: No other GI method calculates high Diffuse Depth values as fast as Light Mapping!
提醒: 没有其他 GI 方法计算高漫反射深度值快于光绘图!
伽马值[0.1. . 10]
 Images 1-6: Different Gamma values ( 图1-6: 不同的伽马值Diffuse Depth 漫射深度 each set to 每一组3). For comparison at
bottom: )。下面作比较:Gamma 伽马 = 1, Diffuse Depth 漫射深度 = 8.
Tip:
提示:
Images 1-6: Different Gamma values ( 图1-6: 不同的伽马值Diffuse Depth 漫射深度 each set to 每一组3). For comparison at
bottom: )。下面作比较:Gamma 伽马 = 1, Diffuse Depth 漫射深度 = 8.
Tip:
提示:This gamma value only affects the indirect GI lighting. Gamma values define how the internally rendered brightness values should be displayed in RGB mode. Simply stated, a progression from the darkest (black) to brightest (white) is defined.
这个伽玛值只影响间接的 GI 照明。Gamma 值定义了在 RGB 模式下内部渲染的亮度值应该如何显示。简单地说,定义了从最黑(黑)到最亮(白)的过程。
This lets relatively dark renderings (e.g., resulting from a low Diffuse Depth value) be brightened. But be careful - high gamma values will reduce contrast and "flatten" the overall image (values ranging from 1 to 3 have proven to be most effective; in some instances higher values may be necessary). Values less than 1 will darken the image, whereas values greater than 1 will brighten an image (see example above).
这使得相对较暗的渲染(例如,由低漫射深度值产生的渲染)变亮。但是要小心——高伽马值会降低对比度,使整个图像“变平”(从1到3的数值被证明是最有效的; 在某些情况下,可能需要更高的数值)。小于1的值将使图像变暗,而大于1的值将使图像变亮(参见上面的例子)。
抽取样本
The Sampling tab’s settings affect the GI sampling for the QMC and IR Primary Method (if both of these are also used for the Secondary Method, only a fraction of the value defined here will be used): How many samples should be sent and where in order to gather light from the environment?. Don’t let the numerous settings intimidate you - the first setting -Samples - is the most important and the others are designed for fine-tuning.
抽样选项卡的设置影响了 QMC 和 IR 主方法的 GI 抽样(如果这两种方法都用于辅助方法,那么将只使用这里定义的值的一小部分) : 应该发送多少个样本,以及为了从环境中收集光线应该发送到哪里?.不要让众多的设置威胁您-第一个设置-样本-是最重要的,其他是为微调而设计的。
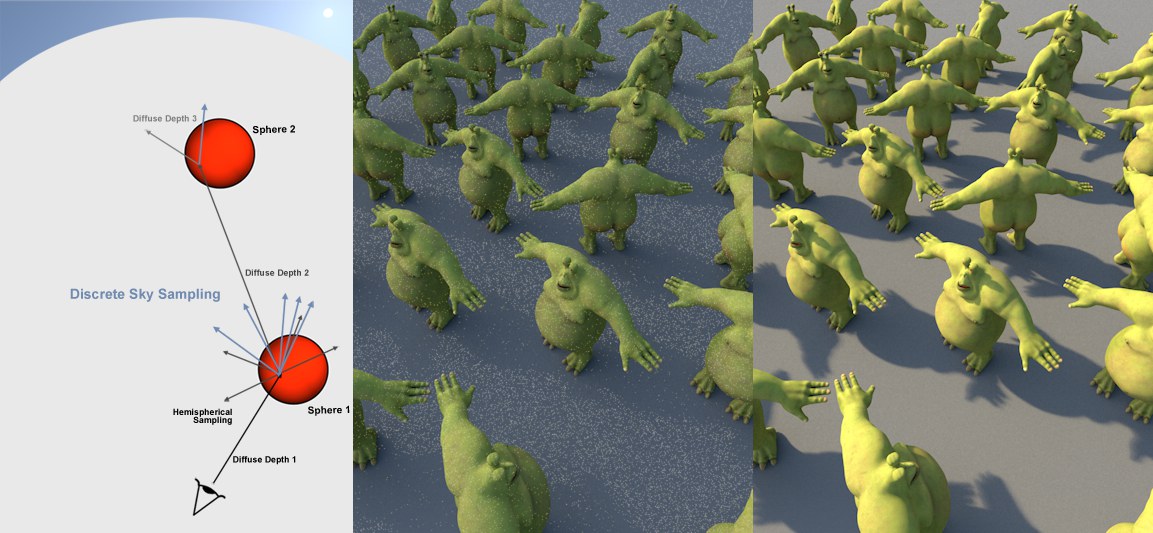
Have a look at the image below. It shows how the QMCGI Mode works (IR works similarly but not for each pixel with a Diffuse Depth value of 3.
请看下面的图片。它显示了如何 QMCGI 模式的工作(红外工程相似,但不是每个像素的漫射深度值为3。

In the image above you can see what additional samples are created by a sample coming from the bottom left when it hits an object (samples are used to sample colors and brightness for a specific location in the environment =, gather’). As you can see, the most commotion takes place at the intersection point, Diffuse Depth 1’ and the first object (and subsequently the light reflections (Diffuse Depth 2, 3, etc.) have progressively decreasing influence on the rendered result).
在上面的图片中,你可以看到当一个样本击中一个物体时,从左下角的样本创建了哪些额外的样本(样本用于对环境中某个特定位置的颜色和亮度进行取样 = ,gather’)。正如你所看到的,最大的骚动发生在交叉点,漫反射深度1’和第一个物体(随后的光反射(漫反射深度2,3等)对渲染结果的影响逐渐减小)。
The Sampling settings described below then only primarily define if and how many samples are created on Sphere 1.
下面描述的抽样设置只是主要定义是否以及有多少样本是在 Sphere 1上创建的。
In order to avoid too much technical jargon, take a look at the image below in which the options have been applied to a rendered Project:
为了避免过多的术语集,看看下面的图片,这些选项被应用到渲染的项目中:
An Area light was positioned at the rear of the room, a window in the wall on the right that looks out to a Sky object with an HDRI assigned to it (yes, it can render hard shadows!). No Cinema 4D light sources have been placed in the Project. The images were rendered in QMCPrimary Method (for IC mode, imagine spots instead of graininess for the image).
房间后面安装了一盏区域灯,右边墙上的一扇窗户可以看到一个天空对象,上面分配了 HDRI (是的,它可以渲染硬阴影!).没有Cinema 4D 光源已被放置在该项目。这些图像是用 QMCPrimary 方法渲染的(对于 IC 模式,用想象点代替图像的颗粒)。

It’s not altogether wrong to leave Discrete Sampling enabled. Only for special instances in which you want to intentionally exclude one of the Sampling modes should it be disabled. The difference in render time will be noticeable if no Area light or sky are present in the Project.
不启用离散采样并非完全错误。只有在特殊情况下,您希望故意排除其中一个采样模式,才应该禁用它。如果项目中没有区域光或天空,渲染时间的差异将是显而易见的。
Tip: 提示:样本
Here you will find several options from which you can choose that control the Accuracy and Sample Count settings.
在这里,您将找到几个选项,您可以从中选择控制“精确度”和“样本计数”设置。
Two methods of defining sample count are integrated:
综合了两种定义样本数的方法:
准确度[0. . 200% ]
Use this setting to automatically define an optimized sample count. The optimal count depends on the Project (and in the case of the IRPrimary Method on the other Irradiance Cache settings) and of course the defined Accuracy value.
使用此设置可自动定义优化的示例数。最佳计数取决于项目(在 IRPrimary 方法的情况下取决于其他辐照度缓存设置) ,当然还取决于定义的精度值。
Tip: 提示:样本数目[1. . 16384]

This setting defines the fixed number of samples to be used. A higher value produces a correspondingly better render quality (for QMC this can be seen in the graininess; for IR the number of spots is reduced). Depending on the Project, values in the thousands can be entered (see also Number of Samples Calculated Per Shading Point).
此设置定义了要使用的样本的固定数量。更高的值相应地产生更好的渲染质量(对于 QMC,这可以在颗粒度中看到; 对于 IR,斑点的数量减少)。根据项目的不同,可以输入以千为单位的数值(参见每个着色点计算的样本数)。
The number of samples used for rendering will also be used by the Discrete Area and Discrete Sky Sampling if they do not have a specific number of samples defined.
渲染使用的样本数量也将用于离散区域和离散天空采样,如果他们没有一个特定的样本数量定义。
半球形取样
Normally, this option should always be enabled. Disabling this option will disable the samples sent out in a hemispheric manner from the shading point (also called the, primary sampler’). Disabling this option rarely makes sense but doing so can help determine how Area lights or the sky affect the Project (because the Diffuse Depth will then be reduced to a value of 1). In such an instance, Discrete Area Sampling and Discrete Sky Sampling should be enabled.
通常,应始终启用此选项。禁用此选项将禁用从阴影点(也称为主取样器)以半球形方式发送的样品。禁用此选项很少有意义,但这样做可以帮助确定如何区域灯光或天空影响项目(因为漫射深度将减少到1的值)。在这种情况下,应该启用离散区域采样和离散天空采样。
 At the left only the effect of the 在左边只有效果Hemispherical Sampling 半球形取样 is shown. It is enabled in the center and disabled at the right
(in both cases 显示。它在中间启用,在右边禁用(在两种情况下都是如此)Discrete Area Sampling 离散区域抽样 and 及Discrete Sky
Sampling 离散天空采样 are enabled). 启用)
At the left only the effect of the 在左边只有效果Hemispherical Sampling 半球形取样 is shown. It is enabled in the center and disabled at the right
(in both cases 显示。它在中间启用,在右边禁用(在两种情况下都是如此)Discrete Area Sampling 离散区域抽样 and 及Discrete Sky
Sampling 离散天空采样 are enabled). 启用)
This sampling method is, for example, well-suited for use with large, homogenous Area lights (e.g., evenly overcast sky - which would not require the subsequently described sampling methods).
例如,这种取样方法非常适用于大面积均匀区域光源(例如,均匀的阴天——这不需要随后描述的取样方法)。
离散区域抽样
 At center 在中间Discrete Area
Sampling 离散区域抽样 disabled, at right enabled. 禁用,在右边启用
At center 在中间Discrete Area
Sampling 离散区域抽样 disabled, at right enabled. 禁用,在右边启用
In order for this sampling type to work, the Polygon Light (or for GI ports Portal) option must be enabled in the respective (illuminating) material.
为了使这种采样类型工作,必须在相应的(照明)材质中启用 Polygon Light (或 GI 端口 Portal)选项。
This sampling method sends additional samples to (polygon) Area lights. This will, emphasize’ them disproportionally, which will have a major effect on the quality of the GI.
此采样方法将附加样本发送到(多边形)区域灯光。这将,强调他们不成比例,这将有一个重大影响的质量的胃肠道。
Note that the Area lights will NOT be omitted from the GI calculation if this option is disabled. These lights will merely receive no special attention and will be hit randomly by the hemispherical sampling (with a correspondingly grainy result).
注意,如果禁用此选项,在 GI 计算中区域灯不会被忽略。这些光线不会受到特别的注意,而是会被半球形的采样随机击中(相应的结果是颗粒状的)。
每像素力量
 At left, 在左边,Force
Per-Pixel 每像素力量 disabled, at right enabled. 禁用,在右边启用
At left, 在左边,Force
Per-Pixel 每像素力量 disabled, at right enabled. 禁用,在右边启用
This option is only advantageous in IR Primary Method. Normally every light will be taken into consideration for the cache when an Irradiance Cache is created. However, this does not work if you have very small, bright Area lights. The result will be spotty images. If you enable the Force Per-Pixel option, the calculation of the Area lights will be split from the cache and calculated separately (as the QMC method does by default) for each potential pixel (object surfaces but no backgrounds or skies, for example).
此选项仅适用于 IR 初级方法。一般来说,当一个辐照度缓存被创建的时候,每个光线都会被考虑到缓存中。然而,这不工作,如果你有非常小,明亮的区域灯。其结果将是参差不齐的图像。如果您启用了“每像素力量”选项,区域灯光的计算将从缓存中分离出来,并为每个潜在像素(例如,物体表面,但没有背景或天空)单独计算(就像 QMC 方法默认所做的那样)。
The result of these calculations will not be saved in the Irradiance Cache and must therefore be calculated anew for each frame of an animation.
这些计算的结果将不会保存在辐照度缓存中,因此必须为动画的每一帧重新计算。
Custom Count
Sample Count[1..16384]
自定义 CountSample 计数[1. . 16384]
Use these values to define a custom sample count. If Custom Count is disabled, the same number of samples will be used as is defined in the Samples setting.
使用这些值定义自定义示例数。如果禁用自定义计数,将使用与示例设置中定义的相同数量的示例。
离散天空采样
This sampling mode takes into account the sky in particular (e.g., the Physical Sky or a HDRI texture that was assigned to a Sky object).
这种采样模式特别考虑了天空(例如,物理天空或分配给天空对象的 HDRI 纹理)。
A sky map will be calculated internally during rendering, which will then concentrate the additionally created samples primarily on the brightest regions during rendering. This means that HDRI textures with enough contrast can cast shadows with locally very bright regions, as in the image below.
天空映射将在渲染期间内部计算,然后在渲染期间将主要集中在最亮的区域上的附加创建的样本。这意味着对比度足够的 HDRI 纹理可以在局部非常明亮的区域投射阴影,如下图所示。
 The only source of illumination here is the HDRI
texture on a Sky object. Note the relatively hard shadow (option disabled at center). 这里唯一的光源是天空对象上的 HDRI 纹理。注意相对较硬的阴影(中间禁用选项)
The only source of illumination here is the HDRI
texture on a Sky object. Note the relatively hard shadow (option disabled at center). 这里唯一的光源是天空对象上的 HDRI 纹理。注意相对较硬的阴影(中间禁用选项)
Note that the Physical Sky’s Merge Sky and Sun option ensures that the Physical Sky is processed internally (incl. the effects of the sun) like an HDRI texture.
注意,物理天空的合并天空和太阳选项确保物理天空是内部处理(包括。太阳的影响)像一个 HDRI 纹理。
If this option is disabled, the sky will NOT be omitted from the GI calculation. The sky will merely receive no special attention and will be hit randomly by the hemispherical sampling (the extremely bright sun will produce a grainy image).
如果此选项被禁用,天空将不会被省略从 GI 计算。天空不会受到特别的注意,只会被半球体的采样随机击中(极其明亮的太阳会产生颗粒状的图像)。
每像素力量
 A Sky object with an HDRI texture applied to it is
located behind the window; at left 一个具有 HDRI 纹理的天空对象位于窗口后面; 在左边Force Per-Pixel 每像素力量 disabled, at right
enabled. 禁用,在右边启用
A Sky object with an HDRI texture applied to it is
located behind the window; at left 一个具有 HDRI 纹理的天空对象位于窗口后面; 在左边Force Per-Pixel 每像素力量 disabled, at right
enabled. 禁用,在右边启用
This option only bears advantages for the IR Primary Method. When an Irradiance Cache is created, the sky will normally be sampled and taken into consideration for the cache. For bright regions (sun) or those with smaller surfaces, this method has limits and will result in spotty renderings.
此选项仅对 IR 初级方法具有优点。当一个辐射缓存创建,天空通常会被采样,并考虑到缓存。对于明亮的区域(太阳)或表面较小的区域,这种方法有局限性,会导致斑点渲染。
If you enable Force Per-Pixel, the calculation of the light emitted by the sky will be split from the cache and calculated separately for each pixel that comes into question (object surfaces but no backgrounds, skies, etc.), which is how the QMC method works by default.
如果你启用了每像素力,天空发射的光的计算将从缓存中分离出来,并分别计算出出现问题的每个像素(物体表面,但没有背景,天空等) ,这就是 QMC 方法默认的工作原理。
The results of this calculation will not be saved in the Irradiance Cache but must be calculated anew for each frame of an animation.
这个计算的结果将不会保存在辐照度缓存中,而是必须为动画的每一帧重新计算。
Custom Count
Sample Count[1..16384]
自定义 CountSample 计数[1. . 16384]
Use these values to define a custom sample count. If Custom Count is disabled, the same number of samples will be used as is defined in the Samples setting.
使用这些值定义自定义示例数。如果禁用自定义计数,将使用与示例设置中定义的相同数量的示例。
QMC 是如何工作的?
 Left, rendered with QMC+QMC, right with IR+IR. Note
the increased level of detail (shadows) in the QMC rendering. 左边,用 QMC + QMC 渲染,右边用 ir + ir 渲染。注意在 QMC 渲染中增加的细节级别(阴影)
Left, rendered with QMC+QMC, right with IR+IR. Note
the increased level of detail (shadows) in the QMC rendering. 左边,用 QMC + QMC 渲染,右边用 ir + ir 渲染。注意在 QMC 渲染中增加的细节级别(阴影)
The QMC method of Global Illumination calculation works under a so-called "brute force" principle. This means that, for each (!) object pixel in the image, a definable number of rays ("Sample Count") can be "beamed" in a hemispherical pattern into the scene. This is not an adaptive process and the render time will definitely not be reduced.
计算全局光源的 QMC 方法基于所谓的“蛮力”原理。这意味着,对于每个(!)对象像素在图像中,一个可定义的射线数量(“样本计数”)可以“定向”在一个半球形模式的场景。这不是一个自适应过程,渲染时间肯定不会减少。
This bears the advantage that it offers the most precise render results. Small details in shadows and shading can be rendered out that would otherwise not be noticeable if the IR method were used.
这样做的好处是可以提供最精确的渲染结果。阴影和阴影中的小细节可以被渲染出来,否则如果使用红外线方法就不会引人注意。
Disadvantages of using QMC as primary method:
使用 QMC 作为主要方法的缺点: