 Save Project with
Assets...
Save Project with
Assets...Texture settings
纹理设置
Most material channels enable you to load a texture. You can select a two-dimensional shader or video or image sequence. Your selection will be used as a texture. Cinema 4D can read the following formats: image formats, movie formats
大多数材质通道允许你加载纹理。您可以选择一个二维着色器或视频或图像序列。您的选择将用作纹理。C4D可以读取以下格式: 图像格式,电影格式
Textures up to 16,000 x 16,000 (32-bit application version) and 128,000 x 128,000 pixels (64-bit application version) can be loaded.
纹理高达16,000 x16,000(32位应用程序版本)和128,000 x128,000像素(64位应用程序版本)可以加载。
The following might be displayed when an image or a video is loaded:
加载图像或视频时可能会显示以下内容:

Depending on which option you select, the texture/movie will be linked to an absolute or a relative path. This means:
根据您选择的选项,纹理/动画将链接到绝对路径或相对路径。这意味着:
If you select No, the "path" to the texture will be saved as an absolute path,
i.e., this is the directory path in which Cinema 4D will look for the texture for rendering. This is,
however, problematic when the scene file is passed on to another artist, for example and the texture will not
be found on the other computer. In most cases it is better to use relative paths (via the Save Project with
Assets...
如果您选择 No,纹理的“路径”将被保存为一个绝对路径,也就是说,这是 Cinema 4D 将在其中查找要渲染的纹理的目录路径。然而,当场景文件传递给另一个艺术家时,这是有问题的,例如,纹理将不会在另一台计算机上找到。在大多数情况下,最好使用相对路径(通过 Save Project with Assets... 命令,您可以将绝对路径转换为相对路径)。
If you select Yes the texture/movie will be saved to the "tex" folder at the location of the scene file. If you pass the scene file, including this directory, on to another artist the textures can be easily found on the other computer. Textures with relative paths will also be searched for hier
如果选择是,纹理/影片将被保存到场景文件位置的“ tex”文件夹中。如果你传递场景文件,包括这个目录,到另一个艺术家的纹理可以很容易地在其他计算机上找到。带有相对路径的纹理也会被搜索为 hier
If you copy materials (with linked relative texture paths) to another Project where they then cannot be found, a prompt will appear asking if an absolute texture path (to the original path) should be defined. If you answer with No, the textures must be copied manually to the known Cinema 4D (relative) paths.
如果您将材质(具有链接的相对纹理路径)复制到另一个项目,然后无法找到它们,则会出现一个提示,询问是否应该定义绝对纹理路径(到原始路径)。如果你的回答是否定的,那么纹理必须手动复制到已知的 Cinema 4D (相对)路径。
Tip: 提示:You can load a texture using the triangle button, Texture box or three dots button. Click the button or box and use the menu or file selection dialog that appears to load the texture.
你可以使用三角形按钮,纹理框或三点按钮加载纹理。单击按钮或框,并使用菜单或文件选择对话框,似乎加载纹理。
Once you have loaded a texture, its preview will appear below the Texture box with three numbers shown immediately below the preview. These numbers specify the width, height and color depth of the texture. If you click on the preview picture or the name of the texture or shader, the picture/shader will be loaded into the Material Editor. You can then edit the picture externally or edit the shader’s settings.
一旦你加载了一个纹理,它的预览就会出现在纹理框的下方,三个数字会立即出现在预览框的下方。这些数字指定纹理的宽度、高度和颜色深度。如果您单击预览图片或纹理或着色器的名称,图片/着色器将载入材质编辑器。然后您可以在外部编辑图片或编辑着色器的设置。

Click on the triangle button next to the Texture box to open a menu that allows you to load bitmaps and load channel shaders. The menu also contains the following commands:
单击纹理框旁边的三角形按钮,打开一个菜单,允许您加载位图和加载通道着色器。菜单还包含以下命令:
安全
Removes the texture/image from the material channel.
从材质通道中移除纹理/图像。
载入图像
Opens a file selection dialog that allows you to load an image into the material channel. You can also load images by clicking on the three dots button on the far right of Texture.
打开文件选择对话框,该对话框允许您将图像加载到材质通道中。你也可以通过点击纹理右边的三点按钮来加载图片。
创建新的纹理
The BodyPaint 3D New Texture dialog window will open in which you can create a new texture using a bitmap
在 BodyPaint 3D New Texture 对话框窗口中,您可以使用位图创建一个新的纹理
编辑
Loads the shader’s parameters or image’s parameters (see above) into the Material Editor.
将着色器的参数或图像的参数(见上文)加载到材质编辑器中。
编辑图像
Opens the image in the default image editing application specified for your computer. For example, choosing Edit Image for a JPEG will open the image in Photoshop if Photoshop is installed and is the default image editor for JPEGs.
在为计算机指定的默认图像编辑应用程序中打开图像。例如,为 JPEG 选择编辑图像,如果 Photoshop 已经安装,并且是 JPEG 的默认图像编辑器,那么在 Photoshop 中将打开图像。
定位图像..。
This command opens the image in your operating system’s Explorer/Finder. If the image is located in a Content Browser library, it will be opened there.
此命令打开操作系统的 Explorer/Finder 中的图像。如果图像位于内容浏览器库中,则在该库中打开。
重新载入图片
Suppose that, after loading an image into the Texture pane, you then edit the image in an image editor. In such cases, use Reload Image to update the texture in the Texture pane. Note to BodyPaint 3D users: you cannot reload images that are being used by BodyPaint 3D (such as if you are rendering to the Picture Viewer).
假设,在将图像加载到纹理窗格中之后,在图像编辑器中编辑图像。在这种情况下,使用 reloadimage 更新纹理面板中的纹理。注意: 不能重新加载 BodyPaint 3D 使用的图像(如果您正在向图片查看器进行渲染)。
复制着色器,粘贴着色器
These commands allow you to copy and paste shader settings from one material channel to another. For example, you can copy a shader from the Color channel and paste it into the Bump channel with the same settings. This saves you from having to set the parameters multiple times.
这些命令允许您复制和粘贴着色器设置从一个材质通道到另一个。例如,您可以从 Color 通道复制着色器,并将其粘贴到 Bump 通道中,使用相同的设置。这样可以省去多次设置参数的麻烦。
加载/保存预置
These options let you save shaders to or load them from a list of presets located in the Content Browser’s Presets / User folder (for multiple shaders of the same type, they will be numbered sequentially when saved). Here, the same applies as previously mentioned: If a shader contains a bitmap, the corresponding preset will only function if Cinema 4D can later find the bitmap (see Texture Paths).
这些选项可以让你保存着色器,或者从位于 Content Browser 的 preset/User 文件夹中的预置列表中加载它们(对于同一类型的多个着色器,它们在保存时将按顺序编号)。在这里,同样适用于前面提到的: 如果着色器包含位图,相应的预设将只有在 Cinema 4D 后来可以找到位图时才起作用(见纹理路径)。
Shaders can also be added to the Presets / User folder via drag & drop. Presets can also be dragged onto the Material Editor.
着色器也可以添加到预设/用户文件夹通过拖放。预设也可以拖动到材质编辑器。
位图
Here you will find a list of all the bitmap that are currently loaded in RAM. Select a bitmap’s name from this list to load the bitmap into the Texture box.
在这里您将找到当前在 RAM 中加载的所有位图的列表。从此列表中选择一个位图的名称以将该位图加载到“纹理”框中。
着色器
You will find a list of shaders in the lower part of the menu, including those of any plugins installed.
你可以在菜单的下半部分找到着色器的列表,包括那些已经安装的插件。
Three dots button, Texture box
三点按钮,纹理框

To load a bitmap into the material channel, click the Texture box or three dots button and use the file selection dialog that opens to load the bitmap. See Bitmap Shader.
若要将位图加载到材质通道中,请单击“纹理”框或“三点”按钮,并使用打开的文件选择对话框来加载位图。参见位图着色器。
抽取样本
Use Sampling to control how the texture’s pixels are interpolated. MIP and SAT are the best choices for animation or for objects in still pictures that extend towards the horizon, such as floors.
使用抽样控制纹理像素的插值方式。MIP 和 SAT 是最好的选择,对于动画或静态图片中的物体,延伸到地平线,如地板。
Square, Alias 1, Alias 2 and Alias 3 should, in general, be used for still pictures only — they generate crisp, sharp textures, but are too sharp for animation and if animated will be likely to flicker. MIP and SAT, on the other hand, blur the texture slightly to allow flicker-free animation.
一般来说,Square、 Alias 1、 Alias 2和 Alias 3应该只用于静态图片ーー它们产生清晰、锐利的纹理,但对于动画来说过于清晰,而且如果是动画,则可能会出现闪烁。另一方面,MIP 和 SAT 对纹理进行了轻微的模糊处理,以允许无闪烁动画。
 Example texture. 纹理示例
没有
When Sampling is set to None, the original texture values are used without interpolation. This method is fast, but often produces poor results and in general is best avoided. Textures tend to look jagged with None interpolation. You can try to reduce the jaggies by using a high antialiasing setting.
当 Sampling 设置为 None 时,使用原始纹理值时不需要插值。这种方法是快速的,但往往产生较差的结果,一般是最好避免。纹理往往看起来参差不齐的无插值。你可以尝试通过使用高抗锯齿设置来减少锯齿。
 None. 没有
圆圈
Circle sampling uses a circle of texture pixels (the ones surrounding the intermediate value). Textures that are enlarged at render time tend to look more natural with this type than with the None type. However, as the examples demonstrate, straight lines are problematic and tend to look frayed. In addition, the texture is very jagged near the horizon. Circle sampling is, however, a good choice for very small textures (e.g., 3 x 3 pixels), because it helps the pixels to blend softly.
圆形采样使用一个圆形的纹理像素(围绕中间值的像素)。在渲染时被放大的纹理倾向于使用这种类型比 None 类型看起来更自然。然而,正如这些例子所示,直线是有问题的,而且往往看起来有磨损。另外,纹理在地平线附近呈锯齿状。然而,对于非常小的纹理(例如,3 x 3像素) ,圆形采样是一个很好的选择,因为它有助于像素柔和地混合。
 Circle. 圆圈
广场
Square uses a square of texture pixels (the ones surrounding the intermediate value). This leads to a softer transition between texture pixels than with None. The picture quality is good.
Square 使用一个正方形的纹理像素(围绕中间值的像素)。这会导致纹理像素之间的过渡比 None 要柔和。图像质量很好。
 Square. 广场
别名1,别名2,别名3
Alias 1, Alias 2 and Alias 3 blend the texture more strongly than Circle and Square. Alias 3 blends the most, Alias 1 the least. In the example above, the texture is difficult to recognize with Alias 3 because it is so small (16 x 16). Alias3 can give smoother results than Alias 1, but it also takes longer to calculate.
别名1,别名2和别名3混合纹理比圆和正方形更强烈。别名3混得最多,别名1混得最少。在上面的例子中,纹理很难用 Alias 3识别,因为它非常小(16 x 16)。Alias3可以给出比 Alias 1更平滑的结果,但它也需要更长的时间来计算。
However, even Alias 3 cannot prevent jaggies near the horizon!
然而,即使是《双面女间谍3》也无法阻止在地平线附近的锯齿!
 Alias 1, Alias 2, Alias 3. 别名1,别名2,别名3
按揭保险计划
MIP stands for multum in parvo, which is Latin for many things in a small place. When many texture pixels effectively lie within a single screen pixel an approximation is made based on the (known) texture pixel values. This results in very smooth blending. MIP is the default sampling type.
MIP 在 parvo 中是 multum 的意思,在拉丁语中意思是小地方的许多事情。当许多纹理像素有效地位于单个屏幕像素内时,基于(已知的)纹理像素值进行近似。这使得混合过程非常顺利。MIP 是默认的采样类型。
 MIP. 按揭保险计划
学术能力评估
SAT is short for summed area tables and it does an even better approximation than MIP mapping. As with MIP mapping, the approximation is based on the texture pixels that lie within a single screen pixel. SAT is the highest-quality sampling type.
SAT 是求和面积表的缩写,它比 MIP 映射更接近实际情况。与 MIP 映射一样,这种近似是基于单屏幕像素内的纹理像素。SAT 是最高质量的抽样类型。
 SAT. 学术能力评估
SAT mapping works with textures up to 4,000 x 4,000 pixels. Cinema 4D switches to MIP mapping automatically if you try to use SAT mapping with textures over this limit. SAT 贴图可以使纹理达到4000x4000像素。如果你尝试使用超过这个限制的纹理 SAT 贴图,C4D 会自动切换到 MIP 贴图
按揭保险计划/学术能力评估
MIP and SAT mapping are especially important for high-quality animation and for objects in stills that extend towards the horizon, such as a sea. MIP mapping is the default sampling type.
MIP 和 SAT 映射对于高质量的动画和向地平线延伸的静态物体(如海洋)尤其重要。MIP 映射是默认的采样类型。
The following two pictures demonstrate MIP / SAT mapping. The tiled texture used Circle sampling. Although the quality is generally good, the quality rapidly deteriorates towards the horizon.
下面两张图片演示了 MIP/SAT 映射。瓷砖纹理使用圆形采样。虽然质量总的来说是好的,但质量却迅速恶化。
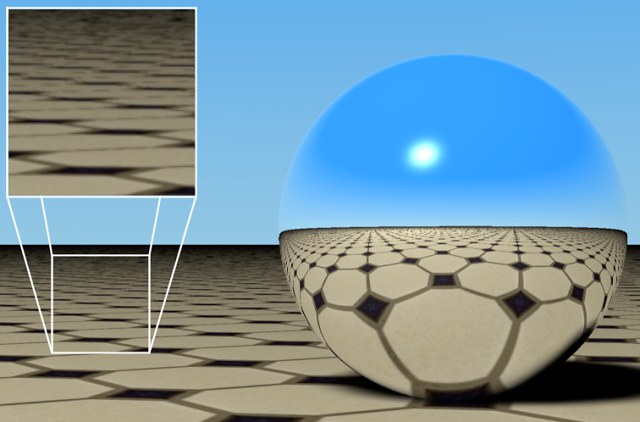 Figure 1: Rendered with MIP
sampling. 图1: 按揭保险计划抽样呈现
Figure 1: Rendered with MIP
sampling. 图1: 按揭保险计划抽样呈现
This unwanted effect is the result of perspective distortion. Each screen pixel representing the floor near the horizon contains perhaps hundreds or even thousands of texture pixels.
这种不必要的影响是透视变形的结果。每个代表地平线附近地面的屏幕像素可能包含数百甚至数千个纹理像素。
MIP and SAT mapping approximate a value using these pixels. Only an approximation is made, since calculating the exact value would increase the render time greatly. Figure 2 shows Edge antialiasing with 2 x 2 oversampling. The material used SAT sampling. The image quality is much improved, including the reflection on the sphere.
使用这些像素映射 MIP 和 SAT 近似值。由于计算精确值会大大增加渲染时间,因此只需要做一个近似值。图2显示了2x2过采样的边缘反走样。材质采用 SAT 取样。图像质量得到了很大的提高,包括球面反射。
 Figure 2: Rendered with SAT
sampling. 图2: 使用 SAT 取样渲染
Figure 2: Rendered with SAT
sampling. 图2: 使用 SAT 取样渲染
The downside to MIP and SAT mapping is that they require extra memory. MIP mapping needs an extra byte of memory per texture pixel, SAT mapping requires an extra 12 bytes per texture pixel. Although SAT mapping produces better render quality than MIP mapping, MIP mapping uses much less RAM and hence is the default interpolation type.
MIP 和 SAT 映射的缺点是它们需要额外的内存。MIP 映射每个纹理像素需要额外的内存字节,SAT 映射每个纹理像素需要额外的12个字节。尽管 SAT 映射比 MIP 映射产生更好的渲染质量,但 MIP 映射使用更少的 RAM,因此是默认的插值类型。
As a rule of thumb, use MIP mapping initially and switch over to SAT mapping if required. Cinema 4D’s shaders use SAT mapping automatically without consuming additional memory.
根据经验,最初使用 MIP 映射,如果需要,切换到 SAT 映射。Cinema 4D 的着色器自动使用 SAT 映射而不消耗额外的内存。
MIP and SAT mapping affect the render time. On the one hand, MIP and SAT mapping take slightly longer to render. On the other hand, you may be able to reduce the antialiasing setting.
MIP 和 SAT 映射会影响渲染时间。一方面,MIP 和 SAT 映射的渲染时间稍微长一些。另一方面,你可以减少抗锯齿设置。
Enable MIP Falloff to enhance the MIP/SAT mapping effect for bump maps. This will reduce the strength of the bump map with increasing distance from the camera. 启用 MIP Falloff 增强凹凸贴图的 MIP/sat 贴图效果。这将减少凹凸贴图的强度随着距离相机的增加模糊偏移,模糊缩放
MIP and SAT mapping only approximate the optimum computation, since a precise computation would increase the render time greatly. SAT mapping is more accurate than MIP mapping. But sometimes these approximations can make a texture too blurred or too sharp.
由于精确的计算会大大增加渲染时间,所以 MIP 和 SAT 映射只能近似最优计算。SAT 映射比 MIP 映射更精确。但有时这些近似会使纹理过于模糊或过于清晰。
So the Blur Offset and Blur Scale options enable you to blur or sharpen the mapping. Blur Offset softens a texture. Blur Scale fine-tunes the strength of the MIP/SAT mapping. A positive value increases the blur; a negative value weakens it. A strong value blurs detail but helps prevent flickering during animation. A weaker value brings out more detail but, increases the risk of flickering.
所以模糊偏移和模糊缩放选项使你能够模糊或锐化映射。模糊偏移可以软化纹理。模糊比例微调 MIP/SAT 映射的强度。正值会增加模糊度,负值会削弱模糊度。强大的值模糊了细节,但有助于防止在动画期间闪烁。较弱的值会带来更多的细节,但是会增加闪烁的风险。
With floors, try a positive blur strength of about 对于地板,尝试正模糊强度约+20% + 20%. Floors tend to suffer most from perspective distortion, so they require special treatment. .地板往往遭受最严重的透视变形,所以他们需要特殊的处理