 Seed Mode
 Variation Shader 变化着色器Basic 基础Shader 着色器
Shader Properties
Seed Mode
种子模式
The settings in this menu can be used to define the elements (objects, polygons) for which the texture should be varied.
这个菜单中的设置可以用来定义应该改变纹理的元素(对象、多边形)。
Seed [1. . + ∞]
This setting is common when defining random values. If you don’t like the results of one Seed value then simply enter a different value to get a different result. Equal values will produce an equal disbursement in an otherwise unmodified scene.
这种设置在定义随机值时很常见。如果您不喜欢一个 Seed 值的结果,那么只需输入一个不同的值就可以得到不同的结果。等值将在未经修改的场景中产生等量的付款。
对象变化
Use this setting to define the element on which the variation should be based:
使用这个设置来定义变化所基于的元素:
 The scene at the left (note the Compositing tags
that give the objects 2 different Buffer IDs) with 3 object variations: Objects, Object Name and Object Buffer
IDs. 左边的场景(注意合成标签,它给对象提供了2个不同的缓冲区 id) ,有3个对象变体: 对象、对象名称和对象缓冲区 id
The scene at the left (note the Compositing tags
that give the objects 2 different Buffer IDs) with 3 object variations: Objects, Object Name and Object Buffer
IDs. 左边的场景(注意合成标签,它给对象提供了2个不同的缓冲区 id) ,有3个对象变体: 对象、对象名称和对象缓冲区 id
Note that the varied colors can change if objects are added to the Project or if hierarchies are modified.
请注意,如果将对象添加到 Project 中,或者修改层次结构,可能会改变不同的颜色。
残疾人士
No variations will take place for different objects with the same Variation shader applied to them.
没有变化将发生不同的对象与相同的变化着色应用到他们。
对象名称
Objects with the same Variation shader and the same name will be given the same variation. If the objects have
different names, the variations will also differ. Note that this option does not work in conjunction with the
Cloner object because the clones all carry different names internally. This
can be seen by making the Cloner object editable using the
对象具有相同的变化着色器和相同的名称将给予相同的变化。如果物体有不同的名字,变化也会不同。请注意,这个选项不能与 Cloner 对象一起使用,因为克隆在内部都带有不同的名称。这可以通过使用 c 键使 Cloner 对象可编辑来看到。
对象层次结构
Assuming the Variations shader is applied to an object that is part of a hierarchy: In this mode, the same color will be applied to all Child objects, i.e., it will not be varied. It will only be varied per hierarchy.
假设 Variations 着色器应用于层次结构中的一个对象: 在这种模式下,相同的颜色将应用于所有的子对象,也就是说,它不会被改变。每个等级只会有所不同。
This also applies to objects that generate clones, e.g., the Cloner object.
这也适用于生成克隆的对象,例如 Cloner 对象。
父母
No variation will be applied to objects that lie on the same hierarchical level with the same Variations shader if they share a Parent object. Child objects of the object to which the material is applied will also not be varied.
如果对象共享一个父对象,则不会对位于相同层次级别、具有相同 Variations 着色器的对象应用任何变化。材质所应用的对象的子对象也不会改变。
对象
Each object to which a shader is assigned (incl. objects in subordinate hierarchies) will be varied (as long as this is not prevented by one of the following settings).
赋予着色器的每个对象(包括。下级层次结构中的对象)将变化(只要不受以下设置之一的阻止)。
对象缓冲区 id
This option can be used in conjunction with Compositing tags, which can assign object buffers. Objects with identical object buffers will be given the same variations, i.e., they will look alike. In the image above at the right the objects were placed into 2 object buffers, which generated precisely two variations.
此选项可以与可以分配对象缓冲区的复合标记结合使用。具有相同对象缓冲区的对象将被赋予相同的变化,也就是说,它们看起来相似。在上面右边的图像中,这些物体被放置到两个物体缓冲器中,这恰好产生了两种变化。
材质名称
Imagine having the same Variation shader in different materials. Use this option of a Variation shader should produce identical random colors for objects with the same material.
想象一下在不同的材质中有相同的变化着色器。使用这个选项的变化着色器应产生相同的随机颜色的对象与相同的材质。
This is useful, for example, if you want to create material buffer IDs. The Variation shader can, for example, be used in the material’s Luminance channel and output the respective multi-pass in order to receive a pass with identical colors for identical materials. This way you can, for example, make color corrections at the material level.
例如,如果您想创建材质缓冲区 id,这是非常有用的。例如,可以在材质的亮度通道中使用变化着色器,并输出相应的多通道,以接收相同材质的相同颜色的通道。这样你就可以,例如,在材质层进行颜色校正。
多边形变化
 Left/center: Leaf textures lie on individual
polygons. If more polygons are used per leaf the 左/中: 叶子的纹理位于单个多边形上。如果每个叶子使用更多的多边形,则Polygon Variation 多边形变化 option can be
applied. Right: A texture tiled in 4Directions on a one-poly plane in the 选项可以应用。右图: 一个纹理在一个多边形平面上向四个方向平铺Polagon
Variation 波拉贡变奏UV Tiles 紫外线瓷砖.
Left/center: Leaf textures lie on individual
polygons. If more polygons are used per leaf the 左/中: 叶子的纹理位于单个多边形上。如果每个叶子使用更多的多边形,则Polygon Variation 多边形变化 option can be
applied. Right: A texture tiled in 4Directions on a one-poly plane in the 选项可以应用。右图: 一个纹理在一个多边形平面上向四个方向平铺Polagon
Variation 波拉贡变奏UV Tiles 紫外线瓷砖.
Textures cannot only be varied per object but also per:
纹理不仅可以根据对象而变化,还可以根据对象而变化:
多边形步骤[1. . + ∞]
If often occurs that, for example, a tree’s leaves are created using a huge amount of coherent polygon groups. For example, a leaf can consist of 6 polygons (to allow it to bend), which is in turn duplicated hundreds of times for a single tree. If the variation should be constant within one 6-polygon group but varied for other 6-polygon groups, define number of polygons for the leaf (in this case 6) and the variation will occur in steps of 6 polygons. However, if only a single leaf has a different polygon count, this function will not work correctly!
如果经常发生这种情况,例如,树的叶子是使用大量相关的多边形组创建的。例如,一片叶子可以由6个多边形组成(允许它弯曲) ,这些多边形对于一棵树可以重复数百次。如果变化在一个六边形群体内是恒定的,但在其他六边形群体中是变化的,那么定义叶子的多边形数量(在这种情况下为6) ,变化将发生在6个多边形的步骤中。但是,如果只有一个叶子有不同的多边形计数,这个函数将不能正常工作!
Set this value to 1 to create variations for each polygon.
将此值设置为1,以创建每个多边形的变化。
概率[0. . 100% ]
Use this value to define the degree to which objects, polygons, object buffer IDs should be varied. Note that the value defined here is only an approximation and that the actual number of variations can, well, vary.
使用此值定义对象、多边形、对象缓冲区 id 的变化程度。请注意,这里定义的值只是一个近似值,而且实际变化的数量可能会有所不同。
If you want to have spatial control over the elements you want to vary, use the Global Mask function described below.
如果希望对要改变的元素进行空间控制,请使用下面描述的全局遮罩函数。
全球面具
 A Voronoi noise with 一种带有旋涡噪声的声音Space 太空 set to 开始World 世界.
Use shaders that work in the world coordinate system such as Noise (Space set to World) or Gradient Type set to 3D Linear and Space set to World) in order to determine via gray scale the degree to which the variations are in fact depicted. White represents 100%, black represents 0% and gray tones represent the values in-between.
使用着色器,如噪音(空间设置为世界)或梯度类型设置为3D 线性和空间设置为世界坐标系,以确定通过灰度变化的程度实际上被描述。白色代表100% ,黑色代表0% ,灰色代表中间值。
Color Variation
颜色变化
The Color Variation menu’s settings are used to define which textures (whereby these can also be projected randomly) should be used and which colors should randomly be mixed with them.
颜色变化菜单的设置用来定义哪些纹理(这些也可以随机投影)应该使用,哪些颜色应该随机混合。
添加
Click on this button to add any number of texture selection possibilities, which will then be listed in the Shaders menu and to which shaders can be assigned. These shaders will first be distributed ransomly across all respective objects. The color and UVW variations described below can be used on these textures.
点击这个按钮添加任意数量的纹理选择可能性,然后将列出着色器菜单和着色器可以分配。这些着色器将首先分布在所有对象上。下面描述的颜色和 UVW 变化可以用于这些纹理。
If no texture is assigned, white will be used.
如果没有指定纹理,则使用白色。
安全
Click on this button to delete all texture selection possibilities that were created, including all assigned textures. You should therefore use this button carefully (each texture selection possibility can be deleted individually).
单击此按钮删除所有已创建的纹理选择可能性,包括所有分配的纹理。因此,您应该小心使用这个按钮(每个纹理选择的可能性可以单独删除)。
从文件夹添加
Click on this button to select a folder from which bitmaps should be imported. Cinema 4D will then import all bitmaps in the folder (files in sub-folders will not be included).
单击此按钮可选择要导入位图的文件夹。C4D 将导入文件夹中的所有位图(子文件夹中的文件将不包括在内)。
正常化分布
Since you can change the Probability value for each texture and the other probability values cannot, for internal reasons, be adjusted directly in the parameter field (which is done internally), clicking on this button will enter the values in the respective fields (the sum of all probability values is always 100%).
由于您可以更改每个纹理的概率值,而其他概率值由于内部原因不能直接在参数字段中调整(在内部完成) ,单击此按钮将输入各个字段中的值(所有概率值的总和总是100%)。
To reiterate: Nothing changes with the distribution, only the correct values will be entered.
重申一下: 不会随分布而改变,只会输入正确的值。
均匀分布
Click on this button if you want to assign a uniform probability (see also Probability) to each of the textures listed in the Shaders menu. All shaders listed will then have the same probability, which together will equal 100%.
点击这个按钮,如果你想分配一个统一的概率(也见概率)的每个纹理列在着色器菜单。所有上市的着色器将有相同的概率,这将相当于100% 。
Deviations within uniform distributions can occur if the probability for individual textures is changed or new textures are added. Clicking on this button will again generate a homogenous probability distribution.
如果单个纹理的概率发生变化或添加了新的纹理,则在均匀分布中可能会发生偏差。点击这个按钮将再次生成一个同质的概率分布。
活跃
Use this option to activate or deactivate the texture. For random distribution, only active textures will be taken into consideration.
使用此选项激活或停用纹理。对于随机分布,只有活动纹理将被考虑在内。
概率
Use this setting to assign a probability to each texture that defines how it will appear on the objects. Probabilities are not complicated: Probabilities are not absolute values. If you have 2 objects and 2 textures, each with 50% probability, one of the textures can be projected double. It’s a little different if you are working with 100 objects. With a certain (other) probability, 50 objects will not have one and 50 the other texture. Rather a ratio of 47:53, 51:49, etc. will occur. The defined Probability will first take effect if you have an innumerable number of objects.
使用此设置为每个纹理分配一个概率,该概率定义了纹理在对象上的显示方式。概率并不复杂: 概率不是绝对值。如果你有2个物体和2个纹理,每个有50% 的可能性,其中一个纹理可以投影双倍。如果你要处理100个对象,这就有点不一样了。在一定的(其他)概率下,50个物体不会有一个纹理,50个物体不会有另一个纹理。而是一个47:53,51:49的比例,等等。如果你有无数个对象,定义的概率将首先生效。
If you are not happy with a given random distribution, e.g., because a green texture simply appears too often, then you can simply reduce the defined value. Since the probability values of the remaining textures cannot be adjusted directly for internal reasons, which can produce an irritating result, the Normalize Distribution button should be clicked, which will adjust all other values to the sum of the probability equals 100%
如果你不满意给定的随机分布,例如,因为绿色纹理出现得太频繁,那么你可以简单地减少定义的值。由于内部原因,剩余纹理的概率值不能直接调整,这可能会产生恼人的结果,所以应该点击标准化分布按钮,这将调整所有其他值的概率之和等于100%
移除
Click on this button to delete the respective texture field from the list.
单击此按钮从列表中删除相应的纹理字段。
纹理
Load a texture into this field.
加载一个纹理到这个字段。
第二纹理
Use this option if you want to randomly mix the Second Texture with the textures (Shader menu) (set Secondary Texture Mode to Replace if you want to replace the texture instead of mixing it; the degree to which the random replacement takes place is defined using the Probability slider).
如果你想随机混合第二纹理和纹理(着色菜单)(如果你想替换纹理而不是混合纹理,设置第二纹理模式为替换; 随机替换的程度是使用概率滑块定义的)。
Secondary Texture Blend[0..+∞%]
Secondary Texture Mode
次级纹理混合[0. . + ∞% ]次级纹理模式
Use these settings to define how the Secondary Texture should be mixed with the other textures. The Secondary Texture Mode is used to define the mix mode (see also Blend Modes). The Secondary Texture Blend value defines the degree with which the Secondary Texture will be mixed.
使用这些设置来定义次要纹理应该如何与其他纹理混合。次级纹理模式用于定义混合模式(参见混合模式)。次级纹理混合值定义次级纹理混合的程度。
The Replace mode is a special mode that will replace the textures with the Secondary Texture regardless of the Secondary Texture Blend setting’s value.
替换模式是一种特殊的模式,它将用次级纹理替换纹理,而不管次级纹理混合设置的值是多少。
梯度
Use this option if you want to randomly mix selected colors or gradients with the other textures. Colors will be selected randomly from this gradient. Click on the small arrow next to the setting’s name to make additional settings visible and set Interpolation to None if you want to use only specific colors.
如果要随机将选定的颜色或渐变与其他纹理混合,请使用此选项。颜色将从这个渐变中随机选择。单击设置名称旁边的小箭头,使其他设置可见,如果您只想使用特定的颜色,则将插值设置为 None。
Gradient Blend[0..+∞%]
Gradient Mode
渐变混合[0. . + ∞% ]渐变模式
Use these settings to define how the random colors from the Gradient setting should be mixed with the other textures. The Gradient Mode setting defines the method with which the colors will be mixed (see also Blend Modes) and the Gradient Blend value defines the degree to which the colors will be mixed.
使用这些设置来定义来自渐变设置的随机颜色应该如何与其他纹理混合。渐变模式设置定义了混合颜色的方法(参见混合模式) ,渐变混合值定义了混合颜色的程度。
The Replace mode is a special mode that will replace the other textures with the random color regardless of the Gradient Blend setting’s value.
替换模式是一种特殊的模式,它将用随机颜色替换其他纹理,而不管渐变混合设置的值是多少。
Random Color[0..+∞%]
Random Color Mode
随机颜色[0. . + ∞% ]随机颜色模式
Use these options if you really want to mix completely random colors with the other textures. Use these settings to define how random colors should be mixed with the other textures. The Random Color Mode defines the method with which the colors will be mixed (see also Blend Modes) and the Random Color value defines the degree with which the random colors will be mixed with the other textures.
如果你真的想要将完全随机的颜色与其他纹理混合,可以使用这些选项。使用这些设置来定义随机颜色应该如何与其他纹理混合。随机颜色模式定义了混合颜色的方法(参见混合模式) ,随机颜色值定义了随机颜色与其他纹理混合的程度。
The Replace mode is a special mode that will replace the textures with the random color regardless of the Random Color setting’s value.
替换模式是一种特殊的模式,它将用随机颜色替换纹理,而不管随机颜色设置的值是多少。
Grading
Variation
级别变更
These settings are used to define which color properties should be varied for the textures.
这些设置用于定义纹理应该改变的颜色属性。
Contrast[0..+∞%]
Gamma[0..+∞%]
Invert[0..+∞%]
Hue[0..+∞%]
Saturation[0..+∞%]
Lightness[0..+∞%]
对比度[0. . + ∞% ]伽玛[0. . + ∞% ]反转[0. . + ∞% ]色相[0. . + ∞% ]饱和度[0. . + ∞% ]明度[0. + ∞% ]
Use these values to define the maximum degree with which each property should be randomly varied for the textures (plus any other defined variations).
使用这些值来定义每个属性对于纹理应该随机变化的最大程度(加上任何其他已定义的变化)。
These values define the range from positive to negative that will be used. For example, a Contrast setting of 50% will randomly vary the contrast between -50% and +50%.
这些值定义了将要使用的从正到负的范围。例如,50% 的对比度设置将随机改变 -50% 和 + 50% 之间的对比度。
UVW Coordinate
Variation
坐标变换
The Variation shader can not only mix colors but can also move and rotate UVW coordinates as well. This works best with tileable textures.
变化着色器不仅可以混合颜色,还可以移动和旋转 UVW 坐标。这对于可贴图的纹理效果最好。
移位[ XYZ ]
These settings define the maximum random movement of UVW coordinates left/right or up/down. For the 3D Channel shader (e.g., Noise with Space set to World), the W direction can also be modified.
这些设置定义 UVW 坐标左/右或上/下的最大随机移动。对于3D 通道着色器(例如,噪声空间设置为世界) ,w 的方向也可以修改。
翻转/XUVW 翻转
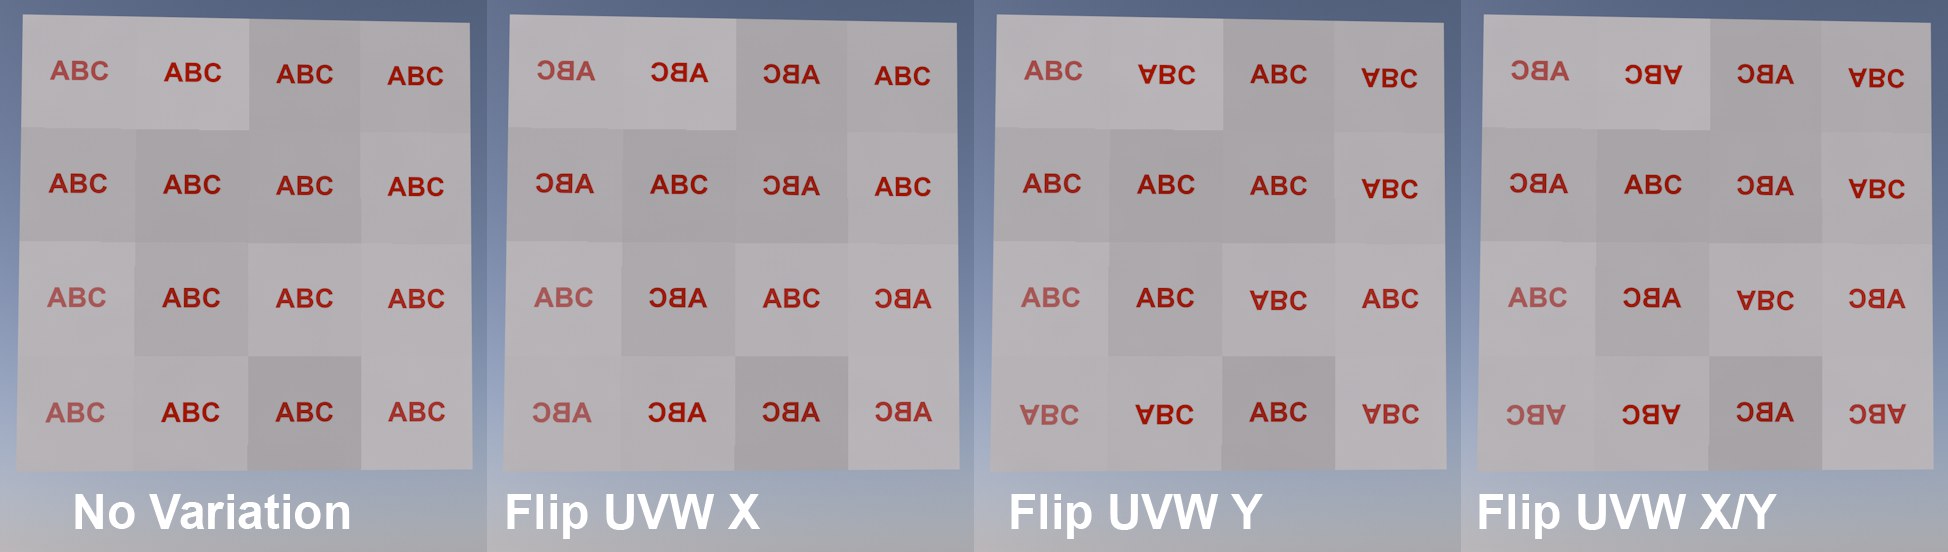 A texture tiled in 4Directions with randomly
flipped UVW polygons. 一个纹理平铺在4个方向随机翻转 UVW 多边形
A texture tiled in 4Directions with randomly
flipped UVW polygons. 一个纹理平铺在4个方向随机翻转 UVW 多边形
These options can be used to randomly mirror UVW coordinates vertically and/or horizontally.
可以使用这些选项随机地在垂直和/或水平方向镜像 UVW 坐标。
The random mirroring takes place prior to any random rotation defined using the following two options.
随机镜像发生在使用以下两个选项定义的任何随机旋转之前。
UVW Tile Offset X[-∞..+∞%]
UVW Tile Offset Y[-∞..+∞%]
UVW 砖偏移 x [-∞ . . + ∞% ] UVW 砖偏移 y [-∞ . . + ∞% ]
 At left a wood texture that was tiled 5 times; at
center UV Tile Offset X=100, UV Tile Offset Y=0 and inverted; at right both settings = 100%. 左边是木材纹理,平铺5次; 中间 UV 瓷砖偏移 x = 100,UV 瓷砖偏移 y = 0和倒置; 右边都是100% 的设置
At left a wood texture that was tiled 5 times; at
center UV Tile Offset X=100, UV Tile Offset Y=0 and inverted; at right both settings = 100%. 左边是木材纹理,平铺5次; 中间 UV 瓷砖偏移 x = 100,UV 瓷砖偏移 y = 0和倒置; 右边都是100% 的设置
In order for these settings to have an effect, Polygon Variation has to be set to UV Tiles.
为了使这些设置有效果,多边形变化必须设置为紫外线贴片。
These two settings can be used to randomly offset the tiling per row of tiles. It is recommended that both values are set to greater than 0 for brick walls, parquet and similar surfaces. Otherwise the randomness will not look realistic (see image right side).
可以使用这两个设置随机地偏移每行瓷砖的瓷砖。对于砖墙、镶木地板和类似的表面,建议将这两个值都设置为大于0。否则这种随机性看起来就不现实了(见图片右侧)。
旋转[0. . + ∞% ]
This value defines the maximum random rotation (by default: 100% = 360°) in each direction for the UV coordinates (rotation center U, V: 0.5, 0.5, i.e., center of the UV tile. Contingent on the next setting, the rotation calculated here will then be set to a fixed, quantized value.
这个值定义了 UV 坐标(旋转中心 u,v: 0.5,0.5,即 UV 瓷砖的中心)每个方向的最大随机旋转(默认值: 100% = 360 °)。视下一个设置而定,这里计算的旋转将被设置为一个固定的量化值。
量子化旋转
 A texture tiled in 4Directions with random,
quantized rotated UVW polygons. 一个纹理平铺在4个方向与随机,量化旋转 UVW 多边形
A texture tiled in 4Directions with random,
quantized rotated UVW polygons. 一个纹理平铺在4个方向与随机,量化旋转 UVW 多边形
Define here if the UVW coordinates should rotate steplessly (0 Degrees) or in steps of 45, 90 or 180 degrees.
在这里定义 UVW 坐标应该无级旋转(0度)或在45,90或180度的步骤。
This is dependent on the UVW Rotate value: an even disbursion of steps is only achieved at a value of 100%.
这取决于 UVW Rotate 值: 只有在值为100% 的情况下才能实现步骤的均匀分配。
量表〔 XYZ 〕
Use these values to randomly scale the UVW coordinates. The values entered here define the limits in the positive and negative directions: e.g., if the U coordinate is set to 0.5, the UV polygons will be varied between 0.5 and 1.5 times the horizontal U scale.
使用这些值可以随机缩放 UVW 坐标。这里输入的数值定义了正负方向的极限: 例如,如果 u 坐标设置为0.5,紫外线多边形将变化在水平 u 尺度的0.5到1.5倍之间。
Options
选择
一号钳
When varying colors, it can happen that they turn out "too bright" (RGB values in excess of 255, 255, 255). This is often not desired and can be prevented by enabling this option.
当改变颜色时,可能会出现“太亮”(RGB 值超过255,255,255)。这往往是不希望的,可以通过启用此选项来防止这种情况。
However, if you use HDRI textures, this option should remain disabled.
但是,如果您使用 HDRI 纹理,则此选项应保持禁用状态。