 Light off 关灯
 Light on 开灯
 PyroClusterBasic 基础Globals 全球Age 年龄Distance 距离Cyl. Distance Cyl,距离Shape 形状Illumination 照明Shadow 阴影Noise 噪音
Illumination
照明
PyroCluster effects can be lit in several ways using the options on this page.
PyroCluster 效果可以使用本页面上的选项以多种方式点亮。
The illumination of atmospheric effects is one of the keys to successful and believable animation. Without light, there’s nothing to see.
大气效果的照明是动画成功与可信的关键之一。没有光,什么也看不见。
The type of illumination used can dramatically change the look of a PyroCluster effect.
使用的照明类型可以戏剧性地改变焦聚效果的外观。
使用照明
Enable the Use Illumination option to activate Illumination effects. 启用“照明使用”选项激活照明效果|
Light off 关灯
|
Light on 开灯
|
模式
漫反射
Use this option if you want to employ a diffuse lighting method. The examples above show the difference between the different illumination models. Diffuse lighting spreads the light within the puff itself.
如果您想使用漫射照明方法,请使用此选项。上面的例子显示了不同光照模型之间的差异。漫射照明使光线在粉扑内部扩散。
TIP: Use Diffuse lighting for clouds and smoke effects. 提示: 对云彩和烟雾效果使用漫射照明
 Diffuse 漫反射 Diffuse 漫反射
|
 Ray angle 射线角 Ray angle 射线角
|
射线角
Enable this option if you want to use the Ray Angle lighting method. The example on the right, above, shows how Ray Angle illuminates according to the line of sight to the light source.
如果您想使用光线角度照明方法,请启用此选项。上面右边的例子展示了光线角度如何根据光源的视线来照明。
TIP: Use Ray Angle lighting for fire and smoke effects. 提示: 使用射线角度照明的火灾和烟雾效果
 Diffuse 漫反射 Diffuse 漫反射
|
 Ray angle 射线角 Ray angle 射线角
|
碰一下
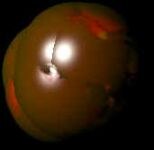
Choose Bump to set the Volume Tracer engine into a special volumetric bump shading mode (also known as voxel rendering). This method uses true phong shading algorithms (adopted for volume tracing) to render the 3D volume.
选择凹凸设置体积示踪引擎到一个特殊的体积凹凸阴影模式(也称为体素渲染)。这种方法使用真实的 phong 阴影算法(采用体积跟踪)来渲染三维体积。
To create a specular highlight only (without any bump structure), set the Bump value at the bottom of the page to 0% or use Ray Angle only. See also Bump below.
要创建一个只有镜面高光的页面(没有任何凹凸结构) ,可以将页面底部的凹凸值设置为0% ,或者只使用 Ray Angle。参见下面的 Bump。
Bump shading example (Puff Rendering):
凹凸阴影例子(粉扑渲染) :

[0. . 100% ]
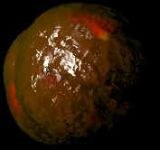
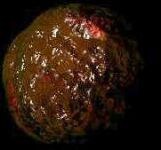
If you increase the Self Illum. value above 0, PyroCluster will add light to each rendered puff even when the cloud is completely in shadow. A value of 100 means that the puff color set on the Globals tab is drawn regardless of the influence of any other light on the puff. If you set this value to 50, only half of the puff’s color intensity is taken into account, while the other half of the brightness is generated by the light source. This feature is useful when you are working with attenuated lights. If you leave this value at 0, cloud areas with no light will be drawn as pure black.
如果你增加自我意识。值大于0,即使云彩完全处于阴影中,PyroCluster 也会为每个渲染的粉扑添加光线。值为100意味着不考虑任何其他光线对泡芙的影响,全球标签上的泡芙颜色设置被绘制。如果你把这个值设置为50,只有一半的颜色强度被考虑进去,而另一半的亮度是由光源产生的。当你使用弱光时,这个功能是很有用的。如果你将这个值保持在0,没有光线的云区将被绘制成纯黑色。
Each of the following images depicts the same cloud:
下面的每一张图片描绘的都是同一片云:
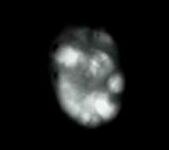 Self Illum. 0% 0%
 Self Illum. 10% 10%
 Self Illum. 100% 100%
In each image above, a spotlight is aimed at the center of the cloud..
在上面的每张图片中,聚光灯都对准了云的中心。
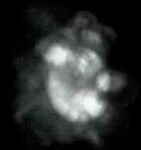
反式伊利亚姆[0.100% ]
Trans. Illum. set to 0% (left), 50% (center) and 100% (right).
反式。伊利亚姆。设置为0% (左) ,50% (中)和100% (右)。
Many rendering systems interpret a surface that receives no light as a pure black surface. This makes sense for 3D geometry and in some cases it is also good for gas or cloud effects. But if you take a close look at the images above, you will see that there are situations when it looks wrong if that rendering method is used.
许多渲染系统将不接收光线的表面解释为纯黑色表面。这对于3D 几何图形有意义,在某些情况下对气体或云层效果也有好处。但是如果你仔细看一下上面的图片,你会发现如果使用渲染方法会出现一些错误的情况。
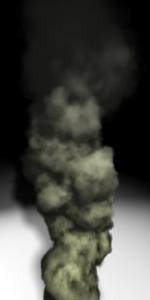
In the examples above, a smoke cloud is rendered on a grey background; there is one spotlight that illuminates the smoke. As you can see in the top image below, the edges of the cloud are, by default, pure black. Trans. Illum. helps you to soften areas in the volume that do not receive light, such as these edges.
在上面的例子中,一个烟雾云渲染在灰色背景上; 有一个聚光灯照亮了烟雾。正如你在下面的顶部图片中看到的,默认情况下,云的边缘是纯黑色的。反式。伊利亚姆。帮助您软化体积中不接收光线的区域,如这些边缘。
A value of 0 will render all areas, regardless of their illumination level. Set Trans. Illum. to its maximum value of 100 and it will only render those areas that are totally in the hot spot of the light cone.
一个0的值会渲染所有的区域,不管他们的照明水平。Set Trans.伊利亚姆。它的最大值为100,它将只渲染那些区域,完全是在热点的光锥。
 Trans. Illum 0% 反式伊朗0%
 Trans. Illum 50% 反式伊利亚姆50%
 Trans. Illum 100% 反式100%
闪亮[0. . 100% ]
The Shininess value controls the amount of glaze on the volume’s surface. Increasing the Shininess value will reduce the size of the specular highlights.
闪光值控制着体积表面的釉的数量。增加亮度值会减少高光的尺寸。
If you use very transparent effects, strange highlights may appear due to the volumetric nature of the volume tracer.
如果使用非常透明的效果,由于体积跟踪器的体积特性,可能会出现奇怪的高光。
例子:
 Shininess = 0% 亮度 = 0% Shininess = 0% 亮度 = 0%
|
 Shininess = 33% 亮度 = 33% Shininess = 33% 亮度 = 33%
|
 Shininess = 66% 亮度 = 66% Shininess = 66% 亮度 = 66%
|
 Shininess = 100% 亮度 = 100% Shininess = 100% 亮度 = 100%
|
强度[0. . + ∞% ]
Strength controls the intensity of the specular highlight. Higher values will result in brighter (whiter) specular highlights (Reflectance channel).
强度控制着镜面高光的强度,强度越高,高光亮度(反射通道)越亮。
例子:
 Strength = 0% 强度 = 0% Strength = 0% 强度 = 0%
|
 Strength = 33% 强度 = 33% Strength = 33% 强度 = 33%
|
 Strength = 66% 力量 = 66% Strength = 66% 力量 = 66%
|
 Strength = 366% 力量 = 366% Strength = 366% 力量 = 366%
|
软化[0. . 100% ]
When Strength is high and Shininess is low you might see harsh backlight effects. Increasing the Soften value will smooth out the regions affected.
当强度高,闪亮度低,你可能会看到强烈的背光效果。增加软化值将平滑的区域受影响。
This effect will be visible only when using more than one light.
这种效果只有在使用多个光源时才可见。
例子:
 Soften = 0% 软化 = 0%
 Soften = 50% 软化 = 50%
 Soften = 100% 软化 = 100%
Bump [-∞ . . + ∞% ]
The Bump value has the most impact on the overall look of the final effect. Higher values will result in more surface deformation. This value can also be set negative to invert the effect.
凹凸值对最终效果的整体外观影响最大。较高的数值将导致更多的表面变形。这个值也可以设置为负值来反转效果。
例子:
 Bump = 0% 0% Bump = 0% 0%
|
 Bump = 33% 33% Bump = 33% 33%
|
 Bump = 66% 66% Bump = 66% 66%
|
 Bump = 100% 100% Bump = 100% 100%
|