
 Material 材质Basic 基础Color 颜色Diffusion 扩散Luminance 亮度Transparency 透明度Reflectance 反射率Environment 环境Fog 雾Bump 碰一下Normal 正常Alpha 阿尔法Glow 发光Displacement 排水量Illumination 照明ViewportAssign 分配
Transparency
透明度
Here you can define the transparency. If the material has a color, the color is automatically reduced with increasing transparency. The equation is: color percentage + transparency percentage = 100%. So a white material with 0% transparency is white (100%). A white material with 50% transparency is 50% white (gray). A white material with 100% transparency has no color.
在这里你可以定义透明度。如果材质有颜色,颜色会随着透明度的增加而自动减少。方程式是: 色彩百分比 + 透明度百分比 = 100% 。因此,透明度为0% 的白色材质是白色的(100%)。透明度为50% 的白色材质是50% 的白色(灰色)。100% 透明的白色材质没有颜色。
Tip: 提示:You can load a texture as a transparency map using the three dots button. The brighter a pixel in the transparency map, the more transparent the corresponding region of the material. A transparency texture is similar to a photographic slide: Red parts of the slide allow only red light to pass through; white parts allow all light through. With black, no light can pass through the slide.
您可以加载纹理作为一个透明地图使用三点按钮。透明度贴图中的一个像素越亮,材质对应区域的透明度就越高。透明材质类似于摄影幻灯片: 幻灯片的红色部分只允许红光通过,白色部分允许所有光线通过。用黑色,没有光线可以通过幻灯片。
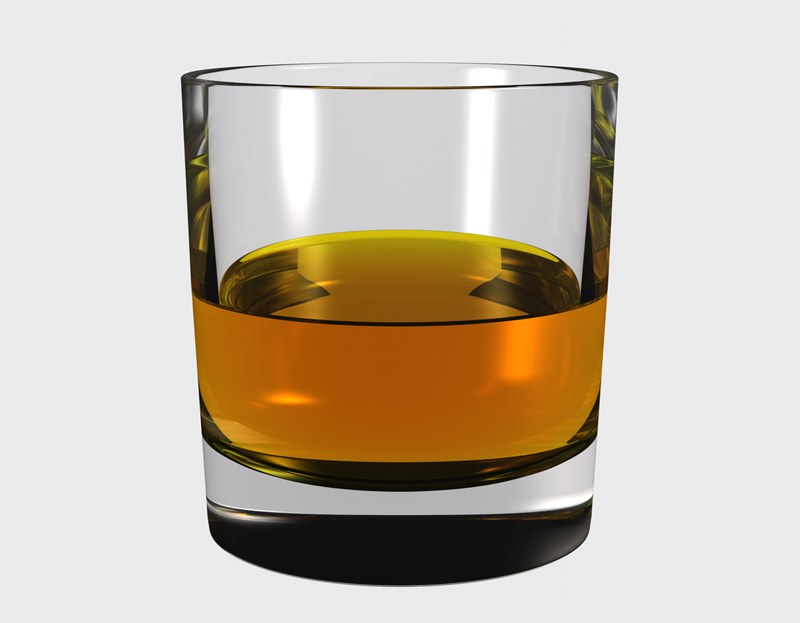
 Figure 6: Transparency may be controlled by a
transparency map or by the Transparency Color. 图6: 透明度可以通过透明贴图或透明颜色来控制
Figure 6: Transparency may be controlled by a
transparency map or by the Transparency Color. 图6: 透明度可以通过透明贴图或透明颜色来控制
You can use a transparent material with a light source to create a light map or gel (look up gels). If a transparent texture is assigned to a light source, the light will be filtered according to the texture’s coloration, just like a real gel.
你可以使用带有光源的透明材质来创建光贴图或凝胶(查找凝胶)。如果一个透明的纹理被分配给一个光源,光线将被过滤根据纹理的颜色,就像一个真正的凝胶。
颜色
You can specify a color on most of the material channel pages using a color chooser.
您可以使用颜色选择器在大多数材质通道页面上指定颜色。
亮度[0. . 100% ]
The Brightness value defines the brightness of the above-mentioned color and thus its transparency.
亮度值定义了上述颜色的亮度,从而定义了它的透明度。
折射预设
Here you will find numerous refraction presets that automatically apply the correct Refraction value. These are the same presets that can be found in the Reflectance channel’s Fresnel function.
在这里你会发现许多折射预置,自动应用正确的折射值。这些是相同的预置,可以在反射通道的菲涅耳函数中找到。
折射[0.25. . 4]
Objects that are not closed, such as a hemisphere without a cap, can give unexpected results with refraction. See Figures 1 to 3. In the figures, the Refraction value is represented by the character n.
不是封闭的物体,例如没有帽子的半球,可以通过折射产生意想不到的结果。见图1至图3。在图形中,折射值由字符 n 表示。
 Figure 1. 图1
When a ray hits a closed surface (Figure 1) with transparency and refraction, the ray is bent to simulate refraction. The bent ray is considered to be inside the object. When the ray reaches another surface of the object (the exit side), it is bent back as in real life.
当一条光线以透明和折射的方式撞击一个封闭的表面(图1)时,光线被弯曲以模拟折射。弯曲的射线被认为是在物体内部。当光线到达物体的另一个表面(出口端)时,它会像现实生活中一样向后弯曲。
However, if the object is open, the ray may not hit a second surface of the object (Figure 2). Thus the ray may not be bent back and the refraction effect may be inaccurate.
然而,如果对象是开放的,射线可能不会击中对象的第二个表面(图2)。因此,光线可能不会向后弯曲,折射效果可能不准确。
 Figure 2. 图2
For this reason, ensure that all transparent surfaces in the scene are closed (Figure 3).
基于这个原因,确保场景中所有的透明表面都是关闭的(图3)。
 Figure 3. 图3
全内反射
If the Fresnel Reflectivity value is larger than 0% the viewing angle — the angle between the camera and the surface — will be taken into account. If you observe a real pane of glass with your eyes parallel to the pane (i.e. with a 90 degree viewing angle), you will notice that the pane barely reflects, almost all light passes through. However, look at the pane from a narrow viewing angle and you will see that it reflects much more of its surroundings. The transparency and reflection values are dependent on the viewing angle.
当菲涅耳反射率大于0% 时,将考虑视角(摄像机与物体表面的夹角)。如果你观察到一块真正的玻璃,你的眼睛与玻璃平行(即90度视角) ,你会注意到玻璃几乎没有反射,几乎所有的光线都穿过玻璃。然而,从一个狭窄的视角来看窗格,你会看到它反射了更多的周围环境。透明度和反射值取决于视角。
The Fresnel option simulates this phenomenon for you.
菲涅耳选项为您模拟这种现象。
Note that the reflective properties (Roughness, Anisotropic, etc.) can be fine-tuned using the Reflectance channel’s * Transparency * setting.
请注意,反射属性(粗糙度,Anisotropic 等)可以通过使用反射通道的 * 透明度 * 设置进行微调。
For example, provided Fresnel Reflectivity is set to 100%, if you set transparency with RGB values of 80%, 80%, 80%, the material is 80% transparent and 0% reflective when the viewing angle is 90 degrees. With a very low viewing angle, the material is approximately 0% transparent and 80% reflective. If you have entered a reflection value in addition to transparency, the reflection value is added to the angle-dependent reflection.
例如,提供菲涅耳反射率设置为100% ,如果您设置透明度的 RGB 值为80% ,80% ,80% ,材质是80% 的透明和0% 的反射时,观赏角度是90度。在一个非常低的视角,材质是大约0% 的透明和80% 的反射。如果除了透明度之外还输入了反射值,则反射值将被添加到依赖于角度的反射中。

If the Fresnel Reflectivity value is larger than 0% the transparency and reflection values are used as they are irrespective of the viewing angle.
如果菲涅耳反射率值大于0% ,则透明度和反射值与视角无关。
退出反思
 At top, 在顶部,Exit
Reflections 退出反思 enabled; at bottom, disabled. 启用; 在底部,禁用
At top, 在顶部,Exit
Reflections 退出反思 enabled; at bottom, disabled. 启用; 在底部,禁用
As soon as a reflection meets a surface after being refracted through glass one of two slightly different reflections can be calculated - ones that result when they enter glass and those that exit the glass. A single reflection is often visually the most appealing one (even if it is in fact false). To achieve this effect, disable the Exit Reflections option.
当一个反射物经过玻璃折射后遇到一个表面时,就可以计算出两种略有不同的反射物之一——一种是进入玻璃时产生的,另一种是退出玻璃时产生的。一个单独的反射通常在视觉上是最吸引人的(即使它实际上是假的)。要达到这个效果,请禁用“退出反思”选项。
菲涅耳反射率[0. . 100% ]
 Figure 4: 图4:Fresnel
Reflectivity 菲涅耳反射率 set to a high value (left) and low value (right). 设置为高值(左)和低值(右)
Figure 4: 图4:Fresnel
Reflectivity 菲涅耳反射率 set to a high value (left) and low value (right). 设置为高值(左)和低值(右)
The Fresnel Reflectivity controls the strength of the Fresnel reflections (see Figure 4).
菲涅耳反射率控制菲涅耳反射的强度(见图4)。
Note the Fresnel Shader, which offers additional settings.
注意菲涅耳着色器,它提供了额外的设置。
添加剂
Usually, if the material has a color, the color is automatically reduced with increasing transparency. This can help to ensure a realistic effect. However, if you don’t want this automatic behavior to take place, you can enable the Additive option.
通常,如果材质有一种颜色,颜色会随着透明度的增加而自动减少。这可以帮助确保一个现实的效果。但是,如果您不希望此自动行为发生,则可以启用 Additive 选项。
纹理
Here an image texture or a 2D shader can be defined. Refer to the Textures chapter for details.
这里可以定义一个图像纹理或二维着色器。详细信息请参阅纹理章节。
混合模式
Use these parameters to mix the color and texture panes using one of four modes. The default mode for all channels is Normal, except for the Environment page, which uses Multiply as the default mode. Not all channels have Mix settings. If you load a texture or a 2D shader, it is placed on a layer above the color (i.e. the texture is placed on top of the color).
使用这些参数可以使用四种模式之一混合颜色和纹理窗格。除了使用 Multiply 作为默认模式的 Environment 页外,所有通道的默认模式都是 Normal。并非所有通道都有 Mix 设置。如果你加载一个纹理或二维着色器,它被放置在颜色之上的一层(即纹理放置在颜色之上)。
正常
In normal mode, the Mix Strength sets the opacity of the texture. If the value is set to 100%, you will see the texture only (remember, the texture is the top layer, so if it is opaque you will not see the color underneath). If the value is set to 70%, the result is 70% of the texture and 30% of the color.
在正常模式下,混合强度设置纹理的不透明度。如果值设置为100% ,你只能看到纹理(记住,纹理是最上面的层,所以如果它是不透明的,你就看不到下面的颜色)。如果值设置为70% ,结果是70% 的纹理和30% 的颜色。
For example, if a texture pixel of RGB 255/0/0 (red) is used with a color value of RGB 255/255/0 (yellow) with the Mix Strength set to 50%, the resultant color is 255/128/0 (orange).
例如,如果使用 RGB 255/0/0(红色)的纹理像素,颜色值为 RGB 255/255/0(黄色) ,混合强度设置为50% ,则结果颜色为255/128/0(橙色)。
添加
The texture’s RGB value is added to the color’s RGB value.
纹理的 RGB 值被添加到颜色的 RGB 值中。
No values will be clamped (e.g., to 255/255/255)
不会夹住任何值(例如,到255/255/255)
减去
The color’s RGB value is subtracted from the texture’s RGB value. Thus if a texture pixel is RGB 255/255/255 (white) and the color value is 255/0/0 (red), subtracting with Mix Strength set to 100% gives the result 0/255/255 (cyan).
颜色的 RGB 值从纹理的 RGB 值中减去。因此,如果一个纹理像素是 RGB 255/255/255(白色) ,颜色值是255/0/0(红色) ,减去混合强度设置为100% 得到的结果是0/255/255(青色)。
繁殖
The RGB value of the texture is multiplied by the RGB value of the color. For example RGB 255/128/0 (orange) multiplied by RGB 0/255/0 (green) results in RGB 0/128/0 (dark green).
纹理的 RGB 值乘以颜色的 RGB 值。例如,RGB 255/128/0(橙色)乘以 RGB 0/255/0(绿色)的结果是 RGB 0/128/0(深绿色)。
混合强度[0. . 100% ]
Mix Strength defines the mixing proportion between the texture and color panes or between the brightness and transparency (depending on which mode is selected) of the texture to be mixed.
混合强度定义了纹理和颜色窗格之间的混合比例,或者纹理的亮度和透明度之间的混合比例(取决于选择哪种模式)。
吸收
 Green Absorption colors. 绿色吸收色
When light enters a transparent medium it weakens and changes color to one degree or another (glass is very rarely completely colorless). The thicker the material the weaker the light becomes as it passed through (glass is not completely transparent). These effects can be emulated in Cinema 4D using the following two parameters. In the following the term Color refers to the Color parameter at the top of the Transparency channel.
当光线进入一个透明介质时,它会减弱并在一定程度上改变颜色(玻璃很少是完全无色的)。材质越厚,光线通过时就越弱(玻璃不是完全透明的)。这些效果可以在Cinema 4d 模拟使用以下两个参数。在下面的术语中,Color 指的是位于透明度通道顶部的 Color 参数。
Tip: 提示:吸收色
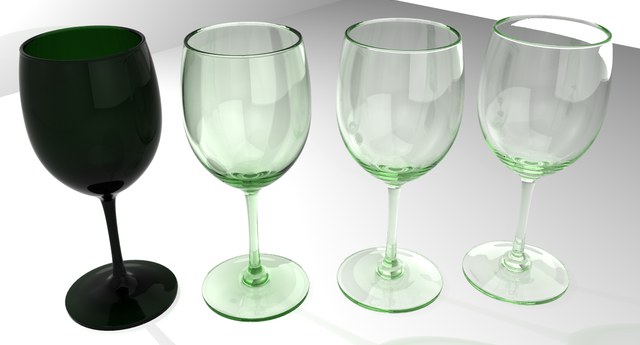
 Different Absorption colors from left to right:
Green, blue, black (color set to 不同的吸收颜色从左到右: 绿色,蓝色,黑色(颜色设置为White 白色 for each object). 每件物品)
Different Absorption colors from left to right:
Green, blue, black (color set to 不同的吸收颜色从左到右: 绿色,蓝色,黑色(颜色设置为White 白色 for each object). 每件物品)
The Absorption Color is the color that is multiplied by the Color when a "ray of light" has travelled the distance defined in the Absorption Distance (next parameter) parameter.
吸收色是当一束“光线”移动到吸收距离(下一个参数)参数中定义的距离时,被颜色乘以颜色的颜色。
The Transparency channel then has two colors. These are defined as follows:
透明度通道有两种颜色,定义如下:
When creating glass you will almost always set the Color to white, but not always:
在创建玻璃时,你几乎总是将 Color 设置为白色,但并不总是:
 The settings for the fluid’s color: Transparency
color = yellow, Absorption color carmine red. 液体的颜色设置: 透明色 = 黄色,吸收红色
The settings for the fluid’s color: Transparency
color = yellow, Absorption color carmine red. 液体的颜色设置: 透明色 = 黄色,吸收红色
Modeling glasses filled with fluid
充满液体的模型玻璃
The best way to model glasses filled with fluid in them is to model the fluid and the glass separately. The fluid object should extend slightly into the glass object. In the case of normal, off-the-shelf glasses (modeled using Splines, each placed into a Lathe object) this would look like:
模拟玻璃中充满液体的最好方法是分别模拟液体和玻璃。液体物体应该稍微伸入玻璃物体。在正常情况下,现成的眼镜(模型使用样条,每个置于一个车床对象)看起来像:
 Scale the spline used to model the fluid and place
it so it extends slightly into the glass. 缩放用于模拟流体的样条曲线,并将其放置,使其稍微延伸到玻璃中
Tip:
提示:
Scale the spline used to model the fluid and place
it so it extends slightly into the glass. 缩放用于模拟流体的样条曲线,并将其放置,使其稍微延伸到玻璃中
Tip:
提示: Left: Concave, absorbing objects, no boole;
right: Two objects with different absorbing materials. 左边: 凹的,吸收的物体,没有 boole; 右边: 两个具有不同吸收材质的物体
Left: Concave, absorbing objects, no boole;
right: Two objects with different absorbing materials. 左边: 凹的,吸收的物体,没有 boole; 右边: 两个具有不同吸收材质的物体
Absorbing, concave objects can be created without using the Boole Object by making the concave object a Child of the larger object and assigning it an absorption material.
吸收,凹对象可以创建不使用布尔对象,使凹对象作为一个子较大的对象,并赋予它一个吸收材质。
吸收距离[0. . + ∞ m ]
 Increasing 增加Absorption
Distance 吸收距离 values from left to right. At left a very low value, slightly greater than 值从左到右。在左边是一个非常低的值,略大于0. All glasses have the same 。所有的眼镜都一样Color 颜色 (white) and
Absorption color (green). (白色)和吸收色(绿色)
Increasing 增加Absorption
Distance 吸收距离 values from left to right. At left a very low value, slightly greater than 值从左到右。在左边是一个非常低的值,略大于0. All glasses have the same 。所有的眼镜都一样Color 颜色 (white) and
Absorption color (green). (白色)和吸收色(绿色)
Use this setting to define the distance rays of light have to travel before Absorption is completely multiplied with the Color. The lower the value the more intense the Absorption Color will be, even for thin glass. A value of 0 will turn Absorption off completely.
使用这个设置来定义光线在吸收完全乘以颜色之前必须经过的距离。值越低,吸收色越强烈,即使是薄玻璃。0的值将完全关闭吸收。
模糊度[0. . 100% ]

You can blur the transparency using the Blurriness, Min Samples, Max Samples and Accuracy settings. The Dispersion value defines the strength of blur for the transparency. 0% means no blur. Increase the value to increase the strength of blur.
你可以模糊透明度使用模糊,最小样本,最大样本和准确度设置。色散值定义了透明度的模糊强度。0% 意味着没有模糊。增加值来增加模糊的强度。
 From upper left to lower right: 从左上角到右下角:Matte 女名女子名 effect 效果0, 5, 10, 15, 20, 25, 30, 35 0,5,10,15,20,25,30,35. The
render times will increase exponentially. 。渲染时间将成倍增长
From upper left to lower right: 从左上角到右下角:Matte 女名女子名 effect 效果0, 5, 10, 15, 20, 25, 30, 35 0,5,10,15,20,25,30,35. The
render times will increase exponentially. 。渲染时间将成倍增长
If you’re wondering why transparent regions are still displayed so clearly despite the activated blurriness effect (i.e., when Total Internal Reflection is enabled), the blurriness effect can be defined for total reflection in the Reflectance material channel without this channel having to be activated.
如果你想知道为什么透明区域仍然显示如此清晰,尽管激活模糊效果(即,当全内反射启用时) ,模糊效果可以在反射材质通道中定义为全内反射,而不需要激活这个通道。
 Left: blurriness effect in Transparency channel
only; right: mblurriness effect also enabled in the Reflectance channel. 左: 只在透明通道中有模糊效果; 右: 在反射通道中也有模糊效果
Left: blurriness effect in Transparency channel
only; right: mblurriness effect also enabled in the Reflectance channel. 左: 只在透明通道中有模糊效果; 右: 在反射通道中也有模糊效果
Min Samples[1..10000]
Max Samples[1..10000]
最小样本[1. . 10000]最大样本[1. . 10000]
These parameters will only be available if Blurriness is set to a value higher than 0%.
只有当模糊度设置为大于0% 时,这些参数才可用。
Increasing Min Samples and/or Max Samples gives a higher quality blur, but a longer render time also.
增加最小样本和/或最大样本会产生更高质量的模糊,但渲染时间也会更长。
Cinema 4D uses samples to create the blur effect. Rather than take samples at even distances, the samples are concentrated where they are most needed. Max Samples defines the number of samples used for the most important areas. Min Samples defines the number of samples used for the least important areas.
C4D院使用样品来制造模糊效果。这些样品不是在甚至很远的地方取样,而是集中在最需要它们的地方。Max Samples 定义了用于最重要领域的样本数量。最小样本定义了用于最不重要区域的样本数量。
If you see black areas when rendering overlapping transparency objects, increase the Ray Depth value on the Options page of the render settings. If you can’t see weak reflections in the render, ensure that Threshold is set to 0%. You will also find this parameter on the Options page of the render settings.
如果在呈现重叠的透明对象时看到黑色区域,请在呈现设置的选项页面上增加 Ray Depth 值。如果你不能在渲染中看到微弱的反射,确保阈值设置为0% 。您还可以在呈现设置的“选项”页中找到此参数。
准确度[0. . 100% ]
This parameter will only be available if Dispersion is set to a value higher than 0%.
只有当分散度设置为大于0% 时,此参数才可用。
Increasing the Accuracy value gives a more accurate blur, but a longer render time also.
增加精度值会产生更精确的模糊效果,但渲染时间也会更长。
Affects the accuracy of the blur effect by controlling the number of samples per shading point. With a value of 100%, the maximum number of samples defined under Max Samples will be used in critical areas. Lower the value to reduce the number of samples used.
通过控制每个着色点的采样数来影响模糊效果的准确性。当值为100% 时,在最大样本下定义的最大样本数将用于关键区域。降低该值以减少所使用的样本数量。