
 Modeling Settings 建模设置Snap 啪Quantize 量化Mesh Checking 网格检查
Snap
啪
Tip: 提示:启用管理单元
启用摄影
Enables or disables Snapping.
启用或禁用断开。
特定工具
If disabled, the global Snap settings will be modified for the options below.
如果禁用,将为下面的选项修改全局管理单元设置。
If enabled, the tool-specific Snap settings (which will also be saved with the Project file) will be modified for the options below.
如果启用,特定于工具的管理单元设置(也将与项目文件一起保存)将为以下选项进行修改。
If this option is disabled for a given tool while simultaneously pressing the
如果在按下 Shift 键的同时对给定工具禁用此选项,则当前设置将全局使用。
类型
Cinema 4D offers 2 Snap methods (Auto Snapping is a combination of 2D Snapping and 3D Snapping):
C4D 提供了两种捕捉方法(自动捕捉是2D 捕捉和3D 捕捉的结合) :
弹力半径[0.1. . 100]
Enter the radius around the cursor within which the elements to be selected and the target element should be recognized and displayed with name. If multiple elements lie within this radius, the element nearest the cursor will be displayed. Click to make your selection.
输入光标周围的半径,在这个半径中选择的元素和目标元素应该被识别并显示为名称。如果有多个元素位于此半径范围内,则显示与光标最接近的元素。点击进行选择。
This setting can also be added to Palettes as a GUI element. The can also be found in the Customize Command Palette and can be dragged from there onto a Palette and used as a normal icon anywhere in the GUI.
此设置也可以作为 GUI 元素添加到调色板中。单元半径滑块也可以在自定义命令调色板中找到,并且可以从那里拖动到调色板上,作为 GUI 中任何地方的常规图标使用。
导向角[0.1.180 ° ]
If the Dynamic Guides option is enabled, the Guide Angle setting can be used to define the rotation angles at which dynamic guides will automatically be displayed based on special points. A good median value to use is 90°.
如果启用动态指南选项,指南角度设置可以用来定义旋转角度,其中动态指南将自动显示基于特殊点。一个好的中位数值是90 ° 。
This setting can also be added to Palettes as a GUI element. This setting can also be found in the Customize Command Palette and can be dragged from there onto a Palette and used as a normal icon anywhere in the GUI.
此设置也可以作为 GUI 元素添加到调色板中。这个设置也可以在 Customize Command Palette 中找到,并且可以从那里拖动到 Palette 上,作为 GUI 中任何地方的普通图标使用。
快照元素
Using the following settings you can define which elements should be snapped to.
使用下面的设置,您可以定义哪些元素应该被捕捉到。
顶点捕捉
顶点
If enabled, the selected element can be snapped to any object vertex (incl. those on the reverse side). For Splines, the intermediate points will be used.
如果启用,选定的元素可以捕捉到任何对象顶点(包括。那些在背面的)。对于样条曲线,将使用中间点。
边缘弹簧
If enabled, the selected element can be snapped to any object edge (incl. those on the reverse side).
如果启用,选定的元素可以捕捉到任何对象边缘(包括那些在反面)。
多边形捕捉
多边形
If enabled, the selected element can be snapped to any object’s surface (incl. those generated). This setting should always be used with the Type setting’s 3D Snap option active.
如果启用,选定的元素可以捕捉到任何对象的表面(包括。所产生的废物)。此设置应始终与类型设置的3D 管理单元选项活动使用。
样条卡扣
花键
If enabled, the selected element can be snapped to Splines (incl. Spline primitives). They will be snapped to the Spline itself and not to its intermediate points.
如果启用,选定的元素可以折叠到样条(包括。样条基元)。它们将折到样条本身,而不是其中间点。
轴的卡扣
轴心
If enabled, the selected element will be snapped to an object’s origin.
如果启用,选定的元素将被捕捉到对象的原点。
交叉点快照
十字路口
If enabled, the selected element will snap to the intersections of:
如果启用,选中的元素将与以下元素的交叉点对齐:
- In the orthographic views, visual orientation can be used; in the Perspective view, objects must actually intersect.
- 在正投影视图中,可以使用视觉方向; 在透视视图中,物体必须实际相交。
When snapping to Guide intersections, note that Guides snapping must also be enabled. A crosshair will appear within the cursor radius (4x Snap Radius) to signal locations at which an element can be snapped.
当拍摄指南交叉点,注意指南拍摄也必须启用。一个十字线将出现在光标半径(4倍管理单元半径)的信号位置,在哪里一个元素可以抓拍。
中点突然断裂
中点
If enabled, the selected element will snap to the center of polygon edges or Spline regions between vertices.
如果启用,选定的元素将对齐到多边形边的中心或顶点之间的样条区域。
网格/工作平面快照
网格/工作平面
Enable this option if you want to snap elements to the work plane. Note that you should also enable The Type setting’s 3D Snap option.
如果要将元素单元到工作平面,请启用此选项。请注意,您还应该启用类型设置的3D 管理单元选项。
网格点快照
网格点
If enabled, the selected element will snap to global grid points or grid points on the work plane.
如果启用,所选元素将与工作平面上的全局网格点或网格点对齐。
网格线快照
网格线
If enabled, the selected element will snap to global grid lines or grid lines on the work plane.
如果启用,所选元素将与工作平面上的全局网格线或网格线对齐。
指南扣
指南
Enable this option if you want to snap to Guide Objects. Also activate the  Intersection
Snap
Intersection
Snap
如果您希望单元来引导对象,请启用此选项。如果您还想与相交的指南对齐,也可以激活交叉管理单元。
动态指南
动态指南
Enable this option if you want to snap to Dynamic Guides. Also activate the Intersection
Snap
如果您希望与动态指南对齐,请启用此选项。如果您还想与相交的指南对齐,也可以激活交叉管理单元。
垂直的
垂直弹簧
Use Perpendicular snapping to snap to lines that run perpendicular along a line (Guides or polygon edges). This is one of the most important Snapping settings. This option is a little more difficult to comprehend but it can be very useful. If used properly you can even do without the orthographic view when modeling. Take a look at the following examples. The should shed some light on the topic.
使用垂直咬住线运行垂直线(指南或多边形边缘)。这是最重要的摄影设置之一。这个选项有点难以理解,但是它可能非常有用。如果使用得当,你甚至可以做没有正投影视图时,建模。看看下面的例子。这应该对这个问题有所帮助。
例子一
You want to add a cut to the marked line that runs perpendicular to the white line:
你需要在垂直于白线的标记线上添加一条切线:
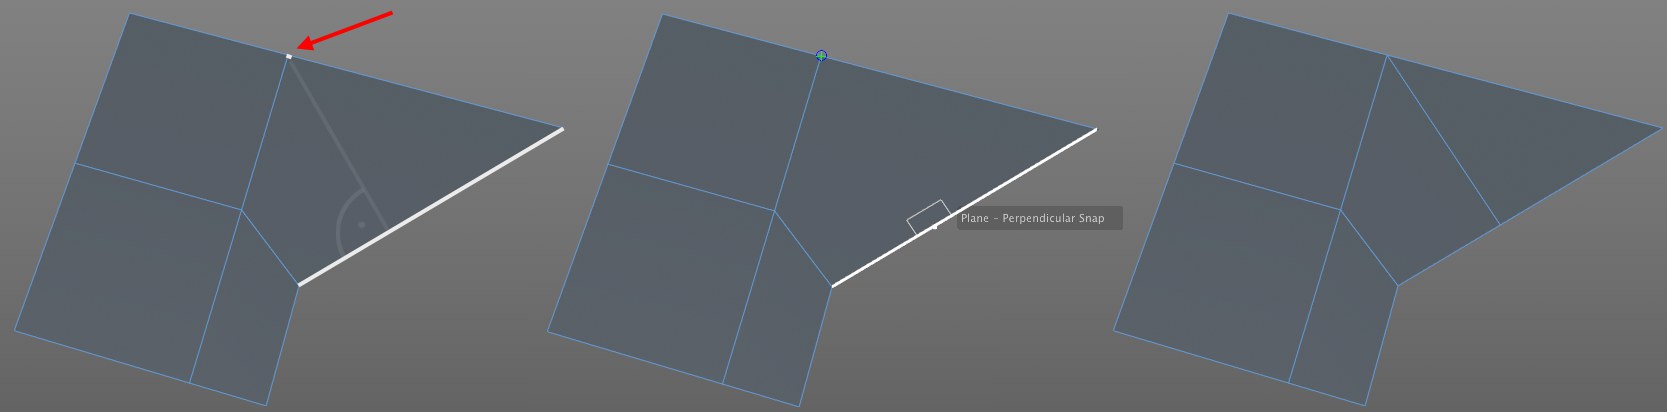
This can be done very easily:
这很容易做到:
例子二
This linear, open Spline needs to be closed and the start and end sections meet at the same intersection point. Proceed as follows (the mouse button must be pressed and held during the entire process):
这个线性,开放样条需要被关闭和开始和结束部分满足在同一交叉点。按照以下步骤操作(在整个操作过程中必须按住鼠标键) :

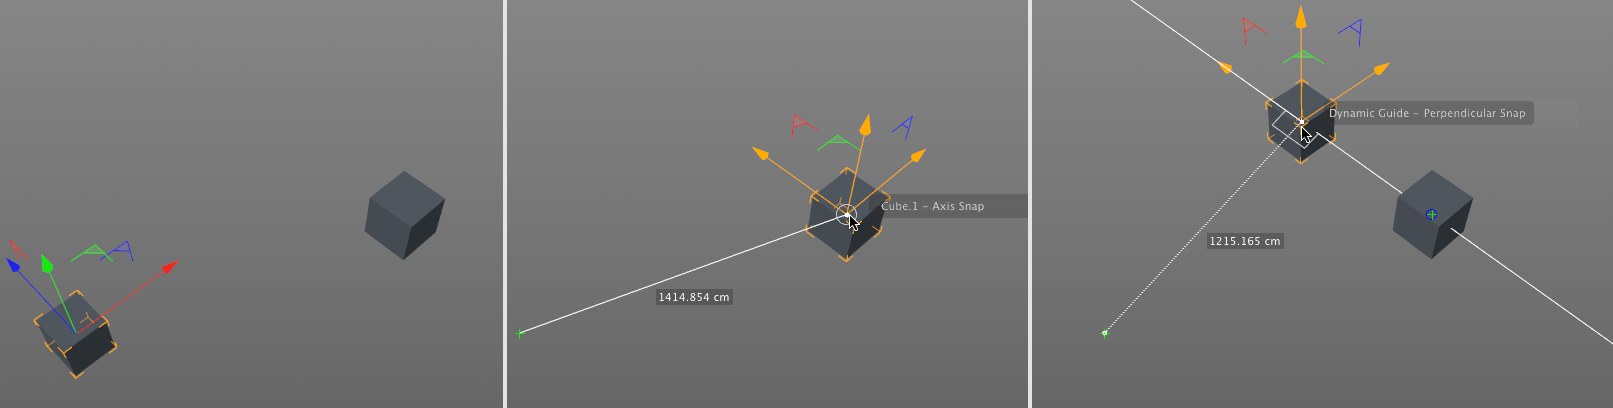
例子3
A cube and a cone are placed freely in space. We want to drag the 4 top cube vertices parallel to the same height as the tip of the cone.
立方体和圆锥体在空间中自由放置。我们希望拖动顶部4个立方体顶点平行于相同的高度作为锥顶端。

例子四
A different type of example: Two cubes are placed freely in space. We want to position the selected cube along the right cube without modifying its X coordinates.
一个不同类型的例子: 两个立方体被自由地放置在空间中。我们希望在不修改 x 坐标的情况下沿着右侧多维数据集定位选定的多维数据集。
RELEASE 23
第23期
像素捕捉
像素
This option is designed for use with the Texture UV Editor.
此选项设计用于纹理 UV 编辑器。
If a texture is loaded in the editor, this option can be enabled to snap UV elements to the pixel corners or centers. This makes it possible to precisely position UV coordinates down to the pixel.
如果在编辑器中加载了纹理,则可以启用此选项将 UV 元素捕捉到像素角或中心。这使得精确定位 UV 坐标下降到像素成为可能。
Have a look at the image below:
请看下面的图片:
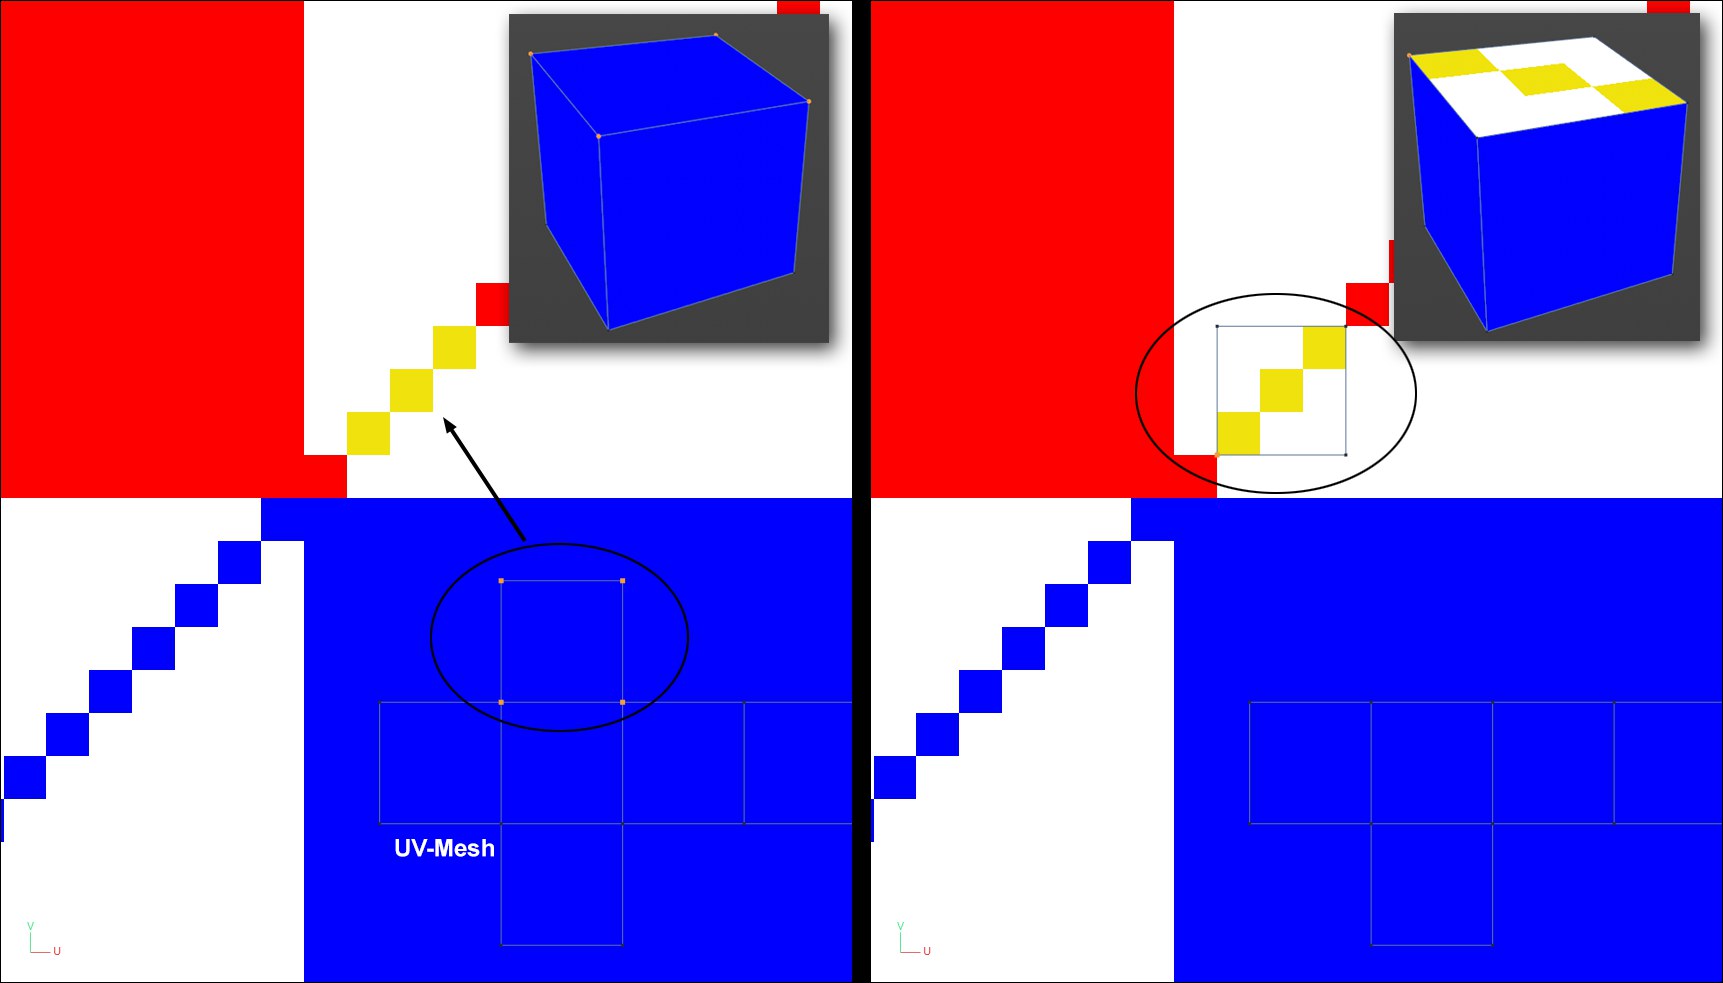
In the image above, a texture in the background is projected onto a cube via the UV mesh shown below. If you want to position one side of the cube’s texture precisely over the three yellow pixels, this can be easily done using Pixel Snap. For larger textures you should zoom in accordingly so the pixels are visible. The makes it easier to snap.
在上图中,背景中的纹理通过下图中的 UV 网格投影到一个立方体上。如果你想要将立方体的纹理的一边精确的定位在三个黄色像素之上,这可以很容易的使用像素管理单元完成。对于较大的纹理,你应该相应放大,使像素是可见的。这使得它更容易折断。
像素位置
Here you can define the snap position in regards to the individual pixel:
在这里你可以定义单独的像素点的位置:


