Material Manager when used with BodyPaint 3D
材质管理器与 BodyPaint 3D 一起使用
 Keep in mind that the 请记住:Material Manager 材质管理器 offers several display modes and may look different to the picture
above. 提供多种显示模式,可能看起来与上面的图片不同
Edit Menu 编辑菜单
Keep in mind that the 请记住:Material Manager 材质管理器 offers several display modes and may look different to the picture
above. 提供多种显示模式,可能看起来与上面的图片不同
Edit Menu 编辑菜单
概览
Good materials are every bit as important to photorealism as good modeling. Using the Material Manager, you can accurately recreate any type of material.
对于照相写实主义来说,好的材质和好的造型同样重要。使用材质管理器,您可以准确地重新创建任何类型的材质。
The Material Manager is where all the materials in the scene are stored. A thumbnail and name is shown for each material.
材质管理员是现场所有材质的储存地。每种材质的缩略图和名称都会显示出来。
The Material Manager can also display the textures (including layers) for each material. In addition, here you can choose which materials and material channels should be painted.
材质管理器还可以显示每种材质的纹理(包括图层)。此外,在这里您可以选择哪些材质和材质渠道应该画。
图层管理器(紧凑)模式
 Alpha channels and layer masks are not displayed in this
mode. 阿尔法通道和图层掩码在此模式下不显示
Alpha channels and layer masks are not displayed in this
mode. 阿尔法通道和图层掩码在此模式下不显示

The top part of the Material Manager works in the same way as the top part of the Color manager (see Color). They both control the same settings; changes you make in one manager are applied automatically to the other manager.
材质管理器的顶部与 Color 管理器的顶部以相同的方式工作(参见 Color)。它们都控制相同的设置; 您在一个管理器中所做的更改将自动应用到另一个管理器。
You can also choose which channels are active for painting or editing. For example, the move layer tool will only move layers with a colored pencil icon.
您还可以选择哪些通道用于绘制或编辑。例如,移动图层工具只移动带有彩色铅笔图标的图层。
The slider controls the opacity of the active layer, the drop-down list defines the blending mode.
滑块控制活动图层的透明度,下拉列表定义混合模式。
Below these controls, you will find a row of material channels. These represent all the material channels you have defined.
在这些控件下面,你会发现一排材质通道。它们代表你定义的所有材质通道。
The button on the left lets you switch multi channel mode on or off. The pencils indicate which material channels are active for painting.
左边的按钮可以让你开启或关闭多通道模式。铅笔表明哪些材质渠道是活跃的绘画。

On the left you will see thumbnail previews for your materials (incl. any assigned layer colors). To the right of each thumbnail, a colored pencil icon means the material is active for painting, a grayed out pencil means the material is loaded in RAM but not active for painting, and a cross means the material is not loaded in RAM.
在左边你会看到你的材质缩略图预览(包括。任何分配的图层颜色)。在每个缩略图的右边,一个彩色铅笔图标意味着材质在绘画中是活跃的,一个灰色铅笔意味着材质在 RAM 中加载但是在绘画中不是活跃的,一个十字意味着材质没有在 RAM 中加载。
To choose which material is active for painting, click the grayed out pencil icon or cross icon (clicking on the cross icon loads the material into RAM). you will see a colored pencil icon appear. To activate multiple materials for painting, shift-click each material that you want to paint on.
要选择绘制活动的材质,点击灰色的铅笔图标或十字图标(点击十字图标将材质加载到 RAM 中)。你会看到一个彩色铅笔图标出现。要激活多种绘画材质,请单击要绘制的每种材质。
To the right of the material names, you will see a triangle for each material that has layers. Click a triangle to display the material’s layers. Click the triangle again to hide the layers once more. When the layers are hidden, they are internally flattened and displayed as a single, combined preview.
在材质名称的右边,你会看到每个有层的材质都有一个三角形。单击一个三角形显示材质的图层。再次点击三角形来隐藏图层。当图层被隐藏时,它们在内部被压平,并显示为一个单独的组合预览。

The right part of the Material Manager is used for displaying the material channels and layers. If these are not displayed, you must first create a texture from the Texture menu (or load a texture - see Load/Unload Texture).
材质管理器的右边部分用于显示材质通道和层。如果这些没有显示,您必须首先从纹理菜单中创建一个纹理(或加载一个纹理——请参阅加载/卸载纹理)。
Non-existent textures or layers, symbolized by a small plus, can be created by double-clicking this cross.
不存在的纹理或层,象征一个小加,可以通过双击这个交叉创建。
The bhodiNUT Fusion shader (described later in this chapter) lets you combine multiple textures. You can access these textures here also, as well as any textures you have created using the Add User Data command.
bhodiNUT Fusion 着色器(在本章后面描述)允许你组合多种纹理。您还可以在这里访问这些纹理,以及使用 Add User Data 命令创建的任何纹理。
隐藏层
The eye icons enable you to hide the layers to the right. Click an eye icon to hide or display the layers. Note that you cannot paint on hidden layers.
眼睛图标使您可以隐藏图层的权利。点击眼睛图标来隐藏或显示图层。注意,你不能在隐藏的图层上绘制。
Alt+click on an Eye icon will make that layer visible and hide all others. Alt+click again will reset the previous state.
点击一个眼睛图标将使该图层可见并隐藏所有其他图层。再次点击 Alt 会重置前一个状态。
You can also click and drag over multiple Eye icons to change their respective states.
你也可以点击并拖动多个眼睛图标来改变它们各自的状态。
.
铅笔图标
The pencil icon tells you whether any of the layers to its right are active for painting. A red frame around a layer means the layer is active for painting.
铅笔图标告诉你它右边的图层中是否有用于绘画的图层。图层周围的红色框架表示该图层正在绘制。
连接层
You can move or transform linked layers as one. You can only link layers if they belong to the same material. To link a layer, click on the area where the pencil icon is usually displayed. you will see a link icon appear.
您可以移动或转换连接层为一个。你只能链接属于同一材质的图层。要链接一个图层,点击通常显示铅笔图标的区域。你会看到一个链接图标出现。

To unlink the layer, click the link icon once more.
要解除图层链接,请再次单击链接图标。
You can import Photoshop files with linked layers intact.
你可以导入完整的链接图层的 Photoshop 文件。
活动层和通道
Each active layer and channel is indicated by a red frame.
每个有源层和通道由一个红色框架表示。
Suppose you want to paint on seven material channels at the same time. Each of these channels has several layers. You can activate a layer for painting by clicking on the layer. This layer’s frame will only turn bright red when you select the next layer that has a dark red frame. Thus you can quickly tell which layers are being manipulated.
假设你想同时在七个材质通道上作画。每个通道都有几个层次。你可以通过点击图层来激活一个图层进行绘制。这个图层的框架只有当你选择下一个图层时才会变成明亮的红色,这个图层的框架是暗红色的。因此,您可以快速地告诉哪些层正在被操纵。
图层的上下文菜单
To open a layer’s context menu, right-click (Windows) or Command-click (macOS) on the layer.
要打开图层的上下文菜单,在图层上右键单击(Windows)或命令单击(macOS)。
Layer Manager (expanded/compact) mode
层管理器(扩展/压缩)模式

This mode works in the same way as the compact mode (see above) except that:
这个模式和紧凑模式工作原理相同(见上文) ,除了:
创建一个 Alpha 通道
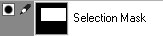
Select some pixels and in the Material Manager, choose Texture / New Alpha Channel. you will see an alpha channel named Selection Mask appear in the active material channel of the active material, right at the bottom.
选择一些像素,在材质管理器中,选择纹理/新的 Alpha 通道。你会看到一个名为选择蒙版的 alpha 通道出现在活性物质的活性物质通道中,就在底部。
To switch the alpha channel on or off, click the black circle icon. If the icon is active, all black parts are cut out, white parts remain visible and gray parts are semi-transparent (the darker the gray, the more transparent it is). Drag & drop the alpha channel from the preview icon into the texture view in order to edit it. Colors you paint on the alpha channel are converted to grayscale.
要开启或关闭 alpha 通道,请单击黑色圆圈图标。如果图标是活动的,所有的黑色部分被切除,白色部分仍然可见,灰色部分是半透明的(灰色越暗,就越透明)。将 alpha 通道从预览图标拖放到纹理视图中进行编辑。您在 alpha 通道上绘制的颜色将转换为灰度。
To create a selection from the alpha channel, choose Selection From Layer from the context menu or from the Material Manager’s Texture menu.
要在 alpha 通道中创建选区,可以从上下文菜单或材质管理器的纹理菜单中选择图层选区。
You can convert alpha channels to normal channels via drag-and-drop.
您可以通过拖放将 alpha 通道转换为正常通道。
An alpha channel defines which parts of a material channel are visible. Note that you cannot use the alpha channel to store a selection. 阿尔法通道定义材质通道的哪些部分是可见的。请注意,不能使用 alpha 通道存储选定内容When an alpha channel (or layer mask) is active, the layer modes change and only two options are available:
当一个 alpha 通道(或者图层蒙版)被激活时,图层模式改变,只有两个选项可用:

Straight, Premultiplied
直线的,自增的
When you render a picture with an alpha channel, both the bitmap and the alpha channel are antialiased. If you load this bitmap and its alpha channel into BodyPaint 3D and you are using the Straight mode, the bitmap and alpha channel are multiplied. This causes the transition from the object’s color to the background color to be calculated twice and this may cause an unwanted seam at the edge. Use premultiplied mode instead to avoid the seam.
当使用 alpha 通道呈现图片时,位图和 alpha 通道都是反锯齿的。如果您将这个位图及其 alpha 通道加载到 BodyPaint 3D 并使用 Straight 模式,则位图和 alpha 通道将相乘。这将导致从对象的颜色到背景颜色的过渡计算两次,这可能会导致在边缘产生一个不想要的接缝。使用预乘模式来避免接缝。
创建一个图层蒙版
To create a layer mask, do one of the following:
要创建图层蒙版,请执行下列操作之一:

As with alpha channels, you can switch the layer mask on or off by clicking the black circle icon.
和 alpha 通道一样,你可以通过点击黑色圆圈图标来切换蒙版的开关。
Also, you can convert the layer mask to a normal layer via drag-and-drop.
此外,您可以转换层蒙版到一个正常的层通过拖放。
To delete a layer mask, click it to select it and in the Material Manager, choose Texture > Delete Layer.
要删除一个图层蒙版,点击它来选择它,在材质管理器中,选择纹理 > 删除图层。
A layer mask defines which parts of the layer are visible. 图层蒙版定义图层的哪些部分是可见的 Layers will be displayed only. 图层将只显示
Currently, BodyPaint 3D does not utilize Photoshop layers but they are displayed in the Layer Manager. These layers will remain unaltered when saved so they can be used again in Photoshop.
目前,BodyPaint 3D 没有使用 Photoshop 图层,但是它们显示在图层管理器中。这些图层保存后将保持不变,以便可以在 Photoshop 中再次使用。
编辑菜单