
Brush Settings
画笔设置

BodyPaint 3D offers you complete control over brushes. When the brush tool is selected, the brush settings will appear in the Active Tool manager. Here you will find descriptions for these settings.
3D 提供了对笔刷的完全控制。当画笔工具被选中时,画笔设置将出现在活动工具管理器中。在这里你可以找到这些设置的描述。
A preview for the brush is displayed in the top left corner of the manager. Click on this preview to access the brush presets. Below this preview you will find a larger preview, which is a sample paintstroke.
笔刷的预览显示在管理器的左上角。点击这个预览进入画笔预置。在这个预览下面你会看到一个更大的预览,这是一个样例画面笔触。
Left of each parameter you will see a blue circle. If a circle is filled, it means an effector is enabled for the parameter such as pen pressure or pen tilt. Effectors are described later in this chapter.
在每个参数的左边你会看到一个蓝色的圆圈。如果填充了一个圆圈,这意味着一个效果器对诸如笔压或笔倾斜之类的参数启用。效果器将在本章后面进行描述。
存储颜色
Enable this option to blend the active color in the Color manager with the brush preview. If you then save the brush settings as a brush preset, the color will be saved together with the brush settings.
启用此选项可以将 Color manager 中的活动颜色与画笔预览混合。如果您然后保存笔刷设置为预置,颜色将与笔刷设置一起保存。
If Store Color is disabled, only the brush settings will be saved.
如果禁用“存储颜色” ,则只保存笔刷设置。
This has implications for painting. Suppose you have picked a color in the Color manager and a brush in the Brush Presets. Suddenly, a different color replaces your chosen color in the Color manager — here, the brush you picked has a stored color which replaced the active color. Therefore only enable this option if you want the brush to always paint with the same color, such as a brush for painting rust. 这对绘画有影响。假设您已经在颜色管理器中选择了一种颜色,并在画笔预置中选择了一个画笔。突然,在 Color manager 中,一个不同的颜色替换了你选择的颜色ー在这里,你选择的画笔有一个存储的颜色替换了活动的颜色。因此,如果您希望画笔始终使用相同的颜色,例如用于绘制铁锈的画笔,则只启用此选项添加预置
This saves the current brush settings as a brush preset in the Brush Presets. Enter the name for the brush in the dialog that opens. The familiar Save Preset window will open.
这将当前画笔设置保存为画笔预置中的画笔设置。在打开的对话框中输入笔刷的名称。熟悉的保存预置窗口将打开。
通用笔刷类型
The Type drop-down list (next to the brush preview) defines the brush type: Generic or Bitmap. The tip of the generic brush is defined by means of options and sliders. These are:
类型下拉列表(在画笔预览旁边)定义了画笔类型: 泛型或位图。通用刷子的尖端是通过选项和滑块来定义的。这些是:
形状
Choose from two basic brush shapes: circle or rectangle. The settings below refine the basic shape.
从两个基本笔刷形状中选择: 圆形或矩形。下面的设置调整基本形状。
个人资料
The profile defines the pressure gradient for the brush tip. The graphs should help to clarify. Each graph describes the brush pressure over brush radius.
这个配置文件定义了笔刷尖端的气压梯度。这些图表应该有助于澄清。每个图表描述刷子压力超过刷子半径。
圆形


线性


针


喷嘴


用户定义
If you select the User Defined option, you can create your own pressure gradient for the brush tip. Click the blue circle next to Profile to open the following window.
如果你选择用户定义选项,你可以为画笔笔尖创建你自己的气压梯度。单击“配置文件”旁边的蓝色圆圈打开以下窗口。
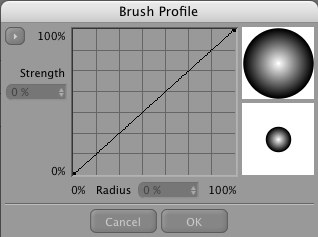
The Y axis corresponds to the brush strength (i.e. pressure) and the X axis represents the brush radius. The curve is linear by default. Click on the first point of the curve. The point will turn to indicate that it is selected. Drag the point and notice how the two real-time previews to the right of the graph update in real-time. The upper preview shows you the brush profile, the lower preview shows the brush itself.
Y 轴对应于刷子强度(即压力) ,x 轴代表刷子半径。默认情况下,曲线是线性的。点击曲线的第一个点。该点将转向表示它已被选中。拖动点并注意两个实时预览是如何实时更新图形右侧的。上面的预览会显示画笔的轮廓,下面的预览会显示画笔本身。
Click anywhere inside the graph (i.e. other than on a point) to create a new point. The curve will adjusts itself to run through the new point. You can add any number of new points.
单击图表中的任何地方(即除了一个点之外)以创建一个新点。曲线会自动调整以通过新的点。你可以添加任意数量的新点数。
To delete a point, click on the point to select it and press the Backspace key or drag the point out of the window.
若要删除某个点,请单击该点并选择该点,然后按退格键或将该点拖出窗口。
You can use the Strength and Radius boxes to read or enter values for the selected point.
您可以使用“强度”和“半径”框读取或输入选定点的值。

|

|
If you click the triangle in the top left corner of the dialog, a menu will open with the following commands:
如果你点击对话框左上角的三角形,一个菜单会用以下命令打开:
复制曲线
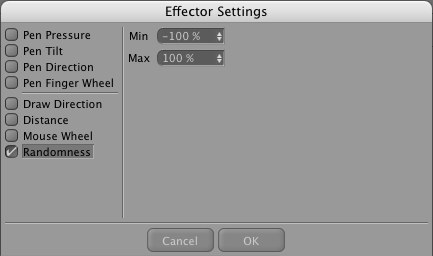
Copies the active curve to the clipboard. Once you have copied the curve, you can use the Paste Curve command to paste it into an effector’s graph. An effector enables you to change a brush parameter dynamically by means of an input device. For example, if you have a graphics tablet, you can use the pen direction to change the brush size while you paint.
将活动曲线复制到剪贴板。一旦你已经复制了曲线,你可以使用粘贴曲线命令粘贴到效果器的图形。效果器使您能够通过输入设备动态地更改画刷参数。例如,如果您有一个图形输入板,您可以在绘制时使用笔的方向来改变画笔的大小。
粘贴曲线
This command is only available if you have copied a curve to the clipboard. It pastes the curve stored in the clipboard into the graph.
此命令只有在您已经将曲线复制到剪贴板时才可用。它将存储在剪贴板中的曲线粘贴到图形中。
重置为默认值
Restores the curve to its default shape (a straight line).
将曲线恢复为默认形状(一条直线)。
Flip Horizontal, Flip Vertical
水平翻转,垂直翻转
These commands flip (mirror) the curve horizontally or vertically.
这些命令水平或垂直翻转(镜像)曲线。
大小
This defines the overall size of the brush. You can edit the value using the slider or you can enter the value numerically into the box right of the slider. The value defines the diameter of the brush in pixels. You can set the value from 1 to 200 pixels.
这定义了画笔的整体大小。您可以使用滑块编辑值,也可以在滑块的右侧框中输入数值。该值以像素为单位定义笔刷的直径。您可以将值从1设置为200像素。
Tip: 提示:压力
This slider defines the brush pressure. The lower you set this value, the more transparent the brushstroke becomes. The maximum value of 100% defines an opaque brushstroke.
这个滑块定义了刷子压力。设置的值越低,笔触就越透明。最大值100% 定义了不透明的笔触。
硬度
This determines how much of the brush is hard as a percentage. The lower you set this value, the softer the brush becomes at the edge and the more its edge will blend with the background color. If Hardness is set to the maximum value of 100% the brushstroke will not blend with the background color at all.
这决定了笔刷的硬度以百分比表示。你设置的这个值越低,笔刷的边缘就越软,它的边缘就越容易与背景颜色混合。如果硬度设置为100% 的最大值,笔触将不会与背景颜色混合在一起。
 0% Hard. 0% 艰难 0% Hard. 0% 艰难
|
 100% Hard. 100% 努力 100% Hard. 100% 努力
|
间隔
If you enable this option you can define the distance between brushmarks in the stroke. A large value will result in a trace of brush marks that follow the cursor. A low value will produce the effect of a continuous brushstroke. If Spacing is disabled, the continuity of the brushstroke will depend on the speed of your computer — a rapid brushstroke may lead to fragmentation.
如果你启用这个选项,你可以定义笔触中笔刷痕迹之间的距离。较大的值将导致跟随光标的刷子标记的跟踪。较低的数值会产生连续的笔触效果。如果间距被禁用,画笔的连续性将取决于你电脑的速度ーー快速的画笔可能会导致碎片化。
 High Spacing value. 高间距值
抖动
The Jitter option causes the paint to be applied at a certain distance from the brush tip.
“抖动”选项使绘图应用于距离画笔笔尖一定距离的位置。
 Linear brushstroke with Jitter
enabled. 线性笔触与抖动启用 Linear brushstroke with Jitter
enabled. 线性笔触与抖动启用
|

|
 Jitter and Randomness
enabled. 启动抖动和随机性 Jitter and Randomness
enabled. 启动抖动和随机性
|
|
抖动计数
Additional random copies of the brush tip will be created. This enlarges the overall application and increases coverage.
将创建额外的刷头随机副本。这将扩大整个应用程序并增加覆盖范围。
挤压
Here you can squeeze (i.e. narrow) the brush tip. A value of 100% leaves the brush in its original shape (circular or rectangular). The lower you set the value, the narrower the tip becomes.
在这里你可以挤压(即缩小)刷头。如果值为100% ,画笔就会保持原来的形状(圆形或长方形)。你设置的值越低,小费就会变得越窄。
 100% and 0% Squeeze. 100% 和0% 挤压
旋转
You can rotate the brush tip by moving the slider or by entering a rotation angle in the input box.
您可以通过移动滑块或在输入框中输入旋转角度来旋转笔刷尖端。
喷枪
 Airbrush with large and small
settings. 大小设置的喷枪
Airbrush with large and small
settings. 大小设置的喷枪Simply clicking with the mouse will apply color - no brush movement is required. It is better if you do not define a brush hardness or pressure. Use the slider to define the amount of color to be applied. If you use this functionality in conjunction with Jitter you should enable the Both Axes option.
只需点击鼠标将申请颜色-没有刷移动是必需的。最好不要定义刷子的硬度或压力。使用滑块定义要应用的颜色数量。如果将此功能与抖动一起使用,则应启用 Both Axes 选项。
位图笔刷类型

BodyPaint 3D handles all loaded bitmaps as grayscale images. You can still use RGB Color bitmaps, but BodyPaint 3D will convert them in memory to grayscale. Black areas of the bitmap are transparent and white areas are opaque. Gray tones vary in transparency accordingly — tones closer to black are more transparent than tones closer to white.
3D 将所有加载的位图处理为灰度图像。你仍然可以使用 RGB 颜色位图,但是 BodyPaint 3D 会在内存中将它们转换为灰度。位图的黑色区域是透明的,白色区域是不透明的。灰色调在透明度方面相应地有所不同ーー接近黑色的色调比接近白色的色调更加透明。
位图
If you click on the triangle, a menu opens with the commands Load From Selection / Texture and Load From Disc, None and Edit in BodyPaint 3D.
如果你点击这个三角形,一个菜单会打开,菜单上有选择加载/纹理和从光盘加载,无和编辑的命令。
从光盘加载
Loads a bitmap from a storage medium. Don’t forget to save the brush via the Save Brush command. Otherwise it will be lost when you exit Cinema 4D.
从存储介质加载位图。不要忘记通过保存画笔命令保存画笔。否则,当你离开C4D院时,它就会消失。
If you select the Load from Selection/Texture command the currently displayed texture or part of the texture (if a selection has been made) will be used as a brush (see also Store Brush).
如果你选择 Load from Selection/Texture 命令,当前显示的纹理或纹理的一部分(如果已经选择)将被用作画笔(参见存储画笔)。
Selecting the Edit in BodyPaint 3D command will load the bitmap used to define the brush’s profile into the Texture view where it can be modified.
选择 Edit in BodyPaint 3D 命令将把用于定义笔刷轮廓的位图加载到纹理视图中,在那里可以修改它。
None removes the currently loaded bitmap brush profile.
没有删除当前加载的位图笔刷配置文件。

After modification, select Load from Selection/Texture to load the modified bitmap. Don’t forget to save the brush to the Content Browser via the Save Brush option.
修改后,选择 Load from Selection/Texture 来加载修改后的位图。不要忘记通过保存画笔选项将画笔保存到内容浏览器。
使用样本大小
 Various brush sizes. Red arrow: After clicking on
不同大小的笔刷。红色箭头: 点击后Use Sample Size 使用样本大小.
Various brush sizes. Red arrow: After clicking on
不同大小的笔刷。红色箭头: 点击后Use Sample Size 使用样本大小.Clicking this button will set the brush parameter Scale back to the base texture’s original size. This increases the quality of the applied stroke. Increasing the brush size lowers the quality of the applied stroke.
单击此按钮将设置画笔参数缩放回基本纹理的原始大小。这样可以提高所应用的笔画的质量。增加笔刷的大小会降低所应用的笔划的质量。
The bitmap brush has fewer settings than the generic brush — Shape, Profile, Hardness and Squeeze are all absent because these properties are defined by the bitmap itself.
位图笔刷的设置比一般笔刷少ーー形状、轮廓、硬度和挤压都不存在,因为这些属性是由位图本身定义的。
The Size, Pressure, Spacing, Jitter and Rotation parameters have exactly the same effect as with the generic brush type — see Generic Brush Type for details.
大小、压力、间距、抖动和旋转参数与一般笔刷类型的效果完全相同ー参见一般笔刷类型了解详细信息。
过滤器
Filters add effects to the brush such as painting with watercolors and smudging.
过滤器添加效果的画笔,如绘制与水彩和模糊。
湿边
 Filter set to Wet Edges. 过滤器设置为湿边缘
This filter generates a watercolor effect. The brushstroke is slightly transparent and paint accumulates at the edges (i.e. the edges are less transparent than the center).
这个滤镜会产生水彩效果。笔触略微透明,颜料在边缘聚集(也就是说边缘不如中心透明)。
污迹
 Filter set to Smudge. 过滤器设置为涂抹
If All Layers is enabled, all layers will be considered when you smudge the active layer.
如果所有图层都启用,那么当你涂抹活动图层时,所有图层都会被考虑。
The Color Mix slider controls the extent to which the active color or pattern (i.e. the one in the Color Manager) is applied to the smudge. If the slider is set to 0%, no new paint is applied and you will smudge the existing colors only. As you increase the slider’s value, so more and more of the active color or pattern is applied to the smudge. In addition, you can enable an effector for the Color Mix value.
Color Mix 滑块控制将活动颜色或图案(即 Color Manager 中的颜色或图案)应用到污迹的程度。如果滑块设置为0% ,则不会应用任何新的颜料,并且只会对现有颜色进行涂抹。当您增加滑块的值时,会有越来越多的活动颜色或图案应用到污迹上。此外,您可以为 Color Mix 值启用一个效果器。
Set Spacing to a lower value if the smudge effect is too coarse. This will produce a softer effect. 如果污迹效果太粗糙,则将间距设置为较低的值。这将产生一种更柔和的效果Dodge, Burn, Saturate, Desaturate
躲闪,燃烧,饱和,去饱和
For details on these filters, see Dodge, Burn, Saturate/Desaturate and Sponge.
有关这些滤镜的详细信息,请参阅道奇,加深,饱和/去饱和和海绵。
效果器
笔刷预设