Cache
缓存
常规
2 types of Ambient Occlusion calculation are available:
环境遮挡有两种计算方法:
- the usual "brut force" method, which checks the environment’s visibility for each individual pixel 通常的“ brut force”方法,检查每个单独像素的环境可见性
- the faster method via cache, which only checks certain points’ visibility and interpolates all others in-between. 更快的方法通过缓存,它只检查某些点的可见性和插值之间的所有其他点
The latter works internally in a similar fashion as the Irradiance Cache GI mode and can also be controlled using similar settings. The advantages of using this method:
后者的工程内部类似的方式作为辐射缓存 GI 模式,也可以控制使用类似的设置。使用这种方法的优点:
- the AO calculation is much faster AO 的计算速度要快得多
- the cache can be cached and used again (this is very useful because AO is independent on material and lighting), i.e., if you want to render different views of a given object using AO, the previously checked regions can be re-used by loading the cache and only having the new regions calculated. However, this only works if no changes have been made to objects’ geometry, spacing between objects or anything else that can affect AO. 缓存可以缓存并再次使用(这非常有用,因为 AO 独立于材质和光照) ,也就是说,如果你想使用 AO 呈现给定对象的不同视图,先前检查过的区域可以通过加载缓存重新使用,只计算新的区域。然而,这只有在没有改变物体的几何形状,物体之间的间距或任何其他可能影响 AO 的情况下才能起作用
Ambient Occlusion and Team Render
环境遮挡和团队渲染
If Team Render should use existing AO cache files, make sure that these cache files (in the scene’s ,illum’ folder with an *.ao extension) are also uploaded and the Auto Load option described below is enabled.
如果 Team Render 应该使用现有的 AO 缓存文件,请确保这些缓存文件(在场景的 illum’文件夹中有 * 。的扩展)也上传和自动加载选项下面描述的启用。
设置
记录密度
Don’t let the numerous settings described below confuse you. Because AO works similar to Irradiance Cache, the settings are for the most part the same. In most cases, you will only have to adjust the Record Density setting. This setting defines the subordinate parameters accordingly (only modify these separately if the AO is consistently wrong or if it does not appear to be precise enough).
不要让下面描述的众多设置迷惑了你。因为 AO 的工作原理类似于辐照度缓存,所以设置在大多数情况下是相同的。在大多数情况下,你只需要调整记录密度设置。这个设置相应地定义了从属参数(只有当 AO 一贯错误或者看起来不够精确时才单独修改这些参数)。
A brief statement about how the AO cache works: During rendering, several pre-calculations take place (pre-passes), during which the Project is analyzed in order to check the regions most important for the camera ("shading points" in corners, concave regions, etc.) for visibility of the environment and to calculate an AO value:
关于 AO 缓存是如何工作的简要说明: 在渲染期间,会进行一些预计算(预通道) ,在此期间分析项目,以便检查对相机最重要的区域(角落、凹区域等的阴影点) ,以获得环境的可见性,并计算 AO 值:
 The AO shading points will be arranged on neuralgic
locations and saved to the AO cache. AO 阴影点将被安排在神经元位置并保存到 AO 缓存中
The AO shading points will be arranged on neuralgic
locations and saved to the AO cache. AO 阴影点将被安排在神经元位置并保存到 AO 缓存中
All AO values will be cached to an AO cache and can be saved as a file for later use.
所有 AO 值将被缓存到一个 AO 缓存中,并且可以保存为一个文件供以后使用。
In a second step, the selectively located AO values will be interpolated and smoothed.
在第二步,选择性定位的 AO 值将被插值和平滑。
The following settings primarily serve to disperse the shading points (reminder: the Basic tab’s settings define inter alia how many samples will be generated hemispherically at each shading point, their length and the effects’s color).
下面的设置主要用于分散阴影点(提醒: 基本标签的设置除其他外定义了在每个阴影点将生成多少个样本、它们的长度和效果的颜色)。
启用缓存
If disabled, AO works as follows: The environement’s visibility will be calculated for each pixel. If enabled, the AO cache described in the previous paragraph will be used.
如果禁用,AO 工作如下: 环境的可见性将计算每个像素。如果启用,将使用前一段中描述的 AO 缓存。
样本[16. . 16384]
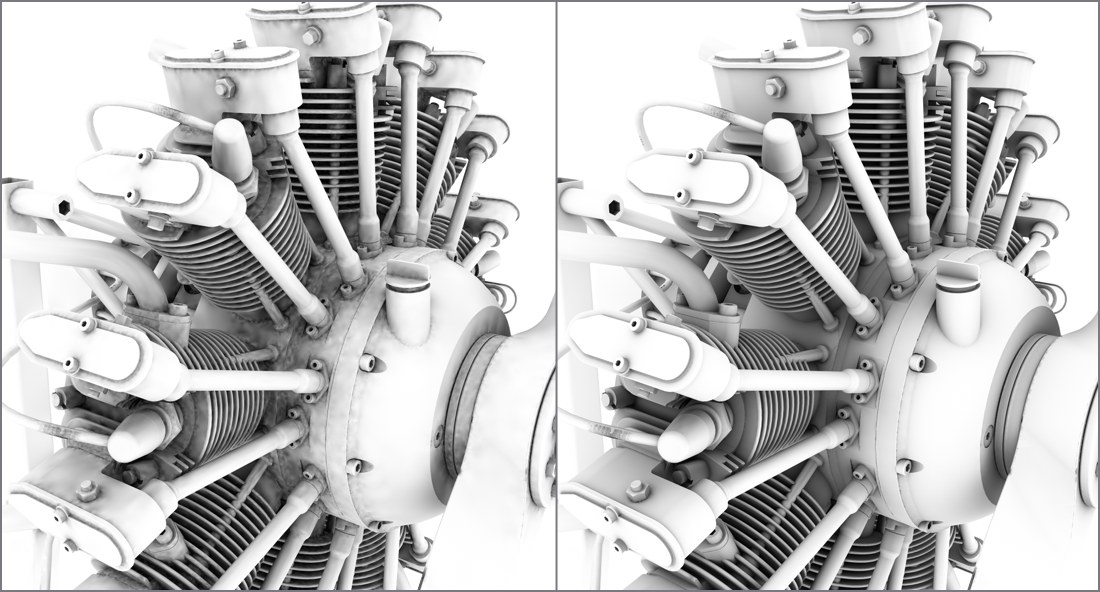 Left: small 左: 小Samples 样本
value. Right: larger 值。右: 更大Samples 样本 value. Model by Steen Winther. 价值。模型作者: Steen Winther
Left: small 左: 小Samples 样本
value. Right: larger 值。右: 更大Samples 样本 value. Model by Steen Winther. 价值。模型作者: Steen Winther
This is the number of samples that are emitted hemispherically from each shading point. If the AO looks spotty, this is the value that should be increased.
这是从每个着色点以半球形发出的样品数量。如果 AO 看起来不稳定,这就是应该增加的值。
Min Rate[-8..4]
Max Rate[-8..4]
最低利率[-8. . 4]最高利率[-8. . 4]
 -8/-8 (left) and -8/+4 (right) for - 8/-8(左)及-8/+ 4(右)Min. Rate 最低利率 and 及Max. Rate 最高利率, respectively. ,分别
These two settings can, for the most part, be ignored. The effect they have is barely visible. The "worst" setting for Min. Rate and Max. Rate (-8for each) differs only slightly from their "best" settings (-8and+4, respectively (see image).
在大多数情况下,这两个设置都可以忽略。它们的影响几乎看不见。对于 Min 来说最糟糕的设置。利率及最高利率。速率(- 8为每个)只是略有不同,从他们的“最佳”设置(- 8和 + 4,分别(见图)。
Nevertheless, their function should be mentioned: While the pre-passes are being rendered (the phase in which th squares are at first large and become increasingly smaller) the dispersion of the render density is defined. This is an adaptive process that places particular emphasis on the critical regions. The difference between the Min. Rate and the Max. Rate defines the number of pre-passes.
然而,应该提到它们的作用: 在渲染预通道时(第四格起初很大并且变得越来越小的阶段)确定了渲染密度的分散度。这是一个适应性过程,特别强调关键区域。最低工资和最低工资的区别。利率和最高利率。费率定义了预通行证的数量。
 -7 and 及0 for 为了Min. Rate 最低利率 and 及Max.
Rate 最高利率, respectively. ,分别
-7 and 及0 for 为了Min. Rate 最低利率 and 及Max.
Rate 最高利率, respectively. ,分别
A value of 0 will result in full image resolution (pixel size 1*1) and a value of -1 will produce a pixel size of 2*2, -2 = 4*4 and so on. The Min. Rate value should therefore be less than or equal to the Max. Rate value. Positive values can also be used, which will allow cacheing in the sub-pixel regions (this could, for example be useful in conjunction with Subpolygon Displacement if details get lost).
0的值将产生完整的图像分辨率(像素尺寸1 * 1) ,-1的值将产生像素尺寸2 * 2、-2 = 4 * 4等等。最低工资。因此,速率值应小于或等于最大值。利率值。正值也可以使用,这将允许在亚像素区域缓存(例如,这可能是有用的结合亚多边形位移,如果细节丢失)。
Density[10..1000%]
Minimum Spacing[0..1000%]
Maximum Spacing[0..1000%]
密度[10. . 1000% ]最小间距[0.1000% ]最大间距[0.1000% ]
It’s better to describe these three settings together because all three work together and, to put it simply, they define the general shading point density at critical and non-critical areas:
最好把这三种设置放在一起描述,因为这三种设置是一起工作的,简单地说,它们在关键和非关键区域定义了一般的阴影点密度:
- Density 密度: The general shading point density in consideration of the following to settings. : 一般阴影点密度考虑到以下设置
- Minimum Spacing 最小间距: The shading point density at critical areas (e.g., corners). : 在关键区域(例如,角落)的阴影点密度
- Maximum Spacing 最大间距: The shading point density at non-critical areas (e.g., planar surfaces without elements that block the view). 在非关键区域(例如,没有遮挡视线元素的平面表面)的阴影点密度 Various values for this setting can be seen if you take a look at the GI’s 如果你看一下 GI’ s,可以看到这个设置的各种值Density 密度 setting. The shading point dispersion is exactly that of the AO cache dispersion. 设置。阴影点分散度与 AO 缓存分散度完全一致
平滑[0. . 1000% ]
All of the setting just described revolve around the placement of shading points and their calculation.
刚才描述的所有设置都围绕着阴影点的位置和它们的计算。
AO was ascertained selectively at numerous locations within the Project. The selective dispersion must be turned into a flat dispersion for rendering. A smoothing algorithm does this as follows: For each pixel to be rendered on an object’s surface, the AO cache is checked for those instances nearest to that pixel and their values will be interpolated for that pixel.
在工程项目的多个地点选择性地确定了 AO。选择性分散必须转化为平面分散,以便呈现。一个平滑算法是这样做的: 对于每个要在物体表面上渲染的像素,AO 缓存会被检查最接近该像素的实例,它们的值会被插值到该像素上。
In brief: Values that are too low will result in spotty AO; higher values will result in more homogenous renderings (but even these iron out Samples that are too low). Generally speaking, higher values take into consideration more shading points for the rendered pixel.
简而言之: 太低的值会导致不连续的 AO; 较高的值会导致更多的同质渲染(但即使这些铁样本太低)。一般来说,较高的值会考虑渲染像素的更多阴影点。
Paradoxically, extremely large values will also lead to spotty results.
矛盾的是,极大的数值也会导致不稳定的结果。
屏幕尺度
If disabled, the output size for rendering is irrelevant for ascertaining the shading point density. It will remain constant, regardless if you render at a resolution of 80*80 or 3000*3000. For the former it would be too large and for the latter too small.
如果禁用,渲染的输出大小与确定阴影点密度无关。它将保持不变,无论你渲染的分辨率是80 * 80还是3000 * 3000。对前者来说太大了,对后者来说太小了。
If enabled, the shading point density will be linked to the output size for rendering. This will result in a more flexible and adaptive shading point density.
如果启用,阴影点密度将链接到渲染的输出大小。这将导致一个更灵活和自适应的着色点密度。
 Cache File
缓存文件
同步缓存
Clicking on this button will delete all saved AO cache files for this Project from your cahe. This should be done for the project modifications mentioned above to avoid incorrect results. If the Auto Load option is disabled, you don’t have to delete the cache because cache files will be ignored.
点击这个按钮将删除所有保存的 AO 缓存文件为这个项目从您的 cahe。对于上面提到的项目修改,应该这样做,以避免不正确的结果。如果“自动加载”选项被禁用,则不必删除缓存,因为缓存文件将被忽略。
At the right of the button the number of Records and the size of the cache are shown, i.e., if Cinema 4D has found an appropriate saved cache.
在按钮的右边显示了记录的数量和缓存的大小,也就是说,如果 Cinema 4D 找到了一个合适的保存的缓存。
跳过筹备阶段(如有)
A brief statement about how the AO cache works: Assuming no previously saved cache is available when you render; the complete cache must be calculated anew. This is done in several pre-passes during which everything in the Project is analyzed, regions are defined that will receive additional attention during rendering, etc., before the actual cached information is rendered in color. This takes some time to complete. However, if a cache is already available, a lot of information still has to be checked but this step can be skipped by enabling the Skip Prepass (If Present) option. This will speed up rendering.
关于 AO 缓存如何工作的简短说明: 假设在呈现时没有以前保存的缓存可用; 必须重新计算完整的缓存。这是在几个预传递过程中完成的,在这个过程中,项目中的所有内容都会被分析,在渲染过程中会定义需要额外关注的区域,等等,然后实际缓存的信息才会以颜色显示。这需要一些时间来完成。但是,如果缓存已经可用,仍然需要检查大量信息,但是可以通过启用 Skip Prepass (如果存在)选项跳过这一步。这将加快渲染速度。
In case no cache exists, it will be calculated regardless of whether or not this option is enabled.
如果不存在缓存,则无论是否启用此选项,都将计算缓存。
If a cache already exists but the angle of view has changed in the meantime (or if you calculated the AO for very small images but subsequently want to render very large images), we suggest that you do not enable this option because incorrect calculation may otherwise occur.
如果缓存已经存在,但同时视角已经改变(或者如果您计算了非常小的图像的 AO,但随后希望渲染非常大的图像) ,我们建议您不要启用此选项,因为否则可能会发生错误的计算。
自动加载
If the Auto Save option was used to save a cache file, the Auto Load option can be enabled to load this cache. If no cache exists, a new cache will be calculated.
如果使用“自动保存”选项保存缓存文件,则可以启用“自动加载”选项加载此缓存。如果不存在缓存,将计算新的缓存。
自动保存
If enabled, the cache file will automatically be saved. If no new save path is defined, it will be saved to an "illum" folder in your Project’s directory. The file name will have an ".ao" extension. If a cache is calculated for each frame of animation (Full Animation Mode enabled), your files will be named "filename0000x.ao".
如果启用,将自动保存缓存文件。如果没有定义新的保存路径,则会将其保存到 Project 目录中的“ illum”文件夹中。文件名将有一个”。“ ao”分机。如果为每一帧动画计算一个缓存(启用全动画模式) ,你的文件将被命名为“ filename0000x.ao”。
全动画模式
If enabled, the cache will be calculated anew for each frame of animation and saved with individualized names. If disabled, the same cache will be used for an entire animation (if Auto Save and Auto Load are enabled). The latter works only for animations in which nothing has been modified that affects AO (e.g., object animations)! Otherwise incorrect calculations can occur. If object positions or shapes change, the Full Animation Mode option should be enabled.
如果启用,缓存将为每一帧动画重新计算,并以个性化名称保存。如果禁用,相同的缓存将用于整个动画(如果启用自动保存和自动加载)。后者仅适用于那些没有修改过的动画影响 AO (例如,对象动画) !否则可能发生错误的计算。如果对象位置或形状发生变化,则应启用“全动画模式”选项。
Note that when saving caches, the Full Animation Mode saves a large number of files, which can result in a lot of memory being required.
请注意,当保存缓存时,完整动画模式保存了大量文件,这可能导致需要大量内存。
Cache File
Location
缓存文件位置
自定义位置/位置
Enable this option and select a path to which you want to save your cache if you want to save it to a specific location.
启用此选项,如果要将缓存保存到特定位置,则选择要保存到其中的路径。