 Subsurface Scattering Shader 次表面散射着色器Basic 基础Shader 着色器Multiple 多个Single 单身Advanced 高级Lights 灯光
Shader Properties
预置
Here you will find several material presets that are defined using the following settings.
在这里,您将发现几个材质预设定义使用下列设置。
颜色
This color represents the general color of the SSS effect. This color can indicate the (illuminated) surface of the material and the parameters Red, Green and Blue (click on the small arrow at the left of Path Length to open the parameter) can indicate the material’s inner dispersion color, which will improve the look of regions not directly affected by the light.
此颜色表示 SSS 效果的一般颜色。这种颜色可以指示材质的(被照亮的)表面和参数红,绿,蓝(点击路径长度左边的小箭头打开参数)可以指示材质的内部分散颜色,这将改善不直接受光影响的区域的外观。
实力[0. . 10000% ]
 Increasing 增加Strength 力量 values from left to right. 值从左到右
The Strength value is a multiplier for the SSS effect. Use it to define the overall strength of the SSS. Greater values are possible, which will cause the object to radiate more brightly.
强度值是 SSS 效果的乘数。用它来定义 SSS 的整体强度。更大的值是可能的,这将导致对象辐射更明亮。
着色器
Using this Shader you can define on an object’s surface how the light hitting it should be colored. Imagine this Shader as a type of color mask (the object’s interior color is defined via the previously described Color value). Generally speaking, any texture used in the material’s Color channel should also be placed here. Quite often, however, this is not necessary and the Shader can be left empty.
使用这个着色器,你可以在物体表面定义光线应该如何着色。把这个着色器想象成一种颜色遮罩(对象的内部颜色是通过前面描述的 Color 值定义的)。一般来说,在材质的颜色通道中使用的纹理也应该放在这里。然而,通常情况下,这是不必要的,并且着色器可以是空的。
 The Shaders shown produce interesting effects
( 着色器产生有趣的效果(Color 颜色 is set to white). 设置为白色)
The Shaders shown produce interesting effects
( 着色器产生有趣的效果(Color 颜色 is set to white). 设置为白色)
What you see in the image above is not the result of the effect a texture has in the Material channel but solely the light dispersed across the object surface. If the material’s Color channel is also enabled, make sure that Color channel’s Brightness and Luminance channel’s Strength do not exceed a combined value of 100% in order to achieve a physically correct result.
你在上面的图像中看到的并不是材质通道中的纹理效果,而仅仅是光线分散在物体表面的结果。如果材质的颜色通道也被启用,请确保颜色通道的亮度和亮度通道的强度不超过100% 的组合值,以实现物理上正确的结果。
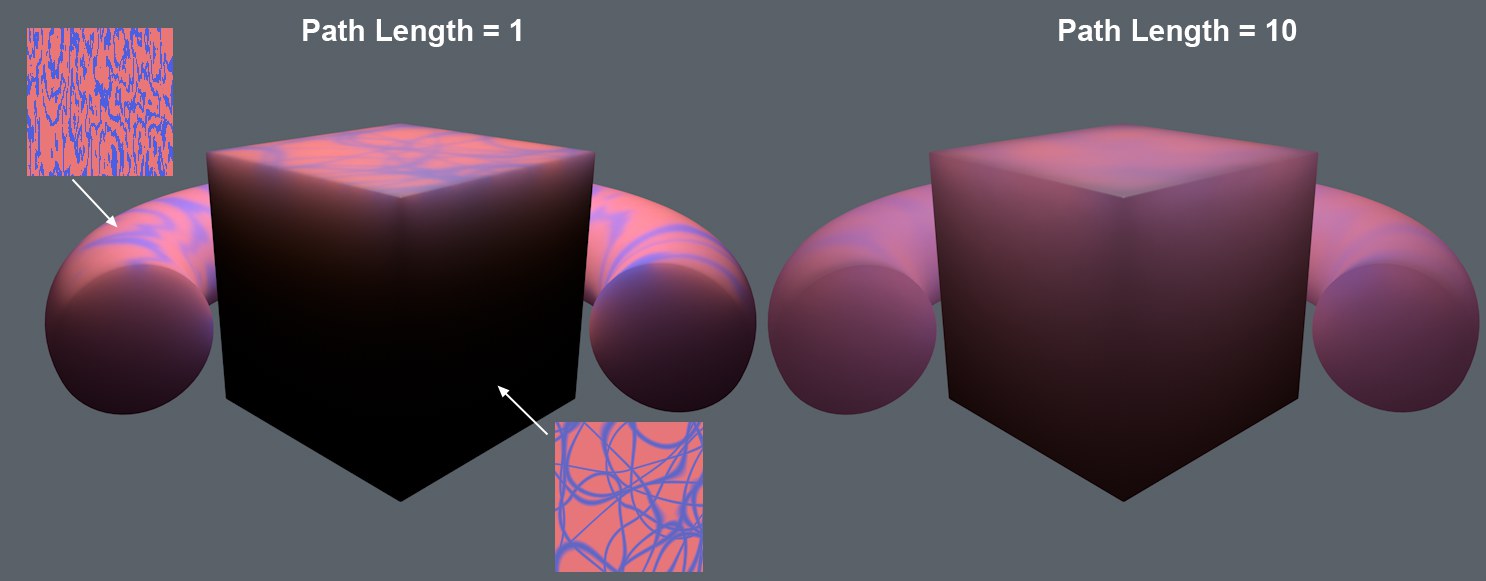
路径长度[0.001.100000米]
 Increasing 增加Path Length 路径长度
values from left to right (1cm, 7cm, 20cm by 300cm path length) and decreasing render times. Scene 2 is
illuminated by 2 Area lights from the horse’s left. 值从左到右(1厘米,7厘米,20厘米,300厘米路径长度) ,并减少渲染时间。场景2被马的左边的2个区域灯照亮
Increasing 增加Path Length 路径长度
values from left to right (1cm, 7cm, 20cm by 300cm path length) and decreasing render times. Scene 2 is
illuminated by 2 Area lights from the horse’s left. 值从左到右(1厘米,7厘米,20厘米,300厘米路径长度) ,并减少渲染时间。场景2被马的左边的2个区域灯照亮
This value defines how far the light can penetrate beneath a given surface. Lesser values absorb faster than greater values. The latter offers the light correspondingly less resistance.
这个值定义了光线在给定表面下能穿透多远。较小的值吸收速度快于较大的值。后者提供的光相应地更少的电阻。
The lower the value the longer the render time. This is because far more samples have to be calculated the shorter the path length. For animations, the values will in part be cached, which causes the first frame of animation to take much longer to finish than the following frames.
值越低,渲染时间越长。这是因为路径长度越短,需要计算的样本就越多。对于动画,这些值将部分缓存起来,这导致动画的第一帧要比后面的帧花费更长的时间来完成。
Red[0.01..10000%]
Green[0.01..10000%]
Blue[0.01..10000%]
红[0.01. . 10000% ]绿[0.01. . 10000% ]蓝[0.01. . 10000% ]
 Various red, green and blue values with unchanging
parameters. 不同的红色、绿色和蓝色值,参数不变Color 颜色 (white). (白色)
Various red, green and blue values with unchanging
parameters. 不同的红色、绿色和蓝色值,参数不变Color 颜色 (white). (白色)
Three additional RGB sliders can be displayed by clicking on the small arrow at the left of the Path Length parameter. So, what are these sliders good for and why are they only subordinates of the Path Length parameter? Simple: these are multipliers of the Path Length, i.e., you can define here, which color can penetrate deeper (higher values) or less deep (lower values) into a material (or to put it differently: lighter colors (higher values) disperse more light; darker colors (lower values) make the material more translucent).
三个额外的 RGB 滑块可以通过点击路径长度参数左边的小箭头来显示。那么,这些滑块有什么好处,为什么它们只是路径长度参数的下属?简单: 这些是路径长度的倍增器,也就是说,你可以在这里定义,哪种颜色可以渗透到材质中更深(更高的值)或者更低(更低的值)(或者换一种说法: 较浅的颜色(更高的值)可以分散更多的光线; 较深的颜色(更低的值)可以使材质更透明)。
The interplay of defining colors using the Color setting is complicated. To put it simply, these colors influence the color effect inside the object (that can also be combined with the Color). These effects primarily occur in object regions not directly affected by light (shadow regions). For the most part, subtle (but nevertheless critical for the overall visual impression) color effects can be achieved. This is, for example, important when rendering a milk material, which is basically white (and defined as such in the Color parameter), for which a non-which a brownish (oily) color can be defined. Take a look at the Preset to see an example of how such color values can be defined.
使用 Color 设置定义颜色的相互作用是复杂的。简单地说,这些颜色影响对象内部的颜色效果(也可以与颜色结合)。这些效果主要发生在不直接受光影影响的对象区域(阴影区域)。在大多数情况下,微妙的(但对整体视觉印象至关重要)颜色效果可以实现。例如,这在渲染牛奶材质时非常重要,它基本上是白色的(在 Color 参数中也是这样定义的) ,对于这种材质,可以定义非棕色(油性)颜色。看看预设,看看这样的颜色值如何定义的例子。
Tip: 提示: