 Brush 刷子Options 选择Tool 工具Distance 距离View Angle 视角Along Guide 沿路指南
Options
选择
The Radius and Angle settings are the same as in the Live Selection tool.
半径和角度设置与实时选择工具相同。
半径[0. . + ∞]
This is the tool radius, which is also displayed in the editor view.
这是工具半径,它也显示在编辑器视图中。
只能看见
If this option is active, only visible guides can be selected. If this option is not active, elements on the reverse side of an object will be selected as well.
如果此选项处于活动状态,则只能选择可见向导。如果此选项不是活动的,则对象背面的元素也将被选中。
限制
If the Hair object is polygonal, the selection of guides can be restricted to a specific polygon selection (Cinema 4D must be in polygon mode).
如果毛发对象是多边形,导游的选择可以限制在一个特定的多边形选择(C4D 必须在多边形模式)。
选择锁定
If this setting is active, locked guides can be selected as well.
如果此设置是活动的,也可以选择锁定的指南。
形状
 A small sampling of possible tool shapes (Aspect
and Angle values were varied). 一个可能的刀具形状的小样本(外观和角度值是不同的)
A small sampling of possible tool shapes (Aspect
and Angle values were varied). 一个可能的刀具形状的小样本(外观和角度值是不同的)
Use Shape to define the shape of the tool: Circle, Box or Diamond.
使用“形状”定义工具的形状: 圆形、盒形或菱形。
压力
If you use a graphics tablet, use this setting to define which settings will be affected by the pressure of the pen.
如果使用图形输入板,请使用此设置来定义哪些设置将受到笔压的影响。
方面[0. . 10000% ]
Use this setting to stretch the shape of the tool in a horizontal direction.
使用此设置可以在水平方向上拉伸工具的形状。
角度[-∞ . . + ∞ ° ]
Use this setting to rotate the shape of the tool.
使用此设置可旋转工具的形状。
锁定选择
The brush will only affect elements that lie under the cursor when the mouse button was pressed. The selected elements can be brushed over and around other elements, which will themselves remain unaffected.
当鼠标按钮被按下时,画笔只会影响光标下面的元素。选定的元素可以在其他元素周围刷过,这些元素本身不会受到影响。
仅供选择
If this setting is active, only selected elements will be affected (guides, points, tips, vertices, roots).
如果此设置是活动的,则只有选定的元素会受到影响(指南、点、提示、顶点、根)。
毛发 IK
If this setting is activated, a link will be established between the guide points. The distance between individual points will remain the same. If you move a point, the other points will follow. If this setting is not active, the points can be moved independently, without affecting others (just like moving Cinema 4D spline points).
如果这个设置被激活,一个链接将被建立在指导点之间。各点之间的距离将保持不变。如果你移动一个点,其他的点也会跟着移动。如果此设置不活动,点可以独立移动,而不影响其他(就像移动Cinema 4D 样条点)。
碰撞
Activating this option ensures that no guides will be brushed below (penetrate) an object’s (exceptions: splines or guides) hair-covered surface, using collision detection.
激活这个选项可以确保没有指南将刷低于(穿透)一个对象的毛发覆盖的表面(例外: 花键或指南) ,使用碰撞侦测。
You can then brush your character’s hair all day long without making the guides disappear beneath the surface.
然后你可以整天梳理你的角色的毛发,而不会让导游消失在表面之下。
Coll.Radius [0. . + ∞ m ]
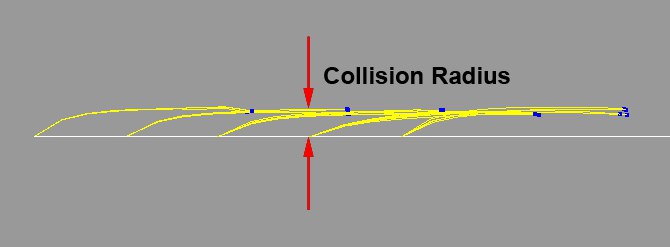
This setting defines the distance of each guide point from the hair-covered surface, at the point at which the collision detection will begin. You will not be able to brush the guides to a distance from the surface below this setting. This way you can prevent the hair from sticking to the surface.
这个设置定义了每个引导点到毛发覆盖表面的距离,从这个点开始碰撞侦测。您将无法刷导轨到距离表面在这个设置之下的距离。这样你可以防止毛发粘在表面上。
模式
These are (finally) the settings with which you determine how the brush affects the guides:
这些是(最后)确定笔刷如何影响向导的设置:
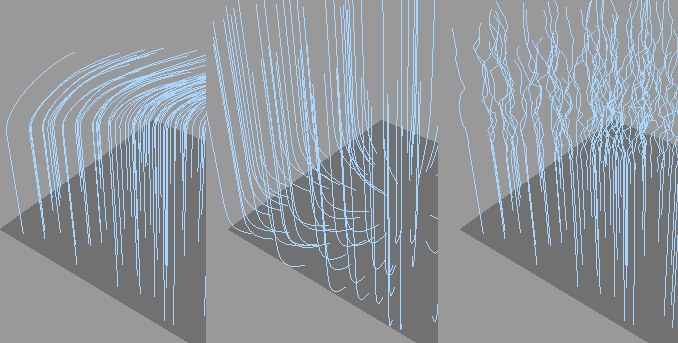 From left to right: 从左到右:Move 走开, Repel 排斥, Kink 扭结.
女名女子名
These options define a given tool’s falloff from the center of the tool to the Radius. A visual depiction of Falloff can be found here. The Spline option lets you define your own falloff curve.
这些选项定义了给定工具从工具中心到半径的衰减。可以在这里找到对弗洛夫的视觉描绘。样条选项允许您定义自己的衰减曲线。
强度[-∞ . . + ∞% ]
Use this slider to define the strength with which the brush tool should work. A value of less than 100% is recommended, which will give you better control of the brush effect.
使用这个滑块来定义画笔工具应该使用的强度。建议值小于100% ,这样可以更好地控制画笔效果。
宽度[0. . 100% ]
This setting defines how hard or soft the effect of the brush should abate within the given radius.
这个设置定义了在给定的半径范围内刷子的效果应该减弱到什么程度。
女名女子名
See Falloff.
参见 Falloff。
顶点涂料

This option lets you paint weight onto each individual guide point. This weight is saved to a Hair Vertex tag and can later be used elsewhere within Hair (e.g., Hair object: Dynamics tab / Maps menu, in order to influence stiffness). The default weight of 100% (red) can be reduced by assigning Strength a negative value and painting over the elements.
此选项允许您在每个单独的引导点上绘制重量。这个权重被保存到一个 Hair Vertex 标签中,以后可以在 Hair 中的其他地方使用(例如,Hair object: Dynamics tab/Maps 菜单,以便影响刚度)。默认的100% 的权重(红色)可以通过分配一个负值和绘制元素来减少。