 Set Active Object as
Camera
Set Active Object as
CameraNavigation
导航
In the following are described all settings for interactive navigation in the Viewport.
下面描述了 Viewport 中交互式导航的所有设置。
相机导航
One of the most important features of a 3D application is the navigation in the Viewport, i.e., how the editor camera is controlled. You want to be able to keep the region in which you are working in view as easily as possible. This is also true if you rotate the camera around this region, move away from or closer to it (see Point of Interest option below). All parameters relevant to controlling cameras can be defined here.
3D 应用程序最重要的特性之一是在 Viewport 的导航,也就是说,如何控制编辑器摄像头。您希望能够尽可能容易地将工作区域保持在视图中。这也是真实的,如果你旋转相机周围这一地区,移动或接近它(见兴趣点选项下面)。与控制摄像机相关的所有参数都可以在这里定义。
The navigation hotkeys (press hotkey + (mouse)click + move camera) that should be noted are:
导航热键(按热键 + (鼠标)点击 + 移动照相机) ,应该注意的是:
In the default Cursor mode, set the POI on the object (or on the region to be zoomed in the orthogonal view) under the cursor.
在默认的 Cursor 模式下,对光标下的对象(或者正交视图中要放大的区域)设置 POI。
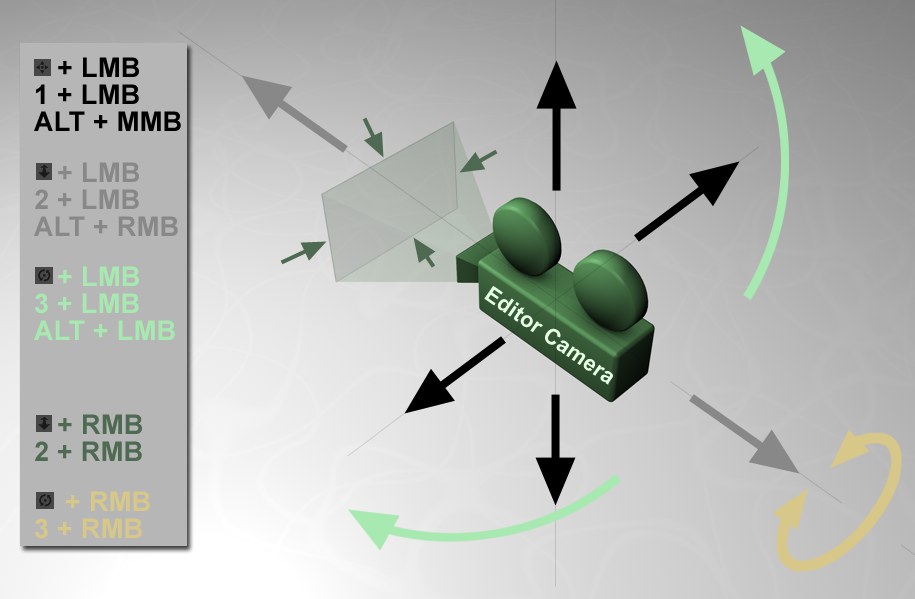 The camera navigation icons and hotkeys (LMB, MMB
and RMB are left, middle and right mouse buttons, respectively). 相机导航图标和热键(LMB,MMB 和人民币左,中间和右鼠标按钮,分别)
The camera navigation icons and hotkeys (LMB, MMB
and RMB are left, middle and right mouse buttons, respectively). 相机导航图标和热键(LMB,MMB 和人民币左,中间和右鼠标按钮,分别)
In addition, the following keys can be pressed when moving the camera:
此外,当移动相机时,可以按下列键:
Many navigation processes have been automated to ensure fluid, intelligent navigation in scenes of any size. The camera will, for example, slow when nearing an object and not simply pass through it, as was the case in previous releases. Generally speaking, the camera moves slower the closer it is to the POI. Such mechanisms function automatically and will not be described specifically. However, numerous navigation settings can be defined according to your own preferences. These can be done using the following settings:
许多导航过程已经自动化,以确保在任何大小的场景中流畅、智能的导航。例如,当接近一个物体时,相机会变慢,而不是像以前的版本那样简单地穿过它。一般来说,相机移动的速度越慢,它是接近 POI。这种机制是自动运作的,不会具体描述。但是,可以根据您自己的首选项定义许多导航设置。这些可以通过以下设置完成:
The POI will be displayed in the Viewport in the shape of a cross (can be disabled in the filter settings). If you want to know the distance the camera lies from the POI, simply enable the Camera Distance option in the Viewport’s Configuration menu’s HUD tab.
POI 将在 Viewport 以十字形显示(可以在过滤器设置中禁用)。如果你想知道相机距离 POI 的距离,只需在视窗配置菜单的 HUD 选项卡中启用相机距离选项。

When in the most important camera modes, the camera movement will slow in proximity to the POI. In extreme cases, this can lead to the camera freezing. In such an event, it can help to set the POI to an object that lies farther away from the camera.
当在最重要的相机模式,相机的运动将放慢接近 POI。在极端情况下,这可能导致相机冻结。在这种情况下,它可以帮助设置 POI 的对象远离相机。
相机模式
The Camera Mode (note the settings made available when clicking on the arrow next to the option name) defines default settings for four parameters, respectively.
Camera Mode (注意单击选项名称旁边的箭头时所提供的设置)分别定义了四个参数的默认设置。
One exception applies: The camera – if included AND selected in the Viewport – rotates around its origin independent of the defined Camera Mode.
一个例外: 相机-如果包括并选择在视口-旋转其原点独立的定义相机模式。
The camera mode can also be defined via commands in the respective views via the Cameras / Navigation menu.
相机模式也可以通过相机/导航菜单在相应视图中的命令来定义。
光标
The camera will rotate around the selected object point. If you click on an empty region of the scene, the camera will rotate around the screen center at the depth of the last defined POI. This is the recommended mode.
相机将围绕选定的对象点旋转。如果你点击场景中的一个空白区域,相机将在最后一个定义的 POI 的深度围绕屏幕中心旋转。这是推荐的模式。
中心
The camera will rotate around the screen center. When approaching the POI, it can occur that the camera freezes in very close proximity of the POI (the POI does not move with the camera).
摄像机将围绕屏幕中心旋转。当接近 POI 时,可能会发生相机冻结在非常接近的 POI (POI 不随着相机移动)。
对象
The camera will rotate around the center of the selected objects/elements.
相机将围绕选定对象/元素的中心旋转。
相机
The camera will rotate around its own axis. It will rotate only and not move.
相机将围绕自己的轴旋转。它只会旋转而不会移动。
习俗
As long as the modifications you have made to the settings are not too complex, this mode will switch to Custom.
只要你对设置的修改不是太复杂,这个模式将切换到自定义模式。
兴趣点
This is the point around which the camera will rotate if Cursor Placement is set to Off, if you click on an empty region of the scene or on a non-valid object.
如果光标放置设置为关闭,如果你点击场景的空白区域或无效对象,相机将围绕这一点旋转。
屏幕中心
The camera will rotate around the screen center. The depth of the point of rotation will lie on the previous navigation movement’s POI.
摄像机将围绕屏幕中心旋转。旋转点的深度将取决于前一个导航运动的 POI。
选择轴
The POI will lie on the common axis of the selected objects or components (points, edges, polygons). If neither components nor objects are selected, the camera will rotate around the world origin.
POI 将位于所选对象或组件(点、边、多边形)的公共轴上。如果既没有选择组件也没有选择对象,相机将围绕原点旋转。
相机轴
The camera will rotate around its own axis.
照相机将围绕自己的轴旋转。
光标放置
This is the position of the cursor on an object when clicked upon around which the camera will rotate. This point will be marked by a small cross. Environment objects such as Background, Sky, etc. will be ignored.
这是一个对象上的光标的位置时,点击周围的相机将旋转。这一点将用一个小十字标记。环境对象,如背景,天空等将被忽略。
This is the most up-to-date and therefore the most recommended mode.
这是最新的,因此也是最推荐的模式。
A fixed (green marker) position can also be set on an object by pressing the Ins (PC) or Home (Mac) key (pressing again will remove the marker). The corresponding command is named Set Camera Pivot and can be found in the Customize Commands… Manager. Note also the Lock Camera Pivot command. This works the same as the previously described command only that the POI will be set to the last used position.
一个固定的(绿色标记)位置也可以设置对象按 Ins (PC)或 Home (Mac)键(再次按将删除标记)。相应的命令名为 Set Camera Pivot,可以在自定义命令... 管理器中找到。还要注意 Lock Camera Pivot 命令。这与前面描述的命令相同,只是将 POI 设置为最后使用的位置。
Tip: 提示:关掉
No cursor position will be ascertained and the camera will rotate around the defined Point of Interest.
没有光标的位置将被确定和相机将旋转围绕定义的兴趣点。
精选
Only objects selected in the Object Manager will be used. The click position will only be able to be ascertained for these objects. For all other objects or when an empty region is clicked, the camera will rotate around the Point of Interest.
只有在对象管理器中选择的对象才会被使用。点击位置将只能确定这些对象。对于所有其他对象或单击空白区域时,相机将围绕兴趣点旋转。
特选儿童
Only the objects selected in the Object Manager (and their Child objects) will be used. The click position will only be able to be ascertained for these objects. For all other objects or when an empty region is clicked, the camera will rotate around the Point of Interest.
只有在对象管理器中选择的对象(及其子对象)才会被使用。点击位置将只能确定这些对象。对于所有其他对象或单击空白区域时,相机将围绕兴趣点旋转。
所有
No limitations. The camera can rotate around any object that can be selected. If an empty region is clicked, the camera will rotate around the Point of Interest.
没有限制。相机可以围绕任何可以选择的物体旋转。如果单击一个空白区域,相机将围绕兴趣点旋转。
深刻
If a valid object is clicked upon, either the object surface (option enabled) or the center between entry and exit points of a straight line in direction of the cursor will be used as the point of rotation. This is, for example, useful if you want the camera to rotate around the entire object instead of only a point on the surface.
如果单击一个有效的对象,对象表面(启用选项)或光标方向的直线的进入点和退出点之间的中心将用作旋转点。例如,如果你想让相机围绕整个物体旋转,而不是仅仅围绕物体表面的一个点旋转,这种方法就很有用。
多莉锁定 POI
This option only applies to the moving in/out of the camera (
此选项仅适用于移入/移出相机(2键)。在摄像机移动开始时定义的 POI 将随着摄像机移动(选项禁用) ,如果没有其他物体位于其路径中。摄像机的速度是恒定的。
If this option is enabled, Cinema 4D will ascertain the position beneath the cursor that lies nearest to
an object and will set the POI there. Visually, this resembles a soft, slow stopping zoom. This can be
problematic if you click in an empty region because the camera will slowly approach the empty region and might
"freeze" there (this can be avoided temporarily by pressing the
如果这个选项被启用,Cinema 4D 将确定光标下方离物体最近的位置,并将 POI 设置在那里。在视觉上,这就像一个柔和的,缓慢的停止变焦。如果你点击一个空白区域,这可能会有问题,因为相机会慢慢接近空白区域,并可能“冻结”那里(这可以通过按下 Shift 暂时避免)。
In such an event, press the
在这种情况下,再次按2并单击一个可见的对象。然后将重新定位 POI。
移动摄影车到光标
Pressing the hotkey 2 will move the camera forwards or backwards (enlarges or reduces the portion of the scene that is displayed).
按下热键2将移动相机前后(放大或缩小场景显示的部分)。
关掉
The camera will move only in the direction of view and will enlarge or reduce the portion of the scene that is displayed.
摄像机只会在视线方向上移动,并且会放大或缩小显示的场景部分。
导航十字架
Enables/disables the display of the navigation cross, which is shown when moving, zooming or rotating the Viewport.
启用/禁用导航十字架的显示,当移动、缩放或旋转 Viewport 时显示。
正投影视图
When moved, the camera will move slightly vertically to the angle of view by moving towards regions around the cursor – at the moment in which the mouse button is pressed, which means that you can determine which region will be enlarged.
当移动时,相机会向光标周围的区域移动,从而稍微垂直地移动到视角——在鼠标按钮被按下的那一刻,这意味着你可以确定哪个区域将被放大。
Synchronize Orthographic Viewports
同步正投影视图
If enabled, each of the other orthogonal views (Top, Right, Front, etc.) will be moved when you navigate in the active view (i.e. the camera coordinates and zoom will be matched accordingly). This makes it possible, for example, to zoom in equally on a specific regions in all three views.
如果启用,当您在活动视图中导航时,其他每个正交视图(顶部、右边、前面等)都将被移动(即相机坐标和缩放将相应匹配)。例如,这使得在所有三个视图中对特定区域进行同等放大成为可能。
This is very useful if you have blueprints loaded in each of the views as backgrounds for modeling.
如果您在每个视图中都有作为建模背景的蓝图,这将非常有用。
反向轨道
If enabled, the camera rotation can be reversed when rotating the camera interactively.
如果启用,相机旋转可以反转当交互旋转相机。
轨迹球旋转
It can occasionally occur that the camera behaves unusually. Normally, when the Viewport is rotate (option disabled in which case it would be a ,Euler’ rotation), the camera will always rotate around a Y axis parallel to the world Y axis through the POI. Subjectively the PDI will always rotate horizontally in relation to the camera detail past the camera. It becomes problematic when you view the PDI from the top or bottom (world coordinate system). Instead of rotating left to right in the field of view as usual when the mouse is moved, the PDI will more or less rotate around the camera’s angle of view. You get used to this effect after a while and you automatically compensate for it. However, this effect can be irritating when working in detail (e.g., vertex weighting) when you need to position the camera very close to a particular region because mouse movements provoke the opposite camera movement.
摄像机偶尔会出现不寻常的行为。通常,当 Viewport 旋转时(在这种情况下禁用选项) ,相机将始终围绕 y 轴旋转,y 轴平行于世界 y 轴,通过 POI。主观上,PDI 将始终相对于经过相机的相机细节水平旋转。当您从顶部或底部(世界坐标系)查看 PDI 时,就会出现问题。当鼠标移动时,PDI 不会像往常一样在视野中从左到右旋转,而是会或多或少地围绕相机的视角旋转。一段时间之后,你就会习惯这种效果,并且你会自动补偿它。然而,当你需要将相机放置在离特定区域非常近的位置时,这种效果在处理细节时(例如,顶点权重)可能会令人恼火,因为鼠标的移动会引起相反的相机移动。
In such cases, press the
在这种情况下,按 Ctrl/Cmd 键(这会暂时激活轨迹球旋转功能,如果已经启用,则禁用该功能)。当鼠标左右移动时,PDI 将始终水平旋转,与相机细节无关。简而言之,轨迹球旋转可以将欧拉导航的优点与轨迹球功能结合起来。
If you then zoom back with the camera to view the entire scene and you want the rotation to behave as usual (as
described above: horizontal rotation in relation to the world coordinate system), press the
如果你随后用相机缩放回来查看整个场景,你希望旋转像往常一样(如上所述: 相对于世界坐标系的水平旋转) ,在旋转过程中按下 Shift 键,旋转轴就会回退。
Another use would be the Set Active Object as
Camera
另一个用途是设置活动对象为相机命令,其中相机和灯光,例如,可以定位,轨迹球旋转可以有助于上述原因。
平滑的视图过渡
If enabled it will be possible to:
如果启用,将有可能:
… during which the change of view can be made using a smooth camera flight. If this option is disabled, you will jump between cameras.
在此期间,可以通过平滑的摄像机飞行来改变视角。如果此选项被禁用,您将在摄像机之间跳转。
Pan Speed[1..10000%]
Dolly/Zoom Speed[1..10000%]
Orbit Speed[1..10000%]
移动速度[1. . 10000% ]移动/变焦速度[1.10000% ]轨道速度[1.10000% ]
You can use these three velocity values to define the Default camera’s navigation speed separately for moving (Pan Speed), zoom in/out (Dolly/Zoom Speed; this setting also applies to the Texture preview!) and rotation (Orbit Speed). The smaller the values the "longer" it will take to navigate and vice-versa.
您可以使用这三个速度值来分别定义默认相机的导航速度(平移速度) ,放大/缩小(Dolly/Zoom Speed; 这个设置也适用于纹理预览!)和旋转(轨道速度)。值越小,导航所需的时间就越长,反之亦然。