 Motion
Clip 动作剪辑Basic 基础Hierarchy 等级Advanced 高级
Motion
Clip 动作剪辑Basic 基础Hierarchy 等级Advanced 高级
Basic Properties
基本属性
姓名
Here you can enter a name for the object.
在这里您可以输入对象的名称。
Lets you name/rename a Motion Clip. Note that the name displayed in a Motion Clip is the name of the Motion Source linked to it and not the name of the Motion Clip itself. In the "Motion View … " dialog window (Timeline menu: Motion System) you can define which name, if any, should be displayed.
让你命名/重命名一个动作剪辑。请注意,在运动剪辑中显示的名称是链接到它的运动源的名称,而不是运动剪辑本身的名称。在“运动视图... ”对话框窗口(时间线菜单: 运动系统) ,您可以定义哪个名称,如果有,应该显示。

颜色
Defines the color in which the Motion Clip will be displayed in the Timeline. If the Show Ghost option is enabled, that Clip’s ghosts will also be displayed in the color defined.
定义在时间轴中显示运动剪辑的颜色。如果启用“显示幽灵”选项,则剪辑的幽灵也将以定义的颜色显示。
Note that the Track Color setting should NOT be set to No Color in the Preferences menu.
请注意,“轨迹颜色”设置不应该在“首选项”菜单中设置为“无颜色”。
锁上了
If enabled, this Clip can no longer be activated or moved in the Timeline. In addition, no changes can be made to this Clip in the Attribute Manager until this option is again disabled.
如果启用,此剪辑将不再在时间轴中被激活或移动。此外,在再次禁用此选项之前,不能对属性管理器中的此剪辑进行任何更改。
《人鬼情未了》
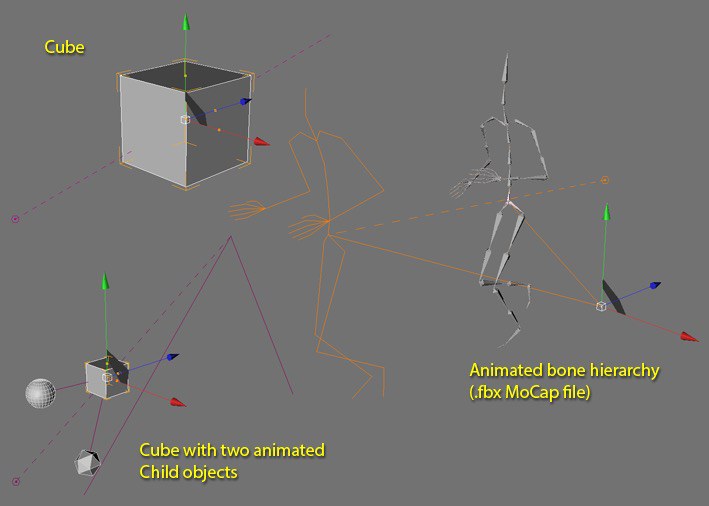
If enabled, a dashed line (in the color defined for that Clip) will be displayed in the Viewport between the start and end position of that Clip. The start position will be denoted by a hexagon. Furthermore, two solid lines will be drawn for each Child object within an object hierarchy - one for the current frame (if the frame does not lie outside of the actual Motion Clip) and one for the last frame within the Clip. Ghosting is very helpful when accurately placing multiple clips end-to-end.
如果启用,一条虚线(为该剪辑定义的颜色)将显示在该剪辑的起始位置和结束位置之间的 Viewport 中。起始位置将由一个六边形表示。此外,每个子对象在一个对象层次结构中将绘制两条实线——一条用于当前帧(如果帧不在实际运动剪辑之外) ,另一条用于剪辑中的最后一帧。鬼影是非常有帮助时,准确地放置多个剪辑端到端。
资料来源
Lets a Motion Clip be linked to a Motion Source. Normally the Motion Source that is automatically generated when the Motion Clip is created is placed here. Since Motion Source can also be saved externally, this option lets you use such a Motion Source for a given Motion Clip. Of course this Motion Source should match the Motion Clip’s object hierarchy. Otherwise the resulting animation most likely be very flawed.
让一个运动剪辑链接到一个运动源。通常,当动作剪辑被创建时自动生成的动作源被放置在这里。因为运动源也可以保存在外部,这个选项允许您使用这样的运动源给定的运动剪辑。当然,这个运动源应该匹配运动剪辑的对象层次结构。否则产生的动画很可能是非常有缺陷的。
开始
Defines the Motion Clip’s start frame. The same can be done by moving the Motion Clip’s orange handle in the Timeline. Note that changing the start frame will not affect the content of the Motion Clip.
定义运动剪辑的起始帧。在时间轴中移动动作剪辑的橙色手柄也可以做到同样的事情。请注意,更改开始帧不会影响运动剪辑的内容。
完
Defines the Motion Clip’s end frame. The same can be done by moving the Motion Clip’s orange handle in the Timeline. The Motion Clip’s last frame will always be displayed as the End frame with no looping.
定义运动剪辑的结束帧。在时间轴中移动动作剪辑的橙色手柄也可以做到同样的事情。运动剪辑的最后一帧将始终显示为结束帧,没有循环。
循环[0. . + ∞]
Define how often a Motion Clip’s animation should be looped. The Motion Clip will be extended accordingly.
定义一个动作剪辑的动画循环的频率。动作剪辑将相应地扩展。
相对循环

Enable this option if you want the looping to take place with a relative offset. If, for example, the Motion Source contains a walk cycle, this option can be used to make the character walk in a straight line indefinitely.
如果希望循环以相对偏移量进行,请启用此选项。例如,如果运动源包含一个行走循环,则可以使用此选项使角色无限期地沿直线行走。
混合动作片

Two Motion Clips must lie on the same Motion Layer before they can be blended with each other.
两个运动剪辑必须位于同一个运动层,然后才能相互混合。
Drag a Motion Source onto an existing Motion Layer to create a new Motion Clip on this layer. To move a Motion
Clip over another Motion Clip, press the
拖动一个运动源到一个现有的运动层创建一个新的运动剪辑在这个层。要将一个动作剪辑移动到另一个动作剪辑上,拖动时按下 Shift 键。
When mixing two Motion Clips, always use the parameters for the proceeding Motion Clip, i.e., the one to the left, for creating the blend.
当混合两个运动剪辑,始终使用参数的程序运动剪辑,即,一个左侧,创建混合。
自动混合范围
If enabled, the overlapping region of two Motion Clips on the same Motion Layer in the Timeline will be blended automatically. The blend will begin at the first frame of the overlapping region and end at the last frame of the overlapping region. Blending will create a smooth transition form one Motion Clip’s animation to the other. A curve will be displayed in the overlapping region that represents the blending process.
如果启用,时间轴中同一运动层上的两个运动剪辑的重叠区域将被自动混合。混合物将从重叠区域的第一帧开始,在重叠区域的最后一帧结束。混合将创建一个平稳过渡的一个运动剪辑的动画到其他。一条曲线将显示在表示混合过程的重叠区域。
If you prefer to define the blending region manually, disable this option. As is also the case with all other blending options, this option blends the selected Motion Clip with the Motion Clip that follows it in the Timeline.
如果您希望手动定义混合区域,请禁用此选项。与其他混合选项一样,此选项将选定的动作剪辑与时间轴中紧随其后的动作剪辑混合。
混合 Gap
Using this option, two Motion Clips can be blended automatically, even if they do not overlap and lie several frames apart in the Timeline. The gap between the Motion Clips will be filled by blending the last frame of the proceeding Motion Clip with the first frame of the following Motion Clip.
使用这个选项,两个运动剪辑可以自动混合,即使他们不重叠,并在时间轴中分开几帧。运动剪辑之间的差距将填补混合的最后一帧的程序运动剪辑与第一帧的下一个运动剪辑。
混合开始
Lets you manually define the frame at which the blend between the selected Motion Clip and the next Motion Clip should begin. You are not restricted to the range within which the Motion Clips overlap - the blending can also be set to begin prior to the overlapping region. Alternatively, the blend start can be defined interactively in the Timeline by dragging the blend curve’s top-most grabber.
允许您手动定义选定的运动剪辑和下一个运动剪辑之间的混合开始的帧。您不受限制的范围内的运动剪辑重叠-混合也可以设置为开始前的重叠区域。或者,混合开始可以定义交互式的时间轴拖动混合曲线的最上面的抓地器。
The Auto Blend Range option must be disabled in order to use this option.
必须禁用“自动混合范围”选项才能使用此选项。
混合结束
Lets you manually define the frame at which the blend between the selected Motion Clip and the next Motion Clip should end. You are not restricted to the range within which the Motion Clips overlap - the blending can also be set to end after the overlapping region, allowing you to manually fill a gap between Motion Clips, if necessary.
允许您手动定义选定的运动剪辑和下一个运动剪辑之间的混合应在哪个帧结束。您不受限制的范围内的运动剪辑重叠-混合也可以设置为结束后的重叠区域,允许您手动填补之间的空白,如果必要的运动剪辑。
Alternatively, the blend end can be defined interactively in the Timeline by dragging the blend curve’s top-most grabber.
或者,通过拖动混合曲线最上面的抓取器,可以在时间轴中交互地定义混合结束。
The Auto Blend Range option must be disabled in order to use this option.
必须禁用“自动混合范围”选项才能使用此选项。
混合

Defines how Motion Clips should be blended. For the most part, these options reflect those for defining the interpolation between Keyframes. The blend curve in the Timeline represents the corresponding selected method. You can select from:
定义应该如何混合运动剪辑。在大多数情况下,这些选项反映了用于定义关键帧之间插值的选项。时间轴中的混合曲线表示相应的选定方法。你可以从以下选择:
关闭
No blending will take place. The first Motion Clip that overlaps the next will be played until its end, at which point the second Motion Clip will be played.
不会发生混合。重叠的第一个动作剪辑将一直播放到下一个动作剪辑结束,此时将播放第二个动作剪辑。
简单易行
The blending will begin and end smoothly. This is the default setting.
混合将平滑地开始和结束。这是默认设置。
线性
A linear blend between the two Motion Clips will result.
两个运动剪辑之间的线性混合将产生。
慢慢来
The blend will begin quickly and end slowly.
混合将迅速开始和缓慢结束。
放松
The blend will begin slowly and end quickly.
混合将开始缓慢,结束迅速。
花键
If selected, a spline curve will be made available in the Attribute Manager with which the blending can be defined manually.
如果选中,样条曲线将在属性管理器中可用,用它可以手动定义混合。
花键
If Blending is set to Spline, this spline curve will let you manually define the blending between the selected Motion Clip and the next Motion Clip.
如果混合设置为样条,这条样条曲线将允许您手动定义选定的运动剪辑和下一个运动剪辑之间的混合。