
Baking Sculpt Objects
烘焙造型对象
Tip: 提示:
No major changes were made in how its used except for the fact that it is no longer necessary to bake a Displacement map together with a Normal map to compensate for artefacting.
在如何使用它没有重大的变化,除了这样一个事实,它不再需要烘焙一个位移图和一个法线图一起补偿人工制品。
常规
 The original cube, which was subdivided for
sculpting, reappears when textures are baked. Once the textures have been completed, the cube again turns into
a Sculpting object for rendering. 原始的立方体,被细分为雕刻,当纹理被烘培时重新出现。一旦纹理已经完成,立方体再次变成一个雕刻对象的渲染
The original cube, which was subdivided for
sculpting, reappears when textures are baked. Once the textures have been completed, the cube again turns into
a Sculpting object for rendering. 原始的立方体,被细分为雕刻,当纹理被烘培时重新出现。一旦纹理已经完成,立方体再次变成一个雕刻对象的渲染
A major disadvantage of sculpting are the high-resolution objects, which cannot be integrated so easily into a normal 3D workflow (painting, animating, etc.) with the average available hardware. How can these highly detailed objects (often consisting of millions of polygons) be integrated into a normal production pipeline?
雕刻的一个主要缺点是高分辨率的对象,这不能很容易地集成到一个正常的3D 工作流(绘画,动画等)与平均可用的硬件。如何将这些高度详细的对象(通常由数百万个多边形组成)集成到正常的生产流水线中?
Simple: The details are baked into the textures and projected onto low-res objects (from which Sculpting, also using internal calculations, created the high-res objects). The objects will be rendered in full detail.
简单: 细节被烘培到纹理中并投影到低分辨率对象上(也使用内部计算,从中雕刻创建高分辨率对象)。这些对象将被渲染得非常详细。
Follow these steps to bake a Sculpt object:
按照以下步骤烘焙 Sculpt 对象:
Make sure that the textures are large enough to bake, otherwise flawed renderings can result.
确保纹理足够大以至于可以烘培,否则就会产生有缺陷的渲染。
Tips for good baking …:
好的烘焙技巧:
Bake Sculpt Objects dialog window
对象对话框窗口
At the top left is a preview of the texture to be baked or of the already baked texture. Right-clicking on the window will make the following options available:
左上角是将要烘培的或已经烘培的纹理的预览。右键单击窗口可以使用以下选项:
预览
Click on this button to quickly display a low-res preview of the texture to be baked.
单击这个按钮可以快速显示要烘培的纹理的低分辨率预览。
烘焙
Click on this button to bake the texture. Make sure that the file path in the Filename field is defined correctly - this is where the bitmaps will be saved.
点击这个按钮烘培纹理。确保 Filename 字段中的文件路径定义正确——位图将在此保存。
别说了
Click on this button to stop the baking process (how quickly this happens depends on the size and complexity of the texture).
点击这个按钮可以停止烘焙过程(速度取决于质地的大小和复杂程度)。
烘焙标签
文件名
This is the location to which the textures will be saved. Type in a path or click on the button at the right to select a path. This (absolute) path will also be used in the object’s newly-created material.
这是将要保存纹理的位置。键入路径或单击右边的按钮以选择路径。这个(绝对)路径也将用于对象的新创建的材质。
Format / Options / Color Depth
格式/选项/颜色深度
Select the format and color depth for the baked textures. If additional options are available for certain formats, click on the Options button to define these (see also Save). When working with displacements you should use 16 or 32-bit color depth to avoid stepping.
选择烘焙纹理的格式和颜色深度。如果某些格式还有其他选项,请单击“选项”按钮来定义这些格式(另请参阅保存)。当处理位移时,你应该使用16位或32位的颜色深度,以避免步进。
锁定比率
If enabled, the Width and Height values will be locked in relation to one another. If one value is modified, the other will change accordingly.
如果启用,宽度和高度值将相互锁定。如果一个值被修改,另一个值也会相应地被修改。
宽度/高度
Use these values to manually define the baked texture’s width and height.
使用这些值手动定义烘焙纹理的宽度和高度。
预置
Here you can select from several square texture sizes.
在这里你可以选择从几个正方形纹理大小。
像素边界
Here you can define an edge (in pixels) beyond the UV polygons (see also the Bake Material tag’s Pixel Border option). This can be necessary to prevent visible seams from appearing during rendering. Values that are too small can result in unwanted peaks being generated for displacements.
在这里,您可以定义一个边缘(以像素为单位)超出紫外线多边形(也请参阅 Bake 材质标签的像素边界选项)。这可能是必要的,以防止可见的接缝出现在渲染期间。如果数值太小,就会产生不必要的峰值,从而导致位移。
标签设置
排水量
方法
See Type.
参见类型。
The preset Type, RGB (XYZ Object) will produce the best result in most cases. If you plan on changing the object’s shape at a later point (e.g., via Deformer), use the RGB (XYZ Tangent) setting. Only in this mode will the texture "work" with deformed geometry.
在大多数情况下,预设的类型 RGB (XYZ 对象)将产生最好的结果。如果你计划在稍后的时间点改变对象的形状(例如,通过 Deformer) ,使用 RGB (XYZ 切线)设置。只有在这种模式下,纹理才能“工作”与变形的几何体。
Note that when in RGB (XYZ Tangent) mode, baking of Normal tags should actually be done in 2 steps. If, for example, you have deformed an object with a Subdivision level of 7. If you want to achieve optimal results, you should bake in a two-step process.
注意,在 RGB (XYZ 切线)模式下,烘培普通标签实际上应该分两步完成。例如,如果你有一个细分级别为7的对象变形。如果你想达到最佳的效果,你应该分两步进行烘焙。
First, only bake the displacement texture with a Target object level of 0 from the Source object (with a level that shows the rough details) level 5 (Options tab). In the second step, bake the Normal texture with Target object level 5 from Source object level 7. Next, both textures have to be combined in one material. Why should it be done like this? Because the Sculpt-bake dialog promises more than it delivers. If you bake both textures (as stated only in RGB (XYZ Tangent) mode) at the same time with the same Target and Source object levels, the Normal texture will falsely simulate additional geometry to that of the displacement, thereby resulting in less optimal shading.
首先,只烘培来自源对象的目标对象级别为0的置换纹理(具有显示粗略细节的级别)级别5(选项标签)。在第二步,烘培普通纹理与目标对象级别5从源对象级别7。接下来,两种材质必须结合在一起。为什么要这样做呢?因为 Sculpt-bake 对话框承诺的远远多于实现的。如果你用相同的目标和源对象级别同时烘焙两种纹理(仅在 RGB (XYZ 切线)模式下说明) ,正常纹理将错误地模拟位移之外的额外几何形状,从而导致不太理想的阴影效果。
圆形几何
 At left, 在左边,Round
Geometry 圆形几何 option disabled, at right enabled for 2 objects with 选项禁用,在右边启用2个对象与Formula 方程式
Effectors assigned to them (which were previously baked using displacement). 分配给它们的效果器(这些效果器以前是用置换法烘培的)
At left, 在左边,Round
Geometry 圆形几何 option disabled, at right enabled for 2 objects with 选项禁用,在右边启用2个对象与Formula 方程式
Effectors assigned to them (which were previously baked using displacement). 分配给它们的效果器(这些效果器以前是用置换法烘培的)
When deforming a baked (displacement texure) object using a Deformer, effects such as those at the top of the image above can result. In such an event, this option should be enabled. The displacement texture will then be baked minimally and the Round Geometry option will be enabled later with the corresponding effect in the Displacement channel.
当使用变形器变形一个烘焙(置换纹理)物体时,会产生上图顶部的效果。在这种情况下,应该启用此选项。位移纹理将被最小化烘培,圆形几何选项将在后面的位移通道中启用相应的效果。
However, this option can also produce better results if the aforementioned effect is not used.
但是,如果不使用上述效果,这个选项也可以产生更好的结果。
正常值
方法/选择
See Method and the following. Here the same applies as in the description above: Use the RGB (XYZ Tangent setting if you plan on changing the object’s shape. Otherwise use the RGB XYZ (Object) setting.
参见方法和以下内容。这里同样适用于上面的描述: 如果您计划改变对象的形状,使用 RGB (XYZ 切线设置)。否则,使用 RGB XYZ (Object)设置。
继续 UVs
If you have defined a Pixel Border, this option defines how the pixels should appear within this border. If enabled, pixels will simply be repeated up to the edge. Otherwise they will be calculated correctly (see also the Bake Material tag’s Continue UVs option).
如果定义了像素边框,则此选项定义像素在此边框内的显示方式。如果启用,像素将简单地重复到边缘。否则它们将被正确地计算(参见 Bake Material 标签的 Continue uv 选项)。
光线投射
Don’t be irritated by the term ,Sculpt Mesh’ in the following. The same function can be found when baking sculpted objects. Simply imagine the source object instead of a ,sculpt mesh’.
不要被下面的“雕刻网格”这个词激怒。同样的功能可以发现,当烘焙雕塑对象。简单地想象一下源对象,而不是一个,雕刻的网格。
If you want to bake a displacement (only 3 types: Intensity, Intensity (centered) and Red/Green), a ,ray cast’ technique will be used. Simply put, it works as follows for displacements: Imagine an initial mesh that is placed over a Sculpt mesh. Position and Normal orientation will be ascertained for each position on the initial mesh. Now a ray is emitted in the direction of the Normals and back and the distance in which it intersects with the Sculpt mesh and which Normals lie at that location will be ascertained. The distance of the first Sculpt mesh surface found will be calculated into the Displacement map.
如果你想烘焙一个位移(只有3种类型: 强度,强度(中心)和红/绿色) ,一个,射线投’技术将被使用。简单地说,它的工作原理如下的位移: 想象一个初始网格是放置在雕塑网格。对于初始网格上的每个位置,将确定其位置和法线方向。现在一条光线沿着法线的方向和背面发射,它与 Sculpt 网格相交的距离以及位于该位置的法线将被确定。找到的第一个造型网格曲面的距离将被计算到位移图中。
In most cases, this works very well but can also fail in certain areas. This can, for example, occur at geometry edges where the ray can easily shoot into empty space. It can also occur that the ray hits false geometry. The texture will then be calculated incorrectly and high spikes will appear at these locations when the scene is rendered. The following settings are designed to reduce errors as much as possible. Therefore, if high spikes appear, it can help to disable the Use Auto Spike Filter Threshold and use a smaller Custom Spike Filter Threshold value.
在大多数情况下,这种方法非常有效,但在某些领域也可能失败。例如,这可能发生在几何边缘,在那里射线可以很容易地射入真空。也可能出现射线撞击假几何体的情况。然后纹理将被计算错误,高峰将出现在这些位置时,场景渲染。下面的设置旨在尽可能减少错误。因此,如果高峰出现,它可以帮助禁用自动穗过滤阈值和使用更小的自定义穗过滤阈值。
Use Max Ray Cast Distance
Custom Ray Cast Distance
使用最大射线投射距离
If the Use Max Ray Cast Distance option is disabled, the ray will basically not be restricted. If the option is enabled, the ray will end at the distance defined by the Custom Ray Cast Distance setting and a displacement (Height = 0) will be calculated at that distance.
如果使用最大射线投射距离选项被禁用,射线将基本上不受限制。如果启用该选项,光线将在自定义光线投射距离设置定义的距离处结束,并在该距离处计算位移(高度 = 0)。
Use Auto Spike Filter Threshold
Custom Auto Spike Filter Threshold
使用自动穗过滤器阈值自定义自动穗过滤器阈值
The spike filter examines the baked texture and uses a statistical method for ascertaining which displacement region is the most prevalent and identifies extreme spikes. These spikes are then removed. If you want to influence this process yourself, disable this option. The smaller the Use Custom Spike Filter Threshold value, the greater the suppression of spikes will be. However, if the values are extremely small, little or none of the displacement will remain.
穗状滤波器检查烘培的纹理,并使用统计方法来确定哪个位移区域是最普遍的,并识别出极端的穗状物。这些尖刺然后被移除。如果您想自己影响这个过程,请禁用此选项。使用自定义穗过滤阈值越小,穗的抑制将更大。然而,如果值非常小,很少或没有位移将保持。
环境遮挡
超级符号
Supersampling defines the AO texture for baking (textures are not affected for baking by the antialiasing settings in the Render Settings).
超级取样定义了用于烘培的 AO 纹理(纹理不受渲染设置中的抗锯齿设置的影响)。
单列纵队
If enabled, individual channels (Displacement, Normal, Ambient Occlusion) will be saved as separate image layers in a single bitmap (instead of saving a separate file for each channel).
如果启用,单个通道(位移、正常、环境遮挡)将被保存为单个位图中的单独图层(而不是为每个通道保存单独的文件)。
创建结果副本
If enabled, a new object, including corresponding material and Material tags, will be created. If disabled, only the textures will be rendered.
如果启用,将创建一个新对象,包括相应的材质和材质标记。如果禁用,则只渲染纹理。
选项卡
Displacement / Normal / Ambient Occlusion
位移/正常/环境遮挡
Use these options to define which textures should be baked. A brief reminder of what these material channels will do:
使用这些选项来定义应该烘培哪些纹理。简要提醒一下这些材质通道将起到什么作用:
In most cases, Displacement and/or Normal should be baked. Otherwise, experiment which textures are best for your individual workflow.
在大多数情况下,位移和/或正常应该被烘培。否则,试验哪些纹理最适合您的个人工作流程。
最佳映射
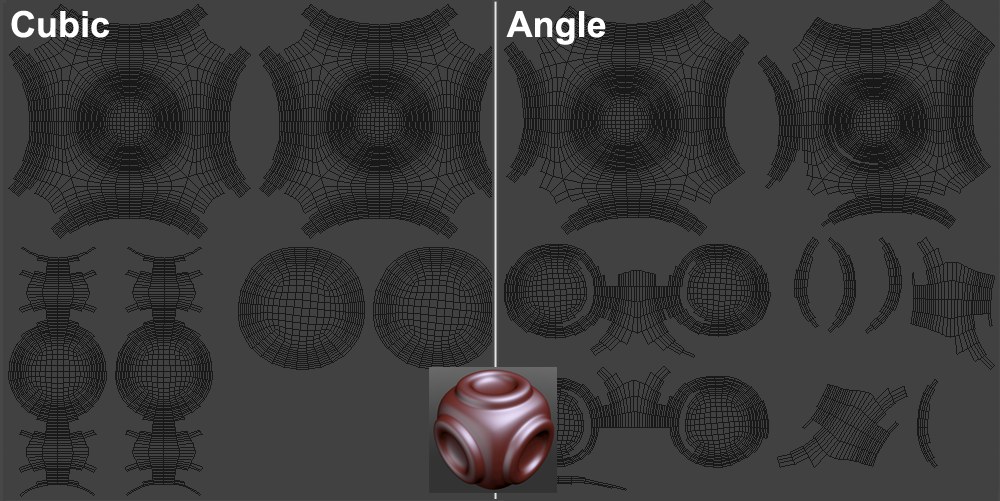 The UV layout of the object in the center in both
modes. 在两种模式的中心对象的 UV 布局
The UV layout of the object in the center in both
modes. 在两种模式的中心对象的 UV 布局
When textures are baked, you have to be sure that no UV polygons overlap.
当纹理被烘培时,你必须确保没有紫外线多边形重叠。
If you have already made sure that none overlap, select the Off option. The UV coordinates will then remain unchanged (and will at the most be subdivided further, depending on the target object).
如果您已经确保没有重叠,请选择 Off 选项。然后紫外线坐标将保持不变(最多将根据目标物体进一步细分)。
This setting can be used for the Sculpt objects included with the application. The UV meshes of these objects have already been optimized.
此设置可用于应用程序中包含的 Sculpt 对象。这些目标的 UV 网格已经被优化。
If you shape your own object and have not optimized the UV coordinates, select either the Cubic or Angle option.
如果你塑造你自己的对象,并没有优化紫外线坐标,选择立方或角度选项。
包括顶层
This option only has a minimal effect on the rendered (and previously baked) result. Moreover, this option ascertains if the mesh created during baking strictly represents a subdivided mesh (option disabled) or if this mesh has been sculpted and thus effects higher subdivision levels (option enabled).
此选项对呈现的(以及先前烘焙的)结果只有最小的影响。此外,这个选项确定如果在烘培过程中创建的网格严格代表一个细分网格(选项禁用)或如果这个网格已经雕刻,因此影响更高的细分级别(选项启用)。
Example:
例子:
 The sculpted object (created from a subdivided
cube) at the left is baked. 左边的雕刻对象(从一个细分立方体创建)正在烘培
The sculpted object (created from a subdivided
cube) at the left is baked. 左边的雕刻对象(从一个细分立方体创建)正在烘培
Sometimes, enabling this option can prevent artifacts from being generated (especially if Type is set to RGB XYZ Tangent) since the shape of the initial mesh is adapted to that of the subsequent shape.
有时,启用此选项可以防止产生工件(特别是如果 Type 设置为 RGB XYZ 切线) ,因为初始网格的形状适应于后续形状的形状。
The tire pictured above (created using a cube subdivided to a level of 9) is baked. If the option is enabled (bottom), the cube will not be cube-shaped but will be deformed slightly (exactly what the Sculpt object would look like if the subdivision level were set to 0). If this option is disabled, a perfect cube will be created. When rendered you will barely notice the difference.
上图所示的轮胎(使用细分到9级的立方体创建)已经烘培完毕。如果启用该选项(底部) ,立方体将不是立方体形状,而是略微变形(如果细分级别设置为0,那么 Sculpt 对象的外观将完全相同)。如果禁用此选项,将创建一个完美的多维数据集。当渲染时,你几乎不会注意到区别。
To put it briefly: If this option is disabled, the mesh created by baking will look more like the rendered (=sculpted) result than if the option were enabled because very little (or no) reference information will be available.
简单地说: 如果禁用这个选项,烘焙创建的网格将看起来更像渲染(= 雕刻)的结果,而不是如果启用这个选项,因为很少(或没有)参考信息可用。
源/目标对象列表

What exactly happens when a Sculpt object is baked?
当一个 Sculpt 对象被烘培时,究竟发生了什么?
The details of high-res objects (Source objects) are transferred via texture onto a low-res object (Target object).
高分辨率对象(源对象)的细节通过纹理传输到低分辨率对象(目标对象)。
Cinema 4D must now be told which of the Sculpt object’s subdivision levels should be used for baking. For the Target object, select the subdivision level that should be used to create the new object, and for the Source object, select the object whose details should be baked. Imagine these objects placed over one another: For the Target object, the distance to the Source object will be ascertained for each surface position and a corresponding displacement will be calculated. The Normal calculation works in a similar fashion.
C4D 现在必须告诉雕刻对象的细分层次应该用于烘培。对于 Target 对象,选择应该用于创建新对象的细分级别,对于 Source 对象,选择应该烘培其细节的对象。想象一下这些物体相互叠加: 对于目标物体,到源物体的距离将被确定为每个表面位置,并计算相应的位移。普通计算也以类似的方式工作。
The Target object’s subdivision level must always be smaller than that of the Source object for baking to work.
目标对象的细分级别必须始终小于源对象的烘焙级别。