
View
查看
预览
将预览设置为选择
Sets the preview range between the first and last keys of the current key selection. If no keys are selected, the preview range will be set to the length of the document.
设置当前键选择的第一个键和最后一个键之间的预览范围。如果没有选择键,则预览范围将设置为文档的长度。
将 Preview 设置为 View
Sets the preview range to the currently visible Timeline.
将预览范围设置为当前可见的时间轴。
设置预览范围..。
Opens a dialog window in which the preview range can be defined manually.
打开一个对话框窗口,可以在其中手动定义预览范围。
网格
子帧
If the timeline is stretched too far resulting in large gaps between frames, grid lines will be added between individual frames.
如果时间线被拉伸得太远,导致帧之间出现较大的间隙,那么每个帧之间就会增加网格线。
没有栅格
Turns off the grid.
关掉电网。
每秒
Defines the horizontal grid spacing in Dope Sheet mode and F-Curve mode.
定义涂料表模式和 f 曲线模式下的水平网格间距。
The Per Second setting will set the spacing to 1 second between grid lines, i.e.,
if the frame rate is set to 30 in the
每秒设置将网格线之间的间距设置为1秒,也就是说,如果在项目设置菜单中将帧速率设置为30,每30帧就会出现一条垂直的网格线。
图标大小
小图标/中图标/大图标
Define the icon size here. In addition to the size of the icons, the size of the rows in the Timeline’s Objects Area will also be affected.
在这里定义图标大小。除了图标的大小,时间轴对象区域中的行的大小也会受到影响。
折叠/展开
全部折叠展开
Use these options to fold or unfold hierarchies in the Objects Area. Alternately you can open or close the
entire child hierarchy, including all vector tracks, by pressing
使用这些选项可以在对象区域中折叠或展开层次结构。或者你可以打开或关闭整个子层次结构,包括所有矢量轨道,通过按 Ctrl/Cmd 并点击相应的 + 图标。
折叠选择
Use these commands to fold or unfold a selected object’s hierarchical structure in the Timeline.
使用这些命令在时间轴中折叠或展开选定对象的层次结构。
表演
动画展示
If activated, animated items will be shown and items without animation tracks will be hidden.
如果激活,动画项目将显示和项目没有动画轨道将隐藏。
If deactivated all items will be shown.
如果停用所有项目将显示。
One small exception: If automatic mode is deactivated, at most only items that were manually placed into the Timeline per drag & drop will be displayed.
一个小的例外: 如果自动模式被停用,最多只有手动放入时间线每拖放项目将被显示。
只显示主动服务
This command is for use in conjunction with the Cinema 4D Take system (Take Manager). If this option is enabled, only the animation Tracks created or modified in the active Take will be shown (i.e., those in the Main Take will be hidden).
此命令用于与Cinema 4D 拍摄系统(采取管理器)。如果启用此选项,将只显示在活动的 Take 中创建或修改的动画轨道(即,那些在 Main Take 中将被隐藏)。
只显示活动动画图层
If enabled, only the active Animation Layer’s Keys will be displayed in the Timeline in Key or F-Curve mode. Otherwise all of a given object’s Keys will be displayed, including those that lie on different Animation Layers.
如果启用,只有活动的动画层的钥匙将显示在时间轴的关键或 f 曲线模式。否则,一个给定对象的所有关键将显示,包括那些位于不同的动画图层。
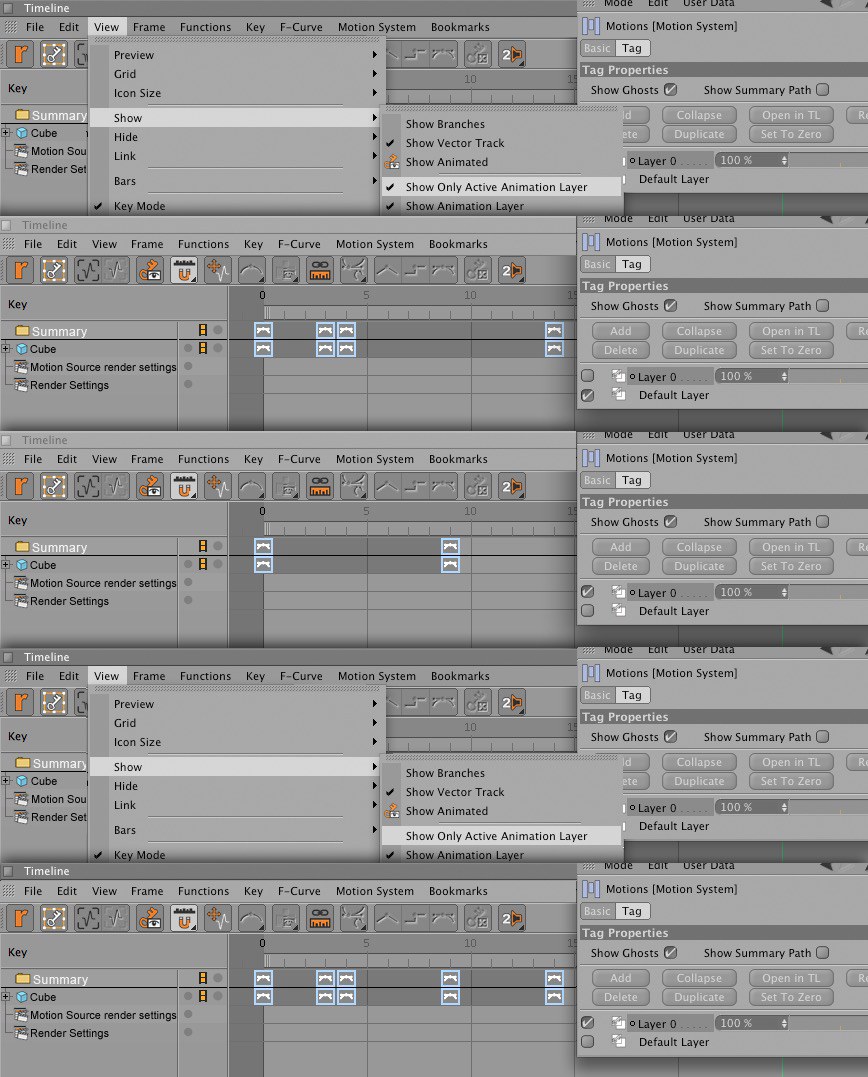
显示动画图层
This option is for use in the Timeline’s Motion mode. If enabled, all Animation Layers will be displayed. Otherwise only the Motion Layers will be displayed.
此选项用于时间轴的运动模式。如果启用,所有动画图层将显示。否则只会显示动态图层。

显示最小/最大值
The minimum and maximum will be displayed for each F-Curve as a horizontal dashed line in the color of the F-Curve. This makes it possible to quickly recognize and react to these important settings. The minimum and maximum lines can be interactively moved vertically, which will scale the F-Curve vertically as a whole.
最小值和最大值将显示为每个 f 曲线作为一个水平虚线的颜色的 f 曲线。这使得我们能够快速识别并对这些重要设置做出反应。最小和最大的线可以交互式垂直移动,这将规模的 f 曲线作为一个整体垂直。
Tip 小贴士显示跟踪值
 Key Values are framed in red. 键值用红色框架表示
Activating this option will add an additional column to the Timeline in which the interpolated track value for each animation track that can be interpolated will be displayed at the current time in the animation. If the Timeslider lies on a key the corresponding track value will be highlighted in color(in this case the key value).
激活此选项将向时间轴添加一个额外的列,其中可以插入的每个动画轨道的插值轨道值将在动画的当前时间显示。如果分时器位于键上,相应的轨道值将以颜色突出显示(在这种情况下为键值)。
This value can be changed by double-clicking on it. The following will occur:
可以通过双击该值来更改该值。会出现以下情况:
显示预览范围
If you and the Preview Range just don’t get along anymore, simply use this option to turn it off. The Preview Range will still exist internally since other Cinema 4D functions will continue to rely on it (e.g., the Preview Range function).
如果你和 Preview Range 不再合得来,只需使用这个选项来关闭它。预览范围内部仍然存在,因为其他C4D 功能将继续依赖于它(例如,预览范围功能)。
显示前/后曲线
Use this option to define whether or not the Curves before and after should be displayed.
使用此选项可定义是否应该显示前后的曲线。
显示键/切线
展示所有的钥匙
Activate this setting if the keys of all visible F-Curves should be displayed. If no keys should be displayed at all, deactivate this setting and the next setting (Show Keys of Selected Curves).
激活这个设置,如果所有可见的 f 曲线的键应该显示。如果根本不应显示任何键,则停用此设置和下一个设置(显示选定曲线的键)。
显示选定曲线的键
Activate this setting if only keys of selected F-Curves should be displayed. Show All Keys should be deactivated.
激活此设置,如果只有选定的 f 曲线键应该显示。显示所有的键应该停用。
显示选定键的切线
Activate this setting if only the tangents of selected keys should be displayed. Show All Tangents should be deactivated.
如果只显示选定键的切线,则激活此设置。显示所有切线应停用。
显示所有切线
Activate this setting if all tangents of all visible keys should be displayed. If no tangents should be displayed at all, deactivate this setting and the Show Tangents of Selected Keys setting.
如果应该显示所有可见键的所有切线,则激活此设置。如果没有切线应该显示在所有,停用此设置和显示切线的选定的关键设置。
显示所有切线
Enable this option if all tangents of all visible keys should be shown. If no tangents should be shown, disable this and the previous option.
如果应该显示所有可见键的所有切线,则启用此选项。如果没有显示切线,则禁用此选项和前面的选项。
藏起来
隐藏所选元素
Use this option to temporarily hide items (including their keys and F-Curves) without having to deal with layers or filters.
使用此选项可以暂时隐藏项目(包括它们的键和 F-Curves) ,而无需处理图层或过滤器。
隐藏未选中的元素
Use this option to temporarily hide all deselected items (see also Hide Selected Elements).
使用此选项可临时隐藏所有取消选择的项(请参阅隐藏选定元素)。
揭开一切
Use this option to unhide all items hidden using the two previous options.
使用此选项可以使用前两个选项取消隐藏所有隐藏项。
链接
带预览范围的链接视图
Activating this option will link the Timeline and the Animation Palette’s Powerslider. The Preview Range defined in the Powerslider is the exact temporal range that will be displayed in the Timeline. In turn, the Powerslider will adapt accordingly to any scaling or moving of the Timeline.
激活此选项将链接时间轴和动画调色板的 Powerslider。在 Powerslider 定义的预览范围是将在时间轴中显示的精确时间范围。反过来,Powerslider 将相应地适应任何缩放或移动的时间轴。
The Powerslider thus assists in the navigation of the Timeline.
因此,Powerslider 协助时间轴的导航。
Object Manager and the Timeline.
对象管理器和时间轴。
链接 TL/OM 选择
Enable this option when all objects and tags selected in the Object Manager should also be selected in the Timeline and vice-versa (with all corresponding Tracks and Keys). This functionality was removed from Cinema 4D with version 9 but has now been reinstated.
当在对象管理器中选择的所有对象和标记也应该在时间轴中选择时,启用此选项,反之亦然(包括所有相应的轨道和键)。这一功能在第9版中从C4D 中移除,但现在已经恢复。
定向选择链接
If this option is enabled, the previously described synchronized selection will only take place from the Object Manager to the Timeline (however, no deselection will be made in the Timeline when new objects are selected in the Object Manager). If other elements are selected in the Timeline, it will not affect the selection in the Object Manager.
如果启用此选项,前面描述的同步选择将只发生在从对象管理器到时间轴(但是,当在对象管理器中选择新对象时,时间轴中不会取消选择)。如果在时间线中选择了其他元素,则不会影响对象管理器中的选择。
链接视图到对象管理器
If activated, only those objects selected in the Objects Manager (if their Child objects and tags should also be shown can be defined precisely in the Timeline’s preferences menu) will be shown. Objects not selected will be hidden. Only relevant objects will be shown – no filters must be defined.
如果激活,只有在对象管理器中选择的对象(如果它们的子对象和标记也应该显示,那么可以在时间轴的首选项菜单中精确定义)将被显示。未选中的对象将被隐藏。只显示相关的对象-不必定义过滤器。
酒吧
显示路径栏
 Left: Document or scene layer; Right: After the
cube was set as root using the Set As Root option. 左: 文档层或场景层; 右: 使用 setasroot 选项将立方体设置为根后
Left: Document or scene layer; Right: After the
cube was set as root using the Set As Root option. 左: 文档层或场景层; 右: 使用 setasroot 选项将立方体设置为根后
Since tree hierarchies in the Objects Area can become very complex when working with larger animations, individual branches can be set as roots (Set As Root), which will result in only a given hierarchical branch being displayed. This hierarchy’s path will be displayed in the Path Bar so you can keep track of which hierarchy you are currently in. Tracks cannot be set as roots (exception: render settings and post effects).
由于在处理较大的动画时,对象区域中的树层次结构可能变得非常复杂,因此可以将单个分支设置为根(Set As Root) ,这将导致只显示给定的层次分支。此层次结构的路径将显示在路径栏中,以便您可以跟踪当前所在的层次结构。轨道不能设置为根(例外: 渲染设置和后期效果)。
Click on the House icon to jump back to the top hierarchical level. Use the Arrow next to the House icon to move up a single level at a time.
点击 House 图标可以跳回到最高层级。使用房子图标旁边的箭头一次向上移动一级。
Otherwise, animations are completely independent of the aforementioned settings, even those that are not currently visible in the Timeline.
否则,动画完全独立于前面提到的设置,即使是那些当前在时间轴中不可见的。
Tip 小贴士过滤器
显示路径栏
At left the Project layer, at right the marked
curve was set as a root using the 在左边的项目层,在右边的标记曲线被设置为一个根Set as Root 设置为根 command. 命令
显示搜索栏
过滤器对象名称
This simple but effective search function covers all items displayed in the Objects Area – objects, tags, materials, shaders, render settings and post effects Project elements (e.g., animated, global Dynamics settings), including the keyframes displayed on the right, F-Curves and motion sources. Animation tracks themselves cannot be hidden or unhidden using this option. They will be hidden and unhidden together with all other aforementioned items.
这个简单而有效的搜索功能涵盖了在对象区域中显示的所有项目-对象、标签、材质、着色器、渲染设置和后期效果项目元素(例如,动画、全局动态设置) ,包括右侧显示的关键帧、 f 曲线和运动源。使用此选项,动画轨迹本身不能被隐藏或显示。它们将与前面提到的所有其他物品一起被隐藏和打开。
Applying this option will not select any items. Show Search Bar is a real-time display filter only. To search for an item, simply enter its name in the search bar. All items containing the same sequence of letters in their respective names will be displayed. The Search Bar is not case sensitive. To clear the search bar, click on the arrow to its left.
应用此选项将不会选择任何项目。显示搜索栏只是一个实时显示过滤器。要搜索一个项目,只需在搜索栏中输入它的名称。所有项目包含相同序列的字母在其各自的名称将显示。搜索栏不区分大小写。要清除搜索栏,请单击其左侧的箭头。
Animations are completely independent of the aforementioned settings, even those that are not currently visible in the Timeline.
动画完全独立于上述设置,即使是那些当前在时间轴中不可见的。
RELEASE 23
第23期
过滤器轨道名称
This works similarly to the Filter Object Name function only that the animation Track is used by the filter. The matching Track name will then be displayed.
这与 Filter Object Name 函数的工作方式类似,只是动画 Track 由筛选器使用。然后将显示匹配的 Track 名称。
显示过滤器
 Complex Timelines can be cleaned up using filters.
At top: A complex Timeline in its original state. Below: Two filter settings and one layer setting that both
achieve the same result. In example 1, items and their corresponding tracks have been hidden. Example 2 shows
how all non-relevant layers have been hidden. In example 3 the manager switches were deactivated in the Layer
Manager to achieve a clearer Timeline. 复杂的时间线可以使用过滤器清理。上图: 复杂时间线的原始状态。下图: 两个过滤器设置和一个图层设置,两者都得到相同的结果。在例1中,项目及其相应的轨道已被隐藏。示例2显示了如何隐藏所有不相关的层。在例3中,管理器开关在图层管理器中被停用,以获得更清晰的时间轴
Complex Timelines can be cleaned up using filters.
At top: A complex Timeline in its original state. Below: Two filter settings and one layer setting that both
achieve the same result. In example 1, items and their corresponding tracks have been hidden. Example 2 shows
how all non-relevant layers have been hidden. In example 3 the manager switches were deactivated in the Layer
Manager to achieve a clearer Timeline. 复杂的时间线可以使用过滤器清理。上图: 复杂时间线的原始状态。下图: 两个过滤器设置和一个图层设置,两者都得到相同的结果。在例1中,项目及其相应的轨道已被隐藏。示例2显示了如何隐藏所有不相关的层。在例3中,管理器开关在图层管理器中被停用,以获得更清晰的时间轴
Activating Show Filter will display the Filters Area. The Filters Area can be used to define which items, including their keys and F-Curves, should be displayed.
激活显示过滤器将显示过滤器区域。过滤器区域可以用来定义哪些项目,包括他们的钥匙和 f 曲线,应该显示。
Show Filter only affects whether or not an item is displayed and has no effect on the items’ respective animations. Use Show Filter to give yourself a concise view of only the items you currently need.
“显示筛选器”仅影响项是否显示,对项的相应动画没有影响。使用显示筛选器可以让您对当前需要的项目有一个简洁的视图。
At the left of the Filters Area you will see all of a given scene’s items displayed in a tree hierarchy. Elements specific to each item (as well as how many elements are present) will be shown as subordinate items of that item.
在过滤器区域的左侧,你会看到一个给定场景的所有项目都显示在树层次结构中。特定于每个项目的元素(以及有多少个元素)将作为该项目的从属项显示。
The display of Motion Sources in the Timeline and for search results in the Timeline can be turned on/off in Key or F-Curve modes.
在时间轴和搜索结果时间轴中显示运动源可以在关键模式或 f 曲线模式中打开/关闭。
At the right of the Filters Area you will see two options, which can be applied separately for each item type. These options have the following functions:
在过滤器区域的右边,你会看到两个选项,它们可以分别应用于每个项目类型。这些备选方案具有以下功能:
Open the Tracks filter to display all animation tracks (can also be hidden and unhidden).
打开轨道过滤器显示所有动画轨道(也可以隐藏和未隐藏)。
The last filter type is the Layer filter. Opening this filter will display all layers of a given animation (layers to which no objects have been assigned will not be displayed). You will also see a layer named Undef. Layer (which is not really a layer). All items not assigned to a specific layer will be assigned to Undef. Layer.
最后一种过滤器类型是图层过滤器。打开这个过滤器将显示给定动画的所有层(没有分配对象的层将不会显示)。您还将看到一个名为 Undef 的层。图层(不是真正的图层)。所有未分配到特定层的项目将被分配到 Undef。图层。
显示运动源
Shows or hides Motion Sources when in Motion Mode.
在运动模式下显示或隐藏运动源。
其他指令
显示运动源
Lets you switch between Dope Sheet mode and F-Curve mode. Alternatively you can click on the key icon / graph icon at the top right of the Timeline. You can switch between modes by Ctrl+spacebar.
让您切换涂料表模式和 f 曲线模式。或者你也可以点击时间轴右上角的图标。您可以通过 Ctrl + 空格键在模式之间切换。
涂料层-曲线模式
运动模式
Select the mode in which you want to work. An easier way of switching is to press the  icon at the top left of the Timeline.
选择要工作的模式。一个更简单的切换方式是按 Tab 键切换模式(如果没有运动剪辑存在的运动模式将被跳过)。你可以通过按下键盘上的空格键来轻松地切换模式。你也可以点击时间轴左上角的图标。
Tip: 提示:Simultaneously pressing the
在点击模式改变图标的同时按下 Ctrl 键将在新模式下保持活动选择,也就是说,在新模式下也会选择相同的选定键。否则,键的选择将相互独立处理。这个功能也可以在首选项菜单中启用。
自动模式
Automatic Mode is the default mode. It ensures that all items that can be animated located in the various Managers, such as objects, tags, materials, render settings, etc. are automatically displayed in the Timeline.
自动模式是默认模式。它确保所有的项目,可动画位于各种管理器,如对象,标签,材质,渲染设置,等自动显示在时间轴。
If this mode is not active, the Individual Mode will be in effect. Items must then
be placed into the Objects Area from the corresponding Manager per drag & drop. Only these items will then
be shown. This means that the first time you switch to Individual Mode the Timeline will be empty until
something is dragged into the Objects Area. If you press the
如果此模式不活动,个人模式将生效。然后项目必须放置到对象区域相应的管理器每拖放。然后只显示这些项目。这意味着第一次切换到单独模式时,时间线将是空的,直到有东西被拖到对象区域。如果在拖放项目到对象区域时按下 Shift 键,所有的子对象也会被放置在那里。
When in Individual Mode, all objects displayed in the Timeline’s Objects Area can be moved via drag & drop or defined as children of other items without affecting the real internal object hierarchy.
当处于单独模式时,所有显示在时间轴对象区域中的对象都可以通过拖放来移动,或者定义为其他项目的子对象,而不会影响真正的内部对象层次结构。
For example, a blur track can be made a child of a material. This is practical if you want to synchronize both animations and they lie right next to each other. Only the display in the Timeline will be affected.
例如,一个模糊的轨迹可以做成一个子材质。这是实际的,如果你想同步两个动画和它们的权利躺在一起。只有时间轴中的显示会受到影响。
A shader can be placed onto the Timeline by simply dragging its preview image from the Material Editor or Attributes Manager onto the Timeline. Post Effects can also be dragged from the Render Settings 一个着色器可以被放置到时间轴上,只需要将它的预览图像从材质编辑器或属性管理器拖到时间轴上。后期效果也可以从渲染设置拖动Effects 效果 tab directly onto the Timeline. 直接标签到时间轴上 When in Automatic mode: If a given item from the Objects Manager or a material from the 当处于自动模式时: 如果一个给定的项目从对象管理器或材质从Material Manager 材质管理器 is dragged into the Timeline’s Objects Area and subsequently selected (or selected in general), this item’s respective individual mode will automatically be made active. 拖放到时间轴的对象区域中,然后选中(或者一般选中) ,该项目的各自模式将自动激活删除选定的对象
This option can only be applied in Individual mode (deactivated Automatic mode). Applying this option will remove all selected objects from the Timeline view. Their animations will not be affected - they simply will not be displayed.
此选项只能应用于个人模式(停用的自动模式)。应用此选项将从时间线视图中删除所有选定的对象。他们的动画不会受到影响-他们只是不会显示。
删除所有对象
This option can only be applied in Individual mode (deactivated Automatic mode). Applying this option will clear the Timeline. Existing animations will not be affected – they simply will not be displayed.
此选项只能应用于个人模式(停用的自动模式)。应用此选项将清除时间轴。现有的动画将不会受到影响-他们只是不会显示。
预览范围
Activating this option will play only the defined preview range of the animation instead of playing through the entire length of the document.
激活此选项将只播放动画的定义预览范围,而不是播放整个文档的长度。
设置为根
Sets the currently selected item as a root, i.e., only this item’s hierarchical tree will be displayed in the Timeline. Activating Show Path Bar will display the hierarchy’s path and make navigating easier.
将当前选定的项目设置为根,也就是说,只有该项目的层次结构树将显示在时间轴中。激活显示路径栏将显示层次结构的路径,并使导航更容易。
Tip: 提示:进入主层
With this option you can jump directly to the top hierarchical level – the document level. The same can be done by clicking on the House icon at the left of the Path Bar.
使用这个选项,您可以直接跳转到顶层的层次结构级别——文档级别。同样可以通过点击路径栏左侧的 House 图标来实现。
Clicking on Summary Track will select all existing keys. The entire animation can then be moved or scaled temporally using the Selection Range.
单击“摘要跟踪”将选择所有现有键。然后可以使用选择范围临时移动或缩放整个动画。
上一层
Selecting this option will bring you up one level in the hierarchy. The same can be done by clicking on the Arrow icon at the left of the Path Bar.
选择此选项将使您在层次结构中上升一级。点击路径栏左侧的箭头图标也可以做到这一点。


