 Cloud
Cloud
云
Tools 工具Smoothing 平滑Display 展示Cloud
云
常规
 Volumetric clouds: Left the viewport view set to
maximum quality; right the rendered image. 体积云: 左视窗视图设置为最大质量; 右渲染图像
Volumetric clouds: Left the viewport view set to
maximum quality; right the rendered image. 体积云: 左视窗视图设置为最大质量; 右渲染图像
Depending on whether or not Effects is enabled (View:
根据是否启用效果(查看: 选项菜单) ,云将显示为高质量的预览或点(如下图所示)。
A volumetric cloud is depicted in the editor as an adjustable grouping of cloud density points. These points give a good impression of what the actual cloud looks like without having to render it.
在编辑器中,体积云被描述为一组可调节的云密度点。这些点给出了一个实际云看起来是什么样子的好印象,而不必渲染它。
 Top left, the rendered cloud; in the main image,
its density-point alter ego. 左上角,渲染的云; 在主图中,它的密度点改变了自我
Top left, the rendered cloud; in the main image,
its density-point alter ego. 左上角,渲染的云; 在主图中,它的密度点改变了自我
The cloud’s density points will only be completely visible (Cloud Tool Display tab) if the Cloud object and Cloud Tool have been selected. When tools other than the Cloud Tool are selected, only a reduced number of points will be visible, which speeds up workflow.
如果云对象和云工具被选中,云的密度点才会完全可见(云工具显示标签)。当选择云工具以外的工具时,只能看到减少的点数,这会加快工作流程。
申请
Basically, there are two ways to work with the Cloud Tool:
基本上,使用云工具有两种方式:
-
Paint new clouds. See 画出新的云彩,看General 常规.
See 看Volumetric Clouds 体积云. -
Edit existing clouds.
编辑现有的云
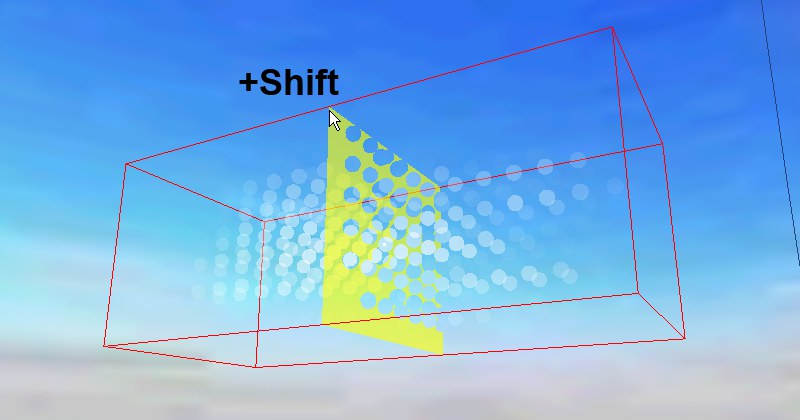
- Activate the cloud you want to edit. 激活你想要编辑的云
- Move the mouse over one of the bounding box’s corner points and press the Shift-key. A plane will appear and will follow your cursor along the X, Y or Z axis. 将鼠标移到边界框的一个角点上,然后按 shift 键。一个平面将会出现,并沿着 x、 y 或 z 轴跟随你的光标
- Move the plane to the desired position, click, and release the Shift-key. The plane has been moved and will now appear in a transparent color. 将平面移动到所需的位置,单击并释放 shift 键。飞机已经移动,现在将以透明的颜色出现
- You can now paint additional points at this altitude using your left mouse button. Be careful not to paint too near to the bounding box’s outer edges since the clouds will then be cut off when rendered. 你现在可以在这个高度使用鼠标左键绘制额外的点。注意不要画得太靠近边界框的外边缘,因为当渲染云彩时会被切断
- In addition, you can also paint on a cloud’s surface in accordance with the 此外,您还可以根据Threshold 门槛 value. 价值