 Material 材质Basic 基础Color 颜色Diffusion 扩散Luminance 亮度Transparency 透明度Reflectance 反射率Environment 环境Fog 雾Bump 碰一下Normal 正常Alpha 阿尔法Glow 发光Displacement 排水量Illumination 照明ViewportAssign 分配
Reflectance
反射率
- Layer Tab 图层标签
- Layer Color 图层颜色
- Layer Mask 图层蒙版
- Layer Anisotropy 层的各向异性
- Layer Cloth 层布
- Layer Fresnel 图层菲涅耳
- Layer Sampling 分层取样
- Layer * Transparency * 图层透明度
- Other Tabs 其他标签页
常规
The Reflectance channel is an enhanced version of the previous Reflection channel. The following modifications were made for R16:
反射通道是以前反射通道的增强版本。对 R16做了以下修改:
- Due to their similarity, the Reflection and Specular channels were merged. 由于它们的相似性,合并了反射通道和镜面通道
- Reflections/specular highlights can be organized in stacked layers. 反射/镜面高光可以组织成叠层
- Numerous properties can now be defined per Reflectance layer. Many of these properties were available as separate material channels (Bump, Normals, etc.) or shaders (Fresnel reflections) prior to R16. 现在可以为每个反射层定义许多属性。在 R16之前,许多这些属性可以作为单独的材质通道(凸起、法线等)或着色器(菲涅耳反射)
- Very many properties can now be controlled per texture. 很多属性现在可以控制每个纹理
- New functions such as various reflectance models, anisotropic, textiles, color bleeds at the edge of a reflection, etc. 新功能,如各种反射模型,各向异性,纺织品,颜色出血在边缘的反射,等等
 Great-looking stacked, reflective and even
scratched lacquered surfaces or cloth can be created using the Reflectance channel. 伟大的期待堆叠,反射,甚至刮伤漆表面或布可以创建使用反射通道
Great-looking stacked, reflective and even
scratched lacquered surfaces or cloth can be created using the Reflectance channel. 伟大的期待堆叠,反射,甚至刮伤漆表面或布可以创建使用反射通道
The Reflectance channel leaves almost nothing to be desired with regard to reflections. Materials such as car or metallic lacquer that are made up of several layers, each of which reflect light differently, are easy to create. Simply stack the respective Reflectance layers.
反射通道几乎没有留下什么可以期望的反射。材质,如汽车或金属漆是由若干层,其中每个反射光线不同,很容易创建。简单地堆叠各自的反射层。
It is possible to define a material only using the Reflectance channel (see also PBR Approach or Where are the color, bump and specular textures added?), which means that the Color channel can be ignored in some cases. However, this should not be done across the board.
这是可能的定义材质只使用反射通道(也见 PBR 方法或哪里是颜色,凹凸和镜面纹理添加?)这意味着在某些情况下可以忽略 Color 通道。然而,这不应该是全面的。
On the one hand, special effects that were previously difficult to create - such as car lacquer, stacked specular highlights, etc. - can be created using the Reflectance channel. On the other hand, Global Illumination (for the Standard and Physcial Renderers) bases its function on the Color channel’s settings (and not on reflections) and cannot do without the Color channel. Furthermore, real diffuse reflections are much more complex to render than are those generated using the Color channel.
一方面,以前很难创建的特殊效果——比如汽车漆、堆叠的高光等等——可以使用反射通道创建。另一方面,全局光源的功能是基于色彩通道的设置(而不是反射) ,不能没有色彩通道。此外,真实漫反射渲染比使用彩色通道渲染要复杂得多。
Tip: 提示:Old materials (prior to Cinema 4D R16) can still be loaded. The specular highlight and reflection settings will be assumed and 2 layers named ,Specular-standard’ and ,Reflection-standard’, which produce almost identical render results (slight variations may appear on matte reflections), will be created. Hence, behavior equivalent to the previous versions will be provided by the 2 layers that are set to 旧的材质(在Cinema 4D R16之前)仍然可以加载。镜面高光和反射设置将被假定,并将创建2个层,分别命名为镜面标准层和反射标准层,它们产生几乎相同的渲染结果(哑光反射可能会出现轻微的变化)。因此,相当于以前版本的行为将由设置为Type 类型Reflection (Legacy) 反思(遗产) and 及Type 类型Specular - Blinn/Phong (Legacy) Specular-Blinn/Phong (Legacy), respectively. Matte effects are now defined using the ,分别。哑光效果现在定义使用Roughness 粗糙度 setting. 设置
How can a metallic look be created?
怎样才能创造出金属般的外观呢?
We’ll use an example with 2 layers: a metallic, sparkling effect with a clear coat layer on top.
我们将使用一个两层的例子: 一个金属,闪闪发光的效果与一个清楚的外套层上。
-
Create a new material, switch to the 创建一个新的材质,切换到Color 颜色 channel and define a color,
e.g., dark red.
定义一个颜色,例如,暗红色
-
Switch to the 切换到Reflectance 反射率 channel’s 频道Layer 图层 tab and
double-click on 选项卡和双击Default Specular 默认镜面 and rename it ,Metallic’. Set this layer’s
重命名为金属。设置这个层的Type 类型 to 到Beckmann 贝克曼.
-
We will add tiny metallic flakes to this layer. To do so, open the 我们将添加微小的金属片到这一层Bump Strength 撞击强度
setting’s menu (small black triangle) and set 设置菜单(小黑三角形)和设置Mode 模式 to 到Custom Bump Map 自定义凹凸贴图. Load a Noise shader into the 。加载噪声着色器到Custom
Texture 自定义纹理 field. Do not load a texture!
不要加载纹理
-
Very small 非常小Global Scale 全球规模 values in combination with the 值与Mod Noise 模拟噪音 type work best in the Noise shader. The metallic effect can be
enhanced by moderately increasing the 类型工作最好的噪音着色器。金属效果可以通过适当增加Low Clip 低剪辑 value.
价值
-
Switch back to the Reflectance channel’s 切换回反射通道Layer 图层 tab and set the 选项卡和设置Reflection Strength 反射强度 slider to a value of 滑块的值100%.
-
In the 在Layer Color 图层颜色 menu, define a color similar to that of the 菜单,定义一个类似的颜色Color 颜色 channel but slightly brighter. This completes the first layer.
通道,但稍微明亮。这完成了第一层
-
Click on the 点击Layer 图层 tab and 标签和Add … 加上.. a new 一个新的Beckmann 贝克曼 layer. Double-click on this layer’s name and rename it ,Clearcoat’.
双击这个图层的名字并重命名为 Clearcoat’
-
Switch to the 切换到Layer Fresnel 图层菲涅耳 menu and set 菜单和套餐Fresnel 菲涅耳 to
到Dielectric 电介质. Set 。设置Preset 预置 to 到Glass 玻璃. That’s it. If you now render your object (including an HDR image
placed on a Sky object), you will get the following result:
.就是这样。如果你现在渲染你的对象(包括放在天空对象上的 HDR 图像) ,你会得到以下结果:
 A metallic car lacquer that reflects its
environment. 一种反映环境的金属车漆
A metallic car lacquer that reflects its
environment. 一种反映环境的金属车漆
PBR Approach or Where are the color, bump and specular textures added?
PBR 方法或在哪里添加颜色,凹凸和镜面纹理?
PBR (Physically Based Lighting) is an approach for rendering as realistically as possible. PBR is not a fixed, unshakeable rule but an approach that is made up of a series of measures designed to achieve this, if possible.
PBR (物理基础照明)是一种尽可能真实地渲染的方法。PBR 不是一个固定的、不可动摇的规则,而是一个由一系列措施组成的方法,如果可能的话,这些措施旨在实现这一目标。
Note the following for Cinema 4D:
注意以下C4D:
- Use a PBR material (see 使用 PBR 材质(见New PBR Material 新型聚丁二烯橡胶材质 or a node-based material) that takes into consideration slight reflections of diffuse reflection elements (in reality, even objects that don’t have reflective properties can reflect to a certain degree). 或者基于节点的材质) ,考虑到漫反射元素的轻微反射(实际上,即使是没有反射属性的物体也可以在一定程度上反射)
- Use PBR lights (see 使用 PBR 灯(见PBR Light). These are area lights with area shadows and inverse square falloff. ).这些是带有区域阴影和逆平方衰减的区域灯光
- Use the camera’s PBR settings (located primarily in the 使用相机的 PBR 设置(主要位于Physical 身体上的 tab) with the Physical Renderer. 选项卡)与物理渲染器
- Set your scene to a realistic scale. If an object is 5m long in reality it should also be so in Cinema 4D. 把你的场景设置成一个真实的比例。如果一个物体在现实中有5米长,那么在C4D中也应该如此
- Consider using Tone Mapping to affect the allocation of light in the image instead of defining unrealistic values to lights. 考虑使用色调映射来影响图像中光线的分配,而不是定义对光线不切实际的值
纹理

Textures often have separate color, bump and specular maps. You have to differentiate between:
纹理通常有单独的颜色,凹凸贴图和镜面贴图。你必须区分:
- the physically correct 物理上是正确的PBR approach PBR 方法 (slower in conjunction with the Standard or Physical Renderers) (与标准渲染器或物理渲染器一起使用时速度较慢)
- the older 年长的Color channel workflow 彩色通道工作流程, which works with GI (e.g., in conjunction with the Stanard or Physical Renderers) ,它与 GI 协同工作(例如,与 Stanard 或 Physical renderer 协同工作)
The following applies to the PBR approach (in conjunction with  New PBR
Material
New PBR
Material
以下内容适用于 PBR 方法(与新的 PBR 材质一起使用) :
- The color texture belongs in the 颜色纹理属于Layer Color 图层颜色 sub-menu of the 的子菜单Reflectance 反射率 channel’s 频道Default Diffuse 默认扩散 menu. 菜单
- The bump texture belongs in the 凹凸纹理属于Bump 碰一下 material channel. 材质通道
- The specular texture belongs to the 镜面纹理属于Reflectance 反射率 channel’s 频道Default Reflection 默认反射 menu (in certain cases the specular texture might have to be inverted). 菜单(在某些情况下镜面纹理可能必须被反转)
The following applies to the Color channel workflow:
以下应用于颜色通道工作流程:
- The color texture belongs in the Color channel ( 颜色纹理属于颜色通道(Texture 纹理).
- The bump texture belongs in the 凹凸纹理属于Bump 碰一下 material channel. 材质通道
- Specular textures belong in the 镜面纹理属于Texture 纹理 field in the 字段Reflectance 反射率 channel’s 频道Layer Color 图层颜色 menu. 菜单
The Reflectance channel as GI Substitute for the Physical Renderer
反射通道作为物理渲染器的 GI 替代品
 No GI was used here. Nevertheless, the
reflected light dispersion and caustics rendered correctly. 这里没有使用 GI。然而,反射光色散和焦散渲染正确 No GI was used here. Nevertheless, the
reflected light dispersion and caustics rendered correctly. 这里没有使用 GI。然而,反射光色散和焦散渲染正确
|

|
As described above, the Reflectance channel does not work in conjunction with normal GI methods (see Global Illumination). However, if materials are only used together with the Reflectance channel (this only applies if the legacy Type settings are NOT used), this can serve as a GI substitute. You should also only use objects with luminous materials for lighting - this does not include an HDRI sky.
如上所述,反射通道不工作与正常的胃肠道方法(见全局光源)。但是,如果材质只与反射通道一起使用(这只适用于没有使用传统类型设置的情况) ,这可以作为 GI 的替代品。你也应该只使用发光材质的物体照明-这不包括一个 HDRI 天空。
If other objects’ Reflectance channels reflect these luminous objects in part in a diffuse manner (the Render Settings’ Refraction Strength more-or-less defines the GI sample depth) then you in principle have a type of global illumination. The quality or noise can be adjusted using the matte reflection’s settings (e.g., Blurriness Subdivision (Max) for the Physical Renderer).
如果其他物体的反射通道以漫反射的方式部分地反射这些发光物体(渲染设置的折射强度或多或少地定义了 GI 样品的深度) ,那么原则上你有一个类型的全局光源。质量或噪音可以调整使用哑光反射的设置(例如,模糊细分(最大)的物理渲染器)。
Render times are comparatively long when using this method. Light-based effects (e.g., Subsurface Scattering), of course, cannot be implemented so easily.
使用此方法渲染时间相对较长。当然,基于光的效果(例如,次表面散射)不能那么容易地实现。
图层排列
You need this setting in conjunction with the Take function (see the Take Manager). It can be overridden via right-click, which lets you change the layer arrangement for new Takes.
您需要将此设置与 Take 函数一起使用(请参阅 Take Manager)。可以通过右键单击重写它,这样可以更改 new Takes 的层次安排。
图层标签
This is where the reflective layers are listed for the currently selected Reflectance material. Each layer can be given a unique name, re-arranged within the
hierarchy (simultaneously pressing
这里列出了当前选定的反射材质的反射层。每一层都可以被赋予一个唯一的名字,在层次结构中重新排列(同时按下 Cmd/Ctrl 将复制该层) ,或者使用两种可用的混合模式之一将其效果与另一层结合起来。
Up to 16 layers can be created. When a new material is created, the Default Specular layer will be created by default, which corresponds to the pre-R16 Specular channel (a reflective layer can be added by clicking on the Add... button and selecting one of the 5 available types).
最多可以创建16个图层。当一个新的材质被创建时,默认的高光层将被创建,它对应于 pre-R16 Specular 通道(一个反射层可以通过点击 Add... 按钮并选择5种可用类型之一来添加)。
If the material channel’s Transparency channel is enabled, the *Transparency* layer will be displayed in the Reflectance channel’s Layer tab (for inner total reflexions, this layer controls the reflection settings for total reflexion).
如果材质通道的透明通道被启用,* 透明 * 层将显示在反射通道的层标签(对于内部总反射,该层控制总反射设置)。
How many layers are needed? As many as in the real world. For example, if you have an object with a metallic lacquer and a clearcoat. This material will need an anisotropic reflective layer that represents the metal surface as well as a slightly reflective layer for the clearcoat. These will be stacked as they would be in reality - from bottom to top:
需要多少层?在现实世界里,这样的事情多得是。例如,如果你有一个物体与金属漆和透明漆。这种材质将需要一个各向异性的反射层,代表金属表面,以及一个轻微的反射层的透明涂层。它们将按照实际情况——从底部到顶部——进行堆放:
 The 1st layer represents the brushed metal and the
2nd layer is the clearcoat. 第一层代表拉丝金属,第二层是清漆
The 1st layer represents the brushed metal and the
2nd layer is the clearcoat. 第一层代表拉丝金属,第二层是清漆
添加
Click on this button to add a new layer. A selection menu will appear from which you can select the desired Types. If you do not want to create anisotropic effects or weaved textiles, the Beckmann option should be selected. Please refer to the aforementioned link for details.
点击这个按钮添加一个新图层。将出现一个选择菜单,您可以从中选择所需的类型。如果您不想创建各向异性效果或编织纺织品,应选择贝克曼选项。详情请参阅上述连结。
移除
Click on this button to remove the currently selected layer from the list.
点击这个按钮从列表中删除当前选择的图层。
复制/粘贴
Use these buttons to copy and paste layers to the very top (also into a different material), including all of their settings.
使用这些按钮复制粘贴图层到最顶端(也可以粘贴到不同的材质中) ,包括它们的所有设置。
Right-clicking on a layer will open a context menu from which the following commands can be selected:
右键单击图层将打开一个上下文菜单,可以从中选择以下命令:
复本
Duplicates the selected layer and places it at the top of the list.
复制选定的图层,并将其放置在列表的顶部。
Click on the eye icon at the left of a given layer to turn it on or off. The layer’s name can be changed by double-clicking on it.
点击图层左侧的眼睛图标来打开或关闭它。层的名称可以改变双击它。
The selection menu at the right of the layer’s name lets you select between two modes:
图层名称右侧的选择菜单允许你在两种模式中选择:
- Normal 正常: Select this mode for all reflective layers. The slider at the right can be used to adjust the layer’s opacity. A value of : 为所有反射层选择此模式。右边的滑块可以用来调整图层的不透明度。的值100% will cover the underlying layer(s) completely. Exception: activated masks or Fresnels can let the underlying layer(s) show through. 会完全覆盖底层。例外: 激活的面具或 Fresnels 可以让底层显示通过
- Add 添加: Select this mode for layers that are solely specular (multiple specular highlights can be stacked additively). The slider at the right can be used to adjust the layer’s opacity. : 选择这种模式的图层,只有镜面(多个镜面高光可叠加)。右边的滑块可以用来调整图层的不透明度
Global Reflection Brightness[0..1000%]
全局反射亮度[0. . 1000% ]
Compared to the layer’s own Reflection Strength setting with which the reflection strength is defined per layer, the Global Reflection Brightness setting regulates the strength of the overall reflection. For example, if you create a complex combination of reflections, each with its own reflective strength and the overall reflection is too intense when rendered, this slider can be used to tone the reflection down without having to adjust individual reflection settings.
与层自身的反射强度设置相比,全局反射亮度设置可以调节整体反射强度。例如,如果你创建了一个复杂的反射组合,每个组合都有自己的反射强度,而且渲染时整体反射过于强烈,这个滑块可以用来调低反射,而不必调整个体的反射设置。
Global Specular Brightness[0..1000%]
全球镜面亮度[0. . 1000% ]
Just as the Global Reflection Brightness setting can be used to adjust or fine-tune a material’s overall reflection, the Global Specular Brightness setting can be used to do the same for the specular brightness.
正如全局反射亮度设置可以用来调整或微调材质的整体反射,全局反射亮度设置也可以用来调整镜面亮度。
独立通行证
This option is useful in combination with Multi-passes (see here). Enable this option if you want to output specific materials in separate passes.
此选项与 Multi-passes 结合使用非常有用(见此处)。如果您希望单独输出特定材质,请启用此选项。
线性色彩空间定位
First off: This option is only visible after a Project is loaded that was created using the Cinema 4D R16 release version. The option will then be disabled. The reason for this is that, due to a bug in the aforementioned version, textures in the Reflectance channel were not evaluated correctly (sRGB instead of linear). This is done automatically in the new version. This option ensures that old Project files render identically to the new files (the option is then disabled).
首先: 这个选项只有在使用 Cinema 4D R16版本创建的项目被加载后才可见。这个选项将被禁用。原因是,由于上述版本中的一个 bug,反射通道中的纹理没有被正确评估(sRGB 而不是线性)。这是在新版本中自动完成的。此选项确保旧的 Project 文件与新的文件呈现完全相同(然后禁用该选项)。
剩下的标签
预览
 Available preview types, which can be selected in
the 可用的预览类型,可以在Type 类型 menu. 菜单
Available preview types, which can be selected in
the 可用的预览类型,可以在Type 类型 menu. 菜单
The preview shows the effect of the defined settings on the currently selected layer. From left to right:
该预览显示了当前选定图层上定义的设置的效果。从左到右:
- Layer preview: displays the combined effect of a layer’s settings 图层预览: 显示图层设置的组合效果
- Falloff function the reflection and specular strength relative to the surface Normals (0°-90° to camera’s angle of view) Falloff 函数的反射和镜面强度相对于表面法线(0 °-90 ° 相对于相机的视角)
- Shows the anisotropic specular highlight distortion and direction. This and the next two previews will only be displayed if 显示各向异性的镜面高光失真和方向。只有在下列情况下才会显示此预览和下两个预览Type 类型 is set to 设置为Anisotropic 各向异性 and 及Primary + Secondary 小学 + 中学Scratches 划痕.
- Primary 小学Scratches 划痕
- Secondary 中学Scratches 划痕
- The defined cloth pattern with 定义的布料图案Type 类型 set to 开始Irawan (Woven Cloth) 伊拉万(编织布)
- Reflection falloff if 反射衰减如果Distance Dim 距离暗淡 is enabled 启用
类型
 The various 各种各样Type 类型
settings with different 设置不同的Roughness 粗糙度 values. The large, reflective object reflects a
HDRI sky, the depictions inset each show the specular highlights from two light sources. Both the diffuse and
the Irawan options produce a result very different from the rest because they do not allow Roughness to be
defined separately (exception: Oren-Nayer). 价值观。大,反射对象反映了一个 HDRI 天空,每个插图描述显示镜面高光从两个光源。漫反射和伊拉万选项产生一个非常不同的结果,因为他们不允许单独定义粗糙度(例外: 奥伦-纳耶尔)
The various 各种各样Type 类型
settings with different 设置不同的Roughness 粗糙度 values. The large, reflective object reflects a
HDRI sky, the depictions inset each show the specular highlights from two light sources. Both the diffuse and
the Irawan options produce a result very different from the rest because they do not allow Roughness to be
defined separately (exception: Oren-Nayer). 价值观。大,反射对象反映了一个 HDRI 天空,每个插图描述显示镜面高光从两个光源。漫反射和伊拉万选项产生一个非常不同的结果,因为他们不允许单独定义粗糙度(例外: 奥伦-纳耶尔)
The illumination examples displayed here show how light is dispersed relative to the angle of incidence and the angle of reflection (in principle, an empirical approach to ascertainable BRDF functions).
这里展示的照明实例显示了光线相对于波动角度和反射角是如何分散的(原则上,这是一种确定 BRDF 函数的经验方法)。
 These modifiable types apply only to matte
reflections. 这些可修改类型仅适用于哑光反射
These modifiable types apply only to matte
reflections. 这些可修改类型仅适用于哑光反射
Dispersion of light is a product of matte reflections. These types have no effect on surfaces with perfect reflections (Roughness set to 0%).
光的散射是无光泽反射的产物。这些类型对具有完美反射的表面没有影响(粗糙度设置为0%)。
The subject of the following text will not be the theory behind each type because this would require going into far too much mathematical detail. We’ll keep the explanation brief:
下面文字的主题不会是每种类型背后的理论,因为这将需要进入太多的数学细节。我们将保持简短的解释:

- Beckmann 贝克曼, GGX 女名女子名, Phong 女名女子名, Ward 病房: These types are functions that only differ in the manner with which they uniformly weaken reflections from the ideal reflection angle (= angle of incidence). This can occur slower/faster or stronger/weaker. Basically only variations of Type a and b shown above. If you take a look at the different depictions you will see that the differences are only very slight. : 这些类型的函数只是不同的方式,他们一致削弱反射从理想的角度(= 波动角度)。这可能发生的更慢/更快或更强/更弱。基本上只有 a 型和 b 型的变种。如果你看看这些不同的描述,你会发现它们之间的差别很小 Beckmann 贝克曼 is a physically correct and fast type and should therefore be the preferred method for normal use. 是一种物理上正确和快速的类型,因此应该是正常使用的首选方法GGX 女名女子名 produces the greatest dispersion and works best for simulating metal surfaces (see top depiction, 2nd row, 2nd column): a bright specular highlight with diminishing brightness. 产生最大的色散,最适合模拟金属表面(见上图,第2行,第2列) : 明亮的镜面高光,但亮度逐渐减弱Ward 病房 is best suited for soft surfaces such as rubber or skin. 是最适合软表面,如橡胶或皮肤
 The four most important types shown on a real-world
reflective model (© Eric Smit) with 60% Roughness. 四个最重要的类型显示在一个真实世界的反射模型(埃里克 Smit)60% 的粗糙度
The four most important types shown on a real-world
reflective model (© Eric Smit) with 60% Roughness. 四个最重要的类型显示在一个真实世界的反射模型(埃里克 Smit)60% 的粗糙度
- Anisotropic 各向异性 bends the reflected bundle of rays in certain directions, which produces a distortion of the reflection, as with brushed or scratched metal, for example. 将反射的一束光线向某些方向弯曲,从而产生反射的变形,例如用有刷或刮痕的金属
- Reflection (Legacy), Specular Blinn/Phong (Legacy) 反射(遗产) ,镜面闪光灯/凤(遗产): These three are only available for reasons of compatibility if an older Project file is loaded. It is recommended that a different mode be used that works physically correct. Specular highlights can be adjusted freely (without having to take roughness into consideration) if : 只有在加载旧的项目文件时,出于兼容性原因,这三个文件才可用。建议使用不同的模式,以便在物理上正确地工作。镜面高光可以自由调整(不必考虑粗糙度) ,如果Specular Blinn/Phong (Legacy) is selected. 被选中
- Lambertian (Diffuse), Oren-Nayer (Diffuse) 兰伯特(漫反射) ,奥伦-纳耶(漫反射): These modes are somewhat different in that they are diffuse models (i.e., ,perfect’ matte reflections). They produce a result similar to the material channel Color (which doesn’t reflect). These channels should be used with caution (they can’t be cached by GI’s Irradiance Cache). Normally, the Color channel should be used instead, also because it simply renders faster. : 这些模式有些不同,因为它们是漫反射模式(即,完美的“哑光反射”)。他们产生的结果类似于材质通道颜色(这并不反映)。这些通道应该谨慎使用(它们不能被 GI 的 Irradiance Cache 缓存)。通常情况下,应该使用颜色通道,也因为它只是简单地呈现更快
- Irwan (Woven Cloth) 伊尔万(编织布) is a type of special anisotropy that contains several cloth patterns internally that can be used to create realistic-looking cloth surfaces. 是一种特殊的各向异性,其内部包含几种布料图案,可用于创建逼真的布料表面
衰减
 The sphere material has a red-and-white striped
Color channel and is and has a Reflectance channel with its Layer Color set to
blue.
The sphere material has a red-and-white striped
Color channel and is and has a Reflectance channel with its Layer Color set to
blue.
The options in this menu are designed to be used in conjunction with the material channel Color:
这个菜单中的选项被设计用于与材质通道颜色:
These options define how the Color channel should be mixed with the layer color (sub-menu Layer Color) with various Reflection Strength settings. If the Color channel is disabled, these settings will have no effect! Note also that if an older specular type is selected, which is made available only for reasons of compatibility, only those modes available for older Cinema 4D versions will be made available (Additive and Metal).
这些选项定义了颜色通道应该如何与各种反射强度设置的图层颜色(子菜单层颜色)混合。如果颜色通道被禁用,这些设置将没有任何效果!还要注意的是,如果选择了一个较老的镜面类型,只有出于兼容性的原因,只有那些模式可用于老的C4D 版本将提供(添加剂和金属)。
In the real world, the Color channel’s effect weakens as the surface’s reflectivity increases, which is something that the Additive mode ignores completely.
在现实世界中,彩色通道效果随着表面反射率的增加而减弱,而加法模式完全忽略了这一点。
- Average: Both colors will be averaged (reflects the previous Additive option when disabled (pre-R15)). This mode does not differ from the next mode, Maximum, if no color is defined in the Color setting (sub-menu: Layer Color). This mode produces the most realistic-looking results.
- Maximum: This mode is best suited for creating colored reflections: The Color channel’s effect will be reduced and the color defined below will dominate.
- Additive: Both colors will be added (not physically correct; the Color channel must be darkened manually).
- Metal: Only available for reasons of compatibility if an older Project is loaded (in older versions of Cinema 4D, this mode could be found in the Specular channel’s Mode setting and it used the color defined in the Color channel to color the specular highlight).
粗糙度[0. . 200% ]
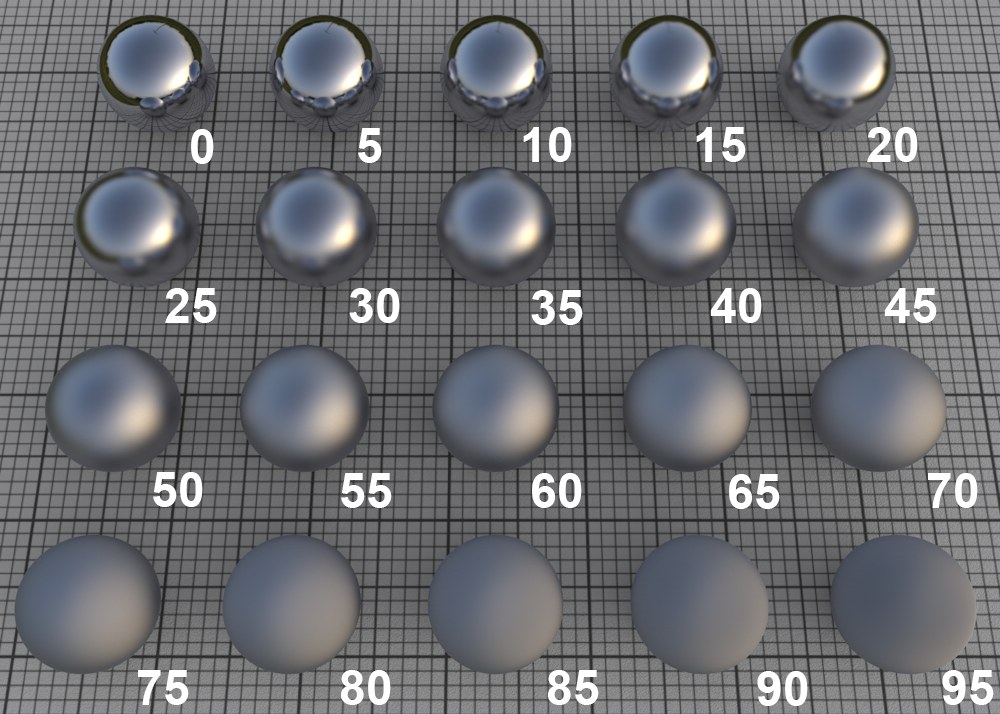 Various Roughness
values that increase in steps of 5.
Various Roughness
values that increase in steps of 5.
In the real world, surfaces are made up of an innumerable number of microscopic reflective facets, each with a different orientation, which, when viewed from a distance, produce a specular highlight or reflection.
在现实世界中,表面是由无数个微观的反射面组成的,每个面都有不同的方向,从远处观察,会产生镜面高光或反射。
A perfectly polished (reflective) surface is made up of facets with the same orientation. The rougher a surface is, the more random the orientation of these micro facets is, which produces a correspondingly more spread out and duller specular highlight. A roughness of 100% is referred to as a Lambertian material (see depiction above). This type of surface reflects light in a circular dispersion in all directions, which constitutes a perfect diffuse material. This is exactly what is defined in the material channel Color: a diffuse material’s color without reflective properties. You can even ignore the Color channel completely and use the layer color to control the diffuse material color (which, however, takes longer to render).
一个完美的抛光(反射)表面是由具有相同方向的面组成的。表面越粗糙,这些微小面的方向就越随机,这样就会产生相应的更加分散和暗淡的镜面高光。100% 的粗糙度被称为朗伯材质(见上面的描述)。这种类型的表面反射光在各个方向的圆形色散,这构成了一个完美的漫射材质。这正是在材质通道颜色中定义的: 没有反射特性的漫反射材质的颜色。你甚至可以完全忽略颜色通道,使用图层颜色来控制漫反射材质颜色(然而,这需要更长的渲染时间)。
Note that the render time will increase accordingly with increasing roughness because reflections from a correspondingly wider range of reflections must be included.
请注意,渲染时间将随着粗糙度的增加而相应增加,因为来自相应范围更广的反射必须包括在内。
Tip:A Roughness value of greater then 0% is required for the calculation of specular highlights and anisotropy.
纹理
 Matte reflections can be controlled using
textures.
Matte reflections can be controlled using
textures.
The Texture setting can be used to apply the previously described setting to an entire texture. The grayscale values of the texture loaded here control the setting as follows: white represents the setting’s full value and black = 0. In-between gray values have a corresponding effect.
纹理设置可用于将前面描述的设置应用于整个纹理。这里加载的纹理的灰度值控制设置如下: 白色表示设置的完整值,黑色 = 0。在灰度值之间有相应的影响。
Anisotropic (see below) can be used to reduce the randomness of the orientation of the micro facets.
各向异性(见下文)可以用来减少微小方面方向的随机性。
Reflection Strength[0..10000%]
反射强度[0. . 1万% ]
This setting defines the strength with which the material should reflect. The Attenuation setting above defines how this setting should work in conjunction with the material channel Color.
这个设置定义了材质反射的强度。上面的衰减设置定义了这个设置应该如何与材质通道颜色一起工作。
Generally speaking, the intensity of the material’s color should subside accordingly as the strength of the reflection increases (which occurs for all modes with the exception of Additive). This effect is also known as energy conservation.
一般来说,材质的颜色的强度应该随着反射强度的增加而相应减弱(除了添加剂之外,所有的模式都会出现这种情况)。这种效果也被称为能量守恒。
If this value is set to 0%, the material will not reflect at all; a value of 100% will produce the maximum amount of reflection. Every material in the real world reflects to some degree, even if it is very minor. Keep this in mind when creating highly realistic textures.
如果这个值设置为0% ,材质将根本不会反射; 100% 的值将产生最大反射量。现实世界中的每一种材质都在某种程度上有所反映,即使是很小的反映。在创建高度真实的纹理时,请记住这一点。
Tip:Note that the combined reflective strength of multiple reflective layers can be adjusted together using the Global Reflection Brightness slider in the Layers tab.
纹理
The Texture setting can be used to apply the previously described setting to an entire texture. The grayscale values of the texture loaded here control the setting as follows: white represents the setting’s full value and black = 0. In-between gray values have a corresponding effect.
纹理设置可用于将前面描述的设置应用于整个纹理。这里加载的纹理的灰度值控制设置如下: 白色表示设置的完整值,黑色 = 0。在灰度值之间有相应的影响。
彩色的
If this option is enabled, the Color defined in the material channel Color will be used as the reflection color (which is normally defined by the Color setting in the Layers Color sub-menu).
如果启用此选项,材质通道 Color 中定义的 Color 将被用作反射颜色(通常由 Layers Color 子菜单中的 Color 设置定义)。
镜面强度[0. . 10000% ]
This value defines the strength of the specular highlight. The use of specular highlights is a (simplified and much faster to render) trick to add reflections to materials without noticeably increasing render time. In the real world, specular highlights are nothing more than light sources reflected in objects’ surfaces. If you want to create a photo-realistic scene, set this value to 0 and use the Reflection Strength setting instead.
这个值决定了镜面高光的实力。镜面高光的使用是一种(简化的和更快的渲染)技巧,可以在不显著增加渲染时间的情况下向材质中添加反射。在现实世界中,镜面高光不过是物体表面反射的光源。如果你想创建一个真实的场景,将这个值设置为0并使用反射强度设置。
The size and appearance of specular highlights (with the exception of Type = Specular Blinn/Phong (Legacy)) depends on the Type, Roughness - this must be set to a value greater than 0% for most modes - and in some cases the anisotropic settings. This is different from pre-R16 versions of Cinema 4D, which let you make physically incorrect adjustments to the specular highlight’s height and width. This can, however, still be done, if necessary, if Type is set to Specular Blinn/Phong (Legacy).
镜面高光的大小和外观(除了 Type = Specular Blinn/Phong (Legacy))取决于类型,粗糙度——对于大多数模式这个值必须设置为大于0% ——在某些情况下还取决于各向异性设置。这不同于之前 r16版本的 Cinema 4D,后者允许你对镜面高光的高度和宽度进行不正确的物理调整。然而,如果必要的话,如果 Type 被设置为 Specular Blinn/Phong (Legacy) ,仍然可以这样做。
Each light source in a given Project generates specular highlights. Note that specular highlights are only generated by real Cinema 4D light sources - as well as by Area lights (however, these differ in size and other aspects from real, reflected Area lights):
给定项目中的每个光源都会产生高光。请注意,高光只能由真正的Cinema 4D 光源产生,也可以由区域光源产生(然而,这些光源的大小和其他方面与真实的、反射的区域光源不同) :
 3 Area lights are reflected in the
floor.
3 Area lights are reflected in the
floor.
Note how the small Area light is rendered far too large, making it look unrealistic. Note in conjunction with this both light source options Show in Specular and Show in Reflection, which can be defined individually for each light.
注意小面积的光线渲染得太大,使它看起来不现实。请注意,这两个光源选项显示在镜面和显示在反射,这可以单独定义为每个光。
See Typ for example images that show the effect of different Type and Roughness settings.
参见 Typ 的例子图像,显示不同的类型和粗糙度设置的效果。
Tip:Note that the combined specular highlight strength of multiple reflective layers can be adjusted together using the Global Specular Brightness slider in the Layers tab.
纹理
The Texture setting can be used to apply the previously described setting to an entire texture. The grayscale values of the texture loaded here control the setting as follows: white represents the setting’s full value and black = 0. In-between gray values have a corresponding effect.
纹理设置可用于将前面描述的设置应用于整个纹理。这里加载的纹理的灰度值控制设置如下: 白色表示设置的完整值,黑色 = 0。在灰度值之间有相应的影响。
彩色的
If this option is enabled, the Color defined in the material channel Color will be used as the specular highlight color (which is normally defined by the Color setting in the Layers Color sub-menu).
如果启用此选项,材质通道颜色中定义的颜色将被用作镜面高光颜色(通常由图层颜色子菜单中的颜色设置定义)。
Cinema 4D specular highlight settings
C4D 镜面高光设置
The following 3 settings apply only to Specular Blinn/Phong (Legacy):
以下3项设置只适用于 Specular Blinn/Phong (Legacy) :
宽度[0. . 100% ]纹理
Use these settings to define width of the specular highlight. Larger widths should be used for matte surfaces (for less specular strength). Polished and shiny surfaces should have very small widths (for greater specular strength).
使用这些设置来定义镜面高光宽度。磨砂表面应该使用更大的宽度(镜面强度较低)。抛光和有光泽的表面应该有非常小的宽度(为了更大的镜面强度)。
The Texture setting can be used to apply the previously described setting to an entire texture. The grayscale values of the texture loaded here control the setting as follows: white represents the setting’s full value and black = 0. In-between gray values have a corresponding effect.
纹理设置可用于将前面描述的设置应用于整个纹理。这里加载的纹理的灰度值控制设置如下: 白色表示设置的完整值,黑色 = 0。在灰度值之间有相应的影响。
脱落[-100. . 100% ]纹理
The Falloff value defines the curve of the specular highlight - anything from pinpoint to bell-shaped or rectangular shapes can be created.
Falloff 值定义了镜面高光的曲线-任何形状,从精确到钟形或矩形都可以创建。
The Texture setting can be used to apply the previously described setting to an entire texture. The grayscale values of the texture loaded here control the setting as follows: white represents the setting’s full value and black = 0. In-between gray values have a corresponding effect.
纹理设置可用于将前面描述的设置应用于整个纹理。这里加载的纹理的灰度值控制设置如下: 白色表示设置的完整值,黑色 = 0。在灰度值之间有相应的影响。
内部宽度[0. . 100% ]纹理
This value defines the specular highlight’s inner region, which is not affected by abatement of brightness.
这个值定义了镜面高光的内部区域,它不受亮度减弱的影响。
The Texture setting can be used to apply the previously described setting to an entire texture. The grayscale values of the texture loaded here control the setting as follows: white represents the setting’s full value and black = 0. In-between gray values have a corresponding effect.
纹理设置可用于将前面描述的设置应用于整个纹理。这里加载的纹理的灰度值控制设置如下: 白色表示设置的完整值,黑色 = 0。在灰度值之间有相应的影响。
凹凸/正常通道
 The metallic glitter and the scratches were each
created using separate Noise shaders in both reflection layers.
The metallic glitter and the scratches were each
created using separate Noise shaders in both reflection layers.
Each reflection layer has its own, autonomous Bump and Normal channel (as such, they function exactly like the material channels of the same name).
每个反射层都有自己的、自主的 Bump 和 Normal 通道(因此,它们的功能完全类似于同名的材质通道)。
A very common use for layer-specific Bump channels is for glitter in metallic car lacquer. The reflective particles are simulated using a very small NoiseTexture.
一个非常常见的用途层特定的凹凸通道是为金属车漆闪光。反射粒子被模拟使用一个非常小的噪声图像。
撞击强度[0. . 100% ]
Use this slider to adjust the strength of the bump effect. If set to 0%, the effect will be disabled; 100% is the maximum effect. This slider can be used to adjust the Bump effect as well as for Normals.
使用这个滑块来调整凸起效果的强度。如果设置为0% ,效果将被禁用; 100% 是最大效果。这个滑块可以用来调整凹凸效果以及法线。
Each layer channel has its own Strength slider but they work differently (for example, the Bump slider also allows negative values).
每个图层通道都有自己的强度滑块,但它们的工作方式不同(例如,凹凸滑块也允许负值)。
纹理
The Texture setting can be used to apply the previously described setting to an entire texture. The grayscale values of the texture loaded here control the setting as follows: white represents the setting’s full value and black = 0. In-between gray values have a corresponding effect.
纹理设置可用于将前面描述的设置应用于整个纹理。这里加载的纹理的灰度值控制设置如下: 白色表示设置的完整值,黑色 = 0。在灰度值之间有相应的影响。
模式
违约
This setting defines the type of Bump or Normal channel that should be used (no specific reflection layer channels).
此设置定义了应该使用的 Bump 或 Normal 通道的类型(没有特定的反射层通道)。
自定义凹凸贴图
Select this mode if you want to use a custom bump map. Load it into the Custom Texture field. You can also load a normal map (using the next option; this can also be a bump map in a Normalizer shader) for better results.
如果要使用自定义凹凸贴图,请选择此模式。加载到自定义纹理字段。您还可以加载一个法线贴图(使用下一个选项; 这也可以是一个凹凸贴图在规范化着色器) ,以获得更好的结果。
自定义法线地图
Select this mode if you want to use a custom normal map. Load it into the Custom Texture field.
如果要使用自定义法线贴图,请选择此模式。将其加载到自定义纹理字段中。
自定义纹理
Load your custom bump or normals map into this field.
载入您的自定义凹凸或法线地图到这个领域。
Strength[-10000..10000%]
Strength[0..10000%]
力量[-10000. . 10000% ]力量[0. . 10000% ]
Use this value to define the strength of the bump/normal mapping. Details can be found under Strength (bump) and Strength (normals).
使用此值定义凹凸/法线贴图的强度。细节可以在强度(碰撞)和强度(法线)下找到。
按揭保险计划
Enabling this option will reduce the bump mapping the farther away it is from the camera (see also MIP Falloff).
启用此选项将减少凹凸贴图离相机越远(参见 MIP Falloff)。
方法
Use this setting to define the coordinate system for the Normals map. Details can be found under Method.
使用此设置为法线映射定义坐标系。详细信息可在方法下找到。
Flip X (Red)
Flip Y (Green)
Flip Z (Blue)
Swap Y & Z (Y up)
翻转 x (红色)翻转 y (绿色)翻转 z (蓝色)交换 y & z (y 向上)
Use these settings to define which axis should have which color. Details can be found under Flip X (Red).
使用这些设置来定义哪个轴应该有哪种颜色。详细信息可以在 Flip x (红色)下找到。
图层颜色
 The textures from the Layer Color menu. White
produces total reflection, black shows the Color channel’s color.
The textures from the Layer Color menu. White
produces total reflection, black shows the Color channel’s color.
This menu’s settings serve as a type of color filter for the reflections. The layer color and the color from the material’s Color channel will be added. This method lets you use a black-and-white texture to define where reflections should take place (white=yes; black=no).
这个菜单的设置可以作为一种反射的颜色过滤器。层的颜色和颜色从材质的颜色通道将被添加。这个方法允许您使用黑白纹理来定义反射应该发生在哪里(白色 = yes; 黑色 = no)。
This is also the color you should use if you want to create colored metal surfaces.
这也是你应该使用的颜色,如果你想创建有色金属表面。
颜色
This defines the layer filter color. The default color is white, which allow reflections without having to modify the color.
这定义了图层过滤器的颜色。默认的颜色是白色,允许反射而不需要修改颜色。
亮度[0. . 1万% ]
Use this setting to adjust the brightness of a channel’s color. The Brightness setting functions somewhat like a multiplier and can be set to greater than 100%.
使用此设置可调整通道颜色的亮度。亮度设置功能有点像一个倍增器,可以设置为大于100% 。
纹理
Here an image texture or a 2D shader can be defined. Refer to the Textures chapter for details.
这里可以定义一个图像纹理或二维着色器。详细信息请参阅纹理章节。
混合模式
Use these parameters to mix the color and texture panes using one of four modes. The default mode for all channels is Normal, except for the Environment page, which uses Multiply as the default mode. Not all channels have Mix settings. If you load a texture or a 2D shader, it is placed on a layer above the color (i.e. the texture is placed on top of the color).
使用这些参数可以使用四种模式之一混合颜色和纹理窗格。除了使用 Multiply 作为默认模式的 Environment 页外,所有通道的默认模式都是 Normal。并非所有通道都有 Mix 设置。如果你加载一个纹理或二维着色器,它被放置在颜色之上的一层(即纹理放置在颜色之上)。
混合强度[0. . 100% ]
Mix Strength defines the mixing proportion between the texture and color panes or between the brightness and transparency (depending on which mode is selected) of the texture to be mixed.
混合强度定义了纹理和颜色窗格之间的混合比例,或者纹理的亮度和透明度之间的混合比例(取决于选择哪种模式)。
图层蒙版
 The textures from the Layer Mask menu with 2
different reflection layers. White allows the entire layer to be shown, black masks it.
The textures from the Layer Mask menu with 2
different reflection layers. White allows the entire layer to be shown, black masks it.
This menu’s settings can be used to create an alpha channel for a layer that defines the visibility of the layer beneath it. White will not hide anything, black hides all, grayscale values hide accordingly.
这个菜单的设置可以用来创建一个阿尔法通道的一个层,定义其下面的层的可见性。白色不会隐藏任何东西,黑色隐藏所有,灰度值相应隐藏。
金额[0.100% ]
Use this setting to adjust the brightness of a channel’s color. The Brightness setting functions somewhat like a multiplier and can be set to greater than 100%.
使用此设置可调整通道颜色的亮度。亮度设置功能有点像一个倍增器,可以设置为大于100% 。
颜色
This setting is used to define the color of the alpha. The default color is white, which allow reflections without having to modify the color.
此设置用于定义 alpha 的颜色。默认颜色是白色,允许反射而不需要修改颜色。
纹理
Here an image texture or a 2D shader can be defined. Refer to the Textures chapter for details.
这里可以定义一个图像纹理或二维着色器。详细信息请参阅纹理章节。
混合模式
Use these parameters to mix the color and texture panes using one of four modes. The default mode for all channels is Normal, except for the Environment page, which uses Multiply as the default mode. Not all channels have Mix settings. If you load a texture or a 2D shader, it is placed on a layer above the color (i.e. the texture is placed on top of the color).
使用这些参数可以使用四种模式之一混合颜色和纹理窗格。除了使用 Multiply 作为默认模式的 Environment 页外,所有通道的默认模式都是 Normal。并非所有通道都有 Mix 设置。如果你加载一个纹理或二维着色器,它被放置在颜色之上的一层(即纹理放置在颜色之上)。
混合强度[0. . 100% ]
Mix Strength defines the mixing proportion between the texture and color panes or between the brightness and transparency (depending on which mode is selected) of the texture to be mixed.
混合强度定义了纹理和颜色窗格之间的混合比例,或者纹理的亮度和透明度之间的混合比例(取决于选择哪种模式)。
层的各向异性
 Left: no anisotropy; right; anisotropy with various
Roughness settings. A HDR image placed on a Sky object is used to create the
reflections.
Left: no anisotropy; right; anisotropy with various
Roughness settings. A HDR image placed on a Sky object is used to create the
reflections.
Anisotropic effects are produced when many fine microscopic scratches are oriented in a specific direction on an object’s surface (as is the case with brushed metal, for example). Specular highlights and reflections will then be "dragged” in the direction of these scratches. In addition to microscopic scratches, larger ridges can also be created in the direction of the scratches.
各向异性效果产生时,许多精细的微观划痕是定向在一个特定的方向上的对象的表面(例如是情况下,与拉丝金属)。镜面高光和反射然后将“拖动”在这些划痕的方向。除了微小的刮痕,在刮痕的方向上也可以形成较大的脊状突起。
To create an anisotropic effect, set Type to Anisotropic, Roughness and Anisotropy to a value greater than 0%. Also make sure that there is enough present in the environment to reflect. HDRI textures on a Sky object are well-suited for this. In case you’re wondering how the Anisotropic pattern is projected onto an object: this process follows the normal rules of projection. As a test, set Scratches to Primary - a corresponding preview will be displayed at the top of the Material Editor. Imagine this preview being projected as a texture.
创建一个各向异性的效果,设置类型为 Anisotropic,粗糙度和各向异性值大于0% 。还要确保在环境中有足够的存在来反映。天空对象上的 HDRI 纹理非常适合这种情况。如果您想知道各向异性模式是如何投射到对象上的: 这个过程遵循正常的投射规则。作为一个测试,设置抓痕为主-相应的预览将显示在材质编辑器的顶部。想象一下这个预览被投影为一个纹理。
重新投射
 Radial only for
the disc. Different materials for the cylinder heads and sides (Planar and Radial).
Radial only for
the disc. Different materials for the cylinder heads and sides (Planar and Radial).
The scratches’ vector tangents, that define the scratch direction internally, can be projected onto an object in one of two ways:
这些划痕的矢量切线,定义了划痕的内部方向,可以通过以下两种方式之一投射到物体上:
- None: Vectors will be projected onto the object without modification
- Planar: Vectors will be scaled, rotated and moved
- Radial: Vectors will be curved circularly, e.g., to simulate the look of the disc in the image above. An image can be loaded into the Pattern field, Offset values can be increased and Count can be varied to create all kinds of interesting spiral/symmetrical effects but the effect in the example above can only be created without using the Pattern setting.
比例[0. . 10000% ]
This value defines the size of the Pattern or Scratches selected.
这个值定义选择的模式或擦痕的大小。
角度[0.5729.578 ° ]
This setting is used to rotate the anisotropic microscopic scratches (and, if defined, the parallel ridges). The rotational axis is defined by the Offset U/V values.
这个设置用于旋转各向异性的微观划痕(以及,如果定义,平行的脊)。旋转轴由偏移量 U/V 值定义。
Offset U[-1000..1000%]
Offset V[-1000..1000%]
补偿 u [-1000. . 1000% ]补偿 v [-1000. . 1000% ]
These settings are used to move the Pattern/Scratches in the U and V directions, respectively. For the effect on the disc in the image above, both values were set to 50%, which means that the rotational axis lies at the center of the circular scratches.
这些设置分别用于在 u 和 v 方向上移动模式/划痕。对于上图中光盘的效果,两个值都设置为50% ,这意味着旋转轴位于圆形划痕的中心。
伯爵
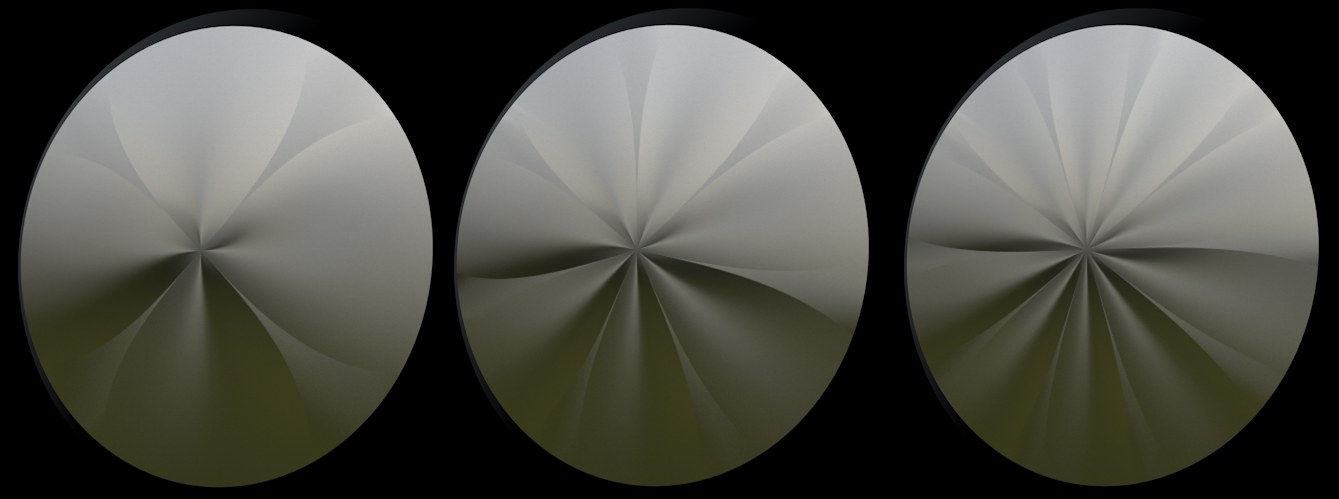 Increasing Count
values from left to right.
Increasing Count
values from left to right.
When applying this setting, a Pattern should be selected first. The Count value then defines the number of ‘threads’ that converge at the center defined by the Offset U/V settings.
当应用此设置时,应该首先选择一个 Pattern。然后,Count 值定义在由 Offset U/V 设置定义的中心收敛的“线程”数量。
模式
This setting can be used to create common anisotropic materials such as carbon, brushed metal, etc. In addition, textures can be used to create numerous other patterns.
这种设置可以用来制造常见的各向异性材质,如碳,拉丝金属等。此外,纹理还可以用来创建许多其他的图案。
没有
Linear scratches whose orientation will remain constant will be created.
将创建定向保持不变的线性划痕。
Circular
Box
Diagonal
Lattice
Custom
循环盒对角点阵定制
 From left to right: None, Circular, Box, Diagonal,
Lattice, Custom.
From left to right: None, Circular, Box, Diagonal,
Lattice, Custom.
Lattice and Box are well-suited for creating carbon fiber surfaces:
格子和 Box 非常适合用来制造碳纤维表面:
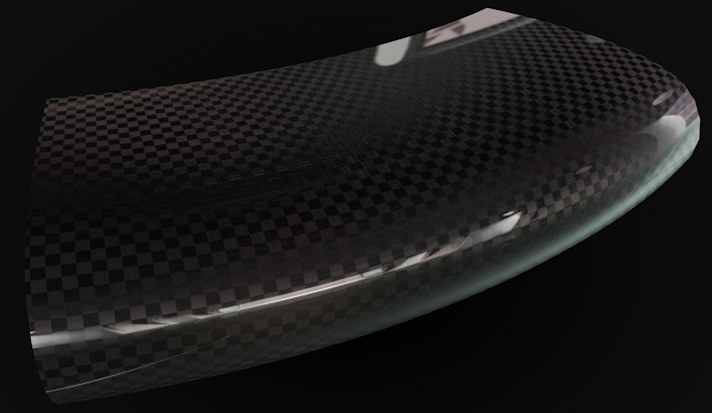 The fitting pattern can be used to create a carbon
fiber material. Here, an additional reflective layer was added to the anisotropy layer.
The fitting pattern can be used to create a carbon
fiber material. Here, an additional reflective layer was added to the anisotropy layer.
Max Angle[0..5729.578°]
Texture
最大角度[0.5729.578 ° ]纹理
 The texture on the left produces the scratch
pattern on the right (Max Angle set to 90°).
The texture on the left produces the scratch
pattern on the right (Max Angle set to 90°).
Instead of using a default pattern, you can also use a custom pattern. To do so, create a black texture with a white pattern on it.
除了使用默认模式,您还可以使用自定义模式。要做到这一点,创建一个白色图案的黑色纹理。
Grayscale values will also be evaluated, whereby Max Angle will represent the scratches’ angle at white regions. Note that you will not see the difference if a scratch is rotated 180°.
灰度值也将被评估,最大角度将代表在白色区域的划痕的角度。请注意,如果将划痕旋转180 ° ,您将看不到区别。
镜子
This setting offers options that let you mirror the Pattern in the U and or V directions (with the exception of Custom patterns).
这个设置提供了一些选项,让您可以在 u 或 v 方向上镜像模式(自定义模式除外)。
划痕
 Primary and secondary scratches in Planar and Radial modes.
Besides anisotropic microscopic scratches that can uniformly deform specular highlights/reflections, additional, even larger ridges can also be defined. There are primary ridges that run parallel to the microscopic scratches and secondary ridges (these make less sense in conjunction with Re-projectionRadial) that run in a perpendicular direction. Both ridge types can be applied simultaneously, as shown at the top right of the image above.
除了各向异性的微观划痕,可以均匀变形镜面高光/反射,额外的,甚至更大的脊也可以定义。有一些初级脊平行于微观的划痕和次级脊(这些与重新射线径向平行) ,垂直于一个方向。两种脊线类型可以同时应用,如上图右上角所示。
各向异性[0. . 100% ]纹理
Use this value to define the over strength of the anisotropy effect. A value of 0% will disable the effect.
使用这个值来定义各向异性效果的过度强度。0% 的值将禁用该效果。
The Texture setting can be used to apply the previously described setting to an entire texture. The grayscale values of the texture loaded here control the setting as follows: white represents the setting’s full value and black = 0. In-between gray values have a corresponding effect.
纹理设置可用于将前面描述的设置应用于整个纹理。这里加载的纹理的灰度值控制设置如下: 白色表示设置的完整值,黑色 = 0。在灰度值之间有相应的影响。
Orientation[0..5729.578°]
Texture
方向[0.5729.578 ° ]纹理
 Various Orientation
values. Note the changes at the marked locations.
Various Orientation
values. Note the changes at the marked locations.
This setting is a little more difficult to comprehend than the others. It regulates a property that does not actually exist in the real world: it rotates the vector tangent scratches mentioned above. What effect does this have? It changes the reflective behavior. This makes it possible to fine-tune the anisotropy effect without having to change the position of the light source.
这种设置比其他设置要难理解一些。它规定了一个实际上并不存在于现实世界中的属性: 它旋转上面提到的矢量切线划痕。这会有什么影响?它改变了反思的行为。这使得在不改变光源位置的情况下微调各向异性效果成为可能。
The Texture setting can be used to apply the previously described setting to an entire texture. The grayscale values of the texture loaded here control the setting as follows: white represents the setting’s full value and black = 0. In-between gray values have a corresponding effect.
纹理设置可用于将前面描述的设置应用于整个纹理。这里加载的纹理的灰度值控制设置如下: 白色表示设置的完整值,黑色 = 0。在灰度值之间有相应的影响。
Primary Amplitude[0..10000%]
Secondary Amplitude[0..10000%]
Texture
Texture
主幅度[0. . 10000% ]次幅度[0. . 10000% ]纹理
 Small and large values for amplitude, scale and
length.
Small and large values for amplitude, scale and
length.
These values are used to define the ridge depth. Note that you can also enter values in excess of 100% to create very deep ridges.
这些值用于定义脊深。请注意,您还可以输入超过100% 的值来创建非常深的山脊。
The Texture setting can be used to apply the previously described setting to an entire texture. The grayscale values of the texture loaded here control the setting as follows: white represents the setting’s full value and black = 0. In-between gray values have a corresponding effect.
纹理设置可用于将前面描述的设置应用于整个纹理。这里加载的纹理的灰度值控制设置如下: 白色表示设置的完整值,黑色 = 0。在灰度值之间有相应的影响。
Primary Scale[0..10000%]
Secondary Scale[0..10000%]
Texture
Texture
初级尺度[0.10000% ]次级尺度[0.10000% ]纹理纹理
These settings are used to define the ridge width.
这些设置用于定义脊线宽度。
The Texture setting can be used to apply the previously described setting to an entire texture. The grayscale values of the texture loaded here control the setting as follows: white represents the setting’s full value and black = 0. In-between gray values have a corresponding effect.
纹理设置可用于将前面描述的设置应用于整个纹理。这里加载的纹理的灰度值控制设置如下: 白色表示设置的完整值,黑色 = 0。在灰度值之间有相应的影响。
Primary Length[0..10000%]
Secondary Length[0..10000%]
Texture
Texture
主长度[0. . 10000% ]次长度[0. . 10000% ]纹理
These values are used to define the ridge length. Very high values lead to concentric (radial) or long ridges with a uniform depth (Planar), very small values lead to very short ridges.
这些值用于定义脊长度。非常高的值导致同心(辐射)或长的脊具有均匀的深度(平面) ,非常小的值导致非常短的脊。
The Texture setting can be used to apply the previously described setting to an entire texture. The grayscale values of the texture loaded here control the setting as follows: white represents the setting’s full value and black = 0. In-between gray values have a corresponding effect.
纹理设置可用于将前面描述的设置应用于整个纹理。这里加载的纹理的灰度值控制设置如下: 白色表示设置的完整值,黑色 = 0。在灰度值之间有相应的影响。
Primary Attenuation[0..10000%]
Secondary Attenuation[0..10000%]
Texture
Texture
初级衰减[0. . 10000% ]次级衰减[0. . 10000% ]纹理
These settings are similar to MIP Mapping for calculating ridge patterns based on their distance from the UV dimensions. In essence, they control the smoothing of the ridges. Small values produce more grainy but faster results and larger value produce correspondingly more blurred and slower results. Note that very large values can be entered here.
这些设置类似于 MIP 映射,用于根据它们与紫外线维度的距离计算脊线模式。从本质上说,它们控制着山脊的平滑。小的值产生更多的颗粒,但更快的结果和更大的价值产生相应的更模糊和慢的结果。注意,可以在这里输入非常大的值。
The Texture setting can be used to apply the previously described setting to an entire texture. The grayscale values of the texture loaded here control the setting as follows: white represents the setting’s full value and black = 0. In-between gray values have a corresponding effect.
纹理设置可用于将前面描述的设置应用于整个纹理。这里加载的纹理的灰度值控制设置如下: 白色表示设置的完整值,黑色 = 0。在灰度值之间有相应的影响。
层布

Cloth is most often made of yarn (and this in turn from fibers) that are woven to create a certain pattern. They are made up of structured surfaces that produce characteristic anisotropic specular highlights/reflections. This is why Cinema 4D has its own cloth mode - Irawan (Woven Cloth) - which can be selected in the Type menu.
布料通常是由纱线(依次是纤维)编织成某种图案。它们由结构化的表面组成,这些表面产生各向异性的高光/反射。这就是为什么Cinema 4D 有自己的布模式-伊拉万(编织布)-这可以在类型菜单中选择。
The material channel Color can be disabled in conjunction with this mode.
材质通道颜色可以在这种模式下禁用。
预置
Here you will find a selection of presets with pre-defined values for each respective weave pattern.
在这里,您将找到一个选择的预设值为每个预定义的编织模式。
The following presets are available:
下面的预设是可用的:
If a preset’s settings are changed, it will automatically switch to Custom mode.
如果预设的设置改变了,它将自动切换到自定义模式。
模式
Woven cloth is made up of various warp and weft threads that are woven perpendicular to each other. When viewed close up, the Cinema 4D weave patterns look like this:
机织布是由各种经线和纬线互相垂直交织而成。当近距离观看时,C4D 编织图案是这样的:
 Various weave patterns. Warp and weft patterns in
dark and light gray.
Various weave patterns. Warp and weft patterns in
dark and light gray.
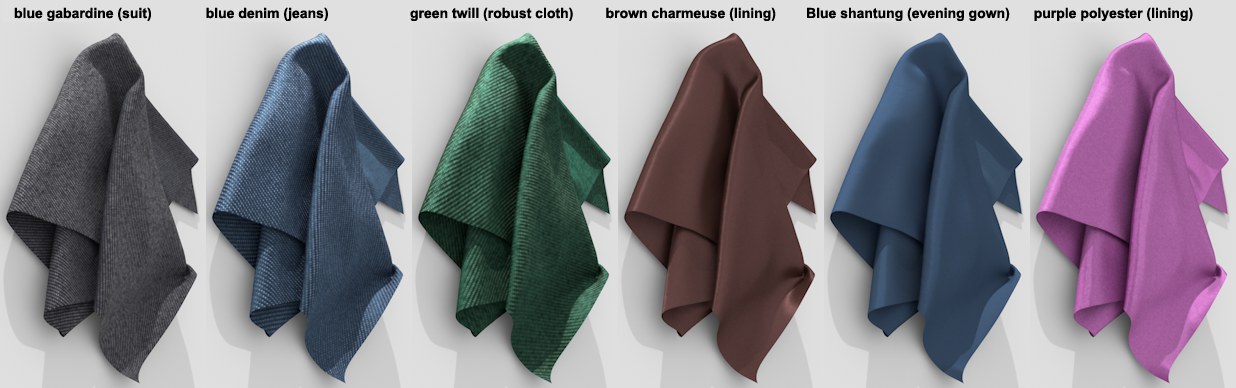
When viewed from a distance, these structures blend to form a characteristic cloth, which looks slightly differently, depending on the angle from which it is viewed. This isn’t surprising considering the fact that, in reality, warp and weft threads are made up of different yarn with different reflective properties. Polyester: for example, lining is made of very shiny elements that lie perpendicular to each other and have strong reflective properties (as can be seen at the far right of the image above).
从远处看,这些结构混合形成一个特征布,看起来略有不同,取决于从哪个角度观察。考虑到实际上经纱和纬纱是由具有不同反射性能的纱线组成的,这并不奇怪。聚酯: 例如,衬里是由非常有光泽的元素,彼此垂直,并具有强烈的反射性能(可以看到在最右边的图像上面)。
品质
Internally, the reflective behavior of the weave pattern is treated like a procedural texture with a strong noise property (analog to the Noise shader, this would reflect a small scale value). When rendered, this texture will be evaluated using various small samples. The three quality levels available here are used to adjust the sample count. The effect this has on render quality is minor (although it has a huge effect on render time) if you do not use the Low option, which is designed for creating test renderings.
在内部,编织模式的反射行为被视为具有强噪声属性的程序纹理(类似于噪声着色器,这将反映一个小尺度值)。渲染时,这个纹理将使用各种小样本进行评估。这里提供的三个质量级别用于调整样本数量。如果不使用 Low 选项,这对渲染质量的影响很小(尽管对渲染时间的影响很大) ,Low 选项是为创建测试渲染而设计的。
The better the antialiasing settings, the less the Quality setting will affect render quality.
反走样设置越好,质量设置对渲染质量的影响就越小。
The higher the quality, the sharper the cloth structure will be the more the Moiré pattern is reduced.
质量越高,织物结构越尖锐,莫尔纹越少。
Orientation[0..5729.578°]
Texture
方向[0.5729.578 ° ]纹理
This setting can be used to rotate the cloth structure (rotational axis U/V=0/0). For example, if a pant leg’s pattern lies perpendicular to the leg, this setting can be used to correct this state. Depending on the weave pattern, even small modifications (e.g., 10°) can have a major effect on the rendered result. It’s a good idea to experiment with this setting a little.
这个设置可以用来旋转布料结构(旋转轴 U/V = 0/0)。例如,如果裤腿的图案位于与裤腿垂直的位置,这个设置可以用来纠正这种状态。根据编织模式的不同,即使是很小的修改(例如10 °)也会对渲染结果产生很大的影响。稍微尝试一下这种设置是个好主意。
The Texture setting can be used to apply the previously described setting to an entire texture. The grayscale values of the texture loaded here control the setting as follows: white represents the setting’s full value and black = 0. In-between gray values have a corresponding effect.
纹理设置可用于将前面描述的设置应用于整个纹理。这里加载的纹理的灰度值控制设置如下: 白色表示设置的完整值,黑色 = 0。在灰度值之间有相应的影响。
Scale U[0..100000%]
Scale V[0..100000%]
Texture
Texture
刻度 u [0.100000% ]刻度 v [0.100000% ]纹理纹理
 Increasing Scale
values from left to right (polyester lining).
Increasing Scale
values from left to right (polyester lining).
These settings can be used to vary the cloth structure in U and V directions. Normally, the scale values should be the same in both directions to correctly reproduce the cloth’s structure. However, these values can also be made to differ in order to achieve a special look.
这些设置可以用来改变布料结构的 u 和 v 方向。正常情况下,两个方向的比例值应该是相同的,以正确地再现布料的结构。但是,为了获得特殊的外观,这些值也可以设置为不同。
Note that very large values will produce correspondingly unrealistic-looking results.
请注意,非常大的值将产生相应的不切实际的结果。
The Texture setting can be used to apply the previously described setting to an entire texture. The grayscale values of the texture loaded here control the setting as follows: white represents the setting’s full value and black = 0. In-between gray values have a corresponding effect.
纹理设置可用于将前面描述的设置应用于整个纹理。这里加载的纹理的灰度值控制设置如下: 白色表示设置的完整值,黑色 = 0。在灰度值之间有相应的影响。
Highlights Width[0..100%]
Texture
高光宽度[0. . 100% ]纹理
 Increasing Highlights
values from left to right.
Increasing Highlights
values from left to right.
The Highlightt Width setting defines the ‘width’ of the specular highlight/reflection. Smaller values produce sharp, bright highlights on individual threads; larger values will soften the highlights accordingly (they will become correspondingly darker and more expansive).
Highlightwidth 设置定义镜面高光/反射的“宽度”。较小的值在单个线程上产生尖锐、明亮的亮点; 较大的值将相应地软化亮点(它们将相应地变得更暗和更广阔)。
The Texture setting can be used to apply the previously described setting to an entire texture. The grayscale values of the texture loaded here control the setting as follows: white represents the setting’s full value and black = 0. In-between gray values have a corresponding effect.
纹理设置可用于将前面描述的设置应用于整个纹理。这里加载的纹理的灰度值控制设置如下: 白色表示设置的完整值,黑色 = 0。在灰度值之间有相应的影响。
Diffuse Warp
Diffuse Weft
Specular Warp
Specular Weft
Texture
Texture
Texture
Texture
漫反射经纱镜面纬纱镜面纹理纹理

These color settings can be used to define separate diffuse and specular colors for the warp and weft threads (see Cloth Pattern).
这些颜色设置可以用来为经纱和纬纱定义单独的漫反射和高光颜色(见布料图案)。
Make sure that the specular color is always brighter than the diffuse color and that they have a similar tone. A shader or bitmap can be loaded into the Texture field to define the color. Note that the texture will be multiplied with the respective color. If you only want to use the texture to define the color, then set the color for that setting to white.
确保镜面颜色总是比漫反射颜色明亮,并且它们有相似的色调。着色器或位图可以加载到纹理字段来定义颜色。请注意,纹理将与各自的颜色相乘。如果您只想使用纹理来定义颜色,那么将该设置的颜色设置为白色。
平滑[0. . 100% ]
 Increasing Smoothing
value from left to right.
Increasing Smoothing
value from left to right.
This setting is for use with the Polyester and SilkPattern options only. Generally speaking, the anisotropic specular highlight becomes more blurred - but brighter - with increasing values.
此设置仅用于聚酯和丝模选项。一般来说,各向异性镜面高光随着数值的增加而变得更加模糊-但更加明亮。
散射-均匀[0. . 0.1]
This setting defines the overall specular/reflection strength. The larger the value, the brighter/more reflective the cloth will be.
这个设置定义了整体镜面/反射强度。值越大,布料的反射强度越高。
散射-向前[0. . 10]
This setting can also be used to adjust specular/highlight strength - but larger values will produce correspondingly smaller effects. More importantly, this setting primarily affects the bright regions of the yarn’s specular highlight and the darker regions will hardly be affected.
这种设置也可以用来调整镜面/高光强度-但较大的数值将产生相应较小的影响。更重要的是,这种设定主要影响纱线镜面高光的明亮区域,而较暗区域几乎不受影响。
噪音
 Various Noise effects (insert: greatly enlarged
view).
Various Noise effects (insert: greatly enlarged
view).
Since just about every cloth has irregularities in its threads and its weave, Cinema 4D offers 3 Noise methods that can be used to simulate such irregularities in cloth:
由于几乎每块布料的线路和编织都有不规则的地方,Cinema 4D 提供了3种噪声方法,可以用来模拟布料的不规则性:
- Yarn color using Noise Strength
- Shape/orientation of the warp thread’s specular highlight using Yarn Noise (Warp)
- Shape/orientation of the weft thread’s specular highlight using Yarn Noise (Weft)
噪音强度[0. . 100% ]
This setting is used to define the strength of the noise applied to the yarn’s color (the thread color will be brightened and darkened in other regions).
这种设置用于确定纱线颜色的噪声强度(纱线颜色在其他区域会变亮或变暗)。
噪音声级[0. . 1000% ]
This setting is used to define the scale of the noise applied to the yarn’s color. Note that very large values can be used, which will produce a correspondingly spotty cloth.
此设置用于定义应用于纱线颜色的噪声的大小。请注意,可以使用非常大的值,这将产生相应的斑点布。
Yarn Noise (Warp)[0..100%]
Yarn Noise (Weft)[0..100%]
纱线噪音(经纱)[0.100% ]纱线噪音(纬纱)[0.100% ]
These settings are used to define the strength with which the internal noise affects the shape and size of the specular highlight (see also image above). The larger the value, the greater the deviation from the parallel thread position and the more the look of the cloth will change - e.g., from a silky surface to a rough canvas-type surface.
这些设置用来定义内部噪音影响镜面高光的形状和大小的强度。值越大,偏离平行线位置的偏差越大,布料的外观就会发生更大的变化——例如,从一个柔滑的表面变成一个粗糙的帆布表面。
纱线噪音量表[0. . 1000% ]
This setting is used to define the scale of the noise effect. The smaller the value, the faster the deviation from the optimal shape will be. Larger values will slow deviation correspondingly, exactly like scaling a Noise shader.
此设置用于定义噪声效果的规模。值越小,偏离最佳形状的速度就越快。较大的值会相应地减慢偏差,就像缩放噪声着色器一样。
图层菲涅耳

These setting are used to define the degree to which the reflection will increase as the surface normals increase their angle to the surface, which is referred to as Fresnel reflection, which should already be familiar to you from the Fresnel-Shader section, which principally works the same.
这些设置被用来定义当表面法线增加它们与表面的角度时反射增加的程度,这被称为菲涅耳反射,这应该是你在菲涅耳-肖德部分已经熟悉的,主要工作相同。
Make sure that the reflectance strength is greater than 0. Otherwise no Fresnel effect will appear.
确保反射强度大于0,否则不会出现菲涅耳效果。
菲涅耳
You can select from:
你可以从以下选择:
- Dielectric for transparent materials such as glass, water, clear coat lacquer, etc.
- Conductor for opaque, reflective materials such as metal, minerals, etc.
Make sure that the material channel Color is disabled for more realistic-looking results. Metal surfaces use reflections almost exclusively.
确保材质通道颜色被禁用,以获得更真实的效果。金属表面几乎完全使用反射。
A series of presets (primarily for metals) is integrated that are based on real-world values. These cannot be modified individually using the Fresnel settings described below.
一系列的预设(主要是金属)是集成的,是基于现实世界的价值观。这些不能单独修改使用菲涅尔设置如下所述。
Note:Even if this selection menu suggests that Fresnel effects are only for these two material types, a subtle Fresnel effect should be applied to just about all materials. Almost all materials reflect slightly and should therefore be assigned a correspondingly slight Fresnel effect. To do so, select Dielectric and define a very small Refraction Index value at around 1.
预置
 Example: a selection of Conductor presets.
Different materials will be made available for selection depending on the Fresnel mode selected. Select Custom if you want to modify the settings yourself.
根据选择的菲涅耳模式,将提供不同的材质供选择。如果要自己修改设置,请选择“自定义”。
Note that the Conductor presets will affect the internal color system (the layer color (Layer Color) should be 100% white!).
请注意,指挥家预置将影响内部颜色系统(层颜色(层颜色)应该是100% 白色!)。
强度[0. . 100% ]纹理
 Increasing Strength
values for Dielectric and Conductor
(copper).
Increasing Strength
values for Dielectric and Conductor
(copper).
The Strength setting is used to define the reflections strength between 0% and 100%.
强度设置用于定义0% 到100% 之间的反射强度。
The Texture setting can be used to apply the previously described setting to an entire texture. The grayscale values of the texture loaded here control the setting as follows: white represents the setting’s full value and black = 0. In-between gray values have a corresponding effect.
纹理设置可用于将前面描述的设置应用于整个纹理。这里加载的纹理的灰度值控制设置如下: 白色表示设置的完整值,黑色 = 0。在灰度值之间有相应的影响。
IOR[1..100]
IOR[0..100]
Texture
Texture
纹理纹理
 Increasing IOR values
(dielectric material) from left to right.
Increasing IOR values
(dielectric material) from left to right.
The IOR is mentioned mainly in conjunction with refractive light effects but it is also a measure for the angle of incidence for a material’s light reflections (regardless if it’s transparent or opaque). As you can see in the image above, low values cause the material to reflect almost exclusively in regions at which the camera’s angle of view is extremely low. Larger values cause the reflection to move correspondingly more to the frontal regions.
返回抑制主要与折射光效果联系在一起,但它也是测量材质的光反射波动角度的一种方法(不管它是透明的还是不透明的)。正如你在上面的图片中所看到的,低值会导致材质几乎完全反射在相机视角极低的区域。较大的数值会使反射波相应地向额区移动更多。
The Conductor mode behaves similarly (however, the increase in reflection that corresponds to the increased IOR is not linear because it is also affected by the Absorption value; it is recommended that you use the preset values to achieve a higher degree of realism) but the reflections are generally much more pronounced.
导体模式的行为类似(但是,与 IOR 增加相对应的反射增加不是线性的,因为它也受到吸收值的影响; 建议使用预设值以获得更高程度的真实感) ,但是反射通常更加明显。
The Strength slider can be used to seamlessly move from reflection (0%) to full Fresnel reflection (100%).
强度滑块可用于从反射(0%)无缝移动到全菲涅耳反射(100%)。
The Texture setting can be used to apply the previously described setting to an entire texture. The grayscale values of the texture loaded here control the setting as follows: white represents the setting’s full value and black = 0. In-between gray values have a corresponding effect.
纹理设置可用于将前面描述的设置应用于整个纹理。这里加载的纹理的灰度值控制设置如下: 白色表示设置的完整值,黑色 = 0。在灰度值之间有相应的影响。
Enable this option to invert the Fresnel reflection. Example (on a sphere): the maximum reflection that is normally at the sphere’s center will be switched to its edges.
启用此选项以反转菲涅耳反射。例如(在球体上) : 通常位于球体中心的最大反射将被切换到球体的边缘。
不透明
In some cases you might want to prevent the Fresnel effect from neighboring surfaces from affecting a given object. In the image above, a reflective surface with an alpha map lies on top of a red, diffuse layer. The Opaque option is disabled at the left: note how the red color from the underlying layer shines through while it is blocked on the right side of the image where the Opaque option is enabled.
吸收[0. . 100]纹理
 The Absorption effect
in conjunction with Roughness (IOR = 2.97).
The Absorption effect
in conjunction with Roughness (IOR = 2.97).
This setting is only available for the Conductor mode. Increasing values will produce correspondingly stronger overall reflections. This setting can be used to fine-tune the degree of reflection.
此设置仅适用于“导体”模式。增加的数值将相应地产生更强的总体反射。这个设置可以用来微调反射的程度。
The Texture setting can be used to apply the previously described setting to an entire texture. The grayscale values of the texture loaded here control the setting as follows: white represents the setting’s full value and black = 0. In-between gray values have a corresponding effect.
分层取样
抽样分组[0. . 16]
This setting is designed for use with the Standard Renderer only (i.e., not the Physical Renderer). It can be used to define the quality of matte reflections.
此设置仅适用于标准渲染器(即,不适用于物理渲染器)。它可以用来确定哑光反射的质量。
Larger values will slow rendering and increase quality correspondingly.
较大的值会减慢渲染速度,相应地提高质量。
夹子[0. . 100]
It can occur that a reflected HDR image/sky can produce extremely bright points (fireflies) on a third object - i.e., a reflection of a reflection. To prevent the sampling settings from being increased dramatically, this setting can be used to limit the intensity of this reflection. The higher the value, the more the intensity of the reflection will be restricted, thus reducing this effect.
截止[0. . 1]
This is a threshold value that defines the degree to which weak reflections will be calculated, if at all. Let’s say you have a Project with numerous reflective objects. An object at the rear of the image that is reflected in a small object near the front can be omitted because its role in the overall image is so small. The smaller this value is, the more reflections that will be ignored. The image below is an example of how this setting can be applied (the very bright HDR image helps make the effect more pronounced):
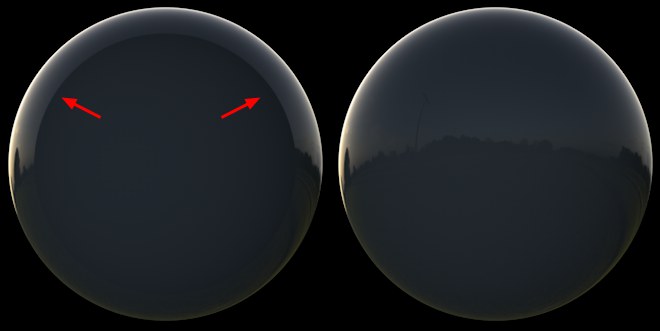 If the effect at the top left takes place, then the
Cutoff value needs to be reduced.
If the effect at the top left takes place, then the
Cutoff value needs to be reduced.
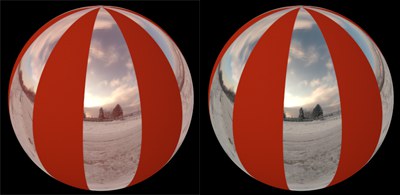
A sphere with a Fresnel reflection reflects a HDRI sky. The Cutoff value on the left is too large; the corrected value is on the right.
具有菲涅耳反射的球体反射 HDRI 天空。左边的 Cutoff 值太大; 纠正值在右边。
退出颜色
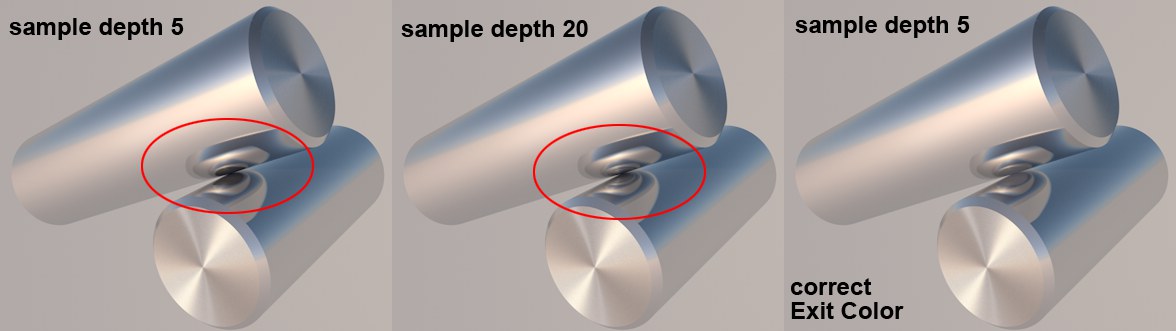 A fitting exit color is used to create a
realistic-looking result without increasing the diffuse depth.
A fitting exit color is used to create a
realistic-looking result without increasing the diffuse depth.
A reflection depth can be defined in the Preferences menu that defines the number of reflections that should take place. For example, if you have two mirrors facing each other, this setting can be used to limit the number of reflections that take place. Otherwise an endless number of reflections would be rendered with a more-or-less endless amount of render time. The Exit Color setting defines the color the reflection should assume in the end. In previous versions of Cinema 4D, this was black by default. However, as you can see in the image above, this produced unwanted black spots. This can be avoided if a fitting color is defined for the last reflection, as can be seen in the image above).
独立通行证
Reflections can be split for Multi-Pass rendering so that only certain materials are output in separate passes. To do so, this option must be enabled (details can be found here).
反射可以分割为多通道渲染,以便只有特定的材质输出在单独的通道。为此,必须启用此选项(详细信息可在此处找到)。
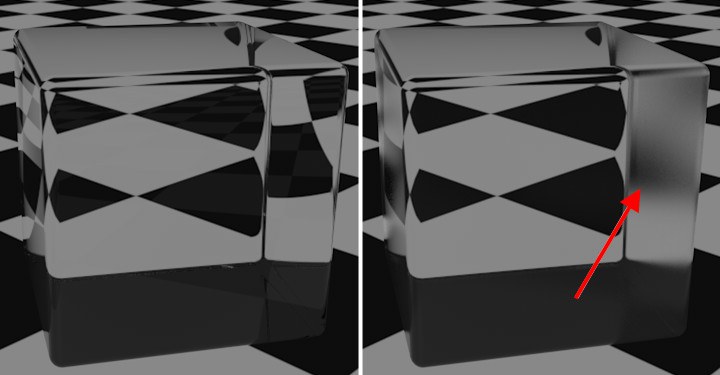
Distance Dim
Distance[0..10000000m]
Falloff[-1..1]
距离调光距离[0.100000000米]下降[-1. . 1]
 Left without, right with Distance Dim
Contrary to what the real world, this setting can be used to omit objects from a material’s reflection depending on their distance from that material. If Distance Dim is disabled, all objects will be reflected. If enabled, the Distance value defines the distance at which an object will no longer be reflected. The reflection falloff up to the Distance value is defined using the Falloff value. A value of 0 produces a linear falloff; other values produce the effects shown in the example above.
The reflection of the Sky object was disabled because it is considered to be an endless distance away.
天空物体的反射被禁用,因为它被认为是一个无穷无尽的距离。
远处的颜色
For this setting, imagine a sphere with a Distance radius around the reflective object. This sphere’s color is reflected when the reflection samples are longer than the Distance value defined. Normally, black would be the correct color in this case because it would prevent anything from being reflected. Other colors can be used depending on the intended result.
* 透明度 * 标签
 The Total Inner
Reflection is also part of the Reflectance channel; the Roughness was increased on the
right.
The Total Inner
Reflection is also part of the Reflectance channel; the Roughness was increased on the
right.
A * Transparency * will be added when the material channel Transparency is enabled. This tab contains reflection settings, however without Color or Mask settings, among others. The settings in this tab let you control the inner total reflection’s reflective properties (which has not possible prior to R16).
Normally, these settings do not have to be modified. If you’re not trying to achieve a very unusual effect, these settings can be left as they are.
通常,这些设置不需要修改。如果你不想达到非常不寻常的效果,这些设置可以保持原样。
This tab cannot be copied or deleted.
无法复制或删除此选项卡。
Tip:The Total Inner Reflection must be enabled in the Transparency channel and Refraction should be set to 0.