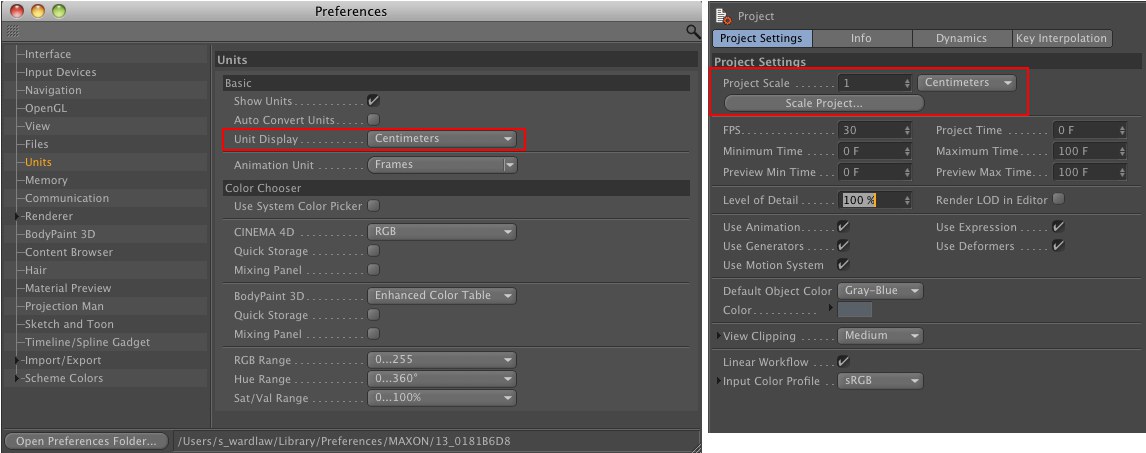
Project Settings
项目设置
项目规模
真正的单位
In previous Releases of Cinema 4D (prior to R12), no real units of measure were present. Although you could enter the unit "mm", this had no meaning for Cinema 4D.
在先前发行的C4D (在 R12之前) ,没有真正的测量单位存在。虽然你可以进入单位“毫米” ,这没有意义的C4D。
This has changed in R12: a unit of 1 meter is now equal to 100 centimeters and 1 kilometer equals 1000 meters, and so on. Hence, if you change your units of measure from, for example, Meter to Centimeter, a cube 2m wide will then be displayed as being 200cm wide. The values will be converted automatically if the Use Units option is enabled.
这在 R12中改变了: 1米的单位现在等于100厘米,1千米等于1000米,以此类推。因此,如果你把你的测量单位从米变成厘米,一个2米宽的立方体就会显示为200厘米宽。如果启用了 Use Units 选项,这些值将自动转换。
In combination with (internal) double precision (which was increased from 32-bit to 64-bit with R12), rounding errors are a thing of the past, which means that you can model 2mm wide specks of dust and then switch to Kilometers and model a huge building in which they lie. Cinema 4D can handle this with no problems at all.
结合(内部)双精度(R12将32位增加到64位) ,舍入误差已经成为过去,这意味着你可以模拟2毫米宽的尘埃斑点,然后切换到 km 模拟一个巨大的建筑物。C4D可以毫无问题地处理这个问题。
It is also possible to, for example, load objects modeled in Millimeters into a scene that contains objects modeled in Meters. The units will be converted automatically.
例如,也可以将毫米模型的物体加载到场景中,场景中包含米模型的物体。这些单位将自动转换。
You can define units of measure within Cinema 4D at these locations:
你可以在这些地方定义C4D院的测量单位:
- In the Preferences menu: This setting does not affect scene parameters. Only the units displayed in the respective fields will be converted. If, for example, a value of 在首选项菜单中: 此设置不影响场景参数。只有在相应字段中显示的单元才会被转换。例如,如果3 cm 3厘米 was defined and you switch to 被定义,然后你切换到Meters 米, the field will then display a value of ,字段将显示一个值0.03 m (or (或0.033 yd 0.033码).
- In the Project Settings: Depending on what has been defined, the scaling of the scene can in fact be modified. A 在项目设置中: 根据已经定义的内容,场景的缩放实际上可以被修改。答:200 cm 200厘米 wide cube ( 宽立方体Document Scale 文件规模: Centimeters 厘米) will be )200 m 200米 wide if you switch to 如果你切换到Meters 米.
比例文件
This is the most important parameter with regard to units of measure. It defines how the numerical value saved within the file will actually be interpreted - 3 meters, 3 kilometers or 3 yards, for example? A new, empty scene will always use the Project Settings’ default values. You should determine the units of measure you want to use from the very beginning of your project. Simply orient yourself to the actual scale of the objects you are creating in 3D. For example, a house would be modeled in Meters, the inner workings of a watch in Millimeters and a mountain range in Kilometers.
这是关于测量单位的最重要的参数。它定义了文件中保存的数值实际上将如何解释——例如,3米、3公里或3码?新的空场景将始终使用项目设置的默认值。您应该从项目的一开始就确定要使用的度量单位。简单的定位你自己到你正在创建的3D 物体的实际尺度。例如,一所房子可以用米来建模,米是以毫米为单位的手表的内部工作机制,而以公里为单位的是山脉。
When importing older scenes (prior to R12), Centimeters will be the default unit of measure used (unless you have defined a different unit in the Scale setting). You can, of course, change the Document Scale at any time if you are working with very large and very small dimensions in a single scene.
当导入旧的场景(在 R12之前)时,使用的默认度量单位是“厘米”(除非你在缩放设置中定义了一个不同的单位)。当然,如果你在一个场景中处理非常大和非常小的维度,你可以随时更改文档缩放。
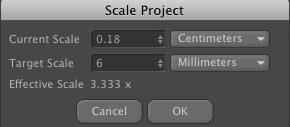
Tip: 提示:You can also use the 你也可以使用
 Scale Project... 大规模项目..
大规模项目..。
When scenes created in older versions of Cinema 4D or objects from external applications are imported into Cinema 4D they often do not have the correct units of length or none at all. This command can be used to scale the scene to the correct size.
当用老版本的 Cinema 4D 创建的场景或外部应用程序的对象被导入 Cinema 4D 时,它们通常没有正确的长度单位或根本没有。这个命令可以用来缩放场景到正确的大小。
Let’s say you have imported a hexagon bolt created in IGES with an unknown scaling. You know it’s supposed to be an M6 bolt and the document is set to the default Centimeter scaling. All you have to do is select two opposing points on the hexagon bolt and define the interval between them (values can be seen in the Coordinate Manager).
假设您导入了一个 IGES 中创建的六角螺栓,其尺寸未知。你知道它应该是一个 M6螺栓和文件设置为默认的厘米缩放。你所要做的就是在六角螺栓上选择两个相对的点,然后定义它们之间的间隔(值可以在坐标管理器中看到)。
Assuming both points lie 0.18 cm apart, the following values have to be entered to scale the scene correctly:
假设两个点相距0.18厘米,必须输入以下数值才能正确缩放场景:
第一财务摘要[1.2500]
This value defines the frame rate for the current document. This value will be applied to all animations create with this scene.
此值定义当前文档的帧速率。此值将应用于所有动画创建与此场景。
Tip 小贴士You can also define a frame rate in the 中定义帧速率Render Settings 渲染设置 menu (see 菜单(见here 这里). However this will not cause the animation to be re-calculated. In certain circumstances, this would result in a reduction of image quality - frames may be skipped or rendered double. ).但是这不会导致动画被重新计算。在某些情况下,这将导致图像质量下降-帧可能被跳过或呈现双倍
工程时间
This is the time (frame) at which the Timeslider is currently positioned.
这是时间利用器当前定位的时间(帧)。
最短时间
Defines the starting point of the animation tracks. This can also be a negative value, e.g. for initiating a particle stream prior to the begin of an animation.
定义动画轨道的起始点。这也可以是一个负值,例如在动画开始之前初始化一个粒子流。
最长时间
Defines the end time for animation tracks.
定义动画音轨的结束时间。
Preview Min Time
Preview Max Time
预览最小时间预览最大时间

These values represent the start and end time of the preview range displayed in the Animation Toolbar. These values can be modified by double-clicking on the areas shown in the image above.
这些值表示在动画工具栏中显示的预览范围的开始和结束时间。可以通过双击上图所示的区域来修改这些值。
详细程度[0. . 100% ]
Tip: 提示:Note also the 还要注意LOD object LOD 对象, which offers a wide range of functions for fine-tuning level of detail. ,提供多种功能,以便微调细节
This value affects how each scene object for which a specific level of detail can be selected is displayed. Such objects include all Primitives, Metaballs or all Generator objects.
这个值会影响每个场景对象的显示方式,对于这些对象可以选择特定的细节级别。这些对象包括所有的 Primitives、 Metaballs 或者所有的 Generator 对象。
The level of detail can be reduced evenly, independently from an individual object’s level of detail.
细节级别可以均匀地减少,独立于单个对象的细节级别。
If this value is set to 100% all objects will be displayed in full detail (in accordance with the value defined in the object’s parameters).
如果该值设置为100% ,则所有对象都将显示完整的详细信息(根据对象参数中定义的值)。
If this value is reduced to 50% all scene objects will be displayed with only half the number of lines in the Viewport.
如果这个值减少到50% ,所有的场景对象将显示只有一半的行数在视口。
Tip 小贴士This and the following parameter only affect the depiction in the Viewport. 这个参数和下面的参数只影响 Viewport 中的描述 Tip 小贴士
Modifying the 修改LOD 检测限 in the Viewport’s 在视窗中Display 展示 menu will influence this default value. 菜单将影响此默认值
在编辑器中渲染 LOD
The value defined in the Render Settings will be applied and the value defined by the LOD will be ignored.
渲染设置中定义的值将被应用,LOD 中定义的值将被忽略。
Use Animation
Use Expression
Use Generators
Use Deformers
使用 AnimationUse 表达式使用生成器使用变形器
These four options have the same effect as those in the main Cinema 4D
这四个选项有相同的效果,作为那些在主要的Cinema 4d 模式 | 执行菜单。关于它们如何工作的详细信息可以在这里找到。
使用动作系统
Disabling this option will disable the Motion System. Alternatively, the Motion System can be disabled in the main Cinema 4D
禁用此选项将禁用运动系统。另外,运动系统可以在主C4D 模式 | 执行菜单中禁用。
默认对象颜色
颜色
Here you can create a color that will be assigned to all objects that do not have a material assigned. 80% Gray is the color used by Cinema 4D versions prior to R12.
在这里,您可以创建一个颜色,这个颜色将被分配给所有没有分配材质的对象。80% 灰色是 R12之前 Cinema 4D 版本使用的颜色。
View Clipping can be used to clearly display any region of the scene.>
视图剪辑可以用来清晰地显示场景的任何区域。 >
View Clipping
Near[0..+∞m]
Far[0..+∞m]
查看 ClippingNear [0. . + ∞ m ] Far [0. . + ∞ m ]
 If faulty depictions, as shown at left, result you
should use a different Clipping region. 如果错误的描述,如左所示,结果您应该使用不同的剪辑区域
If faulty depictions, as shown at left, result you
should use a different Clipping region. 如果错误的描述,如左所示,结果您应该使用不同的剪辑区域
Due to the fact that it is possible to work in very large dimensions (e.g. kilometers) or in very small dimensions (e.g. nanometer), the display (only affects this display - the rendered display remains unaffected) can be a little strained (the Z buffer has a limited resolution and at some point can no longer discern which polygons lie behind other polygons, which results in poor display quality).
由于可以在非常大的尺寸(例如公里)或非常小的尺寸(例如纳米)中工作,显示器(只影响此显示器——呈现的显示不受影响)可能会有点紧张(z 缓冲区的分辨率有限,在某一点上不再能够分辨出哪些多边形位于其他多边形之后,这导致显示质量较差)。
In this case you can define a Clipping region. Outside of this region (calculated from the point of view of the camera) the display will be cut off. Within the region the display will always be correct (the Near and Far values should not differ too much).
在这种情况下,可以定义一个剪辑区域。在这个区域之外(从相机的角度计算)显示将被切断。在该区域内,显示总是正确的(Near 和 Far 值不应该差别太大)。
Select a region from the selection menu or do so manually via the Near and Far values, respectively.
从选择菜单中选择一个区域,或者分别通过 Near 和 Far 值手动选择。
线性工作流
The linear workflow (a.k.a. too many Gammas)
线性工作流(又名太多伽马)
简而言之
In the past years, the idea of linear workflow (in the following referred to as lin. W) has almost been turned into a mythical process that promises to work miracles. Although linear workflow cannot produce miracles it can help you produce better images quicker and with less effort.
在过去的几年中,线性工作流的思想(在下面被称为林。已经几乎变成了一个神话般的过程,承诺创造奇迹。虽然线性工作流不能产生奇迹,但它可以帮助您更快、更省力地生成更好的图像。
 Overexposed regions will be reduced. 过度曝光的区域将会减少
The effect a lin. W has can be seen in the image above. The scene is lit using two light sources, each with inverse square falloff. The quality when lin. W is used at right is dramatically better.
效果很好。可以在上面的图片中看到 w。场景使用两个光源照明,每个光源都是平方反比衰减。质量当林。用在右边要好得多。
Lin. W offers the following advantages:
林女士提供以下优点:
- More harmonious dispersion of light; scene appears brighter overall 光线更和谐的分散; 场景总体上显得更明亮
- Overexposed regions will be reduced 过度曝光的区域将会减少
- More natural coloration 更自然的颜色
- Summary: more realistic dispersion of light (use of light source with physically correct inverse square 简介: 更真实的色散光(使用物理正确的平方反光光源)Falloff 女名女子名 are recommended). 建议)
Note that you cannot simply integrate older scenes into the Lin. W. The lighting must be adjusted accordingly. Of course, older scenes can be loaded and simply rendered in their unchanged state ( 请注意,您不能简单地将旧的场景集成到 Lin 中。W.灯光必须相应地调整。当然,可以加载旧的场景,并简单地将其呈现为未更改的状态(Linear Workflow 线性工作流 and 及Input Color Profile 输入颜色配置文件 options are each be disabled). If you want to use older material libraries (these were most likely not saved linearly) with Lin. W, make sure that 每个选项都是禁用的)。如果您希望使用较旧的材质库(这些库很可能不是线性保存的) ,请使用 Lin。W,确保Input Color Profile 输入颜色配置文件 is set to 设置为sRGB. Tip 2. 技巧2
Note this 注意这个tip 尖端 in conjunction with Multi-Pass rendering and After Effects. More information (English only) about Cinema 4D and After Effects connectivity can be found here: 结合多遍渲染和后期效果。更多关于C4D 和 After Effects 的信息可以在这里找到:http://www.helloluxx.com/cinema4d-rendering/linear-workflow-in-cinema4d-and-after-effects. Tip: 提示:
For those with less patience: No further action is necessary. Enabling the 对于那些缺乏耐心的人: 没有必要采取进一步的行动Linear Workflow 线性工作流 option is all you need to do to benefit from the advantages of Lin. W in Cinema 4D. Internally, Cinema 4D will automatically define all pertinent values accordingly. You don’t have to worry about anything. Textures that are not displayed correctly (Bump, Normals, Alpha and Displacement channels) will be excluded. 你所需要做的就是从林的优势中获益。C4D院的 w。在内部,Cinema 4D 将自动定义所有相关的值。你什么都不用担心。不能正确显示的纹理(凹凸、法线、 Alpha 和位移通道)将被排除
Note that all Cinema 4D-internal material colors and color gradients will be modified directly in the preview. This can also lead to confusion because, for example, grayscale gradients will look differently than before.
请注意,所有Cinema 4D 内部材质的颜色和颜色梯度将直接修改在预览。这也可能导致混淆,例如,灰度梯度将看起来不同于以前。

The color value of 128, 128, 128 at the center of a normal grayscale gradient (Linear Workflow option disabled) will change to approx. 192, 192, 192 when this option is enabled. This behavior is correct!
当启用此选项时,位于正常灰度梯度(禁用线性工作流选项)中心的颜色值128、128、128将更改为大约192、192、192。这种行为是正确的!
For those of you who are interested in the "how and why", simply read on. Everyone else can get started with rendering more beautiful images right away.
对于那些对“如何和为什么”感兴趣的人,请继续往下读。其他人可以马上开始渲染更多漂亮的图片。
详情
Tip: 提示:To make reading the following easier to read, the images to which we refer have a Gamma value of 为了便于阅读以下内容,我们引用的图像伽玛值为2.2. To be precise, this is not exactly correct - the images have a gamma value that makes them look good when viewed on a monitor with a Gamma value of .准确地说,这是不完全正确的-图像有一个伽玛值,使他们看起来很好时,显示器上的伽玛值为2.2. This means that the images actually have a Gamma value of 。这意味着图像实际上有一个伽玛值1/2.2 = 0.45 (this is often not mentioned on Web sites for reasons of simplicity). (为了简单起见,网站上通常不会提到这一点)
The topic gamma values and the corresponding Lin. W is a result of renderers rendering with a linear Gamma value of 1 but being fed with input (textures, shaders, etc.) with a different Gamma value (most commonly 2.2 since the introduction of macOS X 10.6; previously 1.8) even though the renderer expects a Gamma value of 1.
主题 gamma 值及其对应的 Lin。W 是渲染器渲染的线性 Gamma 值为1的结果,但是输入(纹理、着色器等)的 Gamma 值不同(自 macOS x 10.6引入以来最常见的是2.2; 以前是1.8) ,尽管渲染器期望 Gamma 值为1。
This results in the renderer rendering "more incorrectly" (with regard to being physically correct) than it actually should.
这会导致呈现程序呈现“更不正确”(关于物理正确性) ,而不是实际应该呈现的效果。
If you now think that you rendered below-standard for the past 10 years we can confirm this with a hearty "yes and no". If the result is what you were looking for then the rendering was successful. However, you tend to get used to how your renderer works and generally end up working around its shortcomings. If, for example, a fill light was added, which ended up changing the coloration at places and resulting in an unwanted look, this might have been avoided if Lin. W had been used.
如果你现在认为自己在过去10年里的表现低于标准,我们可以用衷心的“是和否”来证实这一点。如果结果是你想要的,那么渲染就是成功的。然而,您倾向于习惯渲染器的工作方式,通常最终会绕过它的缺点。例如,如果加入一个填充灯,最终改变了颜色的位置,导致不必要的外观,如果林可以避免这种情况。已经使用了 w。
This is also the reason that older scenes don’t automatically look better if Lin. W is enabled. Older scenes were designed to work well without Lin. W. If you want to re-use older, optimized lighting configurations you should adapt these for work with Lin. W. If, however, you are satisfied with the render results there is no need to do this.
这也是为什么旧的场景不会自动看起来更好,如果林。启用 w。旧的场景被设计成在没有林的情况下也能很好地工作。W.如果你想重新使用旧的,优化的照明配置,你应该适应这些与林工作。但是,如果您对渲染结果感到满意,则没有必要这样做。
为什么伽马值存在?
Most monitors, for example, have a gamma value of 2.2. If you paint a texture in an image editing program, this image will be displayed with a gamma value of 2.2 and will be saved accordingly. Almost all images that you have created or that you will find on the internet have a gamma value of 2.2.
例如,大多数显示器的伽玛值为2.2。如果你在图像编辑程序中绘制一个纹理,这个图像将以2.2的伽玛值显示,并相应地保存。几乎所有你创建的或者你将在互联网上找到的图片的伽玛值都是2.2。
Only with this value will images look good on an average monitor. This has to do with the fact that images with a lower bit depth (8-bit and 16-bit) are saved in a manner that displays a brightness range that looks good to the human eye. A human eye can make out finer gradation in darker regions than in lighter regions.
只有使用这个值,图像才能在一般的显示器上看起来不错。这与以下事实有关: 较低位深度(8位和16位)的图像保存方式显示亮度范围,人眼看起来很好。人眼可以在较暗的区域比在较亮的区域分辨出更好的层次。
 A gamma corrected 8-bit image with a gamma value of
0.45 is displayed on a monitor (gamma = 2.2) with a (for the human eye) linear brightness range. 一个伽玛校正的8位图像,伽玛值为0.45,显示在一个显示器上(伽玛 = 2.2)与(人眼)线性亮度范围
A gamma corrected 8-bit image with a gamma value of
0.45 is displayed on a monitor (gamma = 2.2) with a (for the human eye) linear brightness range. 一个伽玛校正的8位图像,伽玛值为0.45,显示在一个显示器上(伽玛 = 2.2)与(人眼)线性亮度范围
Renderers on the other hand (including the Cinema 4D renderer) work internally with linear gamma ranges (i.e. gamma =1; defined by the prevailing algorithms) and expect the same from what they display (textures, shaders, etc.). However, this wasn’t so simple in the past. The renderer wants a gamma value of 1 but is given input with a gamma value of 2.2. It’s natural that discrepancies with the physically correct result arise.
另一方面,渲染器(包括 Cinema 4D 渲染器)在内部使用线性伽马范围(即伽马 = 1; 由流行的算法定义) ,并期望从它们显示的内容(纹理、着色器等)中获得同样的效果。然而,这在过去并不是那么简单。渲染器希望伽玛值为1,但是输入伽玛值为2.2。很自然,与实际正确结果的差异会出现。
As soon as the renderer has finished its work the rendered image’s color and brightness has to be reduced and at the same time a gamma value of 2.2. has to be applied so the image looks good when displayed on the monitor (in the image was rendered in 32-bit the gamma correction would take place and the image saved in a subsequent step).
一旦渲染器完成了它的工作,渲染图像的颜色和亮度必须降低,同时伽马值为2.2。必须应用,使图像看起来很好时,显示在显示器上(在图像渲染为32位的伽玛校正将发生和图像保存在随后的步骤)。
So how does the Lin. W fit into all of this? Simple - as soon as you enable Lin. W, all elements involved in the render process (textures, shaders, etc.) will be re-calculated so the renderer sees them with the required gamma value of 1. After this correct rendering has taken place - internally, the renderer also produces images with a gamma value of 1 - the images must be converted to a gamma value befitting the display device (most often a monitor with gamma = 2.2).
那么林书豪是怎么做到的呢。我们如何适应这一切呢?简单——只要您启用 Lin。W,渲染过程中涉及的所有元素(纹理、着色器等等)将被重新计算,以便渲染器看到它们所需的伽马值为1。在进行了正确的渲染之后,渲染器还会生成伽玛值为1的图像,这些图像必须转换为适合显示设备的伽玛值(通常是一个伽玛值为2.2的显示器)。
That was a brief description of the reason behind Lin. W. If you want to read more about the above you can download a very informative and free .pdf file by the name "Be Gamma Correct!" by Martin Breidt (a Web search should lead you to the correct file). Don’t let it bother you that the document refers to a different 3D application from Cinema 4D - the principles are the same.
这是对林背后的原因的简要描述。W.如果你想了解更多关于上述的信息,你可以下载一个非常有用和免费的。Pdf 档案,名为“ Be Gamma Correct! ”Martin Breidt (Web 搜索将引导您找到正确的文件)。不要让它困扰你,文件指的是一个不同的3D 应用程序从C4D-原则是相同的。
The Lin. W’s settings include the color space sRGB. This is somewhat comparable to the above-mentioned gamma value of 2.2, i.e. if an image is saved with a gamma value of 2.2 it most often reflects sRGB values.
林书豪。的设置包括色彩空间 sRGB。这在某种程度上与上面提到的2.2伽马值相当,即如果保存的图像伽马值为2.2,它通常反映的是 sRGB 值。
色彩管理
常规
Everyone has heard of it but only few understand what it really is, even though many books have been - and still are being - written about this topic. In the following you will find a brief introduction of the issues regarding color fastness.
每个人都听说过它,但只有少数人知道它到底是什么,即使许多书已经并且仍然在写这个主题。在下面你会发现一个有关色牢度问题的简要介绍。
Surely you are familiar with the effect of an image looking perfect on your monitor (colors are exactly as you want them to be - brightness, contrast, etc. are immaculate) but when you view the same image on your colleague’s monitor or even printed out it looks completely different - mostly worse.
你肯定熟悉一幅图像在显示器上看起来完美的效果(颜色完全符合你的期望——亮度、对比度等等都完美无瑕) ,但当你在同事的显示器上看同一幅图像,甚至打印出来时,它看起来完全不同——大多数情况下更糟。
How does this happen?
这是怎么发生的?
Colleague A creates an image using an image editing program. He creates his image according to how it looks on his monitor. When finished, he saves the image - and this is where the problems start: Image editing programs have to save images with a reproducible color definition (i.e. the color profile, which is mostly RGB). Most often a color profile is selected that corresponds to the display device - for most (but not all!) monitors sRGB and for printing CMYK, etc.
同事 a 使用图像编辑程序创建图像。他根据显示器上的图像来创建自己的图像。完成后,他保存图像——这就是问题开始的地方: 图像编辑程序必须用可复制的颜色定义(即颜色配置文件,大部分是 RGB)保存图像。大多数情况下,选择的颜色配置文件对应的显示设备-为大多数(但不是所有!)显示 sRGB 和打印 CMYK 等。
This means that the red value on colleague A’s monitor has to correspond to the RGB value in the image file. Colleague A’s monitor must pass on the image’s colors exactly how the image processing program will display the RGB values. In order to do so, Colleague A’s monitor must be calibrated correctly. Over time, a monitor’s color display will change and should theoretically be calibrated every 4 weeks if being used for work with real color profiles. Regular calibration is also necessary for all input and output devices such as monitors, printers, scanners, etc.
这意味着同事 a 监视器上的红色值必须对应于映像文件中的 RGB 值。同事 a 的显示器必须准确地传递图像的颜色,图像处理程序将如何显示 RGB 值。为了做到这一点,同事 a 的显示器必须正确校准。随着时间的推移,显示器的颜色显示将会改变,如果使用真实的颜色配置文件,理论上应该每4周校准一次。所有输入和输出设备,如显示器、打印机、扫描仪等,也需要定期进行校正。
If everything has been calculated correctly, the printed image from colleague A’s monitor should appear exactly the same on colleague C’s monitor after being scanned in. How probable this actually is can be attested to by anyone who has actually attempted such a feat (a 100% match is in fact not possible because not all devices can convert color profiles loss-free). But at least a nearly 100% match can be achieved on different monitors when calibrated correctly.
如果一切都计算正确,从同事 a 的显示器打印的图像应该完全相同的同事 c 的显示器后,扫描。这种可能性实际上可以由任何人证明谁实际上已经尝试了这样的壮举(100% 的匹配实际上是不可能的,因为不是所有的设备可以转换颜色配置文件没有损失)。但是,当校准正确时,至少可以在不同的显示器上实现近100% 的匹配。
This was a simplified explanation of the issues involved with precise color management. What is basically required is a consistent, clearly-defined color profile within the creation process from image editing to the final output of the image.
这是对精确的色彩管理所涉及的问题的一个简单的解释。基本上需要的是在从图像编辑到图像最终输出的创建过程中有一个一致的、清晰定义的颜色配置文件。
And what does all this have to do with Cinema 4D?
这一切和C4D有什么关系?
First the good news: If you’ve never heard of color management and your renderings have always met or exceeded your requirements then you can simply ignore this parameter (and leave all Cinema 4D adjustable color profiles set to their default mode sRGB). To be honest, only very experienced artists will see the difference between images created using precise color management and those created by rule of thumb.
首先,好消息是: 如果你从来没有听说过色彩管理,而且你的渲染总是满足或超出你的要求,那么你可以简单地忽略这个参数(并且让所有 Cinema 4D 可调色彩配置文件设置为默认模式 sRGB)。老实说,只有非常有经验的艺术家才能看到使用精确的色彩管理创造的图像和那些根据经验法则创造的图像之间的区别。
Tip: 提示:Only change the color profile settings if you really know what you’re doing. Changing these values can otherwise lead to frustration and unwanted results. When in doubt, simply set everything back to 如果你真的知道你在做什么,只改变颜色配置文件的设置。否则,改变这些值可能会导致沮丧和不必要的结果。如果有疑问,只要把所有东西都设置回sRGB (see image below). (见下图)
sRGB is the color profile that has been used for several years whenever no alternative color profile has specifically been defined. This is why about 99% of all images on the internet contain this default color profile. Even Cinema 4D versions prior to R12 saved images exclusively in the sRGB color profile.
sRGB 是多年来一直使用的颜色配置文件,只要没有特别定义替代颜色配置文件。这就是为什么互联网上99% 的图片都包含这个默认的颜色配置文件。即使是 R12之前的C4D 版本也只能将图像保存在 sRGB 颜色配置文件中。
The locations within Cinema 4D at which color profiles can be defined are listed below.
在C4D院中,可以定义色彩配置的位置如下所示。
 The most important color profile settings in
Cinema 4D C4D中最重要的色彩配置
The most important color profile settings in
Cinema 4D C4D中最重要的色彩配置
As you can see, there are three "interfaces" from/to Cinema 4D where color profiles (or hardware profiles) can be analyzed:
正如你所看到的,在C4D 之间有三个“接口” ,可以分析颜色配置文件(或硬件配置文件) :
- Textures: As you know, bitmaps can be loaded into various material channels. In the Project Settings you can define if and how imported color profiles should be handled. You can also define which color profile should be used if a bitmap does not contain its own integrated profile. Additionally, you can define whether 纹理: 如你所知,位图可以加载到不同的材质通道。在“项目设置”中,您可以定义应该如何处理导入的颜色配置文件。如果位图不包含自己的集成配置文件,还可以定义应该使用哪种颜色配置文件。另外,您可以定义Linear 线性 or 或sRGB should be used for individual channels (per bitmap shader). 应该用于个人渠道(每位图着色器) The BodyPaint 3D layout also contains several commands with which and locations at which color profiles can be modified (e.g. BodyPaint 3D 布局还包含几个可以修改颜色配置文件的命令和位置(例如:Bitmap Layer 位图层 or 或Change Profile... 改变个人资料..).
- Monitor: Here you can define a custom (preferably calibrated) monitor hardware profile. This profile is responsible for the display of colors in Cinema 4D on your monitor, i.e. what you see in color selection fields, in the Viewport, Picture Viewer, etc. Not necessarily to be ignored if you consider how often you select colors within Cinema 4D. 监视器: 在这里您可以定义一个自定义(最好是校准)监视器硬件配置文件。这个配置文件负责在你的显示器上显示C4D 的颜色,也就是你在颜色选择字段中看到的,在 Viewport,图片查看器,等等。如果你考虑一下你在 Cinema 4D 中选择颜色的频率,你就不一定会被忽略
- Files: Rendered bitmaps (color profiles cannot be added to movies rendered with Cinema 4D). Here you can define the output color profile that is saved with the file and used, for example, when the rendered image is opened in Photoshop. 文件: 渲染位图(颜色配置文件不能添加到C4D 渲染的电影)。在这里你可以定义输出颜色配置文件保存和使用,例如,当渲染图像是在 Photoshop 中打开
In the attachment you will find a list of image formats with which color profiles can be used.
在附件中,您将找到一个可以使用颜色配置文件的图像格式列表。
输入颜色配置文件
More information can be found under Color Management (in most cases sRGB will be correct).
更多的信息可以在色彩管理中找到(在大多数情况下 sRGB 是正确的)。
Here you define 3 things:
这里你定义了三件事:
- Whether or not the embedded color profile of textures should be used 是否应该使用嵌入的纹理颜色配置文件
- Which color profile should be used for textures with NO embedded color profile. 对于没有嵌入颜色配置文件的纹理,应该使用哪种颜色配置文件
- Which color profile should color selection fields, gradients, etc. within the application use 应用程序使用的颜色配置文件应该包括颜色选择字段、渐变等
The selected option is shown in the field below.
选定的选项显示在下面的字段中。
Srgbllinear
If a texture has an embedded color profile, these options define how the color selection fields, gradients, etc. will be displayed in Cinema 4D. sRGB is the most commonly used display mode (when in doubt, use this mode). Linear is the mode that less common and more difficult to use.
如果一个纹理有一个嵌入的颜色配置文件,这些选项定义如何颜色选择字段,渐变等将显示在 Cinema 4D。sRGB 是最常用的显示模式(如果有疑问,使用此模式)。线性模式是一种较不常见且较难使用的模式。
残疾人士
In this mode, embedded color profiles will not be taken into consideration. The sRGB color profile will be used instead. Simultaneously disabling the Linear Workflow option will reflect the mode prior to R12.
在这种模式下,嵌入的颜色配置文件将不被考虑在内。将改为使用 sRGB 颜色配置文件。同时禁用线性工作流选项将反映 R12之前的模式。
Use Color Channel for Node Material
节点材质使用颜色通道
The Use Color Channel for Node Material option in the Project Settings menu modifies the calculation of diffuse BSDF colors in Node Materials to that their color is calculated as they would be by the standard material’s Color channel.
在 Project Settings 菜单中的 Use Color Channel for Node Material 选项修改了 Node Materials 中漫反射 BSDF 颜色的计算,使其颜色按照标准材质的 Color Channel 计算。
This makes the diffuse surface shading of Node Materials independent of the brightness of surrounding surfaces and also of the Emission property that is identical to the luminous properties of other material systems. The behavior of the Node Materials is calculated comparable to a standard material.
这使得 Node 材质的漫反射表面着色独立于周围表面的亮度,也独立于与其他材质系统发光特性相同的发射特性。节点材质的性能可以与标准材质相媲美。
Therefore, the use of Global Illumination will produce the same effect as the diffuse shading. The Emission property of Node Materials can still be used for creating lights in conjunction with Global Illumination rendering.
因此,使用全局光源会产生与漫射阴影相同的效果。节点材质的发射属性仍然可以用于创建与全局光源渲染相结合的灯光。
Or to put it differently: By enabling this option, the physically correct calculation (longer render times) is replaced by physically incorrect calculation (shorter render times).
或者换一种说法: 通过启用此选项,物理上正确的计算(较长的渲染时间)将被物理上不正确的计算(较短的渲染时间)所取代。
The Background Compositing option can in a Compositing tag can only then affect a Material Node if the Use Color Channel for Node Material option is enabled.
如果启用了“使用节点材质的颜色通道”选项,则合成标记中的“背景合成”选项只能影响材质节点。
加载预置... 保存预置..。
Because the Project’s Preferences menu contains so many critical parameters such as frame rate, key interpolation, dynamics tacting, etc., the most important of these can be saved as presets that can be loaded when a new Project is created, for example.
因为项目的首选项菜单包含了很多关键参数,比如帧速率、键值内插、动态时间等,其中最重要的可以保存为预置,在创建新项目时可以加载,例如。
Presets will be saved to the Content Browser in the Presets / User / Project Preferences Presets library (user.lib4d in the corresponding user directory; this is where most other presets will also be saved). When the Save Preset command is selected, a small dialog window will open in which the preset name and other information can be defined. Selecting the Load Preset command will open a small dialog window from which presets can be selected and loaded.
预设将被保存到 preset/User/Project Preferences Presets 库中的 Content Browser 中(对应的用户目录中的 User.lib4d; 这是大多数其他预设也将被保存的地方)。当保存预置命令被选中,一个小对话框窗口将打开,在其中可以定义预置名称和其他信息。选择加载预置命令将打开一个小对话框窗口,可以从中选择和加载预置。
The following tabs’ Project Preferences will be saved in a project preferences preset:
下列选项卡的项目预置将保存在项目预置中:
- Project Preferences 项目偏好
- Dynamics (all tabs with the exception of the 动态(所有标签除了Cache 缓存 tab 标签
- Key interpolation 关键插值