 ChanLum
ChanLum
ChanLum
This shader was kindly supplied to us by Naam. ChanLum creates an effect similar to SubSurface Scattering (see Advanced Render), the difference being that the ChanLum shader’s effect takes place on the object surface. A good comparison would be to that of a peach, whose surface is furry, somewhat blurred.
这个着色器是由 Naam 提供给我们的。ChanLum 创建了一个类似于次表面散射的效果(见高级渲染) ,不同之处在于 ChanLum 着色器的效果发生在物体表面。一个很好的比较应该是桃子,桃子的表面是毛茸茸的,有点模糊。
The ChanLum shader is designed for use in the Luminance channel. Simply load the shader, define a color that should be blended into the object’s color and set Mix Mode to Multiply. This shader can also be used in other channels, e.g., the Color channel – just make sure Mix Mode is always set to Multiply.
ChanLum 着色器是为亮度通道设计的。只需加载着色器,定义一个颜色应该被混合到对象的颜色,并设置混合模式为正片叠底。这个着色器也可以在其他通道中使用,例如,颜色通道-只要确保混合模式总是设置为正片叠底即可。
Light sources must cast shadows! No shadows - no ChanLum effect!
光源必须投射阴影! 没有阴影-没有强光效果!
Of course the ChanLum shader can also be used in conjunction with a texture. Layer or Fusion can be used. In both cases, both the Mix Mode and the mixing of the ChanLum shader with the texture must be set to Multiply.
当然,ChanLum 着色器也可以和纹理一起使用。层或融合可以使用。在这两种情况下,混合模式和混合的 ChanLum 着色器的纹理必须设置为正片叠底。
If you already have the original ChanLum plugin from HappyShip installed on your system, it must be removed. Otherwise you will encounter problems! 如果你的系统中已经安装了来自 HappyShip 的初始 ChanLum 插件,那么必须删除它。否则你会遇到问题改变是如何运作的

|

|
The example above illustrates what happens when a normal surface is rendered. For a point on the surface (P), the angles (a) between the surface and all light sources in the scene will be ascertained. These angles will then by analyzed by such lighting models as Phong or Oren Nayar, which will determine how shading will look based on the lighting.
上面的例子说明了在渲染法线曲面时会发生什么。对于表面上的某一点(p) ,将确定表面与场景中所有光源之间的角度(a)。这些角度将通过分析照明模型,如 Phong 或 Oren Nayar,这将决定如何阴影将看起来基于照明。

Fog, for example, has no surface Normals. The renderer will only take into account the shadows cast by the light sources (when volumetric fog is used).
例如,雾没有表面法线。渲染器将只考虑由光源投射的阴影(当使用体积雾时)。

|

|
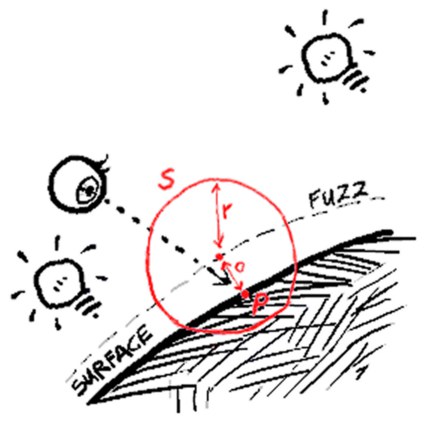
What the ChanLum shader does is gather dispersed light across a given surface. In order to calculate this effect quickly, the shader offsets the sampling point (S) with an offset spacing (O) along the surface normal point (P). The value of (O) defines how thick the virtual fluff layer will be.
ChanLum 着色器所做的是在给定的表面上收集分散的光线。为了快速计算这种影响,着色器用偏置间距(o)沿表面法向点(p)偏移采样点(s)。值(o)定义了虚拟绒毛层的厚度。

ChamLum lets light creep around corners when using this offset. As the illustration above shows, even though the top-most surface point lies on the shadowed (left) side, it still receives light because the sample point ((S) see previous illus.) still does not lie in the shade. This is the basic concept behind ChamLum.
当使用这个偏移时,ChamLum 允许光线在角落周围蔓延。如上图所示,即使最顶端的表面点位于被阴影区(左侧)上,它仍然可以接收光线,因为样本点((s)参见前面的 illus.)仍然不会躺在树荫下。这是 ChamLum 背后的基本概念。

|

|
That‘s why ChanLum also samples to be spread out. This can be achieved in two ways: The first method (Along Normal) is illustrated above. The sample is actually an average sample of the area (S) (the rectangular space). In other words, ChanLum simply takes a set of fog samples along the surface normal, not further away from the original (offset) sample point than radius (R). This smooths the transition from bright to dark, and allows the light to creep along the surface even further.
这就是为什么 ChanLum 也要把样本分散开来。这可以通过两种方法来实现: 第一种方法(沿正常方向)如上所示。样本实际上是该区域(s)(矩形空间)的平均样本。换句话说,ChanLum 只是沿着表面法线提取一组雾样本,而不是比半径(r)离原始(偏移)样本点更远。这使得从明亮到黑暗的过渡变得平滑,并允许光线进一步沿着表面蠕动。

When combining this type of lighting with a Fresnel effect (above), a fuzzy, velvet-like effect will result, that correctly attenuates for shadows.
当结合这种类型的照明与菲涅耳效果(上图) ,一个模糊的,天鹅绒般的效果将会产生,正确地衰减阴影。
|

|
The second method of taking a spread out sample is to measure the average sample of a spherical area (S) with radius (R). To do this properly, ChanLum needs to take random samples within this area. The result will look noisy. This method not only makes the transition smoother but also gives the object another interesting look. This is especially apparent if you increase the sample radius and add a highlight (see below).
第二种方法是用半径(r)测量球面区域(s)的平均样本。为了正确地做到这一点,ChanLum 需要在这个区域内随机采集样本。结果看起来会很嘈杂。这种方法不仅使转换更平滑,而且给对象另一种有趣的外观。如果您增加样本半径并添加高光,这一点尤其明显(见下文)。

|

|
Not only does the shading creep around corners, it seems to be generated by the inside of the object. Only where the object is a lot thicker than the sample area radius does the shading really get darker. The reason being, when the object is thinner than the radius there will be samples taken from the other side of the object, where the object doesn‘t cast a shadow. This effect, when applied well, comes close to SubSurface Scattering, though it is actually entirely different. Nevertheless, it makes for a great wax shader, and when used moderately, can be used to make surfaces like human skin much more realistic, thanks to the light creeping around corners and the softening of shading.
阴影不仅在角落周围蔓延,它似乎是由物体内部产生的。只有当物体比样本区域半径厚很多时,阴影才会变得更暗。原因在于,当物体的半径小于其半径时,就会从物体的另一侧采集样本,这样物体就不会产生阴影。这种效果,如果应用得当,几乎接近次表面散射,尽管它实际上是完全不同的。然而,它是一个伟大的蜡着色器,当使用适度,可以用来使表面像人类皮肤更加现实,感谢光蔓延周围的角落和软化阴影。
The ChanLum Shader as Shadowcaster
强尼 · 肖德饰演的暗影铸造师
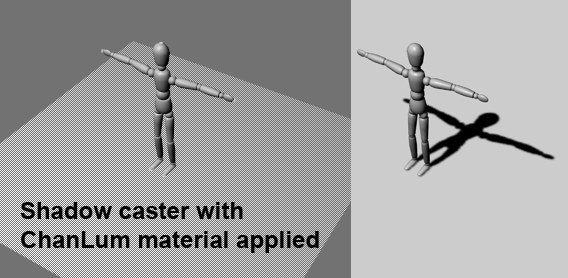
It is often desirable to have a seamless match of shadows and objects when adding 3D objects to live film or images. This is usually done using a dummy object (the shadowcaster). This is where the ChanLum shader comes into use. Load the shader into the shadow caster’s Transparency channel - that’s it. Only the shadow will be visible. Shadow density can be adjusted at the light source.
当添加3D 物体到真实的电影或图像中时,通常需要阴影和物体的无缝匹配。这通常是使用一个假的对象(暗影施法者)。这就是 ChanLum 着色器的用武之地。加载到阴影施法者的透明通道的着色器-就这样。只有阴影是可见的。阴影密度可以在光源处调节。