 Ambient Occlusion Shader 环境遮挡着色器Basic 基础Shader 着色器
Shader Properties
In each of the following sample images, the AO shader was used in the Luminance channel. Its effect can best be seen here. This is, though, not suitable for photorealistic renderings.
在下列每一个样本图像中,AO 着色器被用在亮度通道中。它的效果在这里可以看得最清楚。然而,这并不适合于真实感渲染。
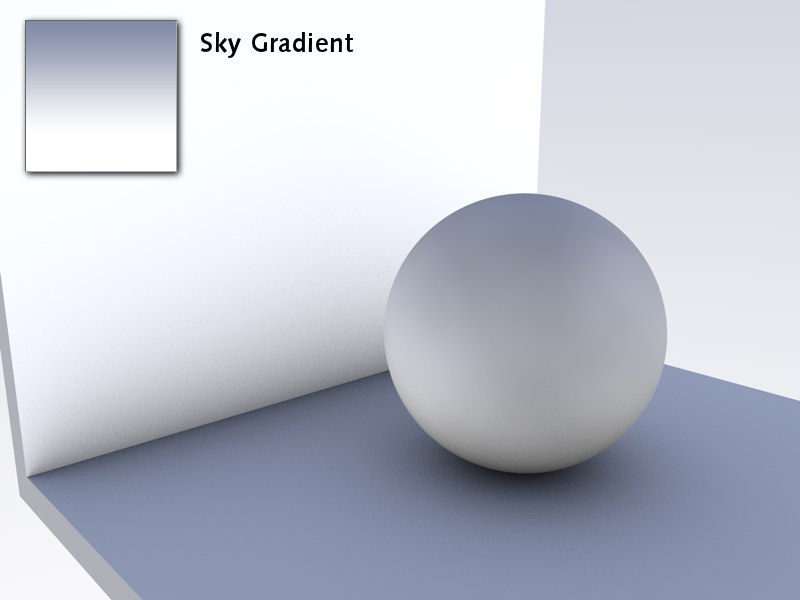
颜色

Use the Color option to define the color gradient that AO assigns, dependent on exposure. Normally, it will be a simple custom black to white gradient but other colors can also be defined.
使用 Color 选项定义 AO 分配的颜色渐变,这取决于曝光。通常,它将是一个简单的自定义黑白渐变,但其他颜色也可以定义。
The left end of the gradient represents areas with minimal exposure (bottom of sphere) and the right side represents areas with maximum exposure.
梯度的左端代表曝光量最小的区域(球体底部) ,右侧代表曝光量最大的区域。
Be aware of the fact that these gradients will be treated as grayscale, depending on the material channel.
请注意,根据材质通道,这些渐变将被视为灰度级。
最小射线长度[0. . + ∞ m ]

Minimum Ray Length determines how the gradient defined in Color will be rendered between exposed and non-exposed areas. The closer the Minimum Ray Length value is to the Maximum Ray Length value, the further the gradient will be pushed towards the edges, which are defined by the maximum ray length.
最小光线长度决定了在曝光区域和非曝光区域之间如何渲染颜色中定义的渐变。最小射线长度的值越接近最大射线长度的值,梯度将被推向边缘,这是由最大射线长度定义的。
This value shouldn’t really be tampered with. Leave it set to its default setting of 0.
这个值不应该被篡改。将它设置为默认设置0。
最大射线长度[0. . + ∞ m ]
 From left to right: increasing 从左到右: 递增Maximum Ray Length 最大射线长度 values. 价值观
This value defines to which distance the surfaces see each other. If low values are used, the wall will not see the sphere and the image is rendered brighter (image: left). Where geometry meets, as with the floor and wall or the sphere and floor, even small rays will fall upon surfaces, which suffices to darken those areas.
这个值定义了两个表面之间的距离。如果使用低值,墙壁将不会看到球体和图像渲染明亮(图像: 左)。在几何学相遇的地方,比如地板、墙壁、球体和地板,即使是微小的光线也会落在表面上,这就足以使这些区域变暗。
If high values are used, a much larger distance will be included within which objects will be able to see each other. This results in a softer, more homogeneous darkening that will cause longer render times (see also sample image at Accuracy setting).
如果使用较高的值,则会包括一个更大的距离,其中对象将能够看到彼此。这会导致更柔和、更均匀的暗化效果,从而延长渲染时间(参见精度设置中的样图)。
In general, lower values are recommended that offer results as in the left-most example above.
一般来说,建议使用较低的值来提供上面最左边示例中的结果。
离散度[0. . 100% ]
 From left to right: 从左到右:Dispersion 分散 values of 0%, 50% and 100%. 分别为0% 、50% 及100%
During each AO calculation, several rays (Samples) will be emitted for each point within a virtual hemisphere in the scene. These samples check to see if any geometry lies within the Maximum Ray Length. Dispersion determines to what extent these samples will be taken into account on the hemisphere’s surface. A value of 0% takes only the hemisphere’s zenith (vertically over the sphere) into account. A value of 100% will take the entire hemisphere into account.
在每个 AO 计算过程中,场景中虚拟半球内的每个点都会发出多个射线(样本)。这些样本检查是否有任何几何体位于最大射线长度之内。分散度决定了这些样品将在多大程度上被考虑在半球的表面。0% 的值只考虑半球的天顶(垂直于球面)。一个100% 的值将把整个半球都考虑进去。
How can this be applied in practice? Imagine Dispersion as blinders. The lower the value, the more the blinders close and the more the sample area will be limited to the vertical.
如何在实践中应用这种方法?把弥散想象成眼罩。数值越低,有色眼镜关闭的越多,样本区域被限制在垂直方向的范围就越大。
The image above shows the effects of: Left = 0% – only the areas directly over (perpendicular to) each point have been taken into account. A value of 100%, on the right, takes all of the sphere’s samples into account and produces a realistic result.
上面的图像显示的影响: 左 = 0%-只有面积直接超过(垂直)每一点已经考虑到。一个100% 的值,在右边,考虑到所有的球体的样本,并产生一个现实的结果。
准确度[0. . 100% ]
The Accuracy, Minimum Samples and Maximum Samples settings are responsible for AO quality. Low quality is accompanied by grainy results. This is not necessarily bad. In fact, in some cases, this may be the desired result since the stochastic result can be of high aesthetic value.
精度,最小采样和最大采样设置负责 AO 质量。低质量是伴随着颗粒状的结果。这并不一定是坏事。事实上,在某些情况下,这可能是期望的结果,因为随机结果可以具有很高的美学价值。
Although, if you prefer homogeneous, seamless transitions, you should select higher quality settings, which will also increase render times.
虽然,如果你喜欢同质的无缝转场,你应该选择更高质量的设置,这也会增加渲染时间。
Use the three previously mentioned settings (especially Accuracy and Maximum Samples) for improved quality.
使用前面提到的三个设置(特别是准确性和最大样本)来改进质量。
The basic AO algorithm is complex so we will not go into detail about it here. We will, though, tell you this much: Samples are required to render AO. The more samples that are used, the more homogeneous (less grainy) the rendering will be – the longer the render times will be as well. Fewer samples, on the other hand, result in shorter render times.
基本的 AO 算法是复杂的,所以我们不会在这里详细讨论它。但是,我们要告诉你的是: 渲染 AO 需要样品。使用的样本越多,渲染的均匀性越好(颗粒越少)——渲染时间也越长。另一方面,样本越少,渲染时间越短。
Of course a maximum number of samples can be calculated for the entire scene. This would take very, very long to calculate and it does not make any sense since a scene contains many areas in which a relatively small number of samples would suffice.
当然,最大数量的样本可以计算出整个场景。这将需要非常,非常长的时间来计算,这是没有任何意义的,因为一个场景包含许多领域,其中相对较少的样本就足够了。
That’s what the Minimum Samples and Maximum Samples settings are for. Use them to specifically control critical and less critical areas of your scene (and interpolate between them).
这就是最小样本和最大样本设置的目的。用它们来特别控制场景中的关键区域和非关键区域(并在它们之间插入)。
The Accuracy setting determines where and in what amount samples must be distributed in order to achieve the best possible result. In critical areas, samples to the amount of Maximum Samples will be used.
精度设置决定了为了达到最佳的可能结果,样品必须分布在何处以及分布的数量。在关键区域,将使用最大样品量的样品。
Hence, the Accuracy setting has the most influence in critical areas (since higher values in these areas lead to more samples) and less influence in less critical areas, which use the Minimum Samples value.
因此,精确度设置对关键区域的影响最大(因为这些区域的数值越高,样本越多) ,而对使用最小样本值的非关键区域的影响较小。
例子:
The following scene (next image) was rendered with various values for this setting:
下面的场景(下一个图像)用这个设置的不同值进行渲染:
The relative render times (per column) are noted on each image in order to give you an impression how render time is affected by a change in the settings.
相对渲染时间(每列)被标记在每个图像,以便给你一个印象如何渲染时间是如何受到改变的设置。
 Consistent in all images: 在所有图像中都是一致的:Minimum Ray Length 最小射线长度0, Dispersion 分散100, and ,及Contrast 对比10.
最少样本数目[1. . 10000]
Use this setting to define the number of samples that should be used in less critical areas.
使用此设置可定义应在较不关键领域使用的样本数量。
最大样本数[1. . 10000]
Use this setting to define the number of samples that should be used in critical areas. The exact number of samples will be dispersed dynamically in correlation to the Accuracy setting.
使用此设置可定义应在关键领域使用的样本数量。精确的样本数量将根据精度设置动态地离散。
对比度[-100. . 100% ]
Use this setting to adjust the AO effect’s contrast. Negative values can also be entered!
使用此设置来调整 AO 效果的对比度。也可以输入负值!
使用天空环境
 The AO shader in the Environment channel, Use Sky
Environment active, no light source. AO 着色器在环境通道中,使用天空环境活动,无光源
The AO shader in the Environment channel, Use Sky
Environment active, no light source. AO 着色器在环境通道中,使用天空环境活动,无光源
If AO is used in the Diffusion material channel, a separate light source must be used (even if it’s only the Auto light).
如果 AO 是用于扩散材质通道,一个单独的光源必须使用(即使它只是自动光)。
AO also works without a light source if the Sky object is used as Illumination. If Use Sky Environment is active, the reflected sky color will be multiplied onto the final AO image. To do this, AO must be placed into the Environment or Luminance material channels.
AO 也可以在没有光源的情况下工作,如果天空物体用作照明的话。如果使用天空环境被激活,反射的天空颜色将被乘到最终的 AO 图像。要做到这一点,AO 必须放置在环境或亮度材质通道。
The 这个Seen by AO 作者: AO option is also present in the Compositing tag. With it, you can define a separate Sky object, specifically for AO. 选项也出现在合成标记中。通过它,您可以定义一个单独的 Sky 对象,特别是 AO 对象评估透明度
 Active 活跃Evaluate
Transparency 评估透明度 option with decreasing transparency from left to right. 从左到右逐渐减少透明度的选项
Active 活跃Evaluate
Transparency 评估透明度 option with decreasing transparency from left to right. 从左到右逐渐减少透明度的选项
When this option is active, transparency will be analyzed on the basis of the Transparency or Alpha material channels. In doing so, the degree of transparency will be taken into consideration: A semi-transparent sphere will still cause some AO in spite of this option being active.
当此选项被激活时,透明度将根据透明度或 Alpha 材质通道进行分析。在这样做时,将考虑到透明度: 一个半透明的球体仍然会导致某些 AO,尽管这种选择是积极的。
只有自我遮蔽
 Left: 左图:Self Shadowing
Only 只有自我遮蔽 not active. Right: 不活跃。右:Self Shadowing Only 只有自我遮蔽 active. Floor and wall are
separate objects. 地板和墙壁是分开的物体
Left: 左图:Self Shadowing
Only 只有自我遮蔽 not active. Right: 不活跃。右:Self Shadowing Only 只有自我遮蔽 active. Floor and wall are
separate objects. 地板和墙壁是分开的物体
When this option is active, separate objects will not see each other, they will only see themselves.
当此选项处于活动状态时,单独的对象将不能看到彼此,它们只能看到自己。
倒转方向
If this option is enabled, the AO effect will be inverted. Corners and holes will not be ascertained and instead outward pointing edges and corners/peaks will be found. Imagine a sphere around an object: the more surface a point sees of the sphere the darker (default behavior) AO will render this point.
如果启用此选项,AO 效果将被反转。将不确定边角和孔洞,而是找到向外指向的边缘和角/峰。想象一个球体围绕一个对象: 一个点看到的球体表面越多,AO 将呈现这个点。
What is this good for?
这有什么好处?
If exposed surface should, for example, have a different appearance than the remaining surfaces, place the AO shader into the Alpha channel and the respective material will only have an effect on outward pointing edges and corners/peaks:
例如,如果外露表面的外观与其他表面不同,将 AO 着色器放入 Alpha 通道,相应的材质只会对向外指向的边缘和角/峰值产生影响:
 This option can be used to restrict effects to
outward pointing edges and corners/peaks. 此选项可用于将效果限制为向外指向的边缘和角/峰值
This option can be used to restrict effects to
outward pointing edges and corners/peaks. 此选项可用于将效果限制为向外指向的边缘和角/峰值
In the image above you can see surface wear on the left and on the right a quickly rendered Subsurface Scattering imitation on the edges and in the corners.
在上面的图片中,你可以看到左边和右边的表面磨损,在边缘和角落里,一个快速渲染的次表面散射。