 Types
Types Sketch Style Tag 草图样式标签Basic 基础Main 主要Lines 台词Shading 阴影Selections 选择Maps 地图
Lines
台词
These settings control which line types and Sketch materials are used by the tag. They work in the same way as the settings of the same name in the Sketch and Toon post effect (see Sketch and Toon Post Effect).
这些设置控制标签使用哪些行类型和草图材质。它们的工作方式与素描和 Toon 后期效果中相同名字的设置相同(见素描和图恩后期效果)。
Types
类型
大纲
An object’s unhidden contour lines.
物体未隐藏的等高线。
折叠
A Fold is the edge between a front and rear polygon.
折叠是前面和后面多边形之间的边。
重叠
Overlaps are silhouette lines that overlap the mesh, or the difference between Fold and creases.
重叠是重叠网格的轮廓线,或折叠和折痕之间的区别。
折痕
Non-smoothed object edges.
非平滑的物体边缘。
角度
This renders the edges of two adjoining polygons that lie in a certain angle or within a certain rotational range to each other.
这使得两个相邻多边形的边缘成一定的角度或者相互之间在一定的旋转范围内。
边境
These are edges that only belong to a single polygon.
这些边只属于一个多边形。
材质
These are edges that belong to regions of a material assigned to a polygon selection.
这些边属于指定给多边形选择的材质区域。
边缘
Renders each individual edge.
呈现每个单独的边缘。
十字路口
Renders edges that are created when one object intersects another.
呈现一个对象与另一个对象交叉时创建的边缘。
三角测量
A triangulated line is rendered for each quad.
为每个四边形呈现一条三角形线。
动作
For objects in motion, lines can be calculated in the direction of motion.
对于运动中的物体,可以沿运动方向计算直线。
等高线
Renders lines of equal angle or height.
呈现等角度或等高的线条。
等臂
Isoparms render lines of the same name from generated objects.
等臂线渲染生成的物体的同名线条。
样条
Splines will be rendered.
将渲染样条。
粒子
Particles will be rendered. Make sure not to place any objects into the Emitter.
粒子将被渲染。确保不要将任何对象放入发射器中。
联合
The following line types will always be created on their own layer: Motion, Particle, Spline, Isoparm, Material alpha map lines. 下面的线条类型总是在它们自己的图层上创建的: 运动、粒子、样条、等臂、材质 alpha 贴图线The Combine mode enables you to merge line types in the following ways.
组合模式使您能够以下列方式合并行类型。
没有
Each line type is created separately and rendered individually on its own layer. If more than one line type produces the same line when using effects such as transparency or patterns, you may notice unwanted results where the lines overlap. An example would be enabling Creases and Angle, which may create lines for the same polygon edges. When strokes are enabled in the Sketch material, the strokes will be limited to lines of the same type.
每个线条类型都是单独创建的,并在自己的图层上单独呈现。如果多个线条类型在使用透明度或模式等效果时产生相同的线条,您可能会注意到不希望看到的线条重叠的结果。例如,启用 Creases 和 Angle,它们可以为相同的多边形边创建线。当在素描材质中使用笔画时,笔画将被限制在同一类型的线条上。
所有
All line types that use the same Sketch material will be combined on a single layer. This helps to prevent overlapping (see None above). When strokes are enabled in the Sketch material, all line types in this layer are available for the strokes to draw along.
所有使用相同素描材质的线条类型将组合在一个单一层上。这有助于防止重叠(参见上面的 None)。当在素描材质中启用笔画时,该层中的所有线条类型都可供笔画沿线绘制。
独家报道
The line types are merged so that only lines which do not overlap between multiple types are created.
合并行类型,以便只创建多个类型之间不重叠的行。
包容性
The enabled line types are merged to create lines that only exist in more than one line type; this is the opposite effect to Exclusive mode.
合并已启用的行类型以创建只存在于多个行类型中的行; 这与 Exclusive 模式的效果相反。
自我淘汰
See Hidden Cull.
参见隐藏剔选。
对象
See Hidden Cull under Objects.
参见对象下的隐藏剔除。
隐藏剔除
To switch off hidden lines, set Hidden Cull to Self and clear the Default Hidden box or local Hidden box.
若要关闭隐藏线,请将 Hidden Cull 设置为 Self 并清除默认隐藏框或本地隐藏框。
These settings control which lines are visible and which are hidden. The Hidden Cull mode sets which objects in the scene are used to find out if a line is hidden. In the following examples, the visible lines are black, the hidden lines are red.
这些设置控制哪些行是可见的,哪些行是隐藏的。隐藏剔除模式设置场景中的哪些对象用于查找是否隐藏了一条线。在下面的示例中,可见线是黑色的,隐藏线是红色的。
自我
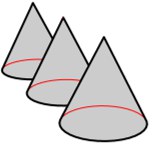
In Self mode, only the object which created the line is used to find out if the line is hidden.
在 Self 模式中,只使用创建行的对象来查看行是否隐藏。
孩子们
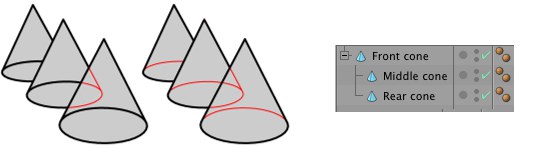 Children mode with Self-Culling disabled (left) and
enabled (center). 禁用自我淘汰(左)和启用(中)的子模式
Children mode with Self-Culling disabled (left) and
enabled (center). 禁用自我淘汰(左)和启用(中)的子模式
Children mode uses the parent and its children to find out if a line is hidden.
子模式使用父模式及其子模式查找是否隐藏了一条线。
希拉奇
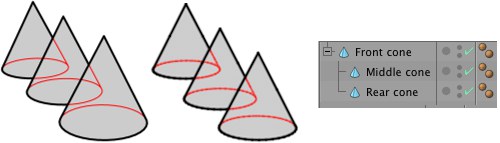
 Hierarchy mode with Self-Culling disabled (left)
and enabled (right). 层次结构模式,禁用自裁剪(左)并启用(右)
Hierarchy mode with Self-Culling disabled (left)
and enabled (right). 层次结构模式,禁用自裁剪(左)并启用(右)
Hierarchy mode finds the top-most parent and then uses the parent and all its children to find out if a line is hidden.
层次结构模式查找最顶层的父级,然后使用父级及其所有子级查找是否隐藏了一条线。
工程项目
In this mode, the line is checked against all objects in the scene to find out if it is hidden.
在这种模式下,对照场景中的所有对象来检查线条是否隐藏。
对象
 Object mode with Self-Culling disabled (left) and
enabled (right) 禁用(左)和启用(右)自删除的对象模式
Object mode with Self-Culling disabled (left) and
enabled (right) 禁用(左)和启用(右)自删除的对象模式
This mode uses the objects in the Objects box to find out if a line is hidden.
此模式使用“对象”框中的对象来查找是否隐藏了一条线。
默认隐藏
See also Default Visible
参见默认可见
Line Materials
Default Visible
线条材质默认可见
Use the Default Visible and Default Hidden boxes to specify which Sketch material to use for visible lines and which to use for hidden lines (Drag & drop the materials from the Material Manager into the boxes). Leaving a box blank means those lines will not be rendered.
使用默认可见和默认隐藏框来指定哪些素描材质用于可见线,哪些用于隐藏线(将材质从材质管理器拖放到框中)。保留空格意味着这些行不会被呈现。
These are the default materials and they are used for all line types except those with their own materials specified in their Visible and Hidden boxes (to display the Visible and Hidden boxes, set Line Materials to Both).
这些是默认的材质,它们用于所有的线条类型,除了那些在可见和隐藏框中指定了它们自己的材质的线条类型(显示可见和隐藏框,将线条材质设置为两者)。
 To display the Visible and Hidden boxes for each
enabled line type, set Line Materials to Both. 若要显示每种启用的行类型的可见和隐藏框,请将“行材质”设置为“两者”
To display the Visible and Hidden boxes for each
enabled line type, set Line Materials to Both. 若要显示每种启用的行类型的可见和隐藏框,请将“行材质”设置为“两者”
Each box has a triangle button to its right which you can click to access the following commands:
每个框的右边都有一个三角形按钮,你可以点击它来访问以下命令:
Outline
大纲
大纲剔除

The Outline Culling mode controls which objects will combine their outlines if they overlap.
大纲剔除模式控制哪些对象将组合他们的轮廓,如果他们重叠。
自我

Outlines are not combined between overlapping objects, but look up Self Culling.
轮廓在重叠对象之间不组合,但查找自我剔除。
孩子们
Children mode combines overlapping outlines for the parent and its children.
子模式组合父模式和子模式的重叠轮廓。
希拉奇
Hierarchy mode looks for the top-most parent and then checks all children of that parent.
层次结构模式查找最顶层的父级,然后检查该父级的所有子级。
 Children mode (left) and Hierarchy mode (center).
In Children mode, the back cone has a separate outline because it is not a child of the middle
cone. 子模式(左)和层次模式(中)。在儿童模式中,后圆锥体有一个单独的轮廓,因为它不是中间圆锥体的子
Children mode (left) and Hierarchy mode (center).
In Children mode, the back cone has a separate outline because it is not a child of the middle
cone. 子模式(左)和层次模式(中)。在儿童模式中,后圆锥体有一个单独的轮廓,因为它不是中间圆锥体的子
工程项目

The overlapping outlines of different objects are combined.
不同物体的重叠轮廓被组合在一起。
对象
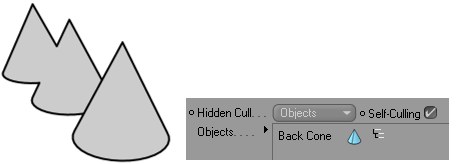
Sketch and Toon combines the outline of each object in the Objects box with the outline of any other object it overlaps.
Sketch 和 Toon 将对象框中每个对象的轮廓与它重叠的任何其他对象的轮廓结合起来。
自我淘汰
 Original object at left: Scene mode, Self-Culling
deactivated, Self-Culling activated. 原始对象在左边: 场景模式,自我淘汰停用,自我淘汰激活
Original object at left: Scene mode, Self-Culling
deactivated, Self-Culling activated. 原始对象在左边: 场景模式,自我淘汰停用,自我淘汰激活
If Self-Culling is active each object’s outline will be combined with the total outline. This will also occur if Outline Culling is set to Self.
如果自我剔除是活动的,每个对象的轮廓将与总轮廓相结合。如果大纲剔除设置为“自我” ,也会出现这种情况。
对象
If Object is selected in the culling outline menu, objects can be placed via drag & drop into this field to be included in the calculation.
如果在剔除大纲菜单中选择了对象,则可以通过拖放将对象放置到该字段中,以包括在计算中。
Folds
折叠
折叠方向
The Fold Direction setting defines which types of folds are created: all folds (Any), folds in the direction of front to back, or folds in the direction of back to front.
褶皱方向设置定义了哪些类型的褶皱被创建: 所有的褶皱(任何) ,从前面到后面的方向的褶皱,或者从后面到前面的方向的褶皱。

The Fold Direction can be useful if you notice many unwanted lines forming creases.
折叠方向可以是有用的,如果你注意到许多不想要的线形成折痕。
Generally the Fold Direction should be set to Any, otherwise it reduces the number of lines created, which can result in gaps.
一般来说,折叠方向应该设置为 Any,否则它会减少创建的行数,这可能会导致间隙。
Creases
折痕
Min [0.180 ° ]
The Min setting helps to prevent creases from appearing in flat parts of the mesh. Each crease is only created if the angle between its polygons is greater than or equal to the Min value.
最小设置有助于防止折痕出现在网格的扁平部分。只有当多边形之间的夹角大于或等于最小值时,才会创建每个折痕。
Angle
角度
Min [0.180 ° ]
The Min and Max values define the range within which angle lines are created.
最小值和最大值定义了创建角线的范围。
麦克斯[0.180 ° ]
Material
材质
模式
The Mode defines whether to include or exclude Material tags for edges around alpha maps or materials. Drag & drop the Material tags into the Tags box.
模式定义了是否包括或排除材质标签的边缘周围的阿尔法地图或材质。将 Material 标签拖放到 Tags 框中。
联合
If the Combine option is enabled, Sketch and Toon will combine the outline for any overlapping alpha maps.
如果启用了合并选项,素描和图恩将合并任何重叠的阿尔法映射的轮廓。
标签
Intersections
十字路口
对象
This mode defines which objects are used to find out if there are intersections.
这个模式定义了使用哪些对象来查找是否有交叉点。
自我
This mode only produces intersection lines where an object intersects itself.
这种模式只生成物体与自身相交的交线。
儿童的等级
Children mode checks the parent for intersections with its children. Hierarchy mode looks for the top-most parent and then checks for intersections with any children of that parent.
子模式检查父模式是否与其子模式交叉。层次结构模式查找最顶层的父级,然后检查与该父级的任何子级的交叉点。
工程项目
This creates intersections where any object in the scene intersects any other object.
这样就创建了场景中任何物体与其他物体交叉的交叉点。
对象
Sketch and Toon checks the objects in the Objects box for intersection with any other objects in the scene.
素描和图恩检查对象框中的对象是否与场景中的其他对象相交。
自相交
Enable this option to switch on lines for where an object intersects itself.
启用此选项可以在对象与自身交叉的线上切换。
对象
Objects in this field will be included in the calculation.
此字段中的对象将包含在计算中。
Motion
动作
Note that the movement lines are only displayed when the animation is rendered to the Picture Viewer (i.e., across multiple frames).
请注意,只有当动画呈现到图片查看器(即跨多个帧)时,移动线才会显示。
行数[1. . 1000]
The number of motion lines to create.
要创建的运动线数。
模式
速度
Velocity mode creates motion lines based on the object’s current velocity — the greater the velocity, the longer the lines. The lines will only appear if the object is travelling at least as fast as the Threshold velocity.
速度模式根据物体的当前速度创建运动线ーー速度越大,运动线越长。只有当物体的运动速度至少与阈值速度一样快时,这些直线才会出现。
小径
Trail mode creates motion lines based on the object’s path. To limit the trail to recent frames only, enable the Limit option and set Trail to the desired number of frames.
拖曳模式根据对象的路径创建运动线。若要将踪迹限制到最近的帧,请启用“限制”选项,并将踪迹设置为所需的帧数。
限制 trail 阈值[0. . + ∞ m ]
The minimum speed at which motion lines will be generated.
产生运动线的最小速度。
偏见
Enable the Bias option if you want the lines to be zero length at the Threshold velocity, otherwise they will already have some length at the Threshold velocity.
如果您希望线在阈值速度时为零长度,则启用 Bias 选项,否则它们在阈值速度时已经具有一定的长度。
2 d line
These are lines drawn away from the object or polygon selection based on a 2D projection.
这些是从物体或基于二维投影的多边形选择中绘制的直线。
大纲
Creates from the line types enabled in the Sketch Style tag or the post effect.
使用草图样式标记或文章效果中启用的行类型创建。
Shapes are created along lines created for the object (e.g., creases, edges or splines; isoparms won’t work), which can be interpreted as a type of motion blur (even though nothing is actually blurred).
形状是按照为物体创建的线条创建的(例如,折痕、边缘或样条; 等臂不起作用) ,这可以被解释为一种运动模糊(即使实际上没有什么是模糊的)。
曲线
Enable the Curves option to creates curves along the motion.
启用曲线选项来创建沿着运动的曲线。
曲线宽度[-100. . 100% ]
Use the Curve Width setting to adjust the width of the curves.
使用曲线宽度设置来调整曲线的宽度。
曲线高度[0. . 200% ]
Use the Curve Height setting to adjust the height of the curves.
使用曲线高度设置来调整曲线的高度。
花键
Uses a spline object (the Spline LINK control). The spline is used from the XY plane with the dimensions of the Spline object (the object matrix is not used).
使用样条对象(Spline LINK 控件)。样条从 XY 平面使用样条对象的尺寸(不使用对象矩阵)。
花键
A spline object (not spline primitives) can be placed into this field per drag & drop. It will then be used as a movement guide.
一个样条对象(不是样条原语)可以放置到这个领域每拖放。然后它将被用作一个运动指南。
长度[0. . + ∞% ]
Length is the scale for the velocity.
长度是速度的比例。
变化[0. . + ∞% ]
Varies the Length value.
改变长度值。
比例 x [0. . + ∞% ]
Scale X scales the motion lines.
缩放 x 尺度的运动线。
标度 y [0. . + ∞% ]
Scale Y scales the motion lines.
刻度 y 可以缩放运动线。
Offset[-∞..+∞]
Offset[-∞..+∞%]
Relative
偏移[-∞ . . + ∞]偏移[-∞ . + ∞% ]相对
The Offset is the size of the gap between the object or polygon selection and the motion lines. Enable the Relative option to make the offset a percentage of the object’s size on screen — this is useful for objects moving towards or away from the camera.
偏移量是物体或多边形选区与运动线之间的间隙大小。启用相对选项,使偏移量占屏幕上对象大小的百分比ーー这对于向相机移动或远离相机的对象非常有用。
削减
Squash or stretch the motion lines as they get further away from the object or polygon selection.
压缩或拉伸运动线,因为他们得到远离对象或多边形选择。
力量 x [-1000. . 100% ]
Defines the strength of tapering along the X axis.
定义沿 x 轴逐渐变细的强度。
力量 y [-1000. . 100% ]
Controls the strength of tapering along the Y axis.
控制沿 y 轴逐渐变细的强度。
Fade Opacity
Strength[0..100%]
淡化不透明度[0. . 100% ]
Use this setting to adjust the strength of the Fade Opacity option.
使用此设置来调整淡入不透明选项的强度。
淡化厚度
Thin out and fade the lines as they get further away from the object or polygon selection.
细化和淡出线条,因为他们得到更远的对象或多边形的选择。
力量[0. . 100% ]
Use this setting to adjust the strength of the Fade Opacity option.
使用此设置来调整淡入不透明选项的强度。
Contour
等高线
模式
The following modes are available:
以下模式可供选择:
角度
The Angle setting defines which axis is used.
角度设置定义了使用哪个轴。
职位
In Position mode you can choose the axis along which the contours are created.
在位置模式下,你可以选择沿着创建轮廓的轴线。
In case a given object contains several UVW tags, a tag can be specified using the Sketch Style tag (drag the UVW tag from the Selection tab into the UVW Contour field).
如果给定对象包含几个 UVW 标记,可以使用 Sketch Style 标记指定一个标记(从 Selection 选项卡拖动 UVW 标记到 UVW Contour 字段)。
角度
The Angle setting defines which axis is used. You can choose the X, Y or Z axis of the object or world coordinate system, or the view’s (i.e. camera’s) X, Y or Z axis.
角度设置定义了使用哪个轴。你可以选择物体或世界的 x、 y 或 z 轴,或者视图的 x、 y 或 z 轴(即相机的坐标系)。
Min [0.180 ° ]
This setting defines the range of rotation over which the contour lines will be created. 0° will result in a right angle to the selected axis.
这个设置定义了旋转的范围,其中轮廓线将被创建。0 ° 将导致与所选轴成直角。
麦克斯[0.180 ° ]
These define the range of angles over which the contour lines will be created. 0° means planar to the axis chosen (see Angle above).
这些定义的角度范围的等高线将创建。0 ° 表示所选轴线的平面(见上面的角度)。
步骤[1. . 10000]
This is the number of contour lines to create.
这是要创建的等高线的数量。
职位
In Position mode you can choose the axis along which the contours are created. You can choose the X, Y or Z axis of the object or world coordinate system, or the view’s (i.e. camera’s) X, Y or Z axis.
在位置模式下,你可以选择沿着创建轮廓的轴线。你可以选择物体或世界的 x、 y 或 z 轴,或者视图的 x、 y 或 z 轴(即相机的坐标系)。
间隔
The Spacing mode gives you two ways to control the distance between contour lines: Relative mode and Absolute mode.
间距模式给你两种方式来控制轮廓线之间的距离: 相对模式和绝对模式。
Relative mode sets the number of contour lines to create (Steps) and how far along the object they start and end (Min and Max).
相对模式设置等高线的数量创建(步骤)和多远沿对象,他们开始和结束(最小和最大)。
Absolute mode sets the distance between each contour line (Step). The Offset value enables you to adjust where the contour lines start along the object.
绝对模式设置每个轮廓线之间的距离(步骤)。偏移量值使您能够调整轮廓线开始沿对象的位置。
变异[0. . + ∞ m ]
Use the Variation value to vary the size of the gap between contour lines. The default value of 0 means no variation and the lines will be equal distances apart.
使用变化值来改变等高线之间间隙的大小。默认值0表示没有变化,而且两条直线之间的距离相等。
偏移量[-∞ . . + ∞ m ]
步骤[-∞ . . + ∞ m ]
最小值[0.100% ]
最高限额[0.100% ]
步骤[1. . 10000]
旋转[-180. . 180 ° ]
This rotates the axis on which the contour lines are based.
这旋转的轴线上的等高线是基于。
If the object has multiple UVW tags, you can specify which of these should be used via the Sketch Style tag (Drag & drop the UVW tags to be used into the Contour UVW box on the Sketch Style tag’s Selections tab).
如果对象有多个 UVW 标记,您可以通过草图样式标记指定应该使用哪些标记(拖放 UVW 标记,将其用于草图样式标记选择选项卡上的 Contour UVW 框中)。
 This is which coordinate to use: U or
V. 这是要使用的坐标: u 或 v
This is which coordinate to use: U or
V. 这是要使用的坐标: u 或 v
最小值[0.100% ]
Use this setting to define where a given line should start.
使用此设置定义给定行的开始位置。
最高限额[0.100% ]
The Min and Max values define how far along the object the lines start (Min) and end (Max).
Min 和 Max 值定义了行开始(Min)和结束(Max)的距离。
步骤[1. . 10000]
This is the number of contour lines to create.
这是要创建的等高线的数量。
Particles
粒子
模式
There are two modes for controlling the length of the particle lines.
粒子线的长度有两种控制方式。
Velocity mode creates a straight line from each particle’s current position. The line is as long as the particle would travel in one second provided Velocity Scale is set to 100%. Use a higher Velocity Scale value to lengthen the lines or a lower value to shorten them. The line points in the particle’s current direction.
速度模式从每个粒子的当前位置创建一条直线。如果速度等级设置为100% ,粒子在一秒钟内运动的距离就是这条线。使用较高的速度刻度值来加长行或较低的值来缩短它们。这条线指向粒子的流动方向。
Trail mode creates lines for the trail (i.e. flight paths already travelled) of the particles. The Limit and Trail settings limit the length of each line to the most recent part of the trail. For example, to draw the trail travelled by the particles over the past ten frames, enable Limit and set Trail to 10 F.
轨迹模式为粒子的轨迹(即已经走过的飞行路径)创建线条。“极限”和“路径”设置将每条路线的长度限制在路径的最新部分。例如,要绘制粒子在过去10帧中所经过的轨迹,启用“极限”并将轨迹设置为10 f。
Note for the PathMode, the entire animation must be rendered in the Picture Viewer so the particles are visible.
注意,对于 PathMode,整个动画必须在图片查看器中呈现,这样粒子才是可见的。

From left to right:
从左到右:
限制
Enables the Limit option.
启用 Limit 选项。
小径
If, for example, you want to render the path that was covered over the previous ten frames, activate Limit and set Trail to 10B.
例如,如果你想渲染前十帧覆盖的路径,激活极限并将 Trail 设置为10B。
速度表[0. . 1000% ]
Use this setting to define the length of the particle lines.
使用此设置定义粒子线的长度。
关于死亡
The On Death setting controls what happens to a line when its particle dies.
死亡设置控制一条线的粒子死亡时会发生什么。
保持划臂动作
With these modes, each line remains or disappears respectively when its particle dies.
在这些模式下,每条直线的粒子死亡时,它们分别保留或消失。
用完了
When each particle dies, its line gets shorter and shorter until it eventually disappears, like a train disappearing into a tunnel.
当每个粒子死亡时,它的直线变得越来越短,直到最终消失,就像火车消失在隧道里一样。
淡出
Each line fades out gradually after its particle dies.
每一条线都在它的粒子死后逐渐消失。
淡出
The Fade value defines how long the line takes to fade out.
Fade 值定义行淡出所需的时间。