 Comb 梳子Options 选择Tool 工具
Options
选择
方向
As the name suggests, this setting is used to select the direction in which the guides should be laid. You can select from the following options:
顾名思义,这个设置用于选择导线应该放置的方向。你可以从以下选项中选择:
力量[-100. . 100% ]
Use this setting to adjust the strength of the guides that pass between the teeth of the comb. Negative values will reverse the effect.
使用此设置可调整梳齿之间通过的导轨的强度。负值会逆转这种效果。
花键
 A simple circular spline over the surface of the
head will create a twirl (inset). 一个简单的圆形样条在头部表面将创建一个旋转(插入)
A simple circular spline over the surface of the
head will create a twirl (inset). 一个简单的圆形样条在头部表面将创建一个旋转(插入)
A spline object can be dragged into this field that will more or less determine the orientation of the guides. The following applies: The tangents of the splines nearest the guides will be used to determine the orientation of the guides. You can also reverse a spline’s point sequence with the Cinema 4D Reverse Sequence tool (main menu: Mesh / Spline / Reverse Sequence), which will also reverse the direction of the tangent and subsequently the orientation of the guide.
可以将样条对象拖入此字段,该字段将或多或少地决定向导的方向。以下应用: 最接近导轨的样条切线将用于确定导轨的方向。你也可以使用 Cinema 4D 反序列工具(主菜单: Mesh/Spline/Reverse Sequence)反转样条的点序列,这也将反转切线的方向,随后反转指南的方向。
纹理
If you select Texture in the Direction menu, you will be able to load a bitmap into this Texture field. The RGB values of the bitmap will be utilized: Red=X; green=Y; blue=Z. These colors represent the directions in which the hair will be combed.
如果你在方向菜单中选择纹理,你将能够加载到这个纹理字段的位图。将使用位图的 RGB 值: Red = x; green = y; blue = z。这些颜色代表将要梳理毛发的方向。
曲线

Use this curve to define the curvature along the length of the guides. A horizontal line in the center of the graph represents a neutral position.
使用这条曲线来定义沿着导轨长度的曲率。图形中心的水平线表示中立位置。
来自 Root
If this option is active, only the original direction of the guide root segment can serve to bend the guides.
如果此选项处于活动状态,则只有导轨根段的原始方向可用于弯曲导轨。
防止交叉路口
If the hair is growing on a polygonal surface, activating this option will prevent the hair from penetrating the surface when combed.
如果毛发是生长在一个多边形的表面,激活这个选项将防止毛发穿透表面时,精梳。
几何加权 <
 Top: A hair-covered Sweep object; Below: The same
curve after being combed using 上图: 一个盖着毛发的扫描物体; 下图: 同样的曲线,在梳理后使用Geometry Weighting 几何加权. The guides follow the shape of
the geometry. 。导游遵循几何形状
Top: A hair-covered Sweep object; Below: The same
curve after being combed using 上图: 一个盖着毛发的扫描物体; 下图: 同样的曲线,在梳理后使用Geometry Weighting 几何加权. The guides follow the shape of
the geometry. 。导游遵循几何形状
Geometry Weighting is a very practical function to make guides follow the shape of geometry. Hair looks ahead a certain distance and will orient the hair based on the direction of the geometry. In the example above, you can see how the hair closely follows the shape of the curve.
几何加权是一个非常实用的功能,使导游遵循几何形状。毛发向前看一定的距离,将基于几何学的方向确定毛发的方向。在上面的例子中,你可以看到毛发是如何紧密地跟随着曲线的形状。
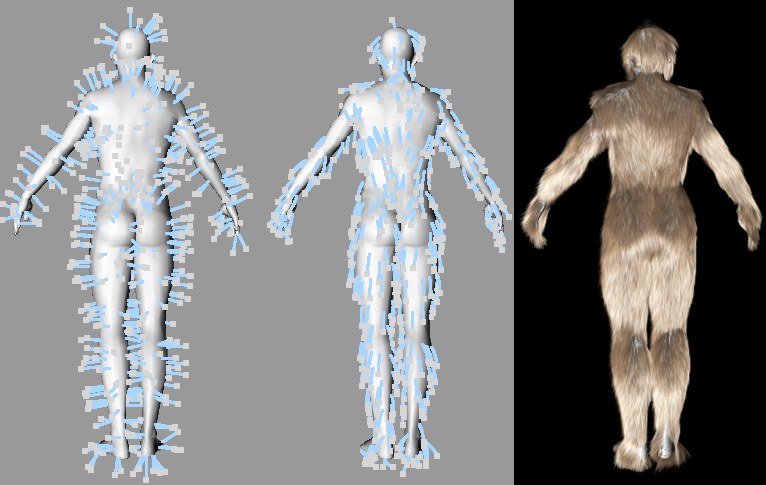
Geometry Weighting is the perfect tool to add fur to a complete character (e.g., a Bigfoot) when the fur has to follow the shape of the geometry:
几何加权是一个完美的工具添加毛皮到一个完整的字符(例如,一个大脚)时,毛皮必须遵循几何形状:
重量[0. . 100% ]
Use this setting to define to what degree the hair will adhere to the geometry.
使用此设置定义毛发将坚持到什么程度的几何形状。
限制距离[0. . + ∞ m ]
Use Limit in conjunction with Distance to define the distance to which Hair should look ahead when laying the guides.
使用极限结合距离定义的距离,毛发应该向前看时,铺设指南。