
Resource Editor
资源编辑器
常规
The Resource Editor is used to configure user interfaces for nodes. You can define a range of file types that should be shown to the user in the Material Editor when the Node Material is edited. Various strings for different language versions can also be saved.
资源编辑器用于配置节点的用户界面。可以定义一系列文件类型,这些文件类型在编辑节点材质时应在材质编辑器中显示给用户。还可以保存不同语言版本的各种字符串。
An example of how this can be applied can be seen in the Uber Material, which is a material based on nodes but offers the same information as the default materials in the Material Editor.
可以在 Uber 材质中看到这种应用的一个例子,这是一个基于节点的材质,但是在材质编辑器中提供了与默认材质相同的信息。
The different groups and parameters for these settings were defined using the Resource Editor.
这些设置的不同组和参数是使用资源编辑器定义的。
If you already have a Node Material or Node Shader open the Node Editor, you can right-click in the Node Editor and select Edit Resource to open a separate Resouce Editor window.
如果您已经有一个节点材质或节点着色器打开节点编辑器,您可以右键单击节点编辑器并选择编辑资源打开一个单独的资源编辑器窗口。
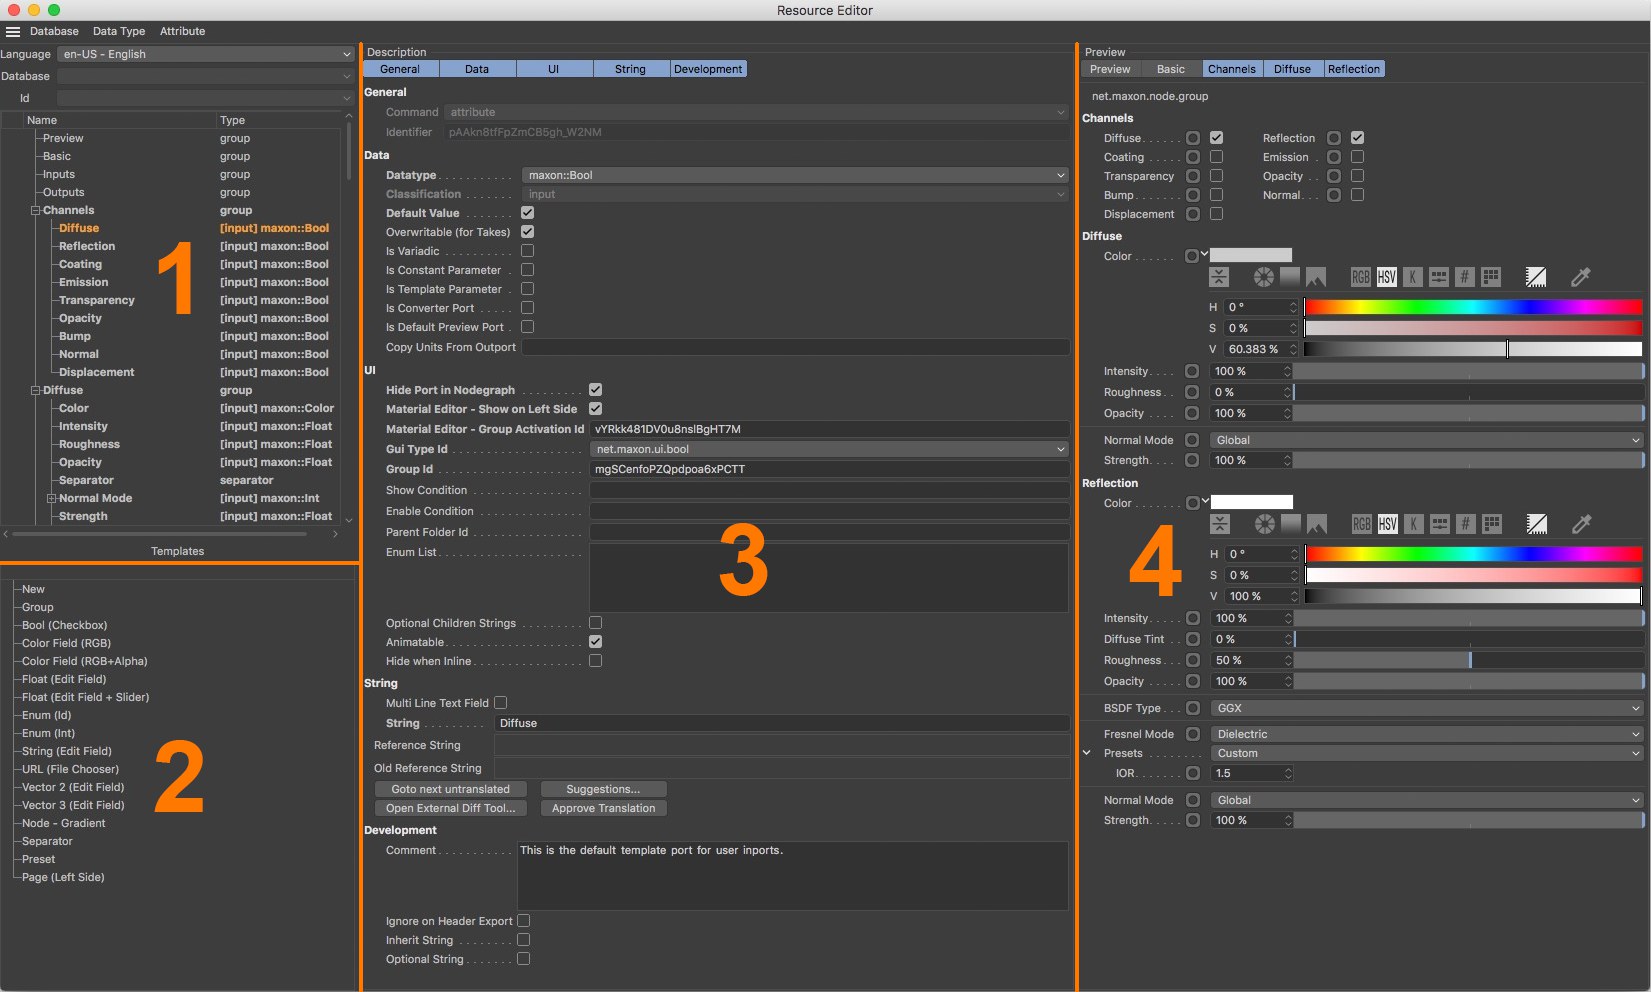 Next to (1) you will find an overview of all
existing attributes and properties. In the Template area next to (2) you will find a list of common file types
for new attributes and commonly used sorting elements (groups and separators). At the center of the Resource
Editor next to (3) you will find the settings available for the selected attribute. Finally, at the far right
next to (4) you will find an integrated Attribute Manager where ports, attributes and properties can be
checked in their display and function. 在(1)旁边,您将找到所有现有属性和属性的概述。在(2)旁边的 Template 区域,您将找到一个新属性和常用排序元素(组和分隔符)的常用文件类型列表。在资源编辑器(3)旁边的中心,您将找到所选属性的可用设置。最后,在最右边(4)你会发现一个集成的属性管理器,其中的端口,属性和属性可以检查它们的显示和功能
Next to (1) you will find an overview of all
existing attributes and properties. In the Template area next to (2) you will find a list of common file types
for new attributes and commonly used sorting elements (groups and separators). At the center of the Resource
Editor next to (3) you will find the settings available for the selected attribute. Finally, at the far right
next to (4) you will find an integrated Attribute Manager where ports, attributes and properties can be
checked in their display and function. 在(1)旁边,您将找到所有现有属性和属性的概述。在(2)旁边的 Template 区域,您将找到一个新属性和常用排序元素(组和分隔符)的常用文件类型列表。在资源编辑器(3)旁边的中心,您将找到所选属性的可用设置。最后,在最右边(4)你会发现一个集成的属性管理器,其中的端口,属性和属性可以检查它们的显示和功能
The Resource Editor is divided into different areas. At the left is a column with an overview of the existing attributes and file types as well as those you added yourself. The priniciple is comparable to adding User Data via the User Data menu in the Attribute Manager. The entries can be organized into groups.
资源编辑器被划分为不同的区域。左边是一列,概述了现有的属性和文件类型以及您自己添加的属性和文件类型。Priniciple 类似于通过属性管理器中的用户数据菜单添加用户数据。参赛作品可以组织成小组。
The bottom section of the left column shows templates. These are the default Cinema 4D file types and user interfaces for input that can also be used for custom parameters. Here, you will, for example, find color fields, text input fields and option check boxes. Elements can be easily dragged and dropped from the templates directly onto the area above.
左列的底部显示了模板。这些是默认的 Cinema 4D 文件类型和用于输入的用户界面,也可以用于自定义参数。例如,在这里,您将找到颜色字段、文本输入字段和选项复选框。可以轻松地将元素从模板直接拖放到上面的区域。
The center column of the Resource Editor shows a description of the currently selected parameter. Here you can, for example, activate the permissible minimum and maximum limits for numeric values or the use of a slider in the interface. More uinique attributes such as if a parameter should even be visible or the units that should be used can also be defined.
“资源编辑器”的中心列显示当前选定参数的说明。例如,您可以在这里激活数值的允许最小和最大限制,或者在界面中使用滑块。还可以定义更多的 uinique 属性,比如参数是否应该可见或者应该使用的单位。
The right column of the Resource Editor shows all activated parameters and attributes of a given node, as would be displayed in the Attribute Manager or Material Editor.
资源编辑器的右列显示给定节点的所有已激活的参数和属性,这将显示在属性管理器或材质编辑器中。
工作流示例
In many cases you will first create a new Node Material and open it in the Node Editor. Now you can construct a material with the help of various Material Nodes or at least mull over the most effective inputs for your material that can be used to control its look. In simple cases, these can, for example, be color values or brightness that can be defined or how textures and other numeric values can be linked in order to control intensity.
在许多情况下,首先要创建一个新的 Node Material 并在 Node Editor 中打开它。现在你可以在各种材质节点的帮助下构建一个材质,或者至少仔细考虑可以用来控制材质外观的最有效的输入。在简单的情况下,这些可以是,例如,可以定义的颜色值或亮度,或纹理和其他数值如何连接,以控制强度。
The more complex a material’s attributes, the more it makes sense to simplify the material’s modification and use in order to be able to use it for future projects. What this can look like can be seen in a Cinema 4D Uber Material. This is a normal Node Material that does not have to be modified using the Node Editor but with the known Material Editor after you double-click on it.
材质的属性越复杂,就越有必要简化材质的修改和使用,以便在未来的项目中使用。这看起来像什么可以在一个Cinema 4d Uber 材质中看到。这是一个普通的节点材质,不必使用节点编辑器进行修改,而是在双击之后使用已知的材质编辑器进行修改。
Select all of your material’s nodes and group them. You can use the shortcut alt+g or the Group Nodes command in the Node Editor’s Create menu, which is also available as an icon at the top of the Node Editor.
选择材质的所有节点并将它们分组。您可以使用 Node Editor 的 Create 菜单中的快捷键 alt + g 或 Group Nodes 命令,该菜单也可以作为 Node Editor 顶部的图标使用。
 After the material nodes have been grouped you can
add ports on the left edge of the node graph that is made available to the user in the Attributte Manager or
the Material Editor. This is done most easily if you drag the node’s respective input ports onto the left edge
of the node graph. 在材质节点分组之后,您可以在节点图的左边缘添加端口,该端口在 Attributte Manager 或 Material Editor 中对用户可用。如果将节点各自的输入端口拖到节点图的左边缘上,那么这样做就非常容易
After the material nodes have been grouped you can
add ports on the left edge of the node graph that is made available to the user in the Attributte Manager or
the Material Editor. This is done most easily if you drag the node’s respective input ports onto the left edge
of the node graph. 在材质节点分组之后,您可以在节点图的左边缘添加端口,该端口在 Attributte Manager 或 Material Editor 中对用户可用。如果将节点各自的输入端口拖到节点图的左边缘上,那么这样做就非常容易
Then open the new node group by clicking on the arrow icon below the group node’s preview area. You can now see the Material Nodes again where you can edit them or easily add nodes. You can also add groups within a group, which can help maintain an overview when working with complex materials.
然后单击组节点预览区域下面的箭头图标,打开新的节点组。您现在可以再次看到材质节点,您可以编辑它们或轻松地添加节点。您还可以在组中添加组,这有助于在处理复杂材质时保持总体视图。
Whenever you want to pass data to the nodes within the group that should be editable in the Material Editor, simply add an input port within the top-most node group. This can be done in different ways:
每当您想要将数据传递给组中应该在 Material Editor 中可编辑的节点时,只需在最上面的节点组中添加一个输入端口。这可以通过不同的方式来实现:
After the desired inputs have been added, their data type and attributes will be adjusted in the Resource Editor, if necessary, and configured in accordance with the user interface. We will cover these options later.
在添加了所需的输入之后,它们的数据类型和属性将在资源编辑器中进行调整,并根据用户界面进行配置。我们稍后将讨论这些选项。
After all input ports have been created and linked to the respective inputs of the Material Node in the group you can exit the group display by reverting back to the material’s node layer in the Node Editor’s tree view. Select the group node and then select Start Node in the Node menu. This command is also available as an icon in the Node Editor’s icon menu.
当所有的输入端口都被创建并链接到组中材质节点的各自输入之后,你可以通过返回到节点编辑器树视图中材质节点层退出组显示。选择组节点,然后在“节点”菜单中选择“开始节点”。这个命令也可以在节点编辑器的图标菜单中作为图标使用。
If you double-click on the Node Material in the Material Editor, the Material Editor (and not the Node Editor) will open where you will find the input ports that were created.
如果您双击材质编辑器中的节点材质,材质编辑器(而不是节点编辑器)将打开您将找到创建的输入端口的位置。
If the material is so good you want to use it for other projects, you can save it as an Asset with a unique name. It can, for example, then be saved to the preset menu for materials and easily accessed via the Node Editor’s Asset section.
如果材质非常好,您希望将其用于其他项目,您可以将其保存为具有唯一名称的资产。例如,可以将其保存到预设的材质菜单中,并通过节点编辑器的资产部分轻松访问。
 The Resource Editor can be used to edit data types,
graphic user interfaces and the names of ports that are created. New ports and attributes can be created and
organized in groups. The result can be checked right away at the right of the Resource Editor in an Attribute
Manager. This image shows the settings for the respective group in which ports can be organized for an
optimized workflow. 资源编辑器可用于编辑数据类型、图形用户界面和所创建的端口的名称。可以创建新的端口和属性并将其组织成组。结果可以在属性管理器中的资源编辑器右侧立即检查。此图像显示了各个组的设置,在这些组中可以组织端口以实现优化的工作流
The Resource Editor can be used to edit data types,
graphic user interfaces and the names of ports that are created. New ports and attributes can be created and
organized in groups. The result can be checked right away at the right of the Resource Editor in an Attribute
Manager. This image shows the settings for the respective group in which ports can be organized for an
optimized workflow. 资源编辑器可用于编辑数据类型、图形用户界面和所创建的端口的名称。可以创建新的端口和属性并将其组织成组。结果可以在属性管理器中的资源编辑器右侧立即检查。此图像显示了各个组的设置,在这些组中可以组织端口以实现优化的工作流
材质资源
After a Node Material has been opened in the Node Editor and the Resource Editor has been called up you will find elements that each material already has. This includes a Preview section, which consists of both preview renderings that show several funtions of the Material Node and the material as it looks in the end.
在节点编辑器中打开一个节点材质并调用资源编辑器之后,您将找到每个材质已经具有的元素。这包括一个 Preview 部分,它包含两个预览渲染,显示了 Material Node 的几个功能,以及材质在最后看起来的样子。
A Basic section is also available where you can define unique names for an asset or a group.
还有一个基本部分,您可以在其中定义资产或组的唯一名称。
Below the Name field you will find an Asset Version selection menu, which can be used to more easily manage edited versions. When a node group or asset is configured for the first time in the Resource Editor you can only select Latest as the Asset Version.
在 Name 字段下面,您将找到一个 Asset Version 选择菜单,可以使用该菜单更容易地管理编辑后的版本。在资源编辑器中首次配置节点组或资产时,只能选择 Latest 作为资产版本。
The remaining settings in the Basic menu are more cosmetic in nature. Enabling the Custom Node Color option will let you assign a custom color to the asset using the Node Color setting.
基本菜单中的其余设置本质上更具装饰性。启用“自定义节点颜色”选项将允许您使用“节点颜色”设置为资产分配自定义颜色。
The entries for Inputs and Outputs represent all input and output ports for a given group or asset. Here you can subordinate your own ports, if necessary, but you can’t modify any of the settings.
输入和输出项表示给定组或资产的所有输入和输出端口。在这里,如果必要的话,你可以从属于你自己的端口,但是你不能修改任何设置。
预设
All of the following settings for the individual user data and ports of a given group or asset can be configured in different languages so the correct translation is displayed if you switch to a given language in Cinema 4D. As a rule, English will be used for the default installation. In addition, you may also have German installed. In such cases it makes sense to first make all settings for the universal English layout and then modify the namels of the settings for German (or the target language).
下面的所有设置可以用不同的语言配置给定组或资产的单个用户数据和端口,因此如果你在 Cinema 4D 中切换到给定的语言,正确的翻译就会显示出来。通常,默认安装将使用英语。此外,您还可能安装了德语。在这种情况下,首先为通用英语布局设置所有设置,然后修改设置的名称为德语(或目标语言)是有意义的。
语言
Select en-US - English as the base language for Cinema 4D to create and name all required user data and ports. After this is done, switch to de-DE - Deutsch in this menu to enter German terminology for these settings. If additional languages are installed, this process can be repeated for each of these languages by simply switching to the desired Language. If language versions exist for which strings have not been translated, these will be marked by a symbol with a small warning sign (see this example)
选择 en-US-English 作为 Cinema 4D 的基本语言来创建和命名所有必需的用户数据和端口。在这之后,切换到 de-DE-Deutsch 在此菜单中输入这些设置的德语术语。如果安装了其他语言,只需切换到所需的语言,就可以对每种语言重复这个过程。如果存在没有被翻译的字符串的语言版本,那么将用带有小警告标志的符号标记这些字符串(参见本示例)
数据库
The data from different application parts, modules or plug-ins are saved in separate databases. These databases are logged in automatically when the application is started and will be made available for use.
来自不同应用程序部件、模块或插件的数据保存在单独的数据库中。当应用程序启动时,这些数据库将自动登录,并可供使用。
身份证
Internally, objects are differentiated using unique numbers called IDs. The respective objects can be selected from this drop-down menu. If an object is edited via the Resource Editor, the database and respective ID will be blocked.
在内部,对象使用称为 id 的唯一数字进行区分。可以从这个下拉菜单中选择相应的对象。如果通过资源编辑器编辑对象,则将阻止数据库和相应的 ID。
Creating and managing attributes
创建和管理属性
As a rule, you will not use a single setting to define material properties but several settings that should be grouped thematically. This is the sampe principle as with other materials, e.g., where grouping is used to define material properties so properties for color, bump, reflection or displacement can be arranged in separate groups for a better overview and workflow. There is also the option of making some of the settings available only optionally. For example, the calculation of the displacement or lighting may not be necessary in every material. Accordingly, these settings can then only be displayed if needed. As a rule, Cinema 4D uses a list of options in the left column of the Material Editor where the optional material channels can be enabled.
通常,您不会使用单个设置来定义材质属性,而是使用几个应该按主题分组的设置。这就是采样原理,和其他材质一样,例如,分组用于定义材质属性,因此颜色、凹凸、反射或位移的属性可以分组安排,以便更好地概述和工作流程。此外,还可以选择只提供一些可选的设置。例如,可能不需要在每种材质中计算位移或照明。因此,只有在需要时才能显示这些设置。一般来说,Cinema 4D 在材质编辑器的左栏中使用了一系列选项,在这里可以启用可选的材质通道。
组别
A group can be used to combine several inputs and to define layout options for your settings.
组可用于组合多个输入并为设置定义布局选项。
The Resource Editor offers exactly this possibility through the use of groups in which you can organize user data and properties. The simplest option for creating a group is to drag the Group setting from the Template field into the field above.
资源编辑器通过使用可以组织用户数据和属性的组来提供这种可能性。创建组的最简单选项是将 Group 设置从 Template 字段拖动到上面的字段中。
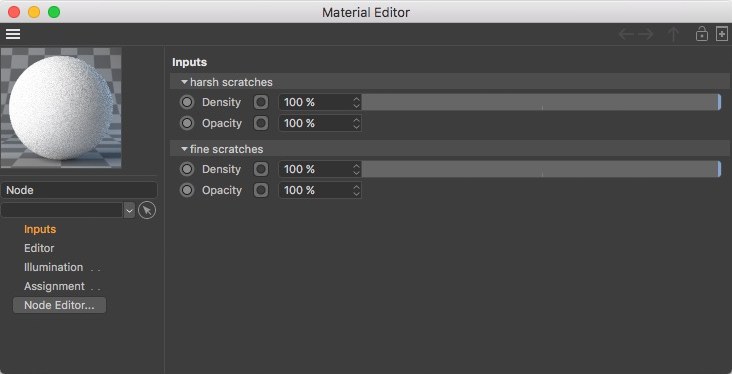 Groups make it easier to organize settings for
display in the Attribute or Material Managers. In this example, the settings for rough and fine scratches are
managed in two separate groups in order to better separate the identical port names. 组使得在属性或材质管理器中组织显示设置变得更加容易。在本例中,粗糙和细小划痕的设置分为两组管理,以便更好地分离相同的端口名
Groups make it easier to organize settings for
display in the Attribute or Material Managers. In this example, the settings for rough and fine scratches are
managed in two separate groups in order to better separate the identical port names. 组使得在属性或材质管理器中组织显示设置变得更加容易。在本例中,粗糙和细小划痕的设置分为两组管理,以便更好地分离相同的端口名
常规
Here you will find settings that normally result directly from the type of selected property and therefore cannot be edited.
在这里,您将找到通常直接由选定属性类型产生的设置,因此无法编辑。
命令
Here the type of the selected property is displayed. For a group, ,group’ will be displayed or an input value ,attribute’. For other special types of properties it can be a Command such as ,separator’, which simply creates a dash in the user dialog to make the text easier to read. The Command ,preset’ can also be used for an element from the preset menu such as a Fresnel refraction index.
此处显示所选属性的类型。对于组,将显示,group’或输入值,attribute’。对于其他特殊类型的属性,它可以是一个 Command,如 separator’ ,它只是在用户对话框中创建一个破折号,使文本更容易阅读。命令,预置’也可以用于预设菜单中的元素,如菲涅耳折射率。
标识符
Each property has a unique Identifier made up of a series of letters, characters and numbers and is assigned automatically. Using this Identifier, a relation between groups and attributes can later be made, e.g., to display groups only when a specific activation option is enabled. An Identifier can itself not be edited or selected in the text field but you can right-clickk on an Identifier’s name and copy the selection to the cache and paste it to another location.
每个属性都有一个由一系列字母、字符和数字组成的唯一标识符,并且是自动分配的。使用此标识符,以后可以建立组和属性之间的关系,例如,只有在启用特定的激活选项时才显示组。标识符本身不能在文本字段中编辑或选择,但您可以在标识符的名称上右键点击,并将选定内容复制到缓存中,然后将其粘贴到另一个位置。
用户界面
In this menu you will mainly find options with which you can define the display of the selected property and the layout in the Material Editor.
在此菜单中,您将主要找到可以用来定义所选属性的显示和材质编辑器中的布局的选项。
组别编号
If desired, you can enter a custom Identifier here for the group. This can be any combination of lower-case letters, points, underscores and numbers. The group ID can, however, not begein with a number. Furthermore, you should not use upper-case letters.
如果需要,可以在此处为组输入自定义标识符。这可以是任何小写字母、点、下划线和数字的组合。但是,组 ID 可以不使用数字。此外,不应使用大写字母。
If this field is left empty, the Identifier from the General settings will automatically be used.
如果该字段为空,则将自动使用“常规设置”中的“标识符”。
端口列表中的显示组
Only if this option is enabled will the groupt itself be listed in the Node Editor’s port list. This method of control can be used independently of the group’s elements. Disabling this option will leave the display of the settings in the group unchanged in the port list.
只有在启用此选项时,groupt 本身才会在节点编辑器的端口列表中列出。这种控制方法可以独立于组的元素使用。禁用此选项将使组中的设置在端口列表中的显示保持不变。
显示条件
The display of the group can be made dependent on the options. To do so, simply enter the name of the respective option between the wavy brackets in this field. Examples of what this can look like: (Checkbox) or {Value}<5.0 ; {Text}=="text" ; {Enum}=="enumvalue". In addition, a formula parser is also behind this function that also permits bracket terms. Alternatively, the Identifier of the respective option can be copied and pasted.
可以根据选项设置组的显示。要做到这一点,只需在此字段中的波浪形括号中输入相应选项的名称。例如: (Checkbox)或{ Value } < 5.0; { Text } = “ Text” ; { Enum } = “ enumvalue”。此外,这个函数后面还有一个公式分析器,它也允许使用括号术语。或者,可以复制和粘贴相应选项的标识符。
组默认开启
As known from the XPresso user data, groups of settings can be opened and closed by clicking on the small triangle next to the setting. If this option is enabled, the group will be displayed opened by default so that all suburdinated entries are visible in the port list.
从 XPresso 用户数据可知,通过单击设置旁边的小三角形,可以打开和关闭设置组。如果启用此选项,该组将默认打开,以便在端口列表中可以看到所有的郊区条目。
显示标题栏
By default, each group starts with a title bar with a different brightness in which the group’s name can be seen. If you don’t like this type of display, simply disable this option. The settings contained in the groupt will then no longer be displayed indented in the Attribute Manager.
默认情况下,每个组以不同亮度的标题栏开始,其中可以看到组的名称。如果您不喜欢这种类型的显示,只需禁用此选项。然后,群组中包含的设置将不再显示在属性管理器中缩进。
专栏
This combination of numbers defines the number of columns for this group. With two columns, for example, up to two properties will always be displayed next to one another.
这个数字组合定义了这个组的列数。例如,对于两列,最多可以有两个属性相邻显示。
隐藏时内嵌
This option hides a setting and its value and interface will no longer be displayed if the corresponding object is opened in a link field in the Attribute Manager.
此选项隐藏一个设置,如果在属性管理器的链接字段中打开对应的对象,则该设置的值和接口将不再显示。
文字
See Text.
参见文本。
定义属性
Attributes make up the actual parameters and settings that you want to make available to whoever is using the given material. In order to more clearly present attributes and to do so in a more attractive layout, the Group element can be used, which can also be used, among other things, to create a two-column display in the Material Editor.
属性组成您希望提供给使用给定材质的任何人的实际参数和设置。为了更清晰地显示属性并以更有吸引力的布局实现这一点,可以使用 Group 元素,除其他外,还可以使用它在 Material Editor 中创建两列显示。
A new attribute can be created in one of several ways. You can either drag the desired element from the Template field into the field above or you can select Add Attribute from the Attribute menu. Attributes are available in a variety of data types. It therefore makes sense to consider which data type you want ahead of time.
可以通过以下几种方式之一创建新属性。您可以将所需的元素从 Template 字段拖动到上面的字段中,也可以从 Attribute 菜单中选择 Add Attribute。属性可以在各种数据类型中使用。因此,提前考虑需要哪种数据类型是有意义的。
 An attribute’s or port’s data type define the type
of input as well as the controls. This is why it is very important to pay close attention to the data settings
of a given property. The most common data types can be called up as presets via the Template field or from the
Attribute menu. 属性或端口的数据类型定义输入的类型以及控件。这就是为什么密切关注给定属性的数据设置是非常重要的。最常见的数据类型可以通过 Template 字段或 Attribute 菜单调用为预设置
An attribute’s or port’s data type define the type
of input as well as the controls. This is why it is very important to pay close attention to the data settings
of a given property. The most common data types can be called up as presets via the Template field or from the
Attribute menu. 属性或端口的数据类型定义输入的类型以及控件。这就是为什么密切关注给定属性的数据设置是非常重要的。最常见的数据类型可以通过 Template 字段或 Attribute 菜单调用为预设置
数据类型
An attribute’s data type defines how this property will subsequently be displayed, evaluated and operated by the user. A color, for example, uses different settings than does a text field. The controls will be correspondingly different. Let’s take a look at the most common data types for settings and attributes as they can be found in the Templates field:
属性的数据类型定义了用户随后将如何显示、计算和操作该属性。例如,颜色与文本字段使用不同的设置。控制将相应地不同。让我们来看一下最常见的设置和属性数据类型,它们可以在 Templates 字段中找到:
数据
This group of settings can be used anytime to modify the Datatype of a selected attribute or other setting, e.g., to unify or limit a value range.
这组设置可以随时用于修改选定属性或其他设置的数据类型,例如,统一或限制值范围。
数据类型
Here you can read out or switch the current Datatype.
在这里,您可以读出或切换当前数据类型。
分类
This setting defines the type of attribute. Once you’ve selected a Classification, this selection cannot be changed. The Input option should be selected as a rule so an input port is created with which the value entered by the user can be passed to the material. Alternatively you can select the Output option which will also create a port but on the output side of the group or asset. This way, user-defined values can also be gotten from the node group. A third possibility is the Data option, which will also make the configured attribute available for the user as an input but will not create a port.
这个设置定义了属性的类型。一旦你选择了一个分类,这个选择不能被改变。Input 选项应该作为一个规则来选择,以便创建一个输入端口,用户输入的值可以通过该端口传递给材质。或者,您可以选择 Output 选项,该选项也将在组或资产的输出端创建端口。这样,也可以从节点组中获得用户定义的值。第三种可能性是 Data 选项,它也将使已配置的属性作为输入对用户可用,但不会创建端口。
If None is selected, the attribute will remain unspecific.
如果选择 None,则该属性将保持不特定。
单位
Here you can define the desired unit, e.g., a numeric value. This unit determines, among other things, if this numeric value is an angle or a unit of measure, for example. You can select from the options Percent (%), Degree (*), Meter and Time. If None is selected, the numeric value will remain without a unit.
在这里,您可以定义所需的单位,例如,数值。例如,这个单元决定这个数值是一个角度还是一个度量单位。您可以选择从百分比(%) ,学位(*) ,米和时间。如果选择 None,则数值将保持不带单位。
默认值
Here you can select the color, setting or value that should be used the first time the dialog for this setting is called up. This ensures, for example, that a material will show a result, even if a user has not yet defined all settings. The Default Value format changes depending on the Datatype selected. For Boole settings, only one option will be offered; for colors a color field; for float settings a numeric field, for example.
在这里,您可以选择颜色、设置或值,应该在第一次使用此设置的对话框被调用。例如,这可以确保材质将显示结果,即使用户尚未定义所有设置。默认值格式根据选定的数据类型而变化。对于 Boole 设置,只提供一个选项; 对于颜色,提供一个颜色字段; 对于 float 设置,提供一个数字字段。
限值
Enabling this option will make additional input fields available that can be used to define admissible maximum and minumum limits for values.
启用此选项将使其他输入字段可用于定义值的可接受的最大和最小限制。
最低/最高
Depending on the Datatype and Gui Type ID selected, separate definitions can be made between which user inputs have to remain. Small values will be increased to the defined Minimum and larger values will be restricted to the defined Maximum.
根据选择的 Datatype 和 Gui Type ID,可以在哪些用户输入必须保留之间创建单独的定义。小值将被增加到定义的最小值,大值将被限制到定义的最大值。
If the Gui Type ID net.maxon.ul.enum is used, the Datatype can also be restricted to the respective Minimum and Maximum values that were defined.
如果使用 Gui Type ID net.maxon.ul.enum,数据类型也可以限制为相应的已定义的最小值和最大值。
This element is available if Datatype is set to Into or Internedid and lets you create an individualized list of elements that will be offered as a menu for the attribute. If Datatype is set to Int, fill the list with Identifier names of the menu entries and set a colon for each followed by a sequential number.
如果 Datatype 设置为 Into 或 Internedid,则可以使用此元素,并允许您创建元素的个性化列表,该列表将作为该属性的菜单提供。如果 Datatype 设置为 Int,则使用菜单项的 Identifier 名称填充列表,并为每个菜单项设置冒号,后跟一个序列号。
可覆盖(为需要)
If enabled, this value can also be overwritten using the Take system in Cinema 4D.
如果启用,该值也可以使用 Cinema 4D 中的 Take 系统覆盖。
是变数吗
If enabled, the Number of Variadic Ports setting can be used to assign any number of sub-values. Commands can be registered in the Variadic Commands field, which will then appear as buttons such as Add or Delete and will have to be executed in their function as a command code.
如果启用,可以使用 Variadic port 设置的数量来分配任意数量的子值。可以在 Variadic Commands 字段中注册命令,然后这些命令将以添加或删除等按钮的形式出现,并且必须以命令代码的形式执行这些命令。
常量参数
If enabled, this port can only be assigned a static value. The value cannot be modified during rendering, for example. A port cannot be connected with the output port of a color gradient or noise node, for example.
如果启用,则只能为此端口分配一个静态值。例如,在呈现期间不能修改该值。例如,端口不能连接到颜色渐变或噪声节点的输出端口。
是模板参数
If enabled, the variable will be marked as a Template Variable, as is also the case the also exist in C++. This type of variable has no defined datatype and can be used to dave static values. A typical example would be a variable for π, which is read out as the flowt 3.1415 … and simply as 3 as an integer.
如果启用,变量将被标记为模板变量,就像 c + + 中也存在的情况一样。这种类型的变量没有定义的数据类型,可以用于 dave 静态值。一个典型的例子是 π 的变量,它被读出为 flot 3.1415... 而简单地读出为3是一个整数。
转换器端口
If enabled, other Datatypes linked to this port will be converted to the port’s native format, if possible.
如果启用,链接到该端口的其他 Datatypes 将转换为该端口的本机格式。
默认预览端口
This option should only be used for one output port on the node because this port will be the preferred port for calculating the node’s preview image.
此选项只应用于节点上的一个输出端口,因为该端口将是计算节点预览映像的首选端口。
外埠复制单位
If enabled, an input port will automtically assume the unit of the output port to which it is linked.
如果启用,则输入端口将自动假定与其链接的输出端口的单元。
用户界面
 The UI Goup settings primarily affect how the
attribute is displayed in the Material Editor and Attribute Manager. UI Goup 设置主要影响属性在 Material Editor 和 Attribute Manager 中的显示方式
The UI Goup settings primarily affect how the
attribute is displayed in the Material Editor and Attribute Manager. UI Goup 设置主要影响属性在 Material Editor 和 Attribute Manager 中的显示方式
In this menu you will mainly find display options for the respective attribute, its port and its dependency on other groups or attributes.
在此菜单中,您将主要找到各自属性的显示选项,其端口及其对其他组或属性的依赖关系。
节点图中隐藏端口
This option reflects the function of the Hide All Ports command in the Node Editor and hides the attribute’s port in the Node’s display by default. Hidden ports can be unhidden at any time and remain visible in the Attribute Manager at all times.
此选项反映了节点编辑器中的“隐藏所有端口”命令的功能,并默认情况下在节点的显示中隐藏属性的端口。隐藏端口可以在任何时候打开,并且在任何时候都可以在属性管理器中看到。
Material Editor – Show on Left side
材质编辑器-显示在左侧
This option is primarily designed for the options shown below the material preview in the left column of the Material Editor that are for activating the material channels.
这个选项主要是为材质编辑器左侧材质预览下面显示的选项设计的,这些选项用于激活材质通道。
Material Editor – Group Activation ID
材质编辑器-组激活 ID
Using this option, other groups can be enabled or disabled according to the state of a given option. A material channel in the Material Editor, for example. If the Bump option is enabled, the group with the bump settng will be activated. This option can only be used in conjunction with the Boole type. Use the group’s Identifier as the Group Activation ID.
使用此选项,可以根据给定选项的状态启用或禁用其他组。例如,材质编辑器中的材质通道。如果 Bump 选项被启用,那么具有 Bump 设置的组将被激活。此选项只能与 Boole 类型结合使用。使用组的标识符作为组激活 ID。
图形用户界面类型 ID
Often, various interface elements are available for the selected Datatype. The following are available:
通常,对于选定的数据类型,可以使用各种接口元素:
组别编号
As soon as an attribute is placed into a group, an Identifier for the group will automatically be placed here. As a rule, this field cannot be modified manually.
一旦将属性放入组中,组的标识符就会自动放在这里。通常,不能手动修改此字段。
显示条件
Here you can enter the name or Identifier, e.g., for an option. Only if this option is enabled will this attribute also be visible in the user dialog. For complex Datatypes, fixed values can be checked, e.g., with the operation {my value}==2. In this case, the attribute will only be displayed if the setting with the name "my value" assumes the state or value 2. Strings can also be evaluated using this method if these are set in quotations, e.g., {my value}=="Hello". If multiple conditions should be true simultaneously, use the "&&" characters to simulate the logical ,and’ and place the terms to be checked within parenthesis, e.g., ({my value}==2 && {my value}=="Hello").
在这里,您可以输入名称或标识符,例如,一个选项。只有在启用此选项时,此属性才会在用户对话框中可见。对于复杂的数据类型,可以使用操作{ my value } = = 2来检查固定值。在这种情况下,只有名为“ my value”的设置假定状态或值为2时,才会显示该属性。如果在 quotes 中设置字符串,也可以使用此方法计算字符串,例如{ my value } = “ Hello”。如果多个条件应该同时为真,使用“ & & ”字符来模拟逻辑,并将要检查的术语放在括号内,例如,({ my value } = 2 & { my value } = “ Hello”)。
启用条件
This setting worlks exactly like the Activation Condition only that the attribute will not be hidden but only grayed out if the linked option is disabled.
这个设置完全类似于激活条件,只是属性不会被隐藏,但只有当链接选项被禁用时才会变成灰色。
父文件夹 ID
Makes it possible to create groups that can be opened or closed in the Attribute Manager. The group must be assigned a unique ID. All settings that are assigned this ID via the Parent Folder ID function can be opened and closed together.
使得可以创建可以在属性管理器中打开或关闭的组。必须为组分配一个唯一的 ID。通过父文件夹 ID 函数分配此 ID 的所有设置都可以一起打开和关闭。
If GUI Type ID is set to net.maxon.ui.enum, enter the Identifier number from the Enum List here as it should appear in the attribute’s menu.
如果 GUI Type ID 设置为 net.maxon.ui.Enum,则在此处输入 Enum List 中的 Identifier 号,因为它应该出现在属性菜单中。
可选的 childrenstrings
If enabled, the strings from the list will not be made available for translation.
如果启用,列表中的字符串将不能进行翻译。
显示滑块
If enabled, an additional slider will be displayed next to the input field for a number.
如果启用,一个附加的滑块将显示在一个数字的输入字段旁边。
限值
If enabled, an additional option for Minimum and Maximum will be made available. These can, for example, be used for sliders to restrict their value range.
如果启用,最小值和最大值的附加选项将可用。例如,这些可以用来限制滑块的值范围。
最低/最高
These settings define the numeric value range for interactive control elements. Note that these values don’t have to be the same as the value restrictions in the Data settings group because they only directly affect a slider’s value range. Smaller or larger values can be applied within the data value range by manually entering the values.
这些设置定义了交互控件元素的数值范围。请注意,这些值不必与 Data 设置组中的值限制相同,因为它们只会直接影响滑块的值范围。通过手动输入值,可以在数据值范围内应用较小或较大的值。
第一步
Here you can define the step size with which the attribute value should change when the small arrow next to the input field is clicked or when using the scroll wheel.
在这里,您可以定义当单击输入字段旁边的小箭头或使用滚轮时,属性值应更改的步长。
多行文本字段
This option is available for string attributes and makes an enlarged String field available for entering text.
此选项可用于字符串属性,并为输入文本提供放大的字符串字段。
只读
This option blocks the string attribute’s String field for input and displays the string’s Default Value grayed out.
此选项将阻止字符串属性的 String 字段用于输入,并将字符串的 Default Value 显示为灰色。
字符串
 In the attribute settings’ String menu you will
mainly find an input field for the name of the attribute. Note that the String field will use the currently
selected language that you can define in the top left corner of the Resource Editor. Various translations can
be used for different language versions of Cinema 4D. 在属性设置的“字符串”菜单中,您将主要找到属性名称的输入字段。注意,String 字段将使用您可以在资源编辑器的左上角定义的当前选定语言。C4D的不同语言版本可以使用不同的翻译
In the attribute settings’ String menu you will
mainly find an input field for the name of the attribute. Note that the String field will use the currently
selected language that you can define in the top left corner of the Resource Editor. Various translations can
be used for different language versions of Cinema 4D. 在属性设置的“字符串”菜单中,您将主要找到属性名称的输入字段。注意,String 字段将使用您可以在资源编辑器的左上角定义的当前选定语言。C4D的不同语言版本可以使用不同的翻译
In this menu you will mainly find the name of the selected property. A group name can be entered for a group. This name will also appear in the Attribute Manager. For attribute properties, the name of a color or numeric value can be defined. Note that these inputs are dependent on the language that was selected. If possible, start with the Engish language en-EN - English and enter the desired name for the group or attribute in the String field. Then switch the language to another intry and translate the string for the setting or group.
在此菜单中,您将主要找到所选属性的名称。可以为组输入组名。此名称也将出现在属性管理器中。对于属性属性,可以定义颜色或数值的名称。请注意,这些输入依赖于所选择的语言。如果可能,从英语 en-EN-English 开始,在 String 字段中输入组或属性的所需名称。然后将该语言切换到另一个 intry,并将该字符串转换为该设置或组。
多行文本字段
Makes mult-line inputs possible for Strings and Reference Strings.
使字符串和引用字符串的多行输入成为可能。
字符串
Here you can enter the name for the selected group or attribute.
在这里,您可以输入所选组或属性的名称。
引用字符串
After switching to another language you will find the group or setting names as a reference as it was entered for English, for example. This makes it easier to translation the terms.
在切换到另一种语言之后,您会发现组或设置名称作为参考,因为它是为英语输入的,例如。这使得术语的翻译更加容易。
古老的引用字符串
Here you will find a previously assigned name for the setting that has been replaced by a new string. To use the current string for the selected parameter and language, you have to click on the Approve Translation button. Otherwise, warning icons may be displayed in the properties list that will warn you that the translation has not yet been approved.
在这里,您将找到以前为已被新字符串替换的设置分配的名称。若要为选定的参数和语言使用当前字符串,必须单击“批准翻译”按钮。否则,在属性列表中可能会显示警告图标,警告您翻译尚未被批准。
转到未翻译的下一页
Jumps to the next string that has not been translated for a laguage other than English. Each modification made to the base language English will result in all languages being marked as not being translated.
跳转到下一个字符串,该字符串没有被翻译为英语以外的语言。对基本语言英语进行的每次修改都将导致所有语言被标记为未翻译。
建议..。
Opens a pop-up window with similar translations.
打开具有类似翻译的弹出窗口。
打开外部差异工具..。
Using an external tool to compare long texts can be very helpful. To do so, the environment variable or command line parameter g_externalCompareTool must be set, e.g., g_externalCompareTool="C:\Program Files (x86)\Beyond Compare 4\BCompare.exe,
使用外部工具比较较长的文本是非常有帮助的。为此,必须设置环境变量或命令行参数 g _ externalcomparetool,例如 g _ externalcomparetool = “ c: Program Files (x86) Beyond compare4 BCompare.exe,
 Naming that has not yet been approved will be
marked with a warning icon. In these cases, check the String field input in the different languages and
approve them accordingly by pressing the Approve Translation button. 尚未被批准的命名将用警告图标标记。在这些情况下,检查不同语言中的 String 字段输入,并通过按 Approve Translation 按钮相应地批准它们
Naming that has not yet been approved will be
marked with a warning icon. In these cases, check the String field input in the different languages and
approve them accordingly by pressing the Approve Translation button. 尚未被批准的命名将用警告图标标记。在这些情况下,检查不同语言中的 String 字段输入,并通过按 Approve Translation 按钮相应地批准它们
批准翻译
Clicking on this button will confirm the current translation in the selected language. Translations not yet confirmed will be marked with a warning icon in the Resource Editor.
单击此按钮将确认所选语言的当前翻译。尚未确认的翻译将在资源编辑器中用警告图标标记。
发展
In this menu you will find additional options for attributes that can be helpful when managing multiple versions of a given asset and its resources.
在此菜单中,您将找到属性的其他选项,这些选项在管理给定资产及其资源的多个版本时非常有用。
评论
Here you can, for example, add comments for an attribute to document its function. This information is not made available to normal users of the material.
例如,您可以在这里为属性添加注释,以记录其功能。这些信息不会提供给正常的材质使用者。
头文件中的内存
For developers, C++ header files are exported directly from the tool. If this option is enabled, this attribute will not be exported to C++.
对于开发人员,c + + 头文件直接从工具导出。如果启用此选项,则不会将此属性导出到 c + + 。
继承字符串
Lets the string be inherited for includes without having to translate it again.
让字符串继承为 include 而不必再次翻译它。
可选字符串
If enabled, the translators will not be forced to translate the text.
如果启用,翻译器将不会被迫翻译文本。
资源编辑器菜单
In the Resource Editor’s menu you will find items for creating custom data types and for creating, copying and deleting attributes.
在“资源编辑器”菜单中,您将找到用于创建自定义数据类型以及用于创建、复制和删除属性的项。
数据库菜单
保存所有数据库
Saves all databases to your hard drive.
将所有数据库保存到硬盘中。
数据类型菜单
添加数据类型
Here you can create a custom data type to which you will have to assign a name. After confirming, the Resource Editor will empty and you can assign the new data type new properties, e.g, from the Templates or Properties fields.
在这里,您可以创建自定义数据类型,必须为其分配名称。确认后,资源编辑器将为空,您可以从模板或属性字段分配新数据类型的新属性,例如。
重命名数据类型
A dialog window will open for the currently selected data type in which you can change its name.
将为当前选定的数据类型打开一个对话框窗口,您可以在其中更改其名称。
重复数据类型
Creates a copy of the selected data type.
创建所选数据类型的副本。
移动到数据库
Saves the selected data type to a database whose name can be entered in the dialog window that opens.
将选定的数据类型保存到可在打开的对话框窗口中输入名称的数据库中。
删除数据类型
Removes the active data type from the database.
从数据库中移除活动数据类型。
属性菜单
In this menu you can create, copy and delete groups and ports, among other elements. The property types available reflect those of the Resource Editor’s Templates field.
在此菜单中,您可以创建、复制和删除组和端口,以及其他元素。可用的属性类型反映了资源编辑器的模板字段的属性类型。
添加属性
A menu will be made available in which you can call up the desired type of new attribute or group or separator.
将提供一个菜单,您可以在其中调用所需类型的新属性或组或分隔符。
复制/粘贴
Saves the selected attribute to the cache / copies the attribute from the cache to the Resource Editor. The same commands can also be found in the context menu that opens if you right-click on a setting. There, you will also find two additional versions. Copy ID can be used to copy the respective setting’s Identifier. The Paste (Keep IDs) command will paste a copy of the attribute. The Identifier will not be updated. This should remain the exception for special applications since all Identifiers should normally remain unique.
将选定的属性保存到缓存/将属性从缓存复制到资源编辑器。在右键单击某个设置时打开的上下文菜单中也可以找到相同的命令。在那里,你还可以找到另外两个版本。复制 ID 可用于复制相应设置的标识符。粘贴(保持 id)命令将粘贴属性的副本。标识符不会被更新。对于特殊应用程序来说,这应该仍然是个例外,因为所有标识符通常都应该保持唯一。
删除
Deletes the selected property and its port from the Node Editor. The same can be done by right-clicking on the property and selecting Delete from the menu that appears. Note that this deletion cannot be undone!
从节点编辑器中删除所选属性及其端口。可以通过右键单击属性并从出现的菜单中选择 Delete 来完成同样的操作。请注意,此删除无法撤消!