Fold My Design!
折叠我的设计!
Fold My Design! – create unique stencils for 3D shapes
折叠我的设计!-为3D 形状创建独特的模板
Among other things, a stencil reproduces the contours, cut-outs and fold seams of a folding box. These paths can, for example, be created using illustration programs such as Adobe Illustrator or using Cinema 4D’s own Spline tools. When the stencil is cut out along the contours and folded along the fold seams, a three-dimensional packaging can be produced. The Fold My Design! feature minimizes the work required to create a 3D packaging from a 2D stencil - and even makes it possible for you to animate the folding process!
在其他东西中,一个模板复制轮廓,裁剪和折叠盒子的接缝。例如,这些路径可以使用插图程序创建,比如 Adobe Illustrator 或者使用 Cinema 4D 自己的样条工具。当模具是沿着轮廓和折叠沿折接缝,一个三维包装可以产生。折叠我的设计!该功能最大限度地减少了从2D 模具创建3D 包装所需的工作-甚至可以使您动画的折叠过程!
Preparing the 3D reconstruction
准备三维重建
If a stencil is created in an illustration program make sure that all segments are closed prior to export. Save the scene in Illustrator 8 format. Cinema 4D is able to open these files directly using the File / Open Project command. The paths will appear as separate Spline objects in the Object Manager.
如果在插图程序中创建了模具,请确保在导出之前关闭所有段。以 Illustrator 8格式保存场景。Cinema 4D 可以直接使用 File/Open Project 命令打开这些文件。路径将作为单独的样条对象出现在对象管理器中。
These types of paths can also be created directly in Cinema 4D. In any case you should make sure that the splines’ axes are centered and oriented uniformly. To do so you can select all splines and then use the Mesh / Axis / Center Axis to command. The splines should also lie on the world coordinate system’s XZ plane. Fold My Design! can also correct this itself, if desired, but it’s a good idea to check this yourself upon import or when creating Spline objects in Cinema 4D.
这些类型的路径也可以直接在 Cinema 4D 中创建。在任何情况下,都应该确保样条的轴居中且均匀定向。为此,可以选择所有样条,然后使用 Mesh/Axis/Center Axis 命令。这些样条也应该位于世界坐标系的 XZ 平面上。折叠我的设计!也可以自行修正,如果需要的话,但这是一个好主意,检查自己的导入或当创建样条对象在Cinema 4d。
Calling up the Fold My Design! feature
调用折叠我的设计! 功能
Open the Content Browser by clicking on its tab at the right of the Object Manager
in the Standard layout or using the
在标准布局中点击对象管理器右侧的选项卡或使用窗口 | 内容浏览器命令打开内容浏览器。导航到预设/工具 & 帮手/折叠我的设计!- 模块式文件夹。在这里你可以找到折叠我的设计图标。
Double-click on it so it opens in your current scene.
双击它,它就会在你当前的场景中打开。
The Fold My Design! object only consists of several Null objects. Two Annotation tags are attached that contain instructions for using this feature. Selecting the Fold My Design! object will open a HUD display in the active viewport and will also make numerous options available in the Attribute Manager with which the type of folding and its animation can be defined. More about this later. First, arrange the existing Spline objects under the stencil beneath the Splines object, which is located beneath the Fold My Designs! object.
折叠我的设计!对象只包含几个 Null 对象。附加了两个注释标记,其中包含使用该特性的说明。选择折叠我的设计!对象将打开一个 HUD 显示在活跃的视图端口,也将使许多选项可用的属性管理器,其中的折叠类型和它的动画可以定义。稍后将详细介绍。首先,将现有的样条对象排列在样条对象下面的模具下面,样条对象位于 Fold My Designs 下面!对象。
 The stencil’s individual splines must be grouped in
the 模具的各个样条必须组合在Fold My Design! 折叠我的设计 object’s splines group. The order of the splines in
this group and the 物体的样条组。这个群中样条的顺序和Fold My Design! 折叠我的设计 object’s 对象Mode
Index 模式索引 settings define the order in which the folding will take place. 设置定义了折叠发生的顺序
The stencil’s individual splines must be grouped in
the 模具的各个样条必须组合在Fold My Design! 折叠我的设计 object’s splines group. The order of the splines in
this group and the 物体的样条组。这个群中样条的顺序和Fold My Design! 折叠我的设计 object’s 对象Mode
Index 模式索引 settings define the order in which the folding will take place. 设置定义了折叠发生的顺序
The order in which the stencil splines are arranged in the splines group is important. They will be processed from top to bottom by default. This means that the first spline in the group will not move because it serves as a basis for the other surfaces and flaps. A different order can be defined in the Fold My Design! object’s Mode Index settings. Down-Up will use the last spline beneath the Spline object as a basis for the folding process. If Random is selected, a random surface will be selected to serve as the basis for the folding process. This will also produce a random order for the animated folding. The Seeds value defines the randomness. However, a certain amount of variation can also be added to the otherwise strictly sequential Up-Down and Down-Up modes. To do so, use the Variation slider, which can also be found in the Fold My Design! object’s User Data menu. The folding process will then always take place in the order of the grouped splines and higher Variation values can also result in deviation in timing for some elements. This makes the folding process look less mechanical.
模板样条在样条组中的排列顺序很重要。默认情况下,它们将从上到下处理。这意味着组中的第一条样条不会移动,因为它是其他表面和襟翼的基础。一个不同的顺序可以定义在折叠我的设计!对象的模式索引设置。向下-向上将使用样条对象下面的最后一条样条作为折叠过程的基础。如果随机被选择,一个随机的表面将被选择作为折叠过程的基础。这也会为动画折叠产生一个随机的顺序。Seeds 值定义了随机性。然而,一定数量的变化也可以添加到其他严格顺序升降和降低向上模式。要做到这一点,使用变化滑块,这也可以在折叠我的设计!对象的用户数据菜单。折叠过程将始终按照分组样条的顺序进行,较高的变化值也可能导致某些元素在时间上的偏差。这使得折叠过程看起来不那么机械化。
调整模具路径
After the Spline objects have been placed beneath the Fold My Design! group’s Null object and their order arranged as desired, check the position and orientation of the objects’ axis systems. The axis systems should be uniform and centered. If this was already checked upon import or when the Spline objects were created in Cinema 4D, another check won’t be necessary. Otherwise the Fold My Design! object offers its own Center & Rotate Spline function in its Tools menu. This function can also be found in the HUD of the active viewport if the Fold My Design! object is selected.
在样条对象被放置在折叠我的设计之下之后!组的零对象及其顺序按需要排列,检查对象的轴系的位置和方向。轴系统应该是统一的和居中的。如果在导入时已经检查过,或者在 Cinema 4D 中创建样条对象时已经检查过,那么就不需要再进行检查了。否则折叠我的设计!对象提供了自己的中心和旋转样条函数在其工具菜单。这个功能也可以在主动视区的平显中找到,如果折叠我的设计!对象被选中。
As soon as this option is enabled, the splines’ object axes in the group will be oriented uniformly and centered on the spline shapes. This option will subsequently disable itself automatically.
一旦启用此选项,样条线组中的对象轴将以样条形状为中心均匀地定向。此选项随后将自动禁用自身。
Next, activate the Fold Preview option. This option can also be found both in the HUD as well as in the Tools menu. Abbreviations and numbers will be displayed in the viewports that show the order in which the stencil’s surfaces will be folded. Your Spline objects will be assigned corresponding names as numbers in the Object Manager. The number’s size can be adjusted to fit the stencil’s size using the Preview Text Size setting - either directly in the Fold My Design! object’s dialog or in the HUD display.
接下来,激活 Fold Preview 选项。这个选项也可以在 HUD 和工具菜单中找到。缩写和数字将显示在显示模具表面折叠顺序的视窗中。样条对象将在对象管理器中被分配相应的名称作为数字。数字的大小可以调整,以适应模具的大小使用预览文本大小设置-无论是直接在折叠我的设计!对象的对话框或在 HUD 显示器中。
The base surface will additionally be assigned the abbreviation B. This information can, for example, be used to correct the order of the Spline objects. The Spline objects are also color-coded.
另外,基面将被分配为缩写 b。例如,可以使用此信息来修正样条对象的顺序。样条对象也是用颜色编码的。
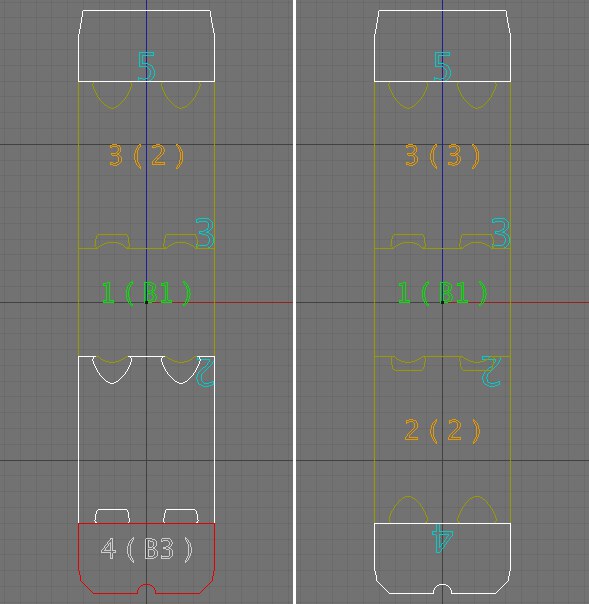 If 如果Fold Preview 折叠预览 is
enabled, the splines will be differentiated by colors and numbers. White surfaces represent flaps and glued
surfaces at the stencil’s edges. If the wrong surfaces are colored white, the vertex positions in relation to
neighboring splines must be checked. Red surfaces are generally not matched perfectly to neighboring surfaces.
Here the vertices must also be checked or re-positioned, if necessary. The corrected result is at the right of
the image. 如果启用,样条将通过颜色和数字来区分。白色表面代表皮瓣和粘合表面在模具的边缘。如果错误的曲面是白色的,则必须检查相邻样条的顶点位置。红色的表面通常不能与相邻的表面完全匹配。这里的顶点也必须检查或重新定位,如果必要的。修正后的结果在图像的右边
If 如果Fold Preview 折叠预览 is
enabled, the splines will be differentiated by colors and numbers. White surfaces represent flaps and glued
surfaces at the stencil’s edges. If the wrong surfaces are colored white, the vertex positions in relation to
neighboring splines must be checked. Red surfaces are generally not matched perfectly to neighboring surfaces.
Here the vertices must also be checked or re-positioned, if necessary. The corrected result is at the right of
the image. 如果启用,样条将通过颜色和数字来区分。白色表面代表皮瓣和粘合表面在模具的边缘。如果错误的曲面是白色的,则必须检查相邻样条的顶点位置。红色的表面通常不能与相邻的表面完全匹配。这里的顶点也必须检查或重新定位,如果必要的。修正后的结果在图像的右边
These will first be visible once the Fold My Design! object is no longer selected. Three color variations are possible:
一旦 Fold My Design! 对象不再被选中,它们将首先可见。可能有三种颜色变化:
Dark yellow highlights sections of the stencil that lie between other surfaces. This color is a good sign because it means that connections to neighboring splines have been found.
暗黄色突出了放在其他表面之间的模板的部分。这种颜色是一个好的迹象,因为它意味着连接邻近的样条已经被发现。
White splines highlight a stencil’s end sections, e.g., flaps. This also means that another spline was found on
at least one side of the flap that is connected to this flap. If this shape is an intermediate section of the
stencil, the white color means that at lease one connection to a neighboring spline was found. This can occur
if a spline’s points do no lie exactly on top of each other. In this case, use the Snap
to Point function to arrange the points accordingly. Another option would be to add new points to
neighboring splines at the same location. The Plane Cut tool is particularly well
suited for this task (
白色样条突出了蜡纸的末端部分,例如,襟翼。这也意味着在皮瓣的至少一侧找到了另一条样条。如果该形状是模具的中间部分,则白色表示至少找到了与邻近样条的一个连接。如果样条曲线的点没有精确地叠加在一起,就会发生这种情况。在这种情况下,使用 Snap to Point 函数来相应地排列这些点。另一种选择是在同一位置向邻近的样条添加新的点。平面切割工具特别适合这个任务(网格 | 切割)。为此,首先选择两个不能识别的相邻样条,然后切换到使用点模式。激活刀具,并设置模式为线。
Click and drag a short line over the splines’ common segment. After the mouse button is released, an identical point will be created for both splines. If a spline is colored red, no connection to other parts of the stencil were made. In this case you must also use the Snapping function to add new points at the same location. Do not proceed until all splines have a dark yellow or a white color.
在样条的公共段上单击并拖动一条短线。释放鼠标按钮后,将为两个样条创建相同的点。如果样条是红色的,则不会连接到模具的其他部分。在这种情况下,您还必须使用 Snapping 函数在同一位置添加新点。直到所有的样条都是深黄色或白色时,才可以继续。
折叠模板
In the Fold My Design! object’s HUD, click on Create Guides to start the calculation of the stencil’s assembly. This option can also be found in the Fold My Design! object’s Tools menu in the Attribute Manager. This option will create several helper objects that can subsequently be found in the Guides group in the Object Manager. These are mainly rotational axes and invisible controllers that can be used to modify the surfaces individually. This can be useful, for example, if a glued flap must lie at a specific distance from a surface or if the packaged product pushes the walls of the packaging outward. These surfaces represent the packaging’s material and therefore also have a thickness, which can be adjusted using the Threshold value in the Fold My Design! object’s User Data menu.
在折叠我的设计!对象的平视显示器,单击创建指南开始计算模具的组装。这个选项也可以在折叠我的设计中找到!属性管理器中的工具菜单。此选项将创建多个 helper 对象,这些对象随后可以在对象管理器中的 Guides 组中找到。这些主要是旋转轴和不可见控制器,可以用来修改单独的表面。这可能是有用的,例如,如果胶皮瓣必须在一个特定的距离从表面或如果包装产品推墙的包装向外。这些表面代表的包装材质,因此也有一个厚度,可以调整使用的阈值在折叠我的设计!对象的用户数据菜单。
 After clicking on 点击后Create
Guides 创建指南, surfaces will appear within the stencil and a material thickness will be simulated. The ,表面将出现在模具和材质厚度将被模拟Animation 动画 slider can be used to show the default folding process at 90° for each
flap. 滑块可以用来显示默认折叠过程在90 ° 为每个襟翼
After clicking on 点击后Create
Guides 创建指南, surfaces will appear within the stencil and a material thickness will be simulated. The ,表面将出现在模具和材质厚度将被模拟Animation 动画 slider can be used to show the default folding process at 90° for each
flap. 滑块可以用来显示默认折叠过程在90 ° 为每个襟翼
Here you will also find the Regular Grid value, which can be used to create additional points within the stencil. These points will be arranged in a uniform grid whose spacing is defined using this value. Smaller values will create more points within the stencil surface and make it possible to later shape it more organically, e.g., if the packaged product pushes the packaging’s walls outwards.
在这里您还可以找到 Regular Grid 值,它可以用于在模具中创建附加点。这些点将被安排在一个均匀的网格中,网格的间距就是用这个值定义的。更小的值将在模具表面创建更多的点,并使之后更有机地形成它成为可能,例如,如果包装产品推包装的墙壁向外。
This uniform point grid’s corner points must be connected with the splines’ points at the stencil’s edge regions. The interpolation and the number of Intermediate Points on the splines should be adjusted accordingly in order to create a connection that is as harmonious as possible. To do so, select all splines in the Splines group and use the Intermediate Points menu’s Number setting in the Attribute Manager. This setting lets you adjust the density of the points in both curves (via the Angle setting) as well as on linear sections (via the Maximum Length value). The goal is that the regions of the uniform grid pass over the stencil’s edge regions as fluidly as possible. The Wireframe mode is the best mode in which to check your work.
这个均匀点网格的角点必须与模具边缘区域的样条点连接。插值和样条上的中间点的数量应该相应地调整,以便创建一个尽可能和谐的连接。为此,请选择样条集中的所有样条,并使用属性管理器中的“中间点”菜单的“数字”设置。这个设置可以让你调整两条曲线(通过角度设置)以及线性部分(通过最大长度值)中的点的密度。目标是统一网格的区域尽可能流畅地通过模具的边缘区域。线框模式是检查你工作的最佳模式。
 The original stencil is at the left after the
guides were activated. The surface density within the stencil can be increased via the 原来的模具是在左后的指南被激活。钢网内的表面密度可以通过Regular Grid 规则网格 setting (at center). After the intermediate points have been adapted to
the stencil’s splines, the edge regions are also subdivided to match the grid spacing of the inner surfaces
(at right). 设置(在中间)。在中间点已经适应模具的样条,边缘区域也被细分,以匹配内表面的网格间距(右)
The original stencil is at the left after the
guides were activated. The surface density within the stencil can be increased via the 原来的模具是在左后的指南被激活。钢网内的表面密度可以通过Regular Grid 规则网格 setting (at center). After the intermediate points have been adapted to
the stencil’s splines, the edge regions are also subdivided to match the grid spacing of the inner surfaces
(at right). 设置(在中间)。在中间点已经适应模具的样条,边缘区域也被细分,以匹配内表面的网格间距(右)
Existing structures can be further optimized by combining multiple triangles to quads. To do so, enable the Untriangulate option in the Fold My Design! object’s User Data menu. The Weld option will weld double points that lie at the edges of neighboring stencil surfaces to a single point. This improves the display quality of the material thickness when the packaging is folded. Increasing the Animation value in the User Data menu will fold the splines according to their defined order. This function is also available in the HUD. If Animation is set to 100%, the packaging will be completely folded. This function can be inverted by enabling the Reverse option in the User Data menu. Moving the Animation slider between 0% and 100% will fold and unfold the packaging accordingly.
现有的结构可以通过组合多个三角形到四边形进一步优化。为此,在折叠我的设计中启用 Untriangulate 选项!对象的用户数据菜单。焊接选项将焊接双点,位于邻近的模具表面的边缘到一个单点。这提高了包装折叠时材质厚度的显示质量。增加“用户数据”菜单中的“动画”值将根据样条的定义顺序对其进行折叠。这个功能也可以在平视显示器中使用。如果动画设置为100% ,包装将完全折叠。通过启用用户数据菜单中的反向选项,可以反转此函数。移动动画滑块在0% 和100% 之间将折叠和打开相应的包装。
The order of the folding process is defined by the order of the Spline objects in the Splines group. Temporal variations can be added to make the folding process look more dynamic and less mechanical. Use the Variation value in the Fold My Design! object’s User Data menu to do so. Lower Variation values will produce a correspondingly more linear behavior. For example, the 3rd spline will not move until the second has reached its final position. The calculation of the Variation setting is based on the Seeds value. If this value is change, the random order of the folding process will also be affected.
折叠过程的顺序由样条组中样条对象的顺序决定。时间的变化可以增加,使折叠过程看起来更加动态和少机械。在折叠我的设计中使用变化值!对象的用户数据菜单来这样做。较低的变异值将相应地产生更多的线性行为。例如,第三条样条曲线在第二条曲线到达最终位置之前不会移动。变异坐标的计算以种子值为基础。如果这个值是变化的,随机顺序的折叠过程也将受到影响。
The Spline curve below the Animation setting in the User Data menu shows the speed with which the folding process takes place. Consider the function graph’s horizontal axis as linked with the Animation value. The Animation value of 0% is represented by the left end of the graph and the maximum value is represented by the right end of the graph. The curve’s height shows the strength of the fold. When the curve reaches a value of 1.0 at its right end, the fold is complete. Hence, the curve should generally run from the bottom left to the top right of the graph. The curve can, however, be used to adjust the speed of the fold. This works best when the Animation value is animated linearly. Otherwise the interpolation of the keyframes will overlap with the Fold My Design! object’s Spline curve and make the timing of the folding less predictable.
在用户数据菜单的动画设置下面的样条曲线显示了折叠过程发生的速度。将函数图的水平轴与 Animation 值链接起来。0% 的 Animation 值用图的左端表示,最大值用图的右端表示。曲线的高度显示了褶皱的强度。当曲线的右端达到1.0时,折叠就完成了。因此,曲线通常应该从图表的左下角到右上角。然而,这条曲线可以用来调整折叠的速度。当 Animation 值是线性动画时效果最好。否则的关键帧插值将与折叠我的设计重叠!对象的样条曲线,使折叠的时间更难以预测。
 Each surface can rotate around an individual axis
when folded. These rotation settings can be found in the guide splines’ User Data menu. 当折叠时,每个表面可以围绕一个单独的轴旋转。这些旋转设置可以在指南样条的用户数据菜单中找到
Each surface can rotate around an individual axis
when folded. These rotation settings can be found in the guide splines’ User Data menu. 当折叠时,每个表面可以围绕一个单独的轴旋转。这些旋转设置可以在指南样条的用户数据菜单中找到
The degree to which each surface should rotate can be defined individually in the splines’ User Data menu, which is located in the Guide Null object’s menu. Here you will find, among others, an Rotate setting that is set to 90° by default. Simply modify this value accordingly if you want to assign a different final position. As already mentioned, the base surface will not be rotated during the fold animation. This is why the corresponding setting is not available for that Spline object.
每个曲面的旋转程度可以在样条的用户数据菜单中单独定义,该菜单位于 Guide Null 对象的菜单中。这里你可以找到一个默认设置为90 ° 的 Rotate 设置。如果您想分配一个不同的最终位置,只需相应地修改此值。如前所述,在折叠动画过程中,基面不会旋转。这就是为什么样条对象的相应设置不可用的原因。
Note the model’s colors when defining the Rotate value. Blue surfaces are those that lie on the inside of the package when folded. Gray surfaces are the outer surfaces of the packaging. Hence, if your base surface represents the top surfaces and not the floor, simply rotate the Fold My Design! object 180° around its Z axis.
在定义旋转值时注意模型的颜色。蓝色表面是那些躺在包装内部时折叠。灰色表面是包装的外表面。因此,如果您的基础表面代表顶部表面,而不是地板,只需旋转折叠我的设计!物体180 ° 绕其 z 轴。
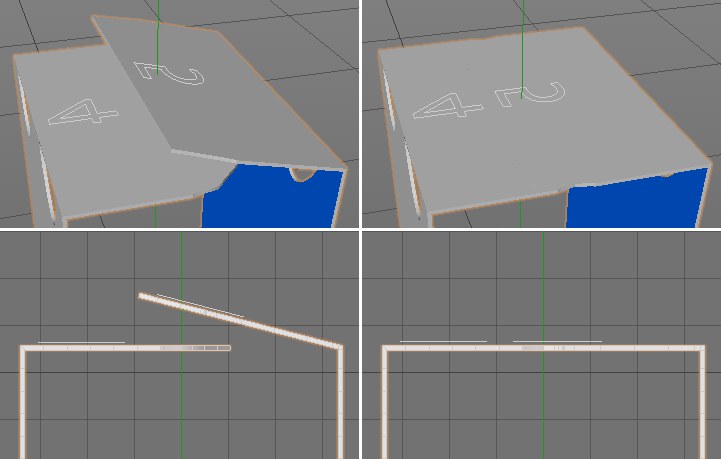 Glued flaps may have to maintain a certain distance
from the neighboring surfaces to prevent them from penetrating during the folding process. The image above is
an example of such a case. In the left column you can see the packaging shortly before the folding process is
complete. In the right column you can see two views of the folded package. The right flap does not lie
correctly on the opposite surface. 粘合皮瓣可能必须保持一定的距离从邻近的表面,以防止他们在折叠过程中穿透。上面的图片就是这种情况的一个例子。在左边一栏中,你可以看到在折叠过程完成前不久的包装。在右边的列中,您可以看到折叠包的两个视图。正确的襟翼不能正确地放置在相反的表面
Glued flaps may have to maintain a certain distance
from the neighboring surfaces to prevent them from penetrating during the folding process. The image above is
an example of such a case. In the left column you can see the packaging shortly before the folding process is
complete. In the right column you can see two views of the folded package. The right flap does not lie
correctly on the opposite surface. 粘合皮瓣可能必须保持一定的距离从邻近的表面,以防止他们在折叠过程中穿透。上面的图片就是这种情况的一个例子。在左边一栏中,你可以看到在折叠过程完成前不久的包装。在右边的列中,您可以看到折叠包的两个视图。正确的襟翼不能正确地放置在相反的表面
Adjusting tuck-in and glued flaps
调整折叠和粘贴皮瓣
In many cases you will already have a completed packaging after the Rotate angle has been defined and the Animation slider has been set to 100%. If this is the case you can simply load an image of your printed stencil into the OUT material’s Color channel and you’re done. Note, however, that this image must fit the shape and size of the original stencil as precisely as possible so the 3D model of the packaging is filled out to all edges.
在很多情况下,在旋转角度被定义并且动画滑块被设置为100% 之后,你已经有了一个完整的包装。如果是这样的情况下,你可以简单地加载到你的印刷模具的图像到 OUT 材质的颜色通道,你就完成了。然而,请注意,这张图片必须尽可能精确地符合原始模具的形状和大小,这样包装的3D 模型才能填充到所有的边缘。
However, if this is a packaging that is squashed or stretched by the product in side or by the manner in which it is glued, additional steps will be required. Numerous settings are available for this purpose in the Fold My Design! object’s Guides group.
然而,如果这是一个包装挤压或伸展的产品在一边或方式,它是胶合,将需要额外的步骤。在折叠我的设计中有许多设置可用于此目的!对象的指南组。
In many cases the stencil will contain surfaces that will be glued. These surfaces should, of course, not penetrate or sink into other surfaces - they should lie on top of the surface(s) to which they are glued. You will find a Level setting in the selected Guide spline’s User Data menu. Note that this setting is not available for your stencil’s base surface.
在许多情况下,模具将包含表面将胶合。当然,这些表面不应该渗透或者下沉到其他表面——它们应该位于它们所粘附的表面之上。您将在选定的指南样条的用户数据菜单中找到一个 Level 设置。请注意,此设置不适用于模具的基面。
 After enabling the Level function and adjusting the
Level splines, the glued flap will fold correctly and come to rest on the surface to which it should be
glued. 在启用水平功能和调整水平样条,粘贴皮瓣将折叠正确,来休息的表面,它应该是胶合板
After enabling the Level function and adjusting the
Level splines, the glued flap will fold correctly and come to rest on the surface to which it should be
glued. 在启用水平功能和调整水平样条,粘贴皮瓣将折叠正确,来休息的表面,它应该是胶合板
Level values can only be positive values and move the corresponding surface outwards, i.e., in the direction of the stencil’s printed side. This movement can be fine-tuned using the special Level curve below the setting. The graph’s horizontal position represents the length of the flap. By modifying the curve you can define which end of the flap should be raised. The curve should, however, have a value of 0 at the left or right end to maintain a connection with the neighboring surface.
水平值只能是正值,并向外移动相应的表面,即,在模具印刷侧的方向。这种运动可以微调使用下面的设置特殊水平曲线。图形的水平位置表示襟翼的长度。通过修改曲线,您可以定义哪一端的皮瓣应提高。然而,为了保持与邻近曲面的连接,曲线的左端或右端的值应该为0。
If you want to use a more complex curve, make sure that the subdivision on the corresponding section of the stencil is adjusted accordingly. Please refer to the Fold My Design! object’s Regular Grid function described above.
如果您想使用更复杂的曲线,请确保在模具的相应部分上进行相应的细分调整。请参考折叠我的设计!对象的规则网格函数。
Next to the Level setting you will find the Animation slider. This slider is used to define the point at which the Level movement should become visible during the folding animation. If set to 0% or 100%, the Level movement will already lie on the flat stencil and will not change its position throughout the folding process. Intermediate Animation values will have a completely different effect. The larger the value and the nearer it lies to 100%, the later and faster the Level movement will be during the fold animation. A value of 1% will produce a very smooth transition between the flat stencil and the end position defined by the Level value.
在等级设置旁边,你会找到动画滑块。这个滑块用于定义在折叠动画期间水平移动应该可见的点。如果设置为0% 或100% ,水平运动将已经躺在平板模具,并不会改变其位置整个折叠过程。中级动画值将有一个完全不同的效果。值越大,距离100% 越近,在折叠动画中水平移动的时间越晚,速度越快。1% 的值会产生一个非常平滑的过渡到平面模具和最终位置定义的水平值。
调整鼓肚
If a product is enclosed by its packaging it can cause the packaging’s sides to bulge. The packaging adapts its shape to that of its contents. Contrary to the Level function, the continuity between neighboring surfaces should not be interrupted. There are different ways to create such deformations:
如果一个产品是封闭的包装,它可以导致包装的侧面膨胀。包装使其形状适应其内容物的形状。与水平函数相反,相邻曲面之间的连续性不应中断。有不同的方法来产生这种变形:
Using modification curves for deformations
变形修正曲线的应用
In the Fold My Design! object’s Guides’ menu you will see the Modify_X and Modify_Y options. Enabling these options will add the suffixes MX and MY, respectively, to splines that are added beneath the respective Guide spline. These are deformation splines that can be edited directly in Use Point mode. However, before you begin editing you should consider how many points you actually need along this deformation spline. If an MX or MY object has been selected, its user data will be displayed in the Attribute Manager. The Num value defines the number of points on the respective spline. The more points you use, the more detailed the surface’s deformation will be. Of course, this is also dependent on the stencil’s polygon density. Note that modifying the Num value will undo the previous deformation.
在折叠我的设计!对象的 Guides’菜单,你会看到 Modify _ x 和 Modify _ y 选项。启用这些选项将分别将 MX 和 MY 后缀添加到相应的 Guide 样条下面添加的样条中。这些是可以在使用点模式下直接编辑的变形样条。但是,在开始编辑之前,应该考虑沿着这条变形样条实际需要多少个点。如果选择了 MX 或 MY 对象,其用户数据将显示在属性管理器中。Num 值定义各个样条上的点数。使用的点越多,表面变形的细节就越多。当然,这也取决于模板的多边形密度。请注意,修改 Num 值将撤消先前的变形。
Enabling the Reset option will reset the spline shape. All previous deformations will be deleted.
启用重置选项将重置样条形状。所有先前的变形将被删除。
The MX and MY splines also offer an Anim slider in their User Data menu, which can be used to define the point at which the deformation will take effect. If 0% or 100% are used, the full deformation will be visible on the flat stencil. Values near 0% will produce a very smooth fold animation. Higher values will delay the deformation accordingly - up to the point of it taking effect in the very last moment.
MX 和 MY 样条还在用户数据菜单中提供了一个 Anim 滑块,可以用来定义变形生效的点。如果0% 或100% 被使用,完整的变形将是可见的平板模具。值接近0% 将产生一个非常平滑的折叠动画。较高的值将相应地延迟变形——直到它在最后一刻生效。
 Using the modification curves 利用修正曲线MX 男名男子名 and 及MY 我的 you can deform individual stencil surfaces to
make them adapt their shape even better to the contents of the package. 你可以变形个别模具表面,使他们适应他们的形状,甚至更好的包装内容
Using the modification curves 利用修正曲线MX 男名男子名 and 及MY 我的 you can deform individual stencil surfaces to
make them adapt their shape even better to the contents of the package. 你可以变形个别模具表面,使他们适应他们的形状,甚至更好的包装内容
If you want to concentrate on the shape of a packaging’s individual sides the remaining sides of the stencil can be hidden by selecting the Guide spline you want to edit and activating the Solo option in the HUD or in the Fold My Design! object’s settings. Disable the Solo option to display all sides of the packaging.
如果你想专注于一个包装的单个边的形状,可以通过选择指南样条隐藏模具的其余边,你想要编辑和激活在 HUD 或折叠我的设计中的单独选项!对象的设置。禁用 Solo 选项来显示包装的所有方面。
包装的活动部件
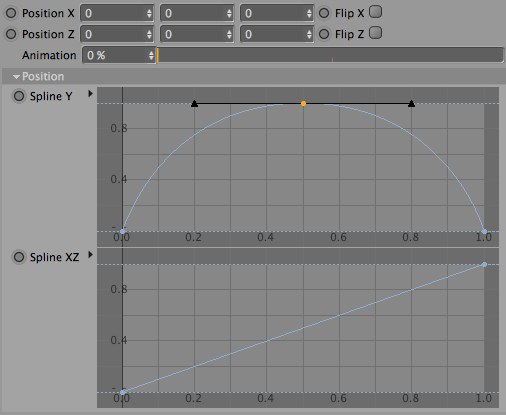
The Modify_X and Modify_Y options make it possible to intuitively reshape parts of the packaging using splines. If you don’t need this direct type of reshaping, a similar result can be achieved by using the Position X and Position Z settings in the Guides’ User Data menu. These settings let you distort each surface of the flat stencil in X, Y or Z direction. A surface can be skewed, scaled or bent. The first value for the Position X vector moves the points of the selected section along the stencil spline’s X axis. The first value for the Position Z vector does the same along the spline’s Z axis. The third position vector works similarly. The last Position X value extends or shortens the section along the spline’s Z axis. The Third Position Z value affects the size of the section along the spline’s X axis. Which sections are affected to which degree is defined using the Spline XZ curve, which can be found in the Position menu below these settings. The curve’s height represents the strength of the deformation at the respective location on the packaging.
Modify _ x 和 Modify _ y 选项使得使用样条函数直观地重塑包装部分的形状成为可能。如果你不需要这种直接类型的重塑,类似的结果可以通过使用位置 x 和位置 z 设置在指南的用户数据菜单。这些设置允许您在 x、 y 或 z 方向上扭曲平板模具的每个表面。曲面可以倾斜,缩放或弯曲。位置 x 向量的第一个值沿模具样条的 x 轴移动选定区段的点。位置 z 矢量的第一个值沿样条的 z 轴也是这样。第三个位置矢量的工作原理类似。最后一个 Position x 值沿样条的 z 轴延伸或缩短截面。第三个位置 z 值影响沿样条的 x 轴剖面的大小。使用样条 XZ 曲线定义哪些部分受到程度的影响,这可以在这些设置下面的位置菜单中找到。曲线的高度代表了在包装上各自位置的变形强度。
 Stencil surfaces can also be bent and distorted
individually using the position vectors and the spline graph. 模具表面也可以单独弯曲和扭曲使用的位置矢量和样条图
Stencil surfaces can also be bent and distorted
individually using the position vectors and the spline graph. 模具表面也可以单独弯曲和扭曲使用的位置矢量和样条图
The second Position vector values move the points parallel to the spline’s X and Z axis, perpendicular to the packaging’s plane and inwards or outwards, which produces a bulging surface. The shape of these bulges can be defined using the Spline Y curve, which is located below these settings. The Flip X and Flip Z options can be enabled to reverse the bulge without having to readjust the shape itself.
第二个位置矢量值移动的点平行于样条的 x 轴和 z 轴,垂直于包装的平面,向内或向外,从而产生一个膨胀的表面。这些凸起的形状可以使用样条 y 曲线来定义,它位于这些设置的下方。翻转 x 和翻转 z 选项可以扭转凸起而不必重新调整形状本身。
As already explained, the packaging shape can be linked to the Animation setting, which is used to fold the stencil. This Animation setting is located beneath the respective Position X and Position Z settings. If set to 0% or 100%, the deformation will be present at its full strength during the entire fold animation.
正如已经解释的,包装形状可以链接到动画设置,这是用来折叠模具。此动画设置位于相应的位置 x 和位置 z 设置之下。如果设置为0% 或100% ,在整个折叠动画过程中,变形将以其最大强度出现。
If small values such as 1% are used, the deformation will be introduced very smoothly into the fold animation as it progresses. Higher values will result in the deformation being introduced correspondingly later in the animation, which also results in the effect taking place correspondingly faster.
如果使用1% 这样的小值,那么随着折叠动画的进展,变形将会非常平滑地引入到动画中。较高的值将导致相应的变形被引入后续的动画,这也导致效果发生相应的更快。
Adjusting the rotation of packaging sections
调整包装部分的旋转
The same principle as described above can also be applied to the Rotation X and Rotation Z settings. The only difference is that only a single Rotation curve is used to control the rotation along the axes. Here you will also find the Flip X and Flip Z options to reverse the respective rotations.
同样的原则,如上所述,也可以适用于旋转 x 和旋转 z 设置。唯一的区别是,只有一个旋转曲线是用来控制旋转沿轴。在这里,您还可以找到 Flip x 和 Flip z 选项,以扭转各自的旋转。
The Animation slider defines the point at which the stencil’s segment should begin to rotate. Higher values will cause the rotation to begin correspondingly late in the fold animation and small values will produce a smooth transition between the stencil’s initial state and the final state. If Animation is set to 0% or 100%, the rotated shape will already appear at the beginning of the fold animation.
动画滑块定义模具的段应该开始旋转的点。较高的值会导致旋转在折叠动画的后期相应地开始,较小的值会在模具的初始状态和最终状态之间产生一个平滑的过渡。如果动画设置为0% 或100% ,旋转后的形状将在折叠动画开始时出现。
Tip: 提示: If you only need the packaging as a model, the
如果您只需要将包装作为模型,则Make Editable 制作可编辑的 option can be used. This will make it possible to edit the model
using the normal polygon tools. 选项可以使用。这样就可以使用法线多边形工具来编辑模型
If you only need the packaging as a model, the
如果您只需要将包装作为模型,则Make Editable 制作可编辑的 option can be used. This will make it possible to edit the model
using the normal polygon tools. 选项可以使用。这样就可以使用法线多边形工具来编辑模型
Using Fold My Design! for modeling
使用折叠我的设计! 建模
If you only want to use the folded packaging for a still image or animation you can configure the packaging and complete the animation, after which you can use the Make Editable option in the Fold My Design! object’s Tools menu to make the object polygonal. The splines will be maintained and you will also have a mesh object, i.e., a normal polygon object, in the shape of the packaging.
如果你只想使用折叠包装的静态图片或动画,你可以配置包装和完成动画,之后你可以使用折叠我的设计中的制作可编辑选项!对象的工具菜单,使对象多边形。样条将被维护,你也将有一个网格对象,即,一个正常的多边形对象,在包装的形状。
This object also contains all necessary selection tags required for assigning materials to the front or back sides, or to the sides of the folded packaging.
这个对象还包含所有必要的选择标签,分配材质的正面或背面,或两边的折叠包装。
Making the Fold My Design! object editable bears the advantage that it can easily be exported to other applications or edited using the Cinema 4D polygon tools.
让折叠成为我的设计!对象可编辑的优点是,它可以很容易地导出到其他应用程序或编辑使用 Cinema 4D 多边形工具。
Tip: 提示: