Timeline Motion Mode
时间轴运动模式
常规
The Motion mode is a Timeline mode. The Motion Mode is specifically designed for working with the Motion System - managing Motion Sources, placing and layering Motion Clips on Motion Layers, and mixing Motion and Animation Layers.
运动模式是时间轴模式。运动模式是专门为运动系统设计的-管理运动源,在运动图层上放置和分层运动剪辑,混合运动和动画图层。

You can switch Motion Modes by clicking on the Motion Mode icon at the top right of the Timeline next to the Key and F-Curve Mode icons. Alternatively you can switch modes via the Timeline’s "View" menu.
你可以通过点击动作模式图标在右上角的时间轴旁边的关键和 f 曲线模式图标。或者你也可以通过时间轴的“查看”菜单切换模式。
运动源窗口
The Motion Source window is located at the far left of the Timeline. This window displays all Motion Sources currently contained in the current project. Clicking on the small arrow next to a Motion Source will open its hierarchy. Motion Sources can also be grouped for a better overview.
运动源窗口位于时间轴的最左侧。此窗口显示当前项目中包含的所有运动源。点击运动源旁边的小箭头将打开它的层次结构。运动源也可以分组以获得更好的概述。
All values shown here, i.e., Name, Start, End and Length can be modified by double-clicking on them. If you used a movie file to create the image ("Picture" column) or enabled the Create Picture option in the "Add Motion Clip … " dialog window when creating the Motion Source, double-clicking the image will play the animation in the Motion Source window.
这里显示的所有值,即 Name、 Start、 End 和 Length 都可以通过双击来修改。如果您使用电影文件创建图像(“图片”列)或启用“添加动作剪辑... ”对话框窗口中的创建图片选项时创建动作源,双击图像将在动作源窗口中播放动画。
Tip: 提示:The Motion Source window can be hidden or unhidden as necessary by clicking on the Motion System icon with the white outline at the far right of the Timeline.
运动源窗口可以隐藏或取消隐藏的必要时点击运动系统图标与白色轮廓在最右边的时间轴。
运动窗口
The Motion window is located to the right of the Motion Source window. This window displays Motion and Animation Layers for each Motion System tag contained in the current project. In the Timeline’s View / Show menu you can also define if Animation Layers should also be displayed.
运动窗口位于运动源窗口的右侧。此窗口显示当前项目中包含的每个运动系统标记的运动和动画图层。在时间轴的“查看/显示”菜单中,您还可以定义动画图层是否也应该显示。

Each folder in the Motion window represents an object with a Motion System tag. If a Motion Source is dragged from the Motion window onto one of these folders, a new Motion Layer will automatically be created for that Motion System tag. A Motion Clip will be created on this Motion Layer that is linked with the corresponding Motion Source. The Motion Clip will be scaled to the length of the project in the Timeline. If, on the other hand, you drag a Motion Source onto an existing Motion Layer, a Motion Clip will be created that matches the length of that Motion Layer.
“运动”窗口中的每个文件夹都表示一个带有“运动系统”标记的对象。如果一个运动源被拖动从运动窗口到这些文件夹之一,一个新的运动层将自动创建该运动系统标记。一个动作剪辑将被创建在这个运动层,是与相应的运动源链接。动作剪辑将缩放到项目的长度在时间轴。另一方面,如果你拖动一个运动源到一个现有的运动层,一个运动剪辑将创建与该运动层的长度相匹配。
The order of the Motion Layers can be easily modified by clicking on its name and dragging it vertically to
another position. If you simultaneously press the
运动层的顺序可以很容易地修改点击它的名称,并将其垂直拖动到另一个位置。如果你同时按下 Ctrl 键,运动层将被复制而不是移动。动作和动画图层也可以很容易地以任何方式结合起来。动画和运动图层可以很容易地区分旁边的图标,他们各自的名称。运动图层有一个运动系统图标和动画图层有一个关键图标。
To the right of each name is the layer value. This value represents the amount of influence that layer has at
that time in the animation. This value can also be animated. A Keyframe can be created by
每个名称的右边是层值。此值表示该层在动画中当时的影响量。这个值也可以是动画的。可以通过 Ctrl + 单击该值左侧的动画圆来创建关键帧。像往常一样,当圆形各自的参数被动画化时,它将变成红色。填充红色圆圈表示该参数的关键帧存在于动画中的当时。一旦一个关键帧被设置为一个层值,额外的关键帧将自动设置每当值被修改。
As soon as a layer value has been animated a small triangle will appear next to the layer name. Clicking on this triangle will open an F-Curve display for that layer value. You can also display this F-Curve by activating the corresponding menu item in the Motion System / Motion View … dialog window.
一旦图层值被动画,一个小三角形就会出现在图层名称旁边。点击这个三角形将会打开该层值的 f 曲线显示。你也可以通过激活运动系统/运动视图... 对话框窗口中的相应菜单项来显示这个 f 曲线。

A layer can be renamed by double-clicking on its current name in the Motion window. The same can be done with the name of the Motion System tag next to the folder icon. These modifications will also appear in the Object Manager and wherever else the name(s) appear(s).
在运动窗口中双击图层的当前名称可以重命名图层。文件夹图标旁边的 Motion System 标记的名称也可以做到这一点。这些修改也将出现在对象管理器和其他出现名称的地方。
时间轴窗口
To the right of the Motion window is the actual Timeline window. This is where Motion Clips can be added to Motion Layers, moved, scaled or blended. Animated regions of Animation Layers are displayed in gray. These regions cannot be moved or otherwise modified here - modification of animations on Animation Layers must be done in Dope Sheet Mode.
在运动窗口的右边是实际的时间线窗口。这是运动剪辑可以添加到运动图层,移动,缩放或混合。动画图层的动画区域以灰色显示。这些区域不能移动或以其他方式修改-动画图层上的动画修改必须在涂料表模式下进行。
However, numerous modification possibilities are available for Motion Clips. As we already stated, a Motion Source can be dragged into an empty region of an Animation Layer to create a new Motion Clip. If a Motion Source is dragged onto an existing Motion Clip, this Motion Source will be assigned to that Motion Clip.
然而,许多修改的可能性是可用的议案剪辑。正如我们已经说过的,一个运动源可以拖动到一个动画层的空白区域来创建一个新的运动剪辑。如果将运动源拖动到现有的运动剪辑上,此运动源将被分配到该运动剪辑上。

Click on the center of the Motion Clip and drag it to a different location in the Timeline. A Motion Clip can also be moved over another to create a transition between two Motion Clips.
单击动作剪辑的中心,并将其拖动到时间线中的不同位置。一个运动剪辑也可以移动到另一个创建两个运动剪辑之间的过渡。
Simultaneously press the
同时按下 Ctrl 键复制剪辑,而不是移动剪辑。

Simultaneously press the
同时按下 Shift 键将剪辑垂直移动到另一个动态图层的空白区域。

Simultaneously press the
同时按 Ctrl 和 Shift 键将一个动作剪辑垂直复制到另一个动作图层的空白区域。

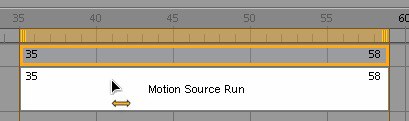
Once a Motion Clip has been selected in the Timeline a orange bar will appear at the top of the Timeline window, as when Keys are selected in Dope Sheet Mode. As with Keys, this bar can be used to move a Motion Clip when grabbed in the center or to scale a Motion Clip when grabbed at one end. The entire Motion Clip (or multiple Motion Clips), including any loops, will be scaled.
一旦一个动作剪辑在时间线中被选中,一个橙色的条就会出现在时间线窗口的顶部,就像在涂料表模式中选中键一样。与键,这个酒吧可以用来移动运动剪辑时,抓住在中心或规模的运动剪辑时,抓住在一端。整个运动剪辑(或多个运动剪辑) ,包括任何循环,将缩放。
If a Motion Clip contains no loops, the same result can be achieved by dragging either end of the Motion Clip. The behavior is different, though, if the Motion Clip contains loops: If you drag at the start of the Motion Clip its length will be scaled and the loops will be scaled proportionally to the Motion Clip’s new length. If you drag at the end of the Motion Clip the number of loops can be changed interactively without changing the length of the Motion Clip itself.
如果一个运动剪辑不包含循环,同样的结果可以通过拖动两端的运动剪辑。但是,如果动作剪辑包含循环,则行为是不同的: 如果你在动作剪辑的开始拖动,它的长度将被缩放,循环将按比例缩放到动作剪辑的新长度。如果你拖动在结束的议案剪辑循环的数量可以交互改变,而不改变议案剪辑本身的长度。

If the Trim option is enabled in the Motion System’s Motion View … dialog you can also trim the selected Motion Clip interactively by Ctrl+clicking either end of the Motion Clip.
如果修剪选项在运动系统的运动视图... 对话框中启用,你也可以交互式修剪选定的运动剪辑,通过 Ctrl + 点击运动剪辑的任意一端。

Here also you can double-click on a Motion Clip to modify any Motion Clip value. Depending on the option(s) enabled in the Motion View … window you can, for example, modify the start or end frame, the overall length or the name of the Motion Clip or the Motion Source linked to it.
在这里,你也可以双击运动剪辑来修改任何运动剪辑值。根据在运动视图... 窗口中启用的选项,你可以,例如,修改开始或结束帧,整体长度或运动剪辑的名称或链接到它的运动源。
In Motion Mode, just as you can in the Key and F-Curve mode, you can drag an object from the Object Manager into the Timeline in order to view only this object. All other objects will be hidden. However, the Motion Mode has its own unique feature: Since only objects with a Motion System tag are displayed here, any object dragged into the Timeline in this manner will automatically be assigned a Motion System tag if it did not already have one.
在运动模式,就像你可以在关键和 f 曲线模式,你可以拖动一个对象从对象管理器到时间线,以便只查看这个对象。所有其他对象将被隐藏。然而,运动模式有它自己独特的功能: 因为这里只显示带有运动系统标记的对象,任何以这种方式拖入时间线的对象如果没有运动系统标记,将自动分配给它。