
F-Curves
F 型曲线
快照功能
 You can switch between the Snapshot curve and
the F-Curve at any time. 你可以随时在快照曲线和 f 曲线之间切换
You can switch between the Snapshot curve and
the F-Curve at any time. 你可以随时在快照曲线和 f 曲线之间切换
Wouldn’t it be nice to be able to:
如果能够:
Well, this is exactly what the Snapshot functionality lets you do!
好吧,这正是 Snapshot 功能允许你做的!
The Snapshot curves will be displayed in dark gray and will not affect the animation unless you activate one of them via Swap Snapshot (will, in turn, deactivate the currently active curve).
快照曲线将以深灰色显示,并且不会影响动画,除非你通过交换快照激活其中一个(反过来,将停用当前激活的曲线)。
Snapshots (up to 5 are possible) are saved along with the respective scene file.
快照(最多5个是可能的)随着各自的场景文件一起保存。
Tip: 提示:查看快照1
Use this option to hide or display the snapshots (up to 5).
使用此选项可隐藏或显示快照(最多5个)。
创建快照1
Use this setting to create snapshot of the F-Curves of selected Tracks. Since Snapshot curves are exact duplicates of the original curves, they will not be visible until changes have been made to the original curve. Selecting Create Snapshot again will overwrite the previous Snapshot curves with new ones.
使用此设置可以创建选定轨道的 f- 曲线的快照。由于快照曲线是原始曲线的精确复制,因此在对原始曲线进行更改之前,它们是不可见的。再次选择 Create Snapshot 将用新的 Snapshot 曲线覆盖先前的 Snapshot 曲线。
Tip 小贴士交换快照1
Depending on the command chosen, set the current F-Curve on the corresponding snapshot. Subsequently executing the command anew will set the Curve back to the previous state. This lets you switch back and forth quickly for testing.
根据所选择的命令,在相应的快照上设置当前的 f 曲线。随后重新执行命令将把 Curve 设置回以前的状态。这使您可以快速地来回切换以进行测试。
RM 曲线
 From left to right: Original curve; RM Curve
active, changed, affect on original curve. 从左到右: 原始曲线; RM 曲线激活,改变,影响原始曲线
From left to right: Original curve; RM Curve
active, changed, affect on original curve. 从左到右: 原始曲线; RM 曲线激活,改变,影响原始曲线
RM Curves are simplified (consist of fewer Keys) control curves with which you can control complex F-Curves.
RM 曲线是简化的(包括较少的键)控制曲线,您可以控制复杂的 f 曲线。
When importing motion capture files or those created by baking animations you normally get an animation that contains on Key for every Frame of the animation (hence, no interpolation necessary). However, the great number of Frames makes it very difficult to subsequently edit the animation. This is where the RM Curves can help.
当导入动作捕捉文件或那些烘焙动画创建你通常会得到一个动画,包含在关键的每帧动画(因此,没有插值的必要)。然而,大量的帧使得编辑动画变得非常困难。这就是 RM 曲线可以帮助的地方。
Depending on the RM Curve selected, more-or-less complex substitute or control curves will be created, which can be more easily controlled since they contain fewer control Keys and simultaneously transform the original F-Curve, including all of its Keys.
根据选择的 RM 曲线,将创建或多或少复杂的替代或控制曲线,这可以更容易地控制,因为它们包含较少的控制键,并同时转换原来的 f 曲线,包括其所有键。
Tip: 提示:Proceed as follows when editing an F-Curve using RM Curves:
使用 RM 曲线编辑 f 曲线时,按照以下步骤进行:
简化修改模式
Use this command to enable or disable the Modification mode. When using the default Curve mode a reduced RM Curve will be created. This RM Curve can be adjusted to reflect the shape of the original Curve to varying degrees:
使用此命令启用或禁用修改模式。当使用默认的曲线模式时,将创建一个简化的 RM 曲线。这条 RM 曲线可以进行调整,以反映原曲线的不同程度的形状:
If this mode is disabled the RM Curves will be hidden and you again will be able to access the original Curve’s individual Keys.
如果这个模式是禁用的 RM 曲线将被隐藏,你将再次能够访问原来的曲线的个人钥匙。
The animation will not be affected, regardless of whether or not this mode is enabled.
无论是否启用此模式,动画都不会受到影响。
无曲线编辑
 This command temporarily removes control of
the RM Curve in order to, for example, move the Curve 此命令临时移除 RM 曲线的控制,以便移动曲线
This command temporarily removes control of
the RM Curve in order to, for example, move the Curve 此命令临时移除 RM 曲线的控制,以便移动曲线
If this option is enabled, the RM Curves can be edited without affecting the original Curve. Once this option is disabled a link will again exist between the RM Curve and the original Curve.
如果启用此选项,RM 曲线可以在不影响原始曲线的情况下进行编辑。一旦这个选项被禁用,链接将再次存在于 RM 曲线和原始曲线之间。
So, what is this good for?
那么,这有什么好处?
Well, there are several reasons for this:
这里有几个原因:
RM Curves must not necessarily have:
RM 曲线不一定有:
重置 RM 曲线..。
 Curve 曲线 mode.
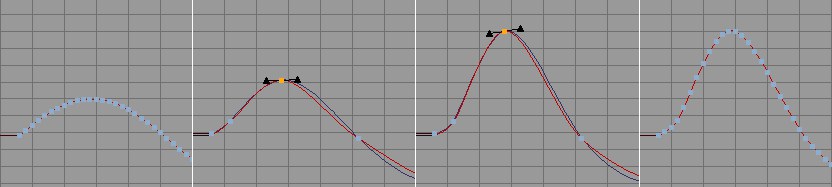
Clockwise from top left: The original Curve and the effects of the respective reduction values. Notice
how the number of Keys is reduced as the Reduction value is increased. 方式。从左上顺时针: 原始曲线和各自的减少值的影响。注意随着 Reduction 值的增加,key 的数量是如何减少的
Curve 曲线 mode.
Clockwise from top left: The original Curve and the effects of the respective reduction values. Notice
how the number of Keys is reduced as the Reduction value is increased. 方式。从左上顺时针: 原始曲线和各自的减少值的影响。注意随着 Reduction 值的增加,key 的数量是如何减少的
This command affects a selected F-Curve and results in the following, depending on the mode selected:
这个命令会影响选定的 f 曲线,并根据选定的模式产生以下结果:
显示所有轨道
Normally, only F-Curves of tracks selected in the Objects Area will be displayed. Activate this setting if you want to display all F-Curves, independent of all selections.
通常,只有在目标区域选择的 f 曲线才会显示出来。激活这个设置,如果你想显示所有的 f 曲线,独立于所有选择。
显示前/后曲线
Use this option to define whether or not the Curves before and after (e.g., see Before) should be displayed.
使用此选项来定义是否应该显示前后的曲线(例如,请参阅前面)。
锁定比率
Sometimes you don’t want to change F-Curves’ proportions when you zoom in to them. Enable this option if
you want to scale proportionally (equally in the X and Y directions). Alternatively you can press the
有时你不想改变 f 曲线的比例时,你放大到他们。如果您想按比例缩放(x 和 y 方向相等) ,请启用此选项。或者你可以在缩放的时候按 Shift 键,这会自动反转这个功能。
Scaling will take place around the cursor, which will be used as the center point.
缩放将围绕光标进行,光标将被用作中心点。
自动相对
Let’s say you have several F-Curves with vastly differing Key values. The Key values of one group range from 10-100 and those of the other group from 10000-12000. You can imagine that the curves probably will not be displayed together on the Timeline.
假设您有几条截然不同的键值的 f 曲线。一组的关键值在10-100之间,另一组的关键值在10000-12000之间。你可以想象这些曲线可能不会一起显示在时间轴上。
Activating the Auto Relative setting will place all selected F-Curves within a value range between 0-100, regardless of their actual Key values. Each of these F-Curves that were detached from the normal Timeline display will be marked with an R (Relative) next to their respective track names. Activating this setting will give you a good overview of all F-Curves involved.
激活自动相对设置将放置所有选定的 f 曲线在0-100之间的值范围,不管他们的实际关键值。从正常时间线显示中分离出来的每一个 f 曲线都将在它们各自的曲目名称旁边标记一个 r (相对)。激活这个设置将给你一个很好的概述所有 f 曲线参与。
We suggest you activate Navigation / Show All in conjunction with Auto Relativewhich will display the F-Curves to their maximum vertical height.
我们建议您激活导航/显示所有与自动相关,这将显示 f 曲线的最大垂直高度。
重置相对
If you used Auto Relative (automatic) or the track settings’ F-Curve Offset and F-Curve Scale properties (manual) to quasi detach the keys from the Timeline’s Y axis naming convention, select Reset Relative to revert the selected F-Curves’ keys to the appropriate naming convention.
如果您使用自动相对(自动)或轨道设置的 f 曲线偏移和 f 曲线缩放属性(手动)准分离键从时间轴的 y 轴变数命名原则,选择复位相对恢复选定的 f 曲线的键到适当的变数命名原则。
简化修改类型
 The various modification types. 各种修改类型
Use this setting to define which type of RM Curve should be created from the original curve.
使用此设置来定义从原始曲线创建 RM 曲线的类型。
曲线
An RM Curve similar to the original curve will be created.
创建一个类似于原始曲线的 RM 曲线。
走开

When this mode is initially called up, a line (with a start and end Key) that runs through the first key of the original curve and parallel to the temporal axis will be created. The distance between the RM Curve’s Key and the original curve will be maintained.
当最初调用此模式时,将创建一条贯穿原曲线第一个键并与时间轴平行的直线(带有开始键和结束键)。RM 曲线的键与原曲线之间的距离将保持不变。
比例

When this mode is initially called up, a line (with a start and end Key) that runs through the original curve’s maximum will be created. The original curve (and its Key values) will be scaled in accordance with the movement of the RM Curves.
当最初调用此模式时,将创建一条贯穿原始曲线最大值的直线(带有开始和结束键)。原始曲线(及其关键值)将按照 RM 曲线的运动进行缩放。
If, for example, one of the two RM Curve Keys is deleted, the entire original curve can be scaled equally.
例如,如果删除两个 RM 曲线键中的一个,则整个原始曲线可以相等地缩放。
显示速度

Activate this setting to display the change in value for all F-Curves. Pictured above is a Y-position curve and its velocity curve that displays the F-Curve’s mathematical derivation. Velocity curves will always be displayed in a dark tone of the corresponding F-Curve’s color.
激活此设置以显示所有 f 曲线的值变化。上图是一个 y 位置曲线和它的速度曲线,显示了 f 曲线的数学推导。速度曲线将始终显示在相应的 f- 曲线的颜色暗色调。
This functionality lets you easily recognize at which time in the animation a lot of action takes place – the greater the velocity, the higher the curve will rise (positive velocity) or sink (negative velocity).
这个功能可以让你很容易地识别在动画中哪个时间发生了很多动作——速度越大,曲线上升(正速度)或下降(负速度)越高。


